Other Manual
Page 2
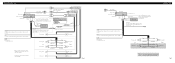
... To system control terminal of this unit is monaural. Rear output 16 cm (6-1/4 in.) Jack for the Wired Remote Control Please see the Instruction Manual for the Wired Remote Control (sold separately) Blue/white To system control terminal of the power amp or Auto-antenna relay...jack Front output Fuse (10 A) AUX jack (3.5 ø) IP-BUS input (Blue) Multi-CD player IP-BUS cable (sold separately) Jack for the Wired Remote Control Please see the Instruction Manual for the Wired Remote Control (sold separately) System remote control + Front speaker ≠ Black (ground) To vehicle...
... To system control terminal of this unit is monaural. Rear output 16 cm (6-1/4 in.) Jack for the Wired Remote Control Please see the Instruction Manual for the Wired Remote Control (sold separately) Blue/white To system control terminal of the power amp or Auto-antenna relay...jack Front output Fuse (10 A) AUX jack (3.5 ø) IP-BUS input (Blue) Multi-CD player IP-BUS cable (sold separately) Jack for the Wired Remote Control Please see the Instruction Manual for the Wired Remote Control (sold separately) System remote control + Front speaker ≠ Black (ground) To vehicle...
Other Manual
Page 5
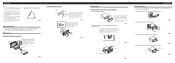
... bush (Fig. 5) Dashboard 182 Holder After inserting the holder into upright positions. (Fig. 13) Fig. 12 4. Fig. 8 10 Factory radio mounting bra1c2ket Screw 11 D13ashboard or Console Fig. 9 Fig. 10 Fixing the Front Panel If you do not operate the removing and attaching the front...unit to this unit. 1. Installation Note: • Before making a final installation of the unit, pull the unit out. porarily connect the wiring to confirm that the connections are fitted), and tighten the screws at the sides of the head unit become aligned (are correct and the system...
... bush (Fig. 5) Dashboard 182 Holder After inserting the holder into upright positions. (Fig. 13) Fig. 12 4. Fig. 8 10 Factory radio mounting bra1c2ket Screw 11 D13ashboard or Console Fig. 9 Fig. 10 Fixing the Front Panel If you do not operate the removing and attaching the front...unit to this unit. 1. Installation Note: • Before making a final installation of the unit, pull the unit out. porarily connect the wiring to confirm that the connections are fitted), and tighten the screws at the sides of the head unit become aligned (are correct and the system...


