Owner's Manual
Page 2
... Front-mount 15 - DIN Rear-mount 16 Fastening the front panel (DEH-2000MP) 16 Additional Information Error messages 17 Handling guideline of the remote control (DEH2000MP) 5 - Before You Start Information to the radio 8 - Using the remote control 5 Operating this manual in a safe place for Pioneer products 4 Visit our website 4 Protecting your model properly. Head unit...
... Front-mount 15 - DIN Rear-mount 16 Fastening the front panel (DEH-2000MP) 16 Additional Information Error messages 17 Handling guideline of the remote control (DEH2000MP) 5 - Before You Start Information to the radio 8 - Using the remote control 5 Operating this manual in a safe place for Pioneer products 4 Visit our website 4 Protecting your model properly. Head unit...
Owner's Manual
Page 3
... reprogrammed. ing on proposition 65 known to an audio compression technology that is short for operating procedures and precautions. ! Use in North America. Protect this manual handy as a reference for Windows Media Audio and refers to the State of this unit can hear sounds from moisture. ! About WMA WARNING Handling the...
... reprogrammed. ing on proposition 65 known to an audio compression technology that is short for operating procedures and precautions. ! Use in North America. Protect this manual handy as a reference for Windows Media Audio and refers to the State of this unit can hear sounds from moisture. ! About WMA WARNING Handling the...
Owner's Manual
Page 4
...://www.pioneerelectronics.com 1 Register your product. For details, please visit http://www.mp3licensing.com. In case the necessary information is required. Pioneer Electronics (USA) Inc. Handle gently when removing or attaching the front panel. ! Make sure that the front panel has been jointed ... updates on file to this information in any other information. Protecting your purchase on the latest products and technologies. 3 Download owner's manuals, order product catalogues, research new products, and much more. Keep the front panel out of Canada, Inc. We will keep the...
...://www.pioneerelectronics.com 1 Register your product. For details, please visit http://www.mp3licensing.com. In case the necessary information is required. Pioneer Electronics (USA) Inc. Handle gently when removing or attaching the front panel. ! Make sure that the front panel has been jointed ... updates on file to this information in any other information. Protecting your purchase on the latest products and technologies. 3 Download owner's manuals, order product catalogues, research new products, and much more. Keep the front panel out of Canada, Inc. We will keep the...
Owner's Manual
Page 6
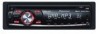
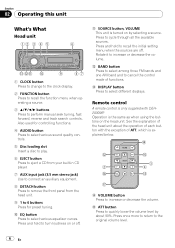
... to increase or decrease the volume. b SOURCE button, VOLUME This unit is explained below. See the explanation of functions. Rotate it to perform manual seek tuning, fast forward, reverse and track search controls. Also used for controlling functions. 4 AUDIO button Press to select various sound quality controls.... 5 Disc loading slot Insert a disc to play. 6 EJECT button Press to eject a CD from your built-in CD player. 7 AUX input jack (3.5 mm stereo jack) Use to connect an auxiliary equipment. 8 DETACH button Press to remove the front...
... to increase or decrease the volume. b SOURCE button, VOLUME This unit is explained below. See the explanation of functions. Rotate it to perform manual seek tuning, fast forward, reverse and track search controls. Also used for controlling functions. 4 AUDIO button Press to select various sound quality controls.... 5 Disc loading slot Insert a disc to play. 6 EJECT button Press to eject a CD from your built-in CD player. 7 AUX input jack (3.5 mm stereo jack) Use to connect an auxiliary equipment. 8 DETACH button Press to remove the front...
Owner's Manual
Page 8
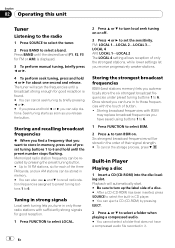
...to 6 and hold until a broadcast strong enough for good reception is displayed. 3 To perform manual tuning, briefly press c or d. 4 To perform seek tuning, press and hold c or d you tune in Player Playing a disc 1 Insert a CD (CD-ROM) into the disc loading slot. FM: LOCAL 1-LOCAL 2-LOCAL 3- Built-in only .... # Be sure to turn BSM on or off. 3 Press c or d to those radio stations with sufficiently strong signals for FM or AM) is found. # You can also use a and b to recall radio station frequencies assigned to preset tuning buttons 1 to turn up the label side of button. !...
...to 6 and hold until a broadcast strong enough for good reception is displayed. 3 To perform manual tuning, briefly press c or d. 4 To perform seek tuning, press and hold c or d you tune in Player Playing a disc 1 Insert a CD (CD-ROM) into the disc loading slot. FM: LOCAL 1-LOCAL 2-LOCAL 3- Built-in only .... # Be sure to turn BSM on or off. 3 Press c or d to those radio stations with sufficiently strong signals for FM or AM) is found. # You can also use a and b to recall radio station frequencies assigned to preset tuning buttons 1 to turn up the label side of button. !...


