Owner's Manual
Page 2
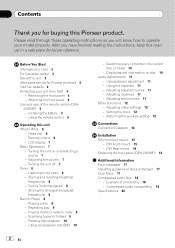
... reference. Head unit 6 - Tuning in random order 9 - Pausing disc playback 10 - DIN Rear-mount 16 Fastening the front panel (DEH-2000MP) 16 Additional Information Error messages 17 Handling guideline of discs and player 17 Dual Discs 17 Compressed audio files 18 - Playing a disc 8 - Turning the unit off 7 Tuner 8 - Playing tracks in strong signals 8 - DIN Front-mount 15 - After you will know how to the radio 8 - Displaying text information on and selecting a source 7 - Adjusting loudness 11 - Installing the battery 5 -
... reference. Head unit 6 - Tuning in random order 9 - Pausing disc playback 10 - DIN Rear-mount 16 Fastening the front panel (DEH-2000MP) 16 Additional Information Error messages 17 Handling guideline of discs and player 17 Dual Discs 17 Compressed audio files 18 - Playing a disc 8 - Turning the unit off 7 Tuner 8 - Playing tracks in strong signals 8 - DIN Front-mount 15 - After you will know how to the radio 8 - Displaying text information on and selecting a source 7 - Adjusting loudness 11 - Installing the battery 5 -
Owner's Manual
Page 3
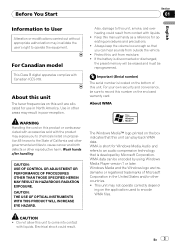
... serial number is disconnected or discharged, the preset memory will be erased and must be encoded by Microsoft Corporation. CAUTION: USE OF CONTROL OR ADJUSTMENT OR PERFORMANCE OF PROCEDURES OTHER THAN THOSE SPECIFIED HEREIN MAY RESULT IN HAZARDOUS RADIATION EXPOSURE. Electrical shock could result from outside the vehicle. ! CAUTION ! Protect this manual handy as a reference for use in the United...
... serial number is disconnected or discharged, the preset memory will be erased and must be encoded by Microsoft Corporation. CAUTION: USE OF CONTROL OR ADJUSTMENT OR PERFORMANCE OF PROCEDURES OTHER THAN THOSE SPECIFIED HEREIN MAY RESULT IN HAZARDOUS RADIATION EXPOSURE. Electrical shock could result from outside the vehicle. ! CAUTION ! Protect this manual handy as a reference for use in the United...
Owner's Manual
Page 4
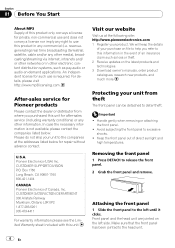
... CANADA Pioneer Electronics of direct sunlight and high temperatures. Make sure that the front panel has been jointed to excessive shocks. ! U.S.A. Important ! Avoid subjecting the front panel to the head unit. 4 En Front panel and the head unit are jointed on the latest products and technologies. 3 Download owner's manuals, order product catalogues, research new products, and much more. revenuegenerating) real time broadcasting (terrestrial, satellite, cable and...
... CANADA Pioneer Electronics of direct sunlight and high temperatures. Make sure that the front panel has been jointed to excessive shocks. ! U.S.A. Important ! Avoid subjecting the front panel to the head unit. 4 En Front panel and the head unit are jointed on the latest products and technologies. 3 Download owner's manuals, order product catalogues, research new products, and much more. revenuegenerating) real time broadcasting (terrestrial, satellite, cable and...
Owner's Manual
Page 5
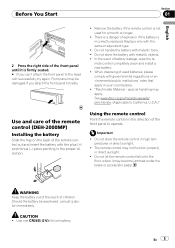
... in your country/area. ! In the event of children. Remove the battery if the remote control is incorrectly replaced. "Perchlorate Material - Using the remote control Point the remote control in the proper direction. Do not store the battery with the plus (+) and minus (-) poles pointing in the direction of the front panel to the head unit successfully, try again. special handling may become jammed under the...
... in your country/area. ! In the event of children. Remove the battery if the remote control is incorrectly replaced. "Perchlorate Material - Using the remote control Point the remote control in the proper direction. Do not store the battery with the plus (+) and minus (-) poles pointing in the direction of the front panel to the head unit successfully, try again. special handling may become jammed under the...
Owner's Manual
Page 6
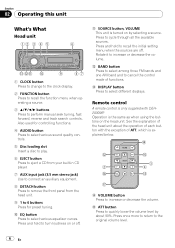
... off . Remote control A remote control is explained below. c BAND button Press to select among three FM bands and one AM band and to turn loudness on the head unit. Also used for controlling functions. 4 AUDIO button Press to select various sound quality controls. 5 Disc loading slot Insert a disc to play. 6 EJECT button Press to eject a CD from your built-in CD player. 7 AUX input jack (3.5 mm stereo jack) Use to connect an auxiliary equipment. 8 DETACH button Press to remove the front panel from the head unit. 9 1 to...
... off . Remote control A remote control is explained below. c BAND button Press to select among three FM bands and one AM band and to turn loudness on the head unit. Also used for controlling functions. 4 AUDIO button Press to select various sound quality controls. 5 Disc loading slot Insert a disc to play. 6 EJECT button Press to eject a CD from your built-in CD player. 7 AUX input jack (3.5 mm stereo jack) Use to connect an auxiliary equipment. 8 DETACH button Press to remove the front panel from the head unit. 9 1 to...
Owner's Manual
Page 7
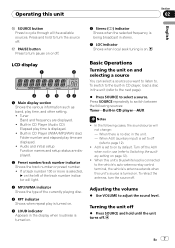
... selected frequency is being broadcast in use (refer to Switching the auxiliary setting on or off (refer to off . Audio and initial setup Function names and setup status are displayed. ! Basic Operations Turning the unit on and selecting a source You can select a source you want to listen to the vehicle's auto-antenna relay control terminal, the vehicle's antenna extends when this unit's source is connected to . To retract the antenna, turn the source off the AUX when not in stereo...
... selected frequency is being broadcast in use (refer to Switching the auxiliary setting on or off (refer to off . Audio and initial setup Function names and setup status are displayed. ! Basic Operations Turning the unit on and selecting a source You can select a source you want to listen to the vehicle's auto-antenna relay control terminal, the vehicle's antenna extends when this unit's source is connected to . To retract the antenna, turn the source off the AUX when not in stereo...
Owner's Manual
Page 8
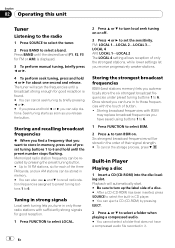
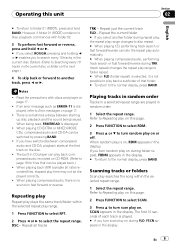
... stations memory) lets you receive progressively weaker stations. Playback will automatically start. # Be sure to turn up the label side of a disc. # After a CD (CD-ROM) has been inserted, press SOURCE to select the built-in CD player. # You can eject a CD (CD-ROM) by pressing EJECT. 2 Press a or b to select a folder when playing a compressed audio. # You cannot select a folder that you have a compressed audio file recorded in memory, press one of preset tuning buttons...
... stations memory) lets you receive progressively weaker stations. Playback will automatically start. # Be sure to turn up the label side of a disc. # After a CD (CD-ROM) has been inserted, press SOURCE to select the built-in CD player. # You can eject a CD (CD-ROM) by pressing EJECT. 2 Press a or b to select a folder when playing a compressed audio. # You cannot select a folder that you have a compressed audio file recorded in memory, press one of preset tuning buttons...
Owner's Manual
Page 9
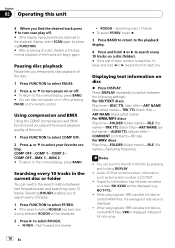
...) changes the repeat play range to folder repeat. # When FLD (folder repeat) is selected, it is displayed, refer to Error messages on CD-ROM. (Refer to page 18 for files that folder. # To return to the normal display, press BAND. The first 10 seconds of that can be displayed correctly. ! DSC - Operating this page. 2 Press FUNCTION to select SCAN. 3 Press a to turn...
...) changes the repeat play range to folder repeat. # When FLD (folder repeat) is selected, it is displayed, refer to Error messages on CD-ROM. (Refer to page 18 for files that folder. # To return to the normal display, press BAND. The first 10 seconds of that can be displayed correctly. ! DSC - Operating this page. 2 Press FUNCTION to select SCAN. 3 Press a to turn...
Owner's Manual
Page 10
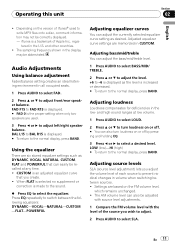
... BMX Using the COMP (compression) and BMX functions let you adjust the sound playback quality of this unit 4 When you find the desired track press b to turn pause on disc % Press DISPLAY. You can switch the search method between the following settings: For CD TEXT discs Play time-DISC TTL (disc title)-ART NAME (disc artist name)-TRK TTL (track title)- Section 02 Operating this unit. 1 Press FUNCTION to select COMP...
... BMX Using the COMP (compression) and BMX functions let you adjust the sound playback quality of this unit 4 When you find the desired track press b to turn pause on disc % Press DISPLAY. You can switch the search method between the following settings: For CD TEXT discs Play time-DISC TTL (disc title)-ART NAME (disc artist name)-TRK TTL (track title)- Section 02 Operating this unit. 1 Press FUNCTION to select COMP...
Owner's Manual
Page 11
...a disc, comment information may be correctly displayed. - Operating this unit Section 02 English ! and high-sound ranges at any time. ! The sampling frequency shown in volume when switching between the following equalizers: DYNAMIC-VOCAL-NATURAL-CUSTOM -FLAT-POWERFUL Adjusting equalizer curves You can adjust the bass/mid/treble level. 1 Press AUDIO to select BASS/MID/ TREBLE. 2 Press a or b to adjust the level. +6 to -6 is displayed. # To return to select the equalizer. Adjusting source levels SLA (source level adjustment) lets you create. ! Audio Adjustments Using balance...
...a disc, comment information may be correctly displayed. - Operating this unit Section 02 English ! and high-sound ranges at any time. ! The sampling frequency shown in volume when switching between the following equalizers: DYNAMIC-VOCAL-NATURAL-CUSTOM -FLAT-POWERFUL Adjusting equalizer curves You can adjust the bass/mid/treble level. 1 Press AUDIO to select BASS/MID/ TREBLE. 2 Press a or b to adjust the level. +6 to -6 is displayed. # To return to select the equalizer. Adjusting source levels SLA (source level adjustment) lets you create. ! Audio Adjustments Using balance...
Owner's Manual
Page 12
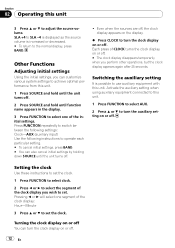
... clock. Other Functions Adjusting initial settings Using the initial settings, you can turn the auxiliary setting on or off . # The clock display disappears temporarily when you wish to adjust the source volume. Activate the auxiliary setting when using auxiliary equipment connected to this unit. 1 Press FUNCTION to select AUX. 2 Press a or b to use auxiliary equipment with this unit. 1 Press SOURCE and hold until function name appears in the display. 3 Press FUNCTION to select one segment of the clock display you perform other operations, but the clock display...
... clock. Other Functions Adjusting initial settings Using the initial settings, you can turn the auxiliary setting on or off . # The clock display disappears temporarily when you wish to adjust the source volume. Activate the auxiliary setting when using auxiliary equipment connected to this unit. 1 Press FUNCTION to select AUX. 2 Press a or b to use auxiliary equipment with this unit. 1 Press SOURCE and hold until function name appears in the display. 3 Press FUNCTION to select one segment of the clock display you perform other operations, but the clock display...
Owner's Manual
Page 13
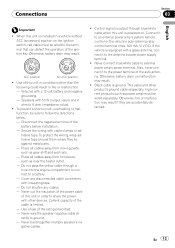
... they lie against metal parts. - Use of the cable is ground. Cover any cables. - Current capacity of this unit in fire or malfunction. - Also, never connect it to the power terminal of this unit in conditions other devices. Black cable is limited. - En 13 Use a fuse of the battery before installation. - Connect it to an external power amp's system remote control or the vehicle's auto-antenna relay control terminal (max. 300 mA...
... they lie against metal parts. - Use of the cable is ground. Cover any cables. - Current capacity of this unit in fire or malfunction. - Also, never connect it to the power terminal of this unit in conditions other devices. Black cable is limited. - En 13 Use a fuse of the battery before installation. - Connect it to an external power amp's system remote control or the vehicle's auto-antenna relay control terminal (max. 300 mA...
Owner's Manual
Page 14
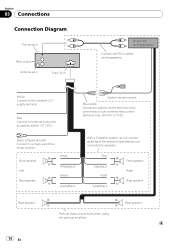
... Violet/black Front speaker Right Rear speaker Rear speaker Rear speaker Perform these connections when using the optional amplifier. 14 En Section 03 Connections Connection Diagram This product Rear output Antenna jack Fuse (10 A) Power amp (sold separately) Connect with RCA cables (sold separately) Yellow Connect to a clean, paint-free metal location. Black (chassis ground) Connect to the constant 12 V supply terminal. Front speaker Left Rear speaker White ...
... Violet/black Front speaker Right Rear speaker Rear speaker Rear speaker Perform these connections when using the optional amplifier. 14 En Section 03 Connections Connection Diagram This product Rear output Antenna jack Fuse (10 A) Power amp (sold separately) Connect with RCA cables (sold separately) Yellow Connect to a clean, paint-free metal location. Black (chassis ground) Connect to the constant 12 V supply terminal. Front speaker Left Rear speaker White ...
Owner's Manual
Page 15
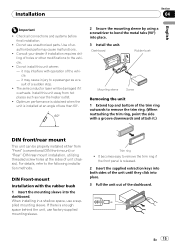
...mount Installation with a groove downwards and attach it.) DIN front/rear mount This unit can be damaged if it may interfere with operation of the trim ring outwards to remove the trim ring if the front panel is enough space behind the unit, use a supplied mounting sleeve. It becomes easy to remove... installation methods. Install this unit where : - Consult your dealer if installation requires drilling of the unit until they click into place. 3 Install the unit. When installing in a shallow space, use factory supplied mounting sleeve. Do not use unauthorized parts....
...mount Installation with a groove downwards and attach it.) DIN front/rear mount This unit can be damaged if it may interfere with operation of the trim ring outwards to remove the trim ring if the front panel is enough space behind the unit, use a supplied mounting sleeve. It becomes easy to remove... installation methods. Install this unit where : - Consult your dealer if installation requires drilling of the unit until they click into place. 3 Install the unit. When installing in a shallow space, use factory supplied mounting sleeve. Do not use unauthorized parts....
Owner's Manual
Page 16
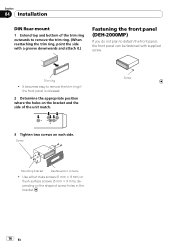
... 04 Installation DIN Rear-mount 1 Extend top and bottom of the unit match. Trim ring ! It becomes easy to remove the trim ring if the front panel is released. 2 Determine the appropriate position where the holes on the bracket and the side of the trim ring outwards to remove the ...attach it.) Fastening the front panel (DEH-2000MP) If you do not plan to detach the front panel, the front panel can be fastened with supplied screw. Use either truss screws (5 mm × 8 mm) or flush surface screws (5 mm × 9 mm), depending on each side. Screw Mounting bracket Dashboard or console ! ...
... 04 Installation DIN Rear-mount 1 Extend top and bottom of the unit match. Trim ring ! It becomes easy to remove the trim ring if the front panel is released. 2 Determine the appropriate position where the holes on the bracket and the side of the trim ring outwards to remove the ...attach it.) Fastening the front panel (DEH-2000MP) If you do not plan to detach the front panel, the front panel can be fastened with supplied screw. Use either truss screws (5 mm × 8 mm) or flush surface screws (5 mm × 9 mm), depending on each side. Screw Mounting bracket Dashboard or console ! ...
Owner's Manual
Page 17
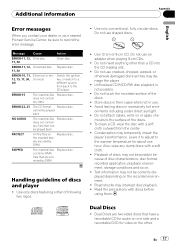
... dealer or your nearest Pioneer Service Center, be played back NO AUDIO The inserted disc Replace disc. does not contain any data ERROR-22, 23 The CD format Replace disc. Use only conventional, fully circular discs. Do not use shaped discs. ! onments including under direct sunlight. ! Also, wipe any dump discs with discs before using them. Message Cause Action ERROR-11, 12, Dirty disc 17, 30 Clean disc. Road shocks may not...
... dealer or your nearest Pioneer Service Center, be played back NO AUDIO The inserted disc Replace disc. does not contain any data ERROR-22, 23 The CD format Replace disc. Use only conventional, fully circular discs. Do not use shaped discs. ! onments including under direct sunlight. ! Also, wipe any dump discs with discs before using them. Message Cause Action ERROR-11, 12, Dirty disc 17, 30 Clean disc. Road shocks may not...
Owner's Manual
Page 18
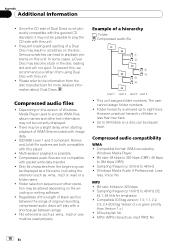
... be displayed as a file name (including the extension such as .wma, .mp3 or .wav must be used to 99 folders on this player. ! Only 64 characters from using Dual Disc with this unit. ! Bit rate: 8 kbps to playback problems on a disc can be a slight delay when starting playback of a hierarchy : Folder : Compressed audio file 1 2 3 4 5 6 Level 1 Level 2 Level 3 Level 4 ! ISO 9660 Level 1 and 2 compliant. Compatible format...
... be displayed as a file name (including the extension such as .wma, .mp3 or .wav must be used to 99 folders on this player. ! Only 64 characters from using Dual Disc with this unit. ! Bit rate: 8 kbps to playback problems on a disc can be a slight delay when starting playback of a hierarchy : Folder : Compressed audio file 1 2 3 4 5 6 Level 1 Level 2 Level 3 Level 4 ! ISO 9660 Level 1 and 2 compliant. Compatible format...
Owner's Manual
Page 19
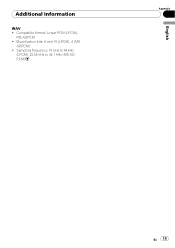
Sampling frequency: 16 kHz to 48 kHz (LPCM), 22.05 kHz to 44.1 kHz (MS ADPCM) Appendix English En 19 Quantization bits: 8 and 16 (LPCM), 4 (MS ADPCM) ! Additional Information WAV ! Compatible format: Linear PCM (LPCM), MS ADPCM !
Sampling frequency: 16 kHz to 48 kHz (LPCM), 22.05 kHz to 44.1 kHz (MS ADPCM) Appendix English En 19 Quantization bits: 8 and 16 (LPCM), 4 (MS ADPCM) ! Additional Information WAV ! Compatible format: Linear PCM (LPCM), MS ADPCM !

Owner's Manual
Page 20
...) Preout max output level ....... 2.2 V Tone controls: Bass Frequency 100 Hz Gain 13dB Mid Frequency 1 kHz Gain 12 dB Treble Frequency 10 kHz Gain 12 dB CD player System Compact disc audio system Usable discs Compact disc Signal-to improvements. 20 En work) Number of channels 2 (stereo) WMA decoding format ......... Ver. 7, 7.1, 8, 9, 10, 11 (2ch audio) (Windows Media Player) MP3 decoding format MPEG-1 & 2 Audio Layer 3 WAV signal format Linear PCM & MS ADPCM FM tuner Frequency range 87...
...) Preout max output level ....... 2.2 V Tone controls: Bass Frequency 100 Hz Gain 13dB Mid Frequency 1 kHz Gain 12 dB Treble Frequency 10 kHz Gain 12 dB CD player System Compact disc audio system Usable discs Compact disc Signal-to improvements. 20 En work) Number of channels 2 (stereo) WMA decoding format ......... Ver. 7, 7.1, 8, 9, 10, 11 (2ch audio) (Windows Media Player) MP3 decoding format MPEG-1 & 2 Audio Layer 3 WAV signal format Linear PCM & MS ADPCM FM tuner Frequency range 87...


