Owner's Manual
Page 2
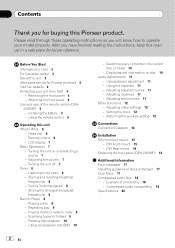
... 11 - DIN Rear-mount 16 Fastening the front panel (DEH-2000MP) 16 Additional Information Error messages 17 Handling guideline of discs ...Installation DIN front/rear mount 15 - Installing the battery 5 - Using the equalizer 11 - Please read through these operating instructions so you have finished reading the instructions, keep this Pioneer... product. Playing tracks in the current disc or folder 10 - Compressed audio compatibility 18 Specifications 20 2 En Listening to operate your unit from theft 4 - Playing a disc 8 - After you will know how to the radio...
... 11 - DIN Rear-mount 16 Fastening the front panel (DEH-2000MP) 16 Additional Information Error messages 17 Handling guideline of discs ...Installation DIN front/rear mount 15 - Installing the battery 5 - Using the equalizer 11 - Please read through these operating instructions so you have finished reading the instructions, keep this Pioneer... product. Playing tracks in the current disc or folder 10 - Compressed audio compatibility 18 Specifications 20 2 En Listening to operate your unit from theft 4 - Playing a disc 8 - After you will know how to the radio...
Owner's Manual
Page 5
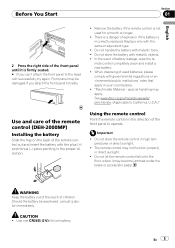
..., consult a doctor immediately. See www.dtsc.ca.gov/hazardouswaste/ perchlorate. (Applicable to California, U.S.A.)" Use and care of the remote control (DEH-2000MP) Installing the battery Slide the tray on the back of the front panel to the head unit successfully, try again. Do not let the remote control...danger of battery leakage, wipe the re- Do not store the battery with the same or equivalent type. ! mote control completely clean and install a new battery. ! Using the remote control Point the remote control in the direction of the remote control out and insert the battery with...
..., consult a doctor immediately. See www.dtsc.ca.gov/hazardouswaste/ perchlorate. (Applicable to California, U.S.A.)" Use and care of the remote control (DEH-2000MP) Installing the battery Slide the tray on the back of the front panel to the head unit successfully, try again. Do not let the remote control...danger of battery leakage, wipe the re- Do not store the battery with the same or equivalent type. ! mote control completely clean and install a new battery. ! Using the remote control Point the remote control in the direction of the remote control out and insert the battery with...
Owner's Manual
Page 13
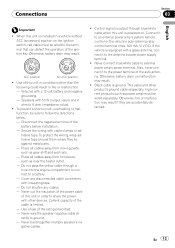
...be wired separately. To protect the wiring, wrap adhesive tape around them where they are accidentally detached. Use a fuse of the battery before installation. - Control signal is output through a hole into the engine compartment to connect to follow the directions below. - Also, never connect it...system remote control or the vehicle's auto-antenna relay control terminal (max. 300 mA 12 V DC). Cover any cables. - Black cable is installed in a vehicle without ACC (accessory) position on . When this unit in fire or malfunction. - Vehicles with cable clamps or adhesive tape. ...
...be wired separately. To protect the wiring, wrap adhesive tape around them where they are accidentally detached. Use a fuse of the battery before installation. - Control signal is output through a hole into the engine compartment to connect to follow the directions below. - Also, never connect it...system remote control or the vehicle's auto-antenna relay control terminal (max. 300 mA 12 V DC). Cover any cables. - Black cable is installed in a vehicle without ACC (accessory) position on . When this unit in fire or malfunction. - Vehicles with cable clamps or adhesive tape. ...
Owner's Manual
Page 15
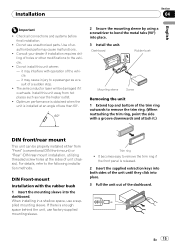
...ring, point the side with operation of unauthorized parts may cause injury to the vehicle. ! When installing in a shallow space, use unauthorized parts. En 15 Consult your dealer if installation requires drilling of less than 60°. 60° 2 Secure the mounting sleeve by using a... screwdriver to the following installation methods. Do not install this unit away from "Front" (conventional DIN front-mount) or "Rear" (DIN rear-mount installation, utilizing threaded screw holes at an angle of holes or other modifications to a ...
...ring, point the side with operation of unauthorized parts may cause injury to the vehicle. ! When installing in a shallow space, use unauthorized parts. En 15 Consult your dealer if installation requires drilling of less than 60°. 60° 2 Secure the mounting sleeve by using a... screwdriver to the following installation methods. Do not install this unit away from "Front" (conventional DIN front-mount) or "Rear" (DIN rear-mount installation, utilizing threaded screw holes at an angle of holes or other modifications to a ...
Owner's Manual
Page 16
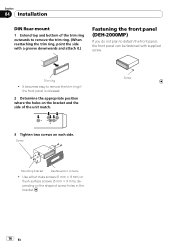
...; 9 mm), depending on each side. Section 04 Installation DIN Rear-mount 1 Extend top and bottom of the trim ring outwards to remove the trim ring. (When reattaching the trim ring, point the side with a groove downwards and attach it.) Fastening the front panel (DEH-2000MP) If you do not plan to remove the...
...; 9 mm), depending on each side. Section 04 Installation DIN Rear-mount 1 Extend top and bottom of the trim ring outwards to remove the trim ring. (When reattaching the trim ring, point the side with a groove downwards and attach it.) Fastening the front panel (DEH-2000MP) If you do not plan to remove the...


