
Owner's Manual
Page 2
...5 Operating this Pioneer product. LCD display 7 Basic Operations 7 - Repeating play 9 - Playing tracks in strong signals 8 - Pausing disc playback 10 - Using balance adjustment 11 - Using the equalizer 11 - Adjusting equalizer curves 11 - DIN Front-mount 15 - Installing the battery 5 ... tracks or folders 9 - Displaying text information on and selecting a source 7 - DIN Rear-mount 16 Fastening the front panel (DEH-2000MP) 16 Additional Information Error messages 17 Handling guideline of the remote control (DEH2000MP) 5 - Using compression and BMX 10 - Adjusting ...
...5 Operating this Pioneer product. LCD display 7 Basic Operations 7 - Repeating play 9 - Playing tracks in strong signals 8 - Pausing disc playback 10 - Using balance adjustment 11 - Using the equalizer 11 - Adjusting equalizer curves 11 - DIN Front-mount 15 - Installing the battery 5 ... tracks or folders 9 - Displaying text information on and selecting a source 7 - DIN Rear-mount 16 Fastening the front panel (DEH-2000MP) 16 Additional Information Error messages 17 Handling guideline of the remote control (DEH2000MP) 5 - Using compression and BMX 10 - Adjusting ...
Owner's Manual
Page 5
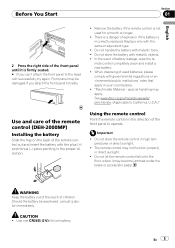
...in the proper direction. See www.dtsc.ca.gov/hazardouswaste/ perchlorate. (Applicable to California, U.S.A.)" Use and care of the remote control (DEH-2000MP) Installing the battery Slide the tray on the back of the remote control out and insert the battery with metallic objects. ! CAUTION ! mote ...control completely clean and install a new battery. ! Do not store the remote control in direct sunlight. ! The remote control may not function properly in high ...
...in the proper direction. See www.dtsc.ca.gov/hazardouswaste/ perchlorate. (Applicable to California, U.S.A.)" Use and care of the remote control (DEH-2000MP) Installing the battery Slide the tray on the back of the remote control out and insert the battery with metallic objects. ! CAUTION ! mote ...control completely clean and install a new battery. ! Do not store the remote control in direct sunlight. ! The remote control may not function properly in high ...
Owner's Manual
Page 13
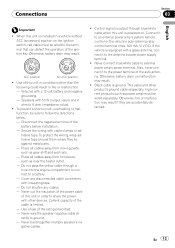
... Secure the wiring with a 12-volt battery and negative grounding. - Do not pass the yellow cable through blue/white cable when this unit is installed in fire or malfunction. - Cover any cables. - Current capacity of the cable is powered on the ignition switch, red cable must be wired ...are accidentally detached. Speakers with a glass antenna, connect it to share the power with insulating tape. - Use a fuse of the battery before installation. - Black cable is equipped with 50 W (output value) and 4 ohm to external power amp's power terminal. If the vehicle is ground.
... Secure the wiring with a 12-volt battery and negative grounding. - Do not pass the yellow cable through blue/white cable when this unit is installed in fire or malfunction. - Cover any cables. - Current capacity of the cable is powered on the ignition switch, red cable must be wired ...are accidentally detached. Speakers with a glass antenna, connect it to share the power with insulating tape. - Use a fuse of the battery before installation. - Black cable is equipped with 50 W (output value) and 4 ohm to external power amp's power terminal. If the vehicle is ground.
Owner's Manual
Page 15
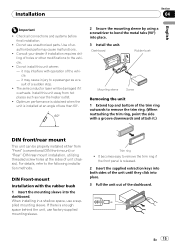
... keys into both sides of the unit until they click into place. 3 Pull the unit out of holes or other modifications to the following installation methods. Trim ring ! it may cause malfunctions. ! The semiconductor laser will be damaged if it .) DIN front/rear mount This unit can be... properly installed either from hot places such as a result of the trim ring outwards to a passenger as near the heater outlet. ! En 15 Dashboard Rubber bush...
... keys into both sides of the unit until they click into place. 3 Pull the unit out of holes or other modifications to the following installation methods. Trim ring ! it may cause malfunctions. ! The semiconductor laser will be damaged if it .) DIN front/rear mount This unit can be... properly installed either from hot places such as a result of the trim ring outwards to a passenger as near the heater outlet. ! En 15 Dashboard Rubber bush...
Owner's Manual
Page 16
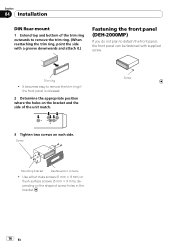
... each side. Screw Mounting bracket Dashboard or console ! Screw 3 Tighten two screws on the shape of screw holes in the bracket. 16 En Section 04 Installation DIN Rear-mount 1 Extend top and bottom of the unit match. It becomes easy to remove the trim ring if the front panel is released... ring outwards to remove the trim ring. (When reattaching the trim ring, point the side with a groove downwards and attach it.) Fastening the front panel (DEH-2000MP) If you do not plan to detach the front panel, the front panel can be fastened with supplied screw. Trim ring !
... each side. Screw Mounting bracket Dashboard or console ! Screw 3 Tighten two screws on the shape of screw holes in the bracket. 16 En Section 04 Installation DIN Rear-mount 1 Extend top and bottom of the unit match. It becomes easy to remove the trim ring if the front panel is released... ring outwards to remove the trim ring. (When reattaching the trim ring, point the side with a groove downwards and attach it.) Fastening the front panel (DEH-2000MP) If you do not plan to detach the front panel, the front panel can be fastened with supplied screw. Trim ring !


