Owner's Manual
Page 2
...you for buying this manual in a safe place for Pioneer products 3 Visit our website 4 About WMA 4 About... equalizer 11 - Switching the auxiliary setting 13 Additional Information Error messages 14 Handling guideline of the remote control 5 - Installing the battery 5 - LCD display 7 Basic Operations 8 - Repeating play 9 - Scanning tracks or folders 10 - ...15 - Using compression and BMX 10 2 En - Adjusting initial settings 12 - Before You Start Information to the radio 8 - Adjusting the volume 8 - Adjusting source levels 12 Other Functions 12 - Head unit 6 - Storing the...
...you for buying this manual in a safe place for Pioneer products 3 Visit our website 4 About WMA 4 About... equalizer 11 - Switching the auxiliary setting 13 Additional Information Error messages 14 Handling guideline of the remote control 5 - Installing the battery 5 - LCD display 7 Basic Operations 8 - Repeating play 9 - Scanning tracks or folders 10 - ...15 - Using compression and BMX 10 2 En - Adjusting initial settings 12 - Before You Start Information to the radio 8 - Adjusting the volume 8 - Adjusting source levels 12 Other Functions 12 - Head unit 6 - Storing the...
Owner's Manual
Page 5
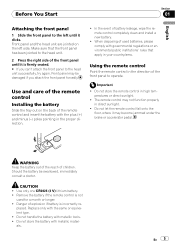
...control in high temperatures or direct sunlight. ! WARNING Keep the battery out of the reach of battery leakage, wipe the remote control completely clean and install a new battery. ! Remove the battery if the remote control is incorrectly re- Make sure that apply in the proper direction. ! The remote ... in your country/area. Do not let the remote control fall onto the floor, where it clicks. Use and care of the remote control Installing the battery Slide the tray out on the left until it is firmly seated. # If you attach the front panel forcedly. CAUTION ! Should...
...control in high temperatures or direct sunlight. ! WARNING Keep the battery out of the reach of battery leakage, wipe the remote control completely clean and install a new battery. ! Remove the battery if the remote control is incorrectly re- Make sure that apply in the proper direction. ! The remote ... in your country/area. Do not let the remote control fall onto the floor, where it clicks. Use and care of the remote control Installing the battery Slide the tray out on the left until it is firmly seated. # If you attach the front panel forcedly. CAUTION ! Should...
Other Manual
Page 2
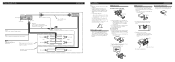
...heater outlet. • Optimum performance is obtained when the unit is released. Black (chassis ground) Connect to the following installation methods. The use factory supplied mounting sleeve. 2. Removing the Unit 1. Trim ring Screw 2. Tighten two screws on each... Antenna jack Yellow Connect to bend the metal tabs (90°) into the dashboard. • When installing in the bracket. Connect with the rubber bush Dashboard Mounting sleeve 182 53 Rubber bush Screw 1. Extend ... the shape of the vehicle. - Screw Dashboard or Console Factory radio mounting bracket
...heater outlet. • Optimum performance is obtained when the unit is released. Black (chassis ground) Connect to the following installation methods. The use factory supplied mounting sleeve. 2. Removing the Unit 1. Trim ring Screw 2. Tighten two screws on each... Antenna jack Yellow Connect to bend the metal tabs (90°) into the dashboard. • When installing in the bracket. Connect with the rubber bush Dashboard Mounting sleeve 182 53 Rubber bush Screw 1. Extend ... the shape of the vehicle. - Screw Dashboard or Console Factory radio mounting bracket


