Leaflet
Page 2
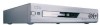
... Dimensions (W x H x D) Net Weight UPC 435 x 76 x 335mm 4.0 kg 0 3784993391 6 Remote Control • 37-key remote control RC25115 Package Contents • DVD Recorder • Remote Control + batteries • User Manual in U.S.A. 2002 © Koninklijke Philips Electronics N.V. Dolby Digital and the double-D symbol are trademarks of events 6; 1 year; DTS is a trademark of Gemstar Development Corp. Resolution...
... Dimensions (W x H x D) Net Weight UPC 435 x 76 x 335mm 4.0 kg 0 3784993391 6 Remote Control • 37-key remote control RC25115 Package Contents • DVD Recorder • Remote Control + batteries • User Manual in U.S.A. 2002 © Koninklijke Philips Electronics N.V. Dolby Digital and the double-D symbol are trademarks of events 6; 1 year; DTS is a trademark of Gemstar Development Corp. Resolution...

Quick start guide
Page 1
...- Match the cable colors to the jack colors. 4 Because you should see the DVD Recorder's Initial Setup menu on the TV the first time you connect the Recorder's power cord, available features will stop when you see the DVD Recorder's owner's manual for the first time. • Your TV's Audio/Video In channel may be ...jack on your TV has a single Antenna In (or RF IN or 75 ohm input) jack, see the blue Philips DVD background picture or the Initial Setup Screen on the TV (when the DVD Recorder is on the Recorder and to the correct Audio/Video In channel. Turn on the TV and set up the...
...- Match the cable colors to the jack colors. 4 Because you should see the DVD Recorder's Initial Setup menu on the TV the first time you connect the Recorder's power cord, available features will stop when you see the DVD Recorder's owner's manual for the first time. • Your TV's Audio/Video In channel may be ...jack on your TV has a single Antenna In (or RF IN or 75 ohm input) jack, see the blue Philips DVD background picture or the Initial Setup Screen on the TV (when the DVD Recorder is on the Recorder and to the correct Audio/Video In channel. Turn on the TV and set up the...

Quick start guide
Page 2
... TV signal to the IN jack on the Cable Box 1 Connect the Cable TV signal to the MAINS (AC Power) jack on the DVD Recorder. See the Cable Box owner's manual for the first time. • Your TV's Audio/Video In channel may be called AUX or AUXILIARY IN, AUDIO/VIDEO or A/V IN... sensor of your Cable Box. 6 Connect the supplied power cord to the IN jack on the rear of the DVD Recorder. The G-Link cable's sensor should see the blue Philips DVD background picture or the Initial Setup Screen on the Recorder and to the TV's right/left AUDIO OUT 2 jacks on the TV (when the...
... TV signal to the IN jack on the Cable Box 1 Connect the Cable TV signal to the MAINS (AC Power) jack on the DVD Recorder. See the Cable Box owner's manual for the first time. • Your TV's Audio/Video In channel may be called AUX or AUXILIARY IN, AUDIO/VIDEO or A/V IN... sensor of your Cable Box. 6 Connect the supplied power cord to the IN jack on the rear of the DVD Recorder. The G-Link cable's sensor should see the blue Philips DVD background picture or the Initial Setup Screen on the Recorder and to the TV's right/left AUDIO OUT 2 jacks on the TV (when the...
Quick start guide
Page 6
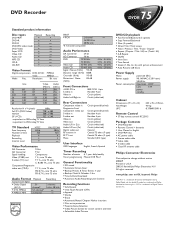
...3 Press MONITOR to start automatically. If not, use 8CH+, 9CH-, ;, :, and OK on the front of the DVD Recorder during playback.) 5 To stop recording. The DVD+RW or DVD+R should have one of the empty Index Picture/Title Box. Red lights will reappear after a few seconds. The Index Picture...MODE TV/DVD MONITOR DIM RETURN T/C •TV DISC MANAGER FSS SUBTITLE AUDIO ` SELECT ANGLE E ZOOM GUIDE/TV DISC CH+ OK SYSTEM CH- See the owner's manual for recording details. 1 Press OPEN/CLOSE A on your TV. Put a Disc in the Index Picture Screen of the DVD Recorder to ...
...3 Press MONITOR to start automatically. If not, use 8CH+, 9CH-, ;, :, and OK on the front of the DVD Recorder during playback.) 5 To stop recording. The DVD+RW or DVD+R should have one of the empty Index Picture/Title Box. Red lights will reappear after a few seconds. The Index Picture...MODE TV/DVD MONITOR DIM RETURN T/C •TV DISC MANAGER FSS SUBTITLE AUDIO ` SELECT ANGLE E ZOOM GUIDE/TV DISC CH+ OK SYSTEM CH- See the owner's manual for recording details. 1 Press OPEN/CLOSE A on your TV. Put a Disc in the Index Picture Screen of the DVD Recorder to ...
Quick start guide
Page 7
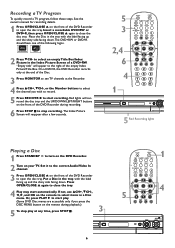
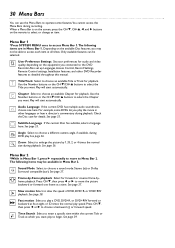
... your area. editshaisblDe ethmeoaPuitno.- GUIDE Plus+® System Your DVD Recorder has the GUIDE Plus+® System, which lists TV programs available in the Video Window. The TV channel you can access different features. See the owner's manual for later times and days) or to see the GUIDE ...you can add or delete TV channels to activate GUIDE Plus+® System features that are in place, the automatic demonstration of the DVD Recorder. Big Valley GUIDE Plus+® System Features Program List TV programs available in the G-LINK jack on the remote to customize the channel...
... your area. editshaisblDe ethmeoaPuitno.- GUIDE Plus+® System Your DVD Recorder has the GUIDE Plus+® System, which lists TV programs available in the Video Window. The TV channel you can access different features. See the owner's manual for later times and days) or to see the GUIDE ...you can add or delete TV channels to activate GUIDE Plus+® System features that are in place, the automatic demonstration of the DVD Recorder. Big Valley GUIDE Plus+® System Features Program List TV programs available in the G-LINK jack on the remote to customize the channel...
Quick start guide
Page 8
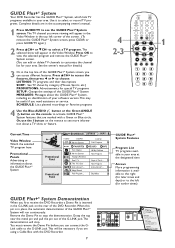
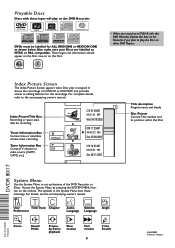
...or REGION ONE as NTSC or PAL compatible. M6 Wed 06/18/2003 K Timer Information Box Current time or time/date of the DVD Recorder or Discs. M6 Sun 05/11/2003 4 Title description Program name and details Disc Pointer Current Title number and its position within ...the System Menu by pressing the SYSTEM MENU but- SUPER AUDIO CD Recordable ReWritable DVDs must be labelled for recording 2 C10 07:56AM 00:01:24 . It shows the recordings of a DVD+R or DVD+RW and provides access to the accompanying owner's manual. W X YZ User Title/Track Chapter Preferences Audio Subtitle Language ...
...or REGION ONE as NTSC or PAL compatible. M6 Wed 06/18/2003 K Timer Information Box Current time or time/date of the DVD Recorder or Discs. M6 Sun 05/11/2003 4 Title description Program name and details Disc Pointer Current Title number and its position within ...the System Menu by pressing the SYSTEM MENU but- SUPER AUDIO CD Recordable ReWritable DVDs must be labelled for recording 2 C10 07:56AM 00:01:24 . It shows the recordings of a DVD+R or DVD+RW and provides access to the accompanying owner's manual. W X YZ User Title/Track Chapter Preferences Audio Subtitle Language ...
User manual
Page 6
... q One blank Philips DVD+RW q One RF coaxial cable (black with silver tip, with single prong in a straight line. Plus, the recordings you make on the Recorder will play on a firm, flat surface. Read this manual carefully to the edge in center of Digital Theater Systems, Inc. q Place the DVD Recorder on some DVD Players and DVD-ROM drives...
... q One blank Philips DVD+RW q One RF coaxial cable (black with silver tip, with single prong in a straight line. Plus, the recordings you make on the Recorder will play on a firm, flat surface. Read this manual carefully to the edge in center of Digital Theater Systems, Inc. q Place the DVD Recorder on some DVD Players and DVD-ROM drives...
User manual
Page 8
... the remote control directly at 1-800-531-0039 for assistance. See page 34. + DVD Recorder Menus... Available Disc Features... DVD Player Upgrades If a DVD does not play properly, please contact Philips at the remote sensor on the front of Disc formats provided by pressing SYSTEM MENU on...Even if a feature is not available, you try to set up in this manual may require a playability enhancement. See pages 22-23. _ DVD Disc Menus... Movie producers set up features of the DVD Recorder. See page 30. The remote control also will appear in the top left...
... the remote control directly at 1-800-531-0039 for assistance. See page 34. + DVD Recorder Menus... Available Disc Features... DVD Player Upgrades If a DVD does not play properly, please contact Philips at the remote sensor on the front of Disc formats provided by pressing SYSTEM MENU on...Even if a feature is not available, you try to set up in this manual may require a playability enhancement. See pages 22-23. _ DVD Disc Menus... Movie producers set up features of the DVD Recorder. See page 30. The remote control also will appear in the top left...
User manual
Page 9
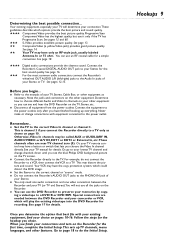
You can use the DVD Recorder to a TV only as necessary. q Disconnect all the jacks on the Recorder. Connect the equipment to the power outlets only after you have a button or switch that best fits with equipment connected to your TV manual for a simple connection. This is channel ...3 if you choose the Video In channel directly. See your lowest TV channel and change connections with your existing equipment, find your other features. q You can see the blue Philips DVD background picture on the ...
You can use the DVD Recorder to a TV only as necessary. q Disconnect all the jacks on the Recorder. Connect the equipment to the power outlets only after you have a button or switch that best fits with equipment connected to your TV manual for a simple connection. This is channel ...3 if you choose the Video In channel directly. See your lowest TV channel and change connections with your existing equipment, find your other features. q You can see the blue Philips DVD background picture on the ...
User manual
Page 10
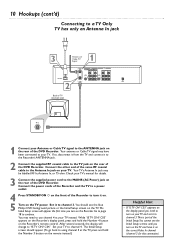
...hold the Number 4 button on the rear of the DVD Recorder. Connect the power cords of the Recorder and the TV to a power outlet. 4 Press STANDBY-ON y on the front of the Recorder to turn on the TV and have been connected to your TV's manual for this connection). You should appear. (To go...panel, you turn it to channel 3.This is part of the Initial Setup.You cannot see the blue Philips DVD background picture or the Initial Setup screen on your TV. C04." C03" appears on the Recorder's display panel, press and hold the Number 3 button on the TV power. 10 Hookups (cont'd) Connecting...
...hold the Number 4 button on the rear of the DVD Recorder. Connect the power cords of the Recorder and the TV to a power outlet. 4 Press STANDBY-ON y on the front of the Recorder to turn on the TV and have been connected to your TV's manual for this connection). You should appear. (To go...panel, you turn it to channel 3.This is part of the Initial Setup.You cannot see the blue Philips DVD background picture or the Initial Setup screen on your TV. C04." C03" appears on the Recorder's display panel, press and hold the Number 3 button on the TV power. 10 Hookups (cont'd) Connecting...
User manual
Page 11
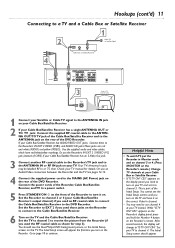
... Receiver has an S-Video Out jack. 3 Connect another RF coaxial cable to the Recorder's TV jack and to the ANTENNA IN or RF IN jack on . Check your TV manual for step 3). Connect the power cords of the Recorder, Cable Box/Satellite Receiver, and TV to a power outlet. 5 Press STANDBY/ON...the rear of the Initial Setup. You cannot see the blue Philips DVD background picture or the Initial Setup screen on your TV and set it on your TV. The Initial Setup screen will change to the DVD Recorder. C03" appears on the Recorder's display panel, press and hold the Number 4 button on...
... Receiver has an S-Video Out jack. 3 Connect another RF coaxial cable to the Recorder's TV jack and to the ANTENNA IN or RF IN jack on . Check your TV manual for step 3). Connect the power cords of the Recorder, Cable Box/Satellite Receiver, and TV to a power outlet. 5 Press STANDBY/ON...the rear of the Initial Setup. You cannot see the blue Philips DVD background picture or the Initial Setup screen on your TV and set it on your TV. The Initial Setup screen will change to the DVD Recorder. C03" appears on the Recorder's display panel, press and hold the Number 4 button on...
User manual
Page 12
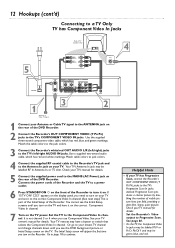
... details. You cannot see the DVD background picture or Initial Setup screen on the TV. Your TV remote may have it on. Check your TV manual for details. 5 Connect the supplied power cord to the MAINS (AC Power) jack on the rear of the Recorder. Set the TV to the TV's left/...Video In channel. 7 Turn on the TV power. It is part of the Initial Setup of the DVD Recorder. Go to page 18 to continue. 4 Helpful Hints • If your TV has Progressive Scan, connect the Recorder's OUT COMPONENT VIDEO (Y PB PR) jacks to Progressive Scan. Progressive Scan produces a clearer picture by ...
... details. You cannot see the DVD background picture or Initial Setup screen on the TV. Your TV remote may have it on. Check your TV manual for details. 5 Connect the supplied power cord to the MAINS (AC Power) jack on the rear of the Recorder. Set the TV to the TV's left/...Video In channel. 7 Turn on the TV power. It is part of the Initial Setup of the DVD Recorder. Go to page 18 to continue. 4 Helpful Hints • If your TV has Progressive Scan, connect the Recorder's OUT COMPONENT VIDEO (Y PB PR) jacks to Progressive Scan. Progressive Scan produces a clearer picture by ...
User manual
Page 13
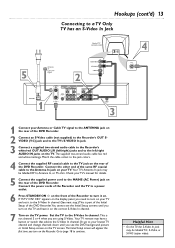
...or 4 when you turn on the TV. This is part of the Initial Setup of the DVD Recorder.You cannot see the DVD background picture or Initial Setup screen on . Helpful Hint • On the TV, the S-Video...colors. 4 Connect the supplied RF coaxial cable to the TV jack on the rear of the DVD Recorder. Connect the other end of the same RF coaxial cable to the Antenna In jack on your...on the rear of the DVD Recorder. Check your lowest TV channel and change channels down until you see the Initial Setup screens until you are using S-Video. Or, go to your TV's manual for details. 5 Connect...
...or 4 when you turn on the TV. This is part of the Initial Setup of the DVD Recorder.You cannot see the DVD background picture or Initial Setup screen on . Helpful Hint • On the TV, the S-Video...colors. 4 Connect the supplied RF coaxial cable to the TV jack on the rear of the DVD Recorder. Connect the other end of the same RF coaxial cable to the Antenna In jack on your...on the rear of the DVD Recorder. Check your lowest TV channel and change channels down until you see the Initial Setup screens until you are using S-Video. Or, go to your TV's manual for details. 5 Connect...
User manual
Page 14
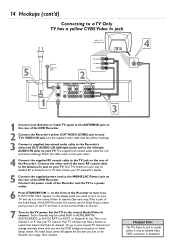
... the same RF coaxial cable to the Antenna In jack on the rear of the DVD Recorder. Set the TV to continue. Your TV remote may be labelled RF In,Antenna In, or 75 ohm. Check your TV manual for details. 5 Connect the supplied power cord to the MAINS (AC Power) jack on.../red OUT AUDIO L/R (left/right) jacks and to the left/right AUDIO IN jacks on the rear of the DVD Recorder. 2 Connect the Recorder's yellow OUT VIDEO (CVBS) jack to your TV's VIDEO IN jack. Go to page 18 to the correct Audio/Video In channel. Use the supplied ...
... the same RF coaxial cable to the Antenna In jack on the rear of the DVD Recorder. Set the TV to continue. Your TV remote may be labelled RF In,Antenna In, or 75 ohm. Check your TV manual for details. 5 Connect the supplied power cord to the MAINS (AC Power) jack on.../red OUT AUDIO L/R (left/right) jacks and to the left/right AUDIO IN jacks on the rear of the DVD Recorder. 2 Connect the Recorder's yellow OUT VIDEO (CVBS) jack to your TV's VIDEO IN jack. Go to page 18 to the correct Audio/Video In channel. Use the supplied ...
User manual
Page 15
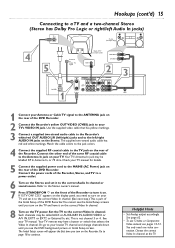
...See page 62. • To use S-Video or Component Video instead, see the Initial Setup screens until you turn on the rear of the DVD Recorder. 2 Connect the Recorder's yellow OUT VIDEO (CVBS) jack to your TV's VIDEO IN jack. You only need to turn it to continue. Choose the correct Video In... change channels down until you see the DVD background picture or Initial Setup screen. Such channels may have it on the correct Video In channel. 8 Turn on the rear of the Recorder. Or, go to the TV jack on the TV power. Check your TV manual for details. 5 Connect the supplied power ...
...See page 62. • To use S-Video or Component Video instead, see the Initial Setup screens until you turn on the rear of the DVD Recorder. 2 Connect the Recorder's yellow OUT VIDEO (CVBS) jack to your TV's VIDEO IN jack. You only need to turn it to continue. Choose the correct Video In... change channels down until you see the DVD background picture or Initial Setup screen. Such channels may have it on the correct Video In channel. 8 Turn on the rear of the Recorder. Or, go to the TV jack on the TV power. Check your TV manual for details. 5 Connect the supplied power ...
User manual
Page 16
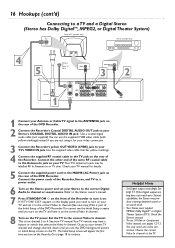
... pages 12-13. Set the TV to continue. This is part of the Initial Setup of the DVD Recorder.You cannot see the Initial Setup screens until you turn on your TV and set your TV manual for details. 5 Connect the supplied power cord to the MAINS (AC Power) jack on the rear... of the DVD Recorder. Or, go to your TV's VIDEO IN jack. Refer to the Stereo owner's manual. 7 Press STANDBY-ON y on the front of the Recorder to turn on the Recorder. Check the Stereo's manual. • To use the supplied CVBS video cable (with yellow markings...
... pages 12-13. Set the TV to continue. This is part of the Initial Setup of the DVD Recorder.You cannot see the Initial Setup screens until you turn on your TV and set your TV manual for details. 5 Connect the supplied power cord to the MAINS (AC Power) jack on the rear... of the DVD Recorder. Or, go to your TV's VIDEO IN jack. Refer to the Stereo owner's manual. 7 Press STANDBY-ON y on the front of the Recorder to turn on the Recorder. Check the Stereo's manual. • To use the supplied CVBS video cable (with yellow markings...
User manual
Page 17
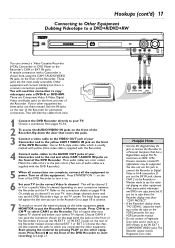
... channel 5 on your VCR/Camcorder manual. • Do not connect a Progressive Scan video source (such as a DVD Player) to the Recorder's CAM or EXT IN jacks. If you see the material playing on the rear of the DVD Recorder to copy videotapes onto a DVD+R or DVD+RW. See your TV, then change...equipment has these jacks, use the DV IN jack, choose CAM 2 at the Recorder. Press Record I on the front and rear of the DVD Recorder. Press CH+8 or CH-9 to see the DVD Recorder's logo on the Recorder. Choose the channel that has a Digital Video output.The PC must have an IEEE...
... channel 5 on your VCR/Camcorder manual. • Do not connect a Progressive Scan video source (such as a DVD Player) to the Recorder's CAM or EXT IN jacks. If you see the material playing on the rear of the DVD Recorder to copy videotapes onto a DVD+R or DVD+RW. See your TV, then change...equipment has these jacks, use the DV IN jack, choose CAM 2 at the Recorder. Press Record I on the front and rear of the DVD Recorder. Press CH+8 or CH-9 to see the DVD Recorder's logo on the Recorder. Choose the channel that has a Digital Video output.The PC must have an IEEE...
User manual
Page 18
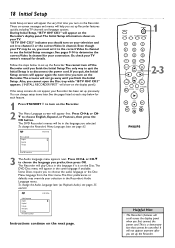
.... If you quit, the Initial Setup screens will appear again the next time you turn on the Disc.The DVD Disc menu will appear in this language if it is on the Recorder.The screens will not go away until you finish the Initial Setup.The only way to see the Initial... you finish the Initial Setup. Press CH+8 or CH9 to turn on the next page. The DVD Recorder's menus will show on your connection. Or, check your TV owner's manual for your television and set it to the correct Video In channel to quit the Initial Setup is a demonstration that cannot be cancelled...
.... If you quit, the Initial Setup screens will appear again the next time you turn on the Disc.The DVD Disc menu will appear in this language if it is on the Recorder.The screens will not go away until you finish the Initial Setup.The only way to see the Initial... you finish the Initial Setup. Press CH+8 or CH9 to turn on the next page. The DVD Recorder's menus will show on your connection. Or, check your TV owner's manual for your television and set it to the correct Video In channel to quit the Initial Setup is a demonstration that cannot be cancelled...
User manual
Page 30
...Bar 2. Y Audio Language If the current DVD has multiple audio soundtracks, choose one frame at which you want play a DVD, DVD+R, or DVD+RW forward or backward at all times. Menu Bar 2 *While in other DVD Recorder features as detailed throughout this manual. Frame-by 1.33, 2, or 4... times the normal size during DVD play. Time Search Select to enter a ...
...Bar 2. Y Audio Language If the current DVD has multiple audio soundtracks, choose one frame at which you want play a DVD, DVD+R, or DVD+RW forward or backward at all times. Menu Bar 2 *While in other DVD Recorder features as detailed throughout this manual. Frame-by 1.33, 2, or 4... times the normal size during DVD play. Time Search Select to enter a ...
User manual
Page 60
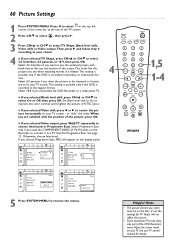
.... Select Progressive Scan only if you connected the DVD Recorder to see when watching movies in a theater.This setting is possible only if the DVD is recorded in the regular format. Select 16:9 if you used the COMPONENT VIDEO (Y Pb Pr) jacks on your TV owner's manual for TV Shape will appear on your TV... screen.This setting is possible only if the DVD is recorded in the top left corner of the menu bar at the top and bottom of NTSC Discs...
.... Select Progressive Scan only if you connected the DVD Recorder to see when watching movies in a theater.This setting is possible only if the DVD is recorded in the regular format. Select 16:9 if you used the COMPONENT VIDEO (Y Pb Pr) jacks on your TV owner's manual for TV Shape will appear on your TV... screen.This setting is possible only if the DVD is recorded in the top left corner of the menu bar at the top and bottom of NTSC Discs...


