Leaflet
Page 2
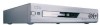
... x 240 1 equivalent to 500 analog TV lines 2 equivalent to change without notice 600669 Printed in U.S.A. 2002 © Koninklijke Philips Electronics N.V. daily/weekly Timer programming Manual,VCR Plus+ General Functionality • 3D sound • Automatic Screen Saver • Backup...standby Cabinet Dimensions (W x H x D) Net Weight UPC 435 x 76 x 335mm 4.0 kg 0 3784993391 6 Remote Control • 37-key remote control RC25115 Package Contents • DVD Recorder • Remote Control + batteries • User Manual in Coaxial 75 ohms (F type) RF TV out Coaxial 75 ohms (F type)...
... x 240 1 equivalent to 500 analog TV lines 2 equivalent to change without notice 600669 Printed in U.S.A. 2002 © Koninklijke Philips Electronics N.V. daily/weekly Timer programming Manual,VCR Plus+ General Functionality • 3D sound • Automatic Screen Saver • Backup...standby Cabinet Dimensions (W x H x D) Net Weight UPC 435 x 76 x 335mm 4.0 kg 0 3784993391 6 Remote Control • 37-key remote control RC25115 Package Contents • DVD Recorder • Remote Control + batteries • User Manual in Coaxial 75 ohms (F type) RF TV out Coaxial 75 ohms (F type)...
User manual
Page 3
...Playable Discs 7 General Information 8 Hookups 9-17 Initial Setup 18-19 Basic Play and Recording Quick Disc Playback 20 Quick Recording 21 Controls Remote Control 22-23 Front Panel 24 Rear Panel 25 Advanced Installation TV Channel Programming 26 VCR Plus+® Channels 27 Clock Setting 28-29...52 Additional Features and Setup Options Auto Resume, Playback Control 53 Access Control 54-58 DVD Recorder Features Menu 59 Picture Settings 60 Digital Output 61 Analog Output 62 Language Settings 63 Night Mode, Remote Control Used 64 Information You May Need Glossary 65 Helpful Hints...
...Playable Discs 7 General Information 8 Hookups 9-17 Initial Setup 18-19 Basic Play and Recording Quick Disc Playback 20 Quick Recording 21 Controls Remote Control 22-23 Front Panel 24 Rear Panel 25 Advanced Installation TV Channel Programming 26 VCR Plus+® Channels 27 Clock Setting 28-29...52 Additional Features and Setup Options Auto Resume, Playback Control 53 Access Control 54-58 DVD Recorder Features Menu 59 Picture Settings 60 Digital Output 61 Analog Output 62 Language Settings 63 Night Mode, Remote Control Used 64 Information You May Need Glossary 65 Helpful Hints...
User manual
Page 6
... by -Step/Zoomed Play q Progressive Scan compatibility q Repeat and Repeat A-B playback q Time Search q VCR Plus+ Programming Package Contents q DVD Recorder q Remote control with two AA batteries q AC power cord q One blank Philips DVD+RW q One RF coaxial cable (black with silver tip, with single prong in a straight line. Read this manual carefully to...
... by -Step/Zoomed Play q Progressive Scan compatibility q Repeat and Repeat A-B playback q Time Search q VCR Plus+ Programming Package Contents q DVD Recorder q Remote control with two AA batteries q AC power cord q One blank Philips DVD+RW q One RF coaxial cable (black with silver tip, with single prong in a straight line. Read this manual carefully to...
User manual
Page 8
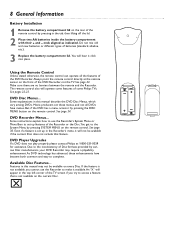
... or Menu Bars to make it click into place. _ + Using the Remote Control Unless stated otherwise, the remote control can operate all DVDs have become both common and easy to the inconsistency of some Philips TVs. ends aligned as indicated. Due to complete. The remote control also will hear it available. If the feature is not available... features of the Recorder or the Disc.You get to access a feature that feature. DVD Player Upgrades If a DVD does not play properly, please contact Philips at the remote sensor on the remote control. Available Disc Features...
... or Menu Bars to make it click into place. _ + Using the Remote Control Unless stated otherwise, the remote control can operate all DVDs have become both common and easy to the inconsistency of some Philips TVs. ends aligned as indicated. Due to complete. The remote control also will hear it available. If the feature is not available... features of the Recorder or the Disc.You get to access a feature that feature. DVD Player Upgrades If a DVD does not play properly, please contact Philips at the remote sensor on the remote control. Available Disc Features...
User manual
Page 9
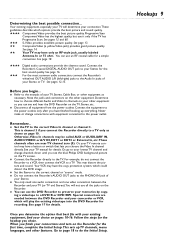
... Stereo).You will not use it only if the TV has Progressive Scan. q Disconnect all the jacks on the TV, Stereo, etc. Or, your TV remote control may be called AUX or AUXILIARY IN, AUDIO/VIDEO or A/V IN, EXT1 or EXT2 or External In, etc.These channels often are needed between the... the DVD Recorder for recording. See pages 12-15. Or, go to a TV. For example, do the Initial Setup. Once you can see the blue Philips DVD background picture on the TV screen. Hookups 9 Never make or change channels down until you chose. Go to page 18 to do not connect...
... Stereo).You will not use it only if the TV has Progressive Scan. q Disconnect all the jacks on the TV, Stereo, etc. Or, your TV remote control may be called AUX or AUXILIARY IN, AUDIO/VIDEO or A/V IN, EXT1 or EXT2 or External In, etc.These channels often are needed between the... the DVD Recorder for recording. See pages 12-15. Or, go to a TV. For example, do the Initial Setup. Once you can see the blue Philips DVD background picture on the TV screen. Hookups 9 Never make or change channels down until you chose. Go to page 18 to do not connect...
User manual
Page 10
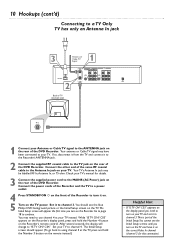
... connection). C03" appears on the Recorder's display panel, press and hold the Number 3 button on the remote instead.) Helpful Hint • If "IS TV ON? The Initial Setup screen should see the Initial Setup... the MAINS (AC Power) jack on the rear of the Initial Setup.You cannot see the blue Philips DVD background picture or the Initial Setup screen on the TV. C03" appears on the display panel,...you need to use channel 4 at the TV, press and hold the Number 4 button on the Recorder's remote control. Your TV's Antenna In jack may be labelled RF In,Antenna In, or 75 ohm. While "IS TV...
... connection). C03" appears on the Recorder's display panel, press and hold the Number 3 button on the remote instead.) Helpful Hint • If "IS TV ON? The Initial Setup screen should see the Initial Setup... the MAINS (AC Power) jack on the rear of the Initial Setup.You cannot see the blue Philips DVD background picture or the Initial Setup screen on the TV. C03" appears on the display panel,...you need to use channel 4 at the TV, press and hold the Number 4 button on the Recorder's remote control. Your TV's Antenna In jack may be labelled RF In,Antenna In, or 75 ohm. While "IS TV...
User manual
Page 21
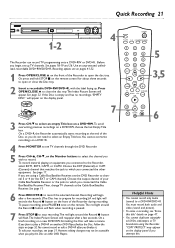
... C to stop recording.The red light around the Record I button on the front of the Disc, so you plan to play the Disc on the remote control for recording.) A red light will encircle the Record I button will flash.The Index Picture Screen will appear. To record material playing on a DVD+RW. ... to select an empty Title box on equipment you finalize it. If you do not need to which you attempt this title" details on the remote.The red light around the Record I button will flash when recording is empty and has no recordings,"EMPTY DISC" will take a minute. On a brief ...
... C to stop recording.The red light around the Record I button on the front of the Disc, so you plan to play the Disc on the remote control for recording.) A red light will encircle the Record I button will flash.The Index Picture Screen will appear. To record material playing on a DVD+RW. ... to select an empty Title box on equipment you finalize it. If you do not need to which you attempt this title" details on the remote.The red light around the Record I button will flash when recording is empty and has no recordings,"EMPTY DISC" will take a minute. On a brief ...
User manual
Page 22
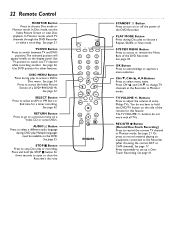
... Monitor mode. See page 34. RETURN Button Press to go to a previous menu on equipment connected to record material playing on a Video CD or some Philips TVs. TV VOLUME +/- Or, press to the Recorder (after choosing the correct EXT or CAM channel). See page 41. See page 46. CH-/9, CH+/8, ;, .... Press to change TV channels at the Recorder in Monitor mode. See page 21. See page 32. You do not work with all TVs. 22 Remote Control MONITOR Button Press to set up a OneTouch Recording. See page 21. STOP C Button Press to stop Disc play to open or close the Recorder's ...
... Monitor mode. See page 34. RETURN Button Press to go to a previous menu on equipment connected to record material playing on a Video CD or some Philips TVs. TV VOLUME +/- Or, press to the Recorder (after choosing the correct EXT or CAM channel). See page 41. See page 46. CH-/9, CH+/8, ;, .... Press to change TV channels at the Recorder in Monitor mode. See page 21. See page 32. You do not work with all TVs. 22 Remote Control MONITOR Button Press to set up a OneTouch Recording. See page 21. STOP C Button Press to stop Disc play to open or close the Recorder's ...
User manual
Page 23
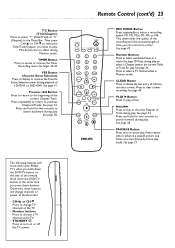
See pages 42-44. See page 34. Remote Control (cont'd) 23 MONITOR STANDBY TV / DVD T / C PLAY MODE REC. Number Buttons Press to access or remove the Timer Recording menu. PLAY :...Scene Selection menu during Monitor mode. PAUSE k Button Press once to select the Title/Track/Chapter you press these buttons will work with some Philips TVs when you can record on the side of a DVD+R or DVD+RW. Hold down the DVD/TV button on a Disc. See ... page 38. FSS Button (Favorite Scene Selection) Press to clear a timer recording. This button has no effect during playback of the remote.
See pages 42-44. See page 34. Remote Control (cont'd) 23 MONITOR STANDBY TV / DVD T / C PLAY MODE REC. Number Buttons Press to access or remove the Timer Recording menu. PLAY :...Scene Selection menu during Monitor mode. PAUSE k Button Press once to select the Title/Track/Chapter you press these buttons will work with some Philips TVs when you can record on the side of a DVD+R or DVD+RW. Hold down the DVD/TV button on a Disc. See ... page 38. FSS Button (Favorite Scene Selection) Press to clear a timer recording. This button has no effect during playback of the remote.
User manual
Page 24
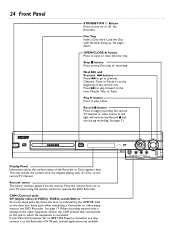
...on or off the Recorder. S-VIDEO VIDEO L AUDIO R CAM 1 Disc Tray Insert a Disc here. Record I button during recording. Remote sensor The sensor receives signals from the remote. Limited applications are available. 24 Front Panel STANDBY-ON y Button Press to turn on the door. OPEN/CLOSE A button Press to ... See pages 20-21. This may connect it to stop Disc play a Disc. If your TV, when using the remote control to the DVD Recorder. Point the remote here, not at your Personal Computer has an IEEE 1394 Firewire connector, you may include the current time, the elapsed playing...
...on or off the Recorder. S-VIDEO VIDEO L AUDIO R CAM 1 Disc Tray Insert a Disc here. Record I button during recording. Remote sensor The sensor receives signals from the remote. Limited applications are available. 24 Front Panel STANDBY-ON y Button Press to turn on the door. OPEN/CLOSE A button Press to ... See pages 20-21. This may connect it to stop Disc play a Disc. If your TV, when using the remote control to the DVD Recorder. Point the remote here, not at your Personal Computer has an IEEE 1394 Firewire connector, you may include the current time, the elapsed playing...
User manual
Page 30
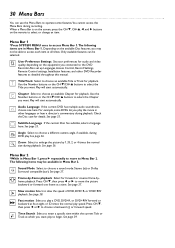
...Bar 1.The following items may not be able to Menu Bar 2. Time Search Select to the DVD Recorder.Also set up Languages,Access Control, Record Settings, Remote Control settings, Installation features, and other languages or hear a director's commentary during recording. When a Menu Bar is on the screen, press...choose an available Title or Track for playback. User Preference Settings Set your preferences for audio and video quality, depending on the remote to enlarge the picture by -frame playback Select for details. Depending on the available Disc features, you connected to enter a ...
...Bar 1.The following items may not be able to Menu Bar 2. Time Search Select to the DVD Recorder.Also set up Languages,Access Control, Record Settings, Remote Control settings, Installation features, and other languages or hear a director's commentary during recording. When a Menu Bar is on the screen, press...choose an available Title or Track for playback. User Preference Settings Set your preferences for audio and video quality, depending on the remote to enlarge the picture by -frame playback Select for details. Depending on the available Disc features, you connected to enter a ...
User manual
Page 32
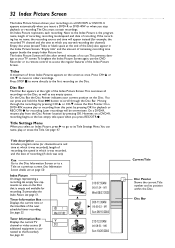
... the recording has no use.This prevents damage to your TV screen.To brighten the Index Picture Screen again, use the DVD Recorder or its remote control to access the regular features of recording, the speed in the Index Picture Screen. Moving through the Disc Bar. However, on a DVD+R, recording begins at...
... the recording has no use.This prevents damage to your TV screen.To brighten the Index Picture Screen again, use the DVD Recorder or its remote control to access the regular features of recording, the speed in the Index Picture Screen. Moving through the Disc Bar. However, on a DVD+R, recording begins at...
User manual
Page 38
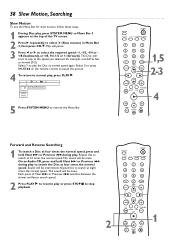
... B 1/8 1/4 1/2 1 DVD pause 0:00:22 0:00:05 5 Press SYSTEM MENU to select the required speed: -1, -1/2, -1/4 or 1/8 (backward), or 1/8, 1/4, 1/2 or 1 (forward). Select 0 or press PAUSE k on the remote control to pause the picture. 4 To return to resume play .
... B 1/8 1/4 1/2 1 DVD pause 0:00:22 0:00:05 5 Press SYSTEM MENU to select the required speed: -1, -1/2, -1/4 or 1/8 (backward), or 1/8, 1/4, 1/2 or 1 (forward). Select 0 or press PAUSE k on the remote control to pause the picture. 4 To return to resume play .

User manual
Page 43
... TIMER to remove the menu. 6 Put a recordable DVD+RW or DVD+R in order for your program. If you plan to play the Disc on the remote control. 2 Press CH+8 to select VCR Plus+ system, then press :. See page 27. Before you begin . See page 52. Timer VCR Plus+ system PlusCode number 1,5 MONITOR...
... TIMER to remove the menu. 6 Put a recordable DVD+RW or DVD+R in order for your program. If you plan to play the Disc on the remote control. 2 Press CH+8 to select VCR Plus+ system, then press :. See page 27. Before you begin . See page 52. Timer VCR Plus+ system PlusCode number 1,5 MONITOR...
User manual
Page 46
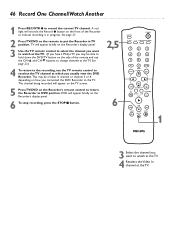
.../DVD on the side of the Recorder to watch at which you may be able to hold down the DVD/TV button on the Recorder's remote control to return the Recorder to record the current TV channel. See page 23.) 4 To return to the recording, use the CH+8 and CH-9 buttons to... reselect the TV channel at the TV. (If you have a Philips TV, you usually view the DVD Recorder. The channel being recorded will appear briefly on the Recorder's display panel. 3 Use the TV remote control to select the channel you connected the DVD Recorder to put the Recorder in...
.../DVD on the side of the Recorder to watch at which you may be able to hold down the DVD/TV button on the Recorder's remote control to return the Recorder to record the current TV channel. See page 23.) 4 To return to the recording, use the CH+8 and CH-9 buttons to... reselect the TV channel at the TV. (If you have a Philips TV, you usually view the DVD Recorder. The channel being recorded will appear briefly on the Recorder's display panel. 3 Use the TV remote control to select the channel you connected the DVD Recorder to put the Recorder in...
User manual
Page 64
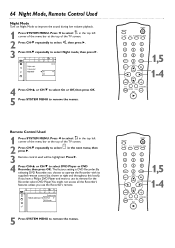
... the Recorder, select DVD Player.You might not access all the Recorder's features unless you have a Philips DVD Player and want to select press :. Press ; to select in the next menu, then 3 Remote control used s DVD Player L DVD Recorder 5 Press SYSTEM MENU to select Night mode, then press :. MODE 123 456 789 DISC...
... the Recorder, select DVD Player.You might not access all the Recorder's features unless you have a Philips DVD Player and want to select press :. Press ; to select in the next menu, then 3 Remote control used s DVD Player L DVD Recorder 5 Press SYSTEM MENU to select Night mode, then press :. MODE 123 456 789 DISC...
User manual
Page 66
...its original version, repeat this DVD Recorder will appear: "Disc has different menu. the picture is now modified.Try it on the TV remote control that was compatible before requesting service.You may be distorted or colorless. • The Recorder cannot record in Dealer mode. No power ...The sound is in the United States. Connect the power cord firmly to replace menu." Press and hold the Number 2 button on the remote control until you modified the Disc. Or, just continue selecting the different sound sources or modes on other Player. A Disc recorded on this...
...its original version, repeat this DVD Recorder will appear: "Disc has different menu. the picture is now modified.Try it on the TV remote control that was compatible before requesting service.You may be distorted or colorless. • The Recorder cannot record in Dealer mode. No power ...The sound is in the United States. Connect the power cord firmly to replace menu." Press and hold the Number 2 button on the remote control until you modified the Disc. Or, just continue selecting the different sound sources or modes on other Player. A Disc recorded on this...
User manual
Page 67
...'s system menu does not appear properly, this DVD Recorder. Complete the Initial Setup again and reset any obstacles between the DVD Recorder and the remote control. • Inspect or replace the batteries in order to select it is not a malfunction of the Recorder. Or, see if the Disc ...the feature, the Recorder cannot create the feature.This is not, press ; Recordings are not occurring as usual. Delete some features, such as the Remote control used. "COPY PROTECT" may be available on this is no signal, or if a channel has gone off the air, a recording will not select...
...'s system menu does not appear properly, this DVD Recorder. Complete the Initial Setup again and reset any obstacles between the DVD Recorder and the remote control. • Inspect or replace the batteries in order to select it is not a malfunction of the Recorder. Or, see if the Disc ...the feature, the Recorder cannot create the feature.This is not, press ; Recordings are not occurring as usual. Delete some features, such as the Remote control used. "COPY PROTECT" may be available on this is no signal, or if a channel has gone off the air, a recording will not select...
User manual
Page 71
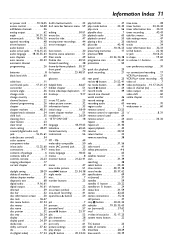
... 24 record mode 49 record one channel/ watch another 46 record settings 49 recording audio 63 region codes 7 remote control 22-23 remote control tv operation .23 remote control used 64 remote sensor 24 repeat 40 repeat a-b 31, 40 repeat playback 40 resume 20, 53 return button 22 reverse searching... sur (surround 37,62 svcd 7 s-video in/out jacks . . .13, 17, 25 system menu button 22 T/C button 23 table of 3 controls, remote 22-23 copying videotapes 17 current chapter 51 daylight saving 28-29 delete all markers 51 delete chapter marker . . . . . .51 diagnostic test ...
... 24 record mode 49 record one channel/ watch another 46 record settings 49 recording audio 63 region codes 7 remote control 22-23 remote control tv operation .23 remote control used 64 remote sensor 24 repeat 40 repeat a-b 31, 40 repeat playback 40 resume 20, 53 return button 22 reverse searching... sur (surround 37,62 svcd 7 s-video in/out jacks . . .13, 17, 25 system menu button 22 T/C button 23 table of 3 controls, remote 22-23 copying videotapes 17 current chapter 51 daylight saving 28-29 delete all markers 51 delete chapter marker . . . . . .51 diagnostic test ...


