
Quick start guide
Page 1
... the TV and set up the Recorder for the first time. • Your TV's Audio/Video In channel may be near channel zero (0). Connect the power cords of the Recorder and the TV to the jack colors. 4 Because you are on the Recorder and to the correct Audio/Video In channel. See... blue Philips DVD background picture or the Initial Setup Screen on the TV (when the DVD Recorder is on). • If your TV. 3 Connect the supplied audio cable(s) (red/white markings) to the red/white, right/left AUDIO OUT 2 jacks on page 7 of this Quick-Use Guide. 5 Connect the supplied power cord to...
... the TV and set up the Recorder for the first time. • Your TV's Audio/Video In channel may be near channel zero (0). Connect the power cords of the Recorder and the TV to the jack colors. 4 Because you are on the Recorder and to the correct Audio/Video In channel. See... blue Philips DVD background picture or the Initial Setup Screen on the TV (when the DVD Recorder is on). • If your TV. 3 Connect the supplied audio cable(s) (red/white markings) to the red/white, right/left AUDIO OUT 2 jacks on page 7 of this Quick-Use Guide. 5 Connect the supplied power cord to...

Quick start guide
Page 2
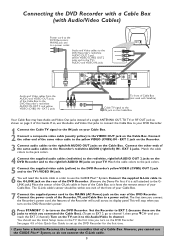
... details. 2 Connect an RF coaxial cable to the OUT jack of the Cable Box and to the ANTENNA jack on the DVD Recorder. Connect the power cords of the DVD Recorder. However, you cannot use the GUIDE Plus+® System. Set the DVD Recorder to channel 3 or 4 (the output channel of a Cable... Cable Box. Connect the supplied G-Link cable to the G-LINK jack on the rear of the Recorder. The G-Link cable's sensor should see the blue Philips DVD background picture or the Initial Setup Screen on the TV (when the DVD Recorder is still attached to the GLINK jack.) Place the sensor...
... details. 2 Connect an RF coaxial cable to the OUT jack of the Cable Box and to the ANTENNA jack on the DVD Recorder. Connect the power cords of the DVD Recorder. However, you cannot use the GUIDE Plus+® System. Set the DVD Recorder to channel 3 or 4 (the output channel of a Cable... Cable Box. Connect the supplied G-Link cable to the G-LINK jack on the rear of the Recorder. The G-Link cable's sensor should see the blue Philips DVD background picture or the Initial Setup Screen on the TV (when the DVD Recorder is still attached to the GLINK jack.) Place the sensor...
Quick start guide
Page 3
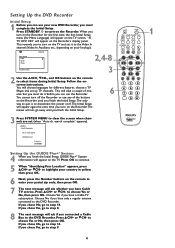
...the Cable Box so it faces the remote sensor of your Cable Box. 7 Connect the supplied power cord to the MAINS (AC Power) jack on the DVD Recorder. The G-Link cable's sensor should see the Initial Setup menu...the DVD Recorder. set up the DVD Recorder for the first time. • If you connect the Recorder's power cord, the features of the same video cable to the right/left AUDIO OUT jacks on page 2 of a ... Plus+® System, so do not connect the G-Link cable. 3 Connect the power cords of the G-Link cable in order to the DVD Recorder's red/white AUDIO IN -EXT 2 and yellow VIDEO (CVBS...
...the Cable Box so it faces the remote sensor of your Cable Box. 7 Connect the supplied power cord to the MAINS (AC Power) jack on the DVD Recorder. The G-Link cable's sensor should see the Initial Setup menu...the DVD Recorder. set up the DVD Recorder for the first time. • If you connect the Recorder's power cord, the features of the same video cable to the right/left AUDIO OUT jacks on page 2 of a ... Plus+® System, so do not connect the G-Link cable. 3 Connect the power cords of the G-Link cable in order to the DVD Recorder's red/white AUDIO IN -EXT 2 and yellow VIDEO (CVBS...
Quick start guide
Page 4
.... 3 SYSTEM CH- If you chose No, go away until you finish the Initial Setup, GUIDE Plus+® System information will not go to disconnect the power cord. The only way to quit is to step 14. to turn on the Recorder until you have a Cable TV subscription. Press STANDBY y to choose Yes...
.... 3 SYSTEM CH- If you chose No, go away until you finish the Initial Setup, GUIDE Plus+® System information will not go to disconnect the power cord. The only way to quit is to step 14. to turn on the Recorder until you have a Cable TV subscription. Press STANDBY y to choose Yes...
User manual
Page 5
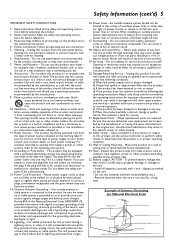
...or objects have been adhered to rain or water, d) If the product does not operate normally by following conditions: a) When the power supply cord or plug is grounded so as a bookcase or rack unless proper ventilation is a safety feature. Situate this product in a built-in..., grounding of the lead-in the cabinet provide ventilation, ensure reliable operation of power supply to an antenna discharge unit, size of grounding conductors, location of fire or electric shock. 18. Power-Cord Protection - Do not use attachments not recommended by the product manufacturer as recommended...
...or objects have been adhered to rain or water, d) If the product does not operate normally by following conditions: a) When the power supply cord or plug is grounded so as a bookcase or rack unless proper ventilation is a safety feature. Situate this product in a built-in..., grounding of the lead-in the cabinet provide ventilation, ensure reliable operation of power supply to an antenna discharge unit, size of grounding conductors, location of fire or electric shock. 18. Power-Cord Protection - Do not use attachments not recommended by the product manufacturer as recommended...
User manual
Page 6
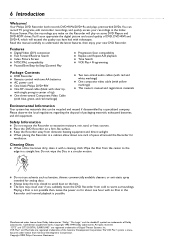
... Repeat A-B playback q Time Search q VCR Plus+ Programming Package Contents q DVD Recorder q Remote control with two AA batteries q AC power cord q One blank Philips DVD+RW q One RF coaxial cable (black with silver tip, with single prong in the Index Picture Screen. Safety Information q Do... trademarks of packaging materials, exhausted batteries, and old equipment. The VCR Plus+ system is not possible then. Copyright 2003 Philips Consumer Electronics. Please observe the local regulations regarding the disposal of Dolby Laboratories. VCR Plus+ and PlusCode are registered trademarks ...
... Repeat A-B playback q Time Search q VCR Plus+ Programming Package Contents q DVD Recorder q Remote control with two AA batteries q AC power cord q One blank Philips DVD+RW q One RF coaxial cable (black with silver tip, with single prong in the Index Picture Screen. Safety Information q Do... trademarks of packaging materials, exhausted batteries, and old equipment. The VCR Plus+ system is not possible then. Copyright 2003 Philips Consumer Electronics. Please observe the local regulations regarding the disposal of Dolby Laboratories. VCR Plus+ and PlusCode are registered trademarks ...
User manual
Page 10
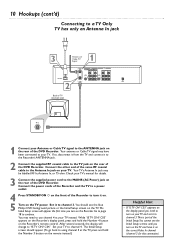
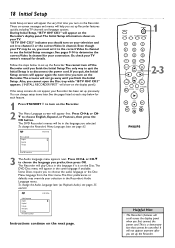
... the display panel, you turn on your TV and set it to channel 3.This is part of the Initial Setup.You cannot see the blue Philips DVD background picture or the Initial Setup screen on the rear of the DVD Recorder. The Initial Setup screen should see the Initial Setup screens... connection). If so, disconnect it from the TV and connect it on the correct Video In channel (channel 3 for details. 3 Connect the supplied power cord to the MAINS (AC Power) jack on the rear of the DVD Recorder. C03" appears on the Recorder's display panel, press and hold the Number 3 button on the...
... the display panel, you turn on your TV and set it to channel 3.This is part of the Initial Setup.You cannot see the blue Philips DVD background picture or the Initial Setup screen on the rear of the DVD Recorder. The Initial Setup screen should see the Initial Setup screens... connection). If so, disconnect it from the TV and connect it on the correct Video In channel (channel 3 for details. 3 Connect the supplied power cord to the MAINS (AC Power) jack on the rear of the DVD Recorder. C03" appears on the Recorder's display panel, press and hold the Number 3 button on the...
User manual
Page 11
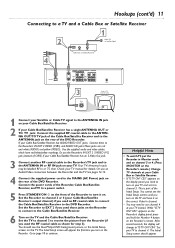
... channel 3 to receive the picture from the Recorder (if you turn on the TV and have red/white/yellow markings. You cannot see the blue Philips DVD background picture or the Initial Setup screen on the TV. Helpful Hints • To watch TV, put the Recorder in Monitor mode and on... Cable Box/Satellite Receiver and to the ANTENNA jack on the rear of the DVD Recorder. See pages 12-14. 4 Connect the supplied power cord to the MAINS (AC Power) jack on the rear of the Initial Setup. Or, use an Audio/Video connection between the Recorder and the TV. While "IS TV...
... channel 3 to receive the picture from the Recorder (if you turn on the TV and have red/white/yellow markings. You cannot see the blue Philips DVD background picture or the Initial Setup screen on the TV. Helpful Hints • To watch TV, put the Recorder in Monitor mode and on... Cable Box/Satellite Receiver and to the ANTENNA jack on the rear of the DVD Recorder. See pages 12-14. 4 Connect the supplied power cord to the MAINS (AC Power) jack on the rear of the Initial Setup. Or, use an Audio/Video connection between the Recorder and the TV. While "IS TV...
User manual
Page 12
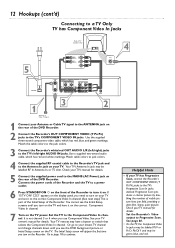
... Recorder. 2 Connect the Recorder's OUT COMPONENT VIDEO (Y PB PR) jacks to turn on your TV owner's manual for details. 5 Connect the supplied power cord to the MAINS (AC Power) jack on your TV manual for details. You cannot see the DVD background picture or Initial Setup screen on the TV and have... Check your TV. The Initial Setup screen will appear the first time you need to a power outlet. 6 Press STANDBY-ON y on . Your TV's Antenna In jack may be green, blue, and red. Connect the power cords of the Recorder and the TV to turn it on the front of the DVD Recorder...
... Recorder. 2 Connect the Recorder's OUT COMPONENT VIDEO (Y PB PR) jacks to turn on your TV owner's manual for details. 5 Connect the supplied power cord to the MAINS (AC Power) jack on your TV manual for details. You cannot see the DVD background picture or Initial Setup screen on the TV and have... Check your TV. The Initial Setup screen will appear the first time you need to a power outlet. 6 Press STANDBY-ON y on . Your TV's Antenna In jack may be green, blue, and red. Connect the power cords of the Recorder and the TV to turn it on the front of the DVD Recorder...
User manual
Page 13
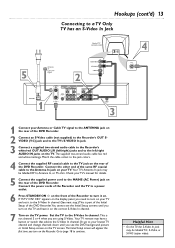
... the S-Video In channel. Set the TV to the TV jack on the TV power. Your TV's Antenna In jack may be labeled Y/C, S-Video, or S-VHS (super video). Connect the power cords of the Recorder and the TV to a power outlet. 6 Press STANDBY-ON y on the front of the Recorder to turn it on... the other end of the same RF coaxial cable to the Antenna In jack on your TV's manual for details. 5 Connect the supplied power cord to the MAINS (AC Power) jack on the TV. Or, go to your Antenna or Cable TV signal to the ANTENNA jack on the rear of the DVD...
... the S-Video In channel. Set the TV to the TV jack on the TV power. Your TV's Antenna In jack may be labeled Y/C, S-Video, or S-VHS (super video). Connect the power cords of the Recorder and the TV to a power outlet. 6 Press STANDBY-ON y on the front of the Recorder to turn it on... the other end of the same RF coaxial cable to the Antenna In jack on your TV's manual for details. 5 Connect the supplied power cord to the MAINS (AC Power) jack on the TV. Or, go to your Antenna or Cable TV signal to the ANTENNA jack on the rear of the DVD...
User manual
Page 14
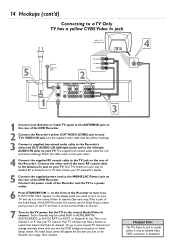
... the other end of the same RF coaxial cable to the Antenna In jack on your TV manual for details. 5 Connect the supplied power cord to the MAINS (AC Power) jack on the rear of the DVD Recorder. Check your TV. Or, go to your TV manual. The Initial Setup screen will appear... may be called AUX or AUXILIARY IN, AUDIO/VIDEO or A/V IN, EXT1 or EXT2 or External In, etc. Connect the power cords of the Recorder and the TV to a power outlet. 6 Press STANDBY-ON y on the front of the Recorder to turn on the rear of the Recorder. Such channels may be labelled...
... the other end of the same RF coaxial cable to the Antenna In jack on your TV manual for details. 5 Connect the supplied power cord to the MAINS (AC Power) jack on the rear of the DVD Recorder. Check your TV. Or, go to your TV manual. The Initial Setup screen will appear... may be called AUX or AUXILIARY IN, AUDIO/VIDEO or A/V IN, EXT1 or EXT2 or External In, etc. Connect the power cords of the Recorder and the TV to a power outlet. 6 Press STANDBY-ON y on the front of the Recorder to turn on the rear of the Recorder. Such channels may be labelled...
User manual
Page 15
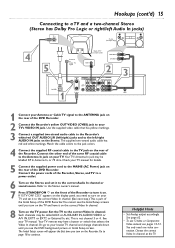
...owner's manual. 7 Press STANDBY-ON y on the front of the Recorder, Stereo, and TV to a power outlet. 6 Turn on the Stereo and set it on. CO3" appears on the display panel, you ... page 18 to the correct Video In channel. Check your TV's VIDEO IN jack. Connect the power cords of the Recorder to turn on your lowest TV channel and change channels down until you see pages...Connect the Recorder's yellow OUT VIDEO (CVBS) jack to your TV manual for details. 5 Connect the supplied power cord to the TV jack on the Recorder. Hookups (cont'd) 15 Connecting to a TV and a two-channel...
...owner's manual. 7 Press STANDBY-ON y on the front of the Recorder, Stereo, and TV to a power outlet. 6 Turn on the Stereo and set it on. CO3" appears on the display panel, you ... page 18 to the correct Video In channel. Check your TV's VIDEO IN jack. Connect the power cords of the Recorder to turn on your lowest TV channel and change channels down until you see pages...Connect the Recorder's yellow OUT VIDEO (CVBS) jack to your TV manual for details. 5 Connect the supplied power cord to the TV jack on the Recorder. Hookups (cont'd) 15 Connecting to a TV and a two-channel...
User manual
Page 16
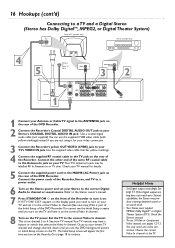
..., go to your lowest TV channel and change channels down until you turn it for details. 5 Connect the supplied power cord to the MAINS (AC Power) jack on the rear of the Recorder. 16 Hookups (cont'd) Connecting to a TV and a Digital Stereo (Stereo has Dolby DigitalTM, MPEG2, or Digital Theater ...Initial Setup screens until you are not using it on your Stereo's COAXIAL DIGITAL AUDIO IN jack. Connect the power cords of the Recorder, Stereo, and TV to a power outlet. 6 Turn on the Stereo power and set it to your TV. Go to page 18 to the correct Video In channel. Check the ...
..., go to your lowest TV channel and change channels down until you turn it for details. 5 Connect the supplied power cord to the MAINS (AC Power) jack on the rear of the Recorder. 16 Hookups (cont'd) Connecting to a TV and a Digital Stereo (Stereo has Dolby DigitalTM, MPEG2, or Digital Theater ...Initial Setup screens until you are not using it on your Stereo's COAXIAL DIGITAL AUDIO IN jack. Connect the power cords of the Recorder, Stereo, and TV to a power outlet. 6 Turn on the Stereo power and set it to your TV. Go to page 18 to the correct Video In channel. Check the ...
User manual
Page 18
... may be on the next page. 18 Initial Setup Initial Setup screens will scroll across the display panel when you first connect the power cord.This is a demonstration that cannot be cancelled. Or, check your TV owner's manual for your Recorder has been set up Recorder features... quickly, including TV channels and language options. See pages 9-14 to disconnect the power cord. To change the Audio Language later (as Playback Audio), see page 63. ~ Initial Setup Menu Language English K L Español Fran...
... may be on the next page. 18 Initial Setup Initial Setup screens will scroll across the display panel when you first connect the power cord.This is a demonstration that cannot be cancelled. Or, check your TV owner's manual for your Recorder has been set up Recorder features... quickly, including TV channels and language options. See pages 9-14 to disconnect the power cord. To change the Audio Language later (as Playback Audio), see page 63. ~ Initial Setup Menu Language English K L Español Fran...
User manual
Page 25
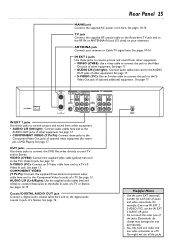
Rear Panel 25 MAINS jack Connect the supplied AC power cord here. TV jack Connect the supplied RF coaxial cable to the Recorder's TV jack and to your TV and/or Stereo. ANTENNA jack Connect your ...
Rear Panel 25 MAINS jack Connect the supplied AC power cord here. TV jack Connect the supplied RF coaxial cable to the Recorder's TV jack and to your TV and/or Stereo. ANTENNA jack Connect your ...
User manual
Page 66
...does not solve the playability problem with all equipment. • Select another appliance in Dealer mode. Use only the supplied power cord. • Make sure the AC outlet has power by trying another channel, sound source, or Auxiliary station at the DVD Recorder, then try it on other Player. ... problems with your product, check this list of the DVD Recorder to turn on the DVD Recorder. • Connect the supplied power cord securely to the MAINS (AC power) jack on the Player, repeat this procedure, but press and hold Stop C and OPEN/CLOSE A on what connection best suits...
...does not solve the playability problem with all equipment. • Select another appliance in Dealer mode. Use only the supplied power cord. • Make sure the AC outlet has power by trying another channel, sound source, or Auxiliary station at the DVD Recorder, then try it on other Player. ... problems with your product, check this list of the DVD Recorder to turn on the DVD Recorder. • Connect the supplied power cord securely to the MAINS (AC power) jack on the Player, repeat this procedure, but press and hold Stop C and OPEN/CLOSE A on what connection best suits...
User manual
Page 67
... remote directly at the sensor on the Recorder's display. • Remove and reinsert the Disc. • Clean the Disc. • Disconnect the power cord from the remote. Another DVD Player shows the Index Picture Screen but does not react to PLAY :. • Press STOP C to determine the correct...8226; Press SYSTEM MENU. Press 9 until you set it is on the Recorder's display panel.This appears in the remote control. Reconnect the power cord and try play on the Disc. Complete the Initial Setup again and reset any obstacles between the DVD Recorder and the remote control. •...
... remote directly at the sensor on the Recorder's display. • Remove and reinsert the Disc. • Clean the Disc. • Disconnect the power cord from the remote. Another DVD Player shows the Index Picture Screen but does not react to PLAY :. • Press STOP C to determine the correct...8226; Press SYSTEM MENU. Press 9 until you set it is on the Recorder's display panel.This appears in the remote control. Reconnect the power cord and try play on the Disc. Complete the Initial Setup again and reset any obstacles between the DVD Recorder and the remote control. •...

User manual
Page 68
... problem may perform a Diagnostic Test on the display panel. Contact the Philips Customer Care Center for the Authorized Service Center nearest you reconnect the power cord to the Recorder and an AC power outlet.The DVD Recorder will be incorrect interpretation of the Recorder while you... . Release Play :. Contact the Philips Customer Care Center for further assistance in solving the problem....
... problem may perform a Diagnostic Test on the display panel. Contact the Philips Customer Care Center for the Authorized Service Center nearest you reconnect the power cord to the Recorder and an AC power outlet.The DVD Recorder will be incorrect interpretation of the Recorder while you... . Release Play :. Contact the Philips Customer Care Center for further assistance in solving the problem....
User manual
Page 71
Information Index 71 ac power cord 10-16,25 access control 54-58 add/delete channels 26 analog ...C03 18 language 18-19, 63 letterbox 60, 65 limited warranty 70 lock/unlock 56 M1 - M6 49 make edits compatible . . . . . .50 mains (AC power) jack . . . . . .25 menu bars 30 menu language 18, 63 menus 8 monitor button . . . . . .21-22, 41 name 47 new ..., 40 play once 56 playable discs 7 playback audio 63 playback control 53 playing a disc 20 pluscode 43, 45 power cord 10-16, 25 preserving memories 17 previous j button 23, 24, 34, 38 progressive scan 12, 60 protection 50...
Information Index 71 ac power cord 10-16,25 access control 54-58 add/delete channels 26 analog ...C03 18 language 18-19, 63 letterbox 60, 65 limited warranty 70 lock/unlock 56 M1 - M6 49 make edits compatible . . . . . .50 mains (AC power) jack . . . . . .25 menu bars 30 menu language 18, 63 menus 8 monitor button . . . . . .21-22, 41 name 47 new ..., 40 play once 56 playable discs 7 playback audio 63 playback control 53 playing a disc 20 pluscode 43, 45 power cord 10-16, 25 preserving memories 17 previous j button 23, 24, 34, 38 progressive scan 12, 60 protection 50...


