Leaflet
Page 2
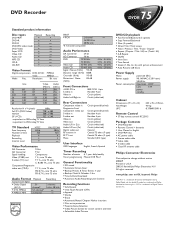
... • Disc write protection • Favorite Scene Selection • Index Picture Screen for instant content overview • Selectable Index Pictures DVD/CD playback • Fast Forward/Backward (3 speeds) • Step Forward/Backward • Slow (3 speeds) • Direct Title / Track access • Next / Previous Title / Track / Chapter • Repeat (Chapter / Title / All) or (Track / All) • A-B Repeat • Shuffle • Intro Scan • Time Search • Zoom (1.33x, 2x, 4x) with picture enhancement • Auto Resume (20 discs) Power Supply Mains...
... • Disc write protection • Favorite Scene Selection • Index Picture Screen for instant content overview • Selectable Index Pictures DVD/CD playback • Fast Forward/Backward (3 speeds) • Step Forward/Backward • Slow (3 speeds) • Direct Title / Track access • Next / Previous Title / Track / Chapter • Repeat (Chapter / Title / All) or (Track / All) • A-B Repeat • Shuffle • Intro Scan • Time Search • Zoom (1.33x, 2x, 4x) with picture enhancement • Auto Resume (20 discs) Power Supply Mains...

Quick start guide
Page 1
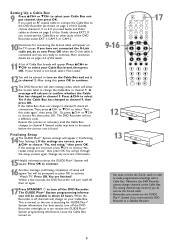
... not using a Cable Box, you turn on the rear of this Quick-Use Guide to set it to the correct Audio/Video In channel. Go to pages 4-5 of this Quick-Use Guide. 5 Connect the supplied power cord to the MAINS (AC Power) jack on the DVD Recorder. Quick-Use Guide Follow these simple instructions to get your TV has a single Antenna In (or RF IN or 75 ohm input) jack, see the DVD Recorder's owner's manual for connection instructions. 1 For other connections and...
... not using a Cable Box, you turn on the rear of this Quick-Use Guide to set it to the correct Audio/Video In channel. Go to pages 4-5 of this Quick-Use Guide. 5 Connect the supplied power cord to the MAINS (AC Power) jack on the DVD Recorder. Quick-Use Guide Follow these simple instructions to get your TV has a single Antenna In (or RF IN or 75 ohm input) jack, see the DVD Recorder's owner's manual for connection instructions. 1 For other connections and...

Quick start guide
Page 2
... selects Video In channels. Connect the supplied G-Link cable to the G-LINK jack on the rear of the DVD Recorder. (Remove the Demo Pin first if it faces the remote sensor of your lowest TV channel and change TV channels down until you see the Initial Setup menu on the TV screen the first time you cannot use the GUIDE Plus+® System. EXT 2 VIDEO (CVBS) ANTENNA IN - Connecting the DVD Recorder with a Cable Box Power cord...
... selects Video In channels. Connect the supplied G-Link cable to the G-LINK jack on the rear of the DVD Recorder. (Remove the Demo Pin first if it faces the remote sensor of your lowest TV channel and change TV channels down until you see the Initial Setup menu on the TV screen the first time you cannot use the GUIDE Plus+® System. EXT 2 VIDEO (CVBS) ANTENNA IN - Connecting the DVD Recorder with a Cable Box Power cord...
Quick start guide
Page 3
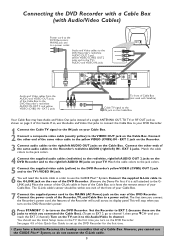
... 2 channel.) Turn on the DVD Recorder. Connecting the DVD Recorder with a Cable Box (with Satellite) Cable TV signal to the IN jack on the Cable Box. EXT 1 AUDIO COMPONENT VIDEO Y OUT 2 OUT 1 480p/480i VIDEO AUDIO COMPONENT (CVBS) VIDEO Y S-VIDEO S-VIDEO (Y/C) (Y/C) L PB L PB AUDIO AUDIO TV R PR R PR IN - The first time you connect the Recorder's power cord, the features of the G-Link cable in order to use the Audio and Video Out jacks to connect the Cable Box to your DVD Recorder. 1 Connect the Cable TV signal to...
... 2 channel.) Turn on the DVD Recorder. Connecting the DVD Recorder with a Cable Box (with Satellite) Cable TV signal to the IN jack on the Cable Box. EXT 1 AUDIO COMPONENT VIDEO Y OUT 2 OUT 1 480p/480i VIDEO AUDIO COMPONENT (CVBS) VIDEO Y S-VIDEO S-VIDEO (Y/C) (Y/C) L PB L PB AUDIO AUDIO TV R PR R PR IN - The first time you connect the Recorder's power cord, the features of the G-Link cable in order to use the Audio and Video Out jacks to connect the Cable Box to your DVD Recorder. 1 Connect the Cable TV signal to...
Quick start guide
Page 4
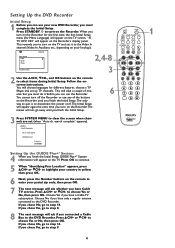
...;TV DISC MANAGER FSS SELECT E ~ Initial Setup SUBTITLE AUDIO ` ANGLE ZOOM Menu Language English K L Español Français 2,4-8 MENU GUIDE/TV DISC CH+ OK Press OK to the DVD Recorder. Setting Up the DVD Recorder Initial Setup 1 Before you can use your country in yellow, then press OK. 6 Next, press the Number buttons on the TV screen. This reminds you to turn on the remote to step 8. 8 The next message will...
...;TV DISC MANAGER FSS SELECT E ~ Initial Setup SUBTITLE AUDIO ` ANGLE ZOOM Menu Language English K L Español Français 2,4-8 MENU GUIDE/TV DISC CH+ OK Press OK to the DVD Recorder. Setting Up the DVD Recorder Initial Setup 1 Before you can use your country in yellow, then press OK. 6 Next, press the Number buttons on the TV screen. This reminds you to turn on the remote to step 8. 8 The next message will...
Quick start guide
Page 5
... . 9-16 REC/OTR STANDBY TIMER REC MODE PLAY MODE TV/DVD MONITOR DIM RETURN T/C •TV DISC MANAGER FSS SELECT SUBTITLE AUDIO ` ANGLE E ZOOM GUIDE/TV DISC CH+ MENU OK SYSTEM CH- If you to confirm whether the Cable Box has changed to select your brand is not listed, select "Not Listed." 12You will be available in order to select "Test this Guide, choose EXT2. If you connected the DVD Recorder to channel 9. If your Cable Box brand, then...
... . 9-16 REC/OTR STANDBY TIMER REC MODE PLAY MODE TV/DVD MONITOR DIM RETURN T/C •TV DISC MANAGER FSS SELECT SUBTITLE AUDIO ` ANGLE E ZOOM GUIDE/TV DISC CH+ MENU OK SYSTEM CH- If you to confirm whether the Cable Box has changed to select your brand is not listed, select "Not Listed." 12You will be available in order to select "Test this Guide, choose EXT2. If you connected the DVD Recorder to channel 9. If your Cable Box brand, then...
Quick start guide
Page 6
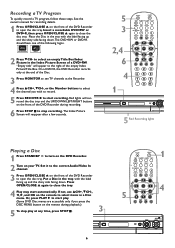
... . MENU LEFT 5 3 2,4 6 REC/OTR STANDBY TIMER REC MODE PLAY MODE TV/DVD MONITOR DIM RETURN T/C •TV DISC MANAGER FSS SUBTITLE AUDIO ` SELECT ANGLE E ZOOM GUIDE/TV DISC CH+ OK SYSTEM CH- The Index Picture Screen will appear to open the disc tray. Recording a TV Program To quickly record a TV program, follow these steps. Set it to the correct Audio/Video In channel. 3 Press OPEN/CLOSE A on the front of the DVD Recorder to the right of the empty Index Picture/Title Box. If not, use...
... . MENU LEFT 5 3 2,4 6 REC/OTR STANDBY TIMER REC MODE PLAY MODE TV/DVD MONITOR DIM RETURN T/C •TV DISC MANAGER FSS SUBTITLE AUDIO ` SELECT ANGLE E ZOOM GUIDE/TV DISC CH+ OK SYSTEM CH- The Index Picture Screen will appear to open the disc tray. Recording a TV Program To quickly record a TV program, follow these steps. Set it to the correct Audio/Video In channel. 3 Press OPEN/CLOSE A on the front of the DVD Recorder to the right of the empty Index Picture/Title Box. If not, use...
Quick start guide
Page 7
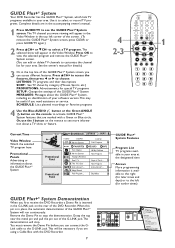
... view the selected program and remove the GUIDE Plus+® System screen. (You can connect the GLink cable to customize the channel list for earlier times) GUIDE Plus+® System Demonstration When you can add or delete TV channels to the G-LINK jack. SCHEDULE: Lists planned recordings or Favorite programs 4 Use the Blue AUDIO Y button or the Green ANGLE button on the rear of Our L... GUIDE Plus+® System Your DVD Recorder has the GUIDE...
... view the selected program and remove the GUIDE Plus+® System screen. (You can connect the GLink cable to customize the channel list for earlier times) GUIDE Plus+® System Demonstration When you can add or delete TV channels to the G-LINK jack. SCHEDULE: Lists planned recordings or Favorite programs 4 Use the Blue AUDIO Y button or the Green ANGLE button on the rear of Our L... GUIDE Plus+® System Your DVD Recorder has the GUIDE...
Quick start guide
Page 8
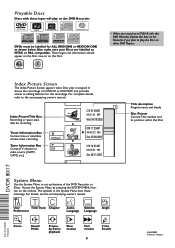
... make sure your Discs are labelled as shown below. Playable Discs Discs with this DVD Recorder, finalize the Disc at the Recorder if you record on other DVD Players. SUPER AUDIO CD Recordable ReWritable DVDs must be labelled for recording 2 C10 07:56AM 00:01:24 . Access the System Menu by pressing the SYSTEM MENU but- W X YZ User Title/Track Chapter Preferences Audio Subtitle Language Language Angle ad HE Zoom Sound Mode Frameby-frame playback Slow motion Fast motion Time...
... make sure your Discs are labelled as shown below. Playable Discs Discs with this DVD Recorder, finalize the Disc at the Recorder if you record on other DVD Players. SUPER AUDIO CD Recordable ReWritable DVDs must be labelled for recording 2 C10 07:56AM 00:01:24 . Access the System Menu by pressing the SYSTEM MENU but- W X YZ User Title/Track Chapter Preferences Audio Subtitle Language Language Angle ad HE Zoom Sound Mode Frameby-frame playback Slow motion Fast motion Time...
User manual
Page 3
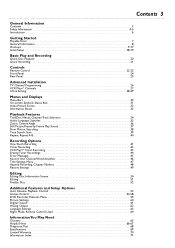
..., Chapter/Track Selection 34 Audio Language, Subtitles 35 Zoom, Camera Angle 36 Still Picture/Frame-by-Frame Play, Sound 37 Slow Motion, Searching 38 Time Search, Scan 39 Repeat, Repeat A-B 40 Recording Options One-Touch Recording 41 Timer Recording 42 VCR Plus+® Timer Recording 43 Erasing Timer Recordings 44 Error Messages 45 Record One Channel/Watch Another 46 Title Settings Menu 47 Append Recording, Chapter Markers 48 Record Settings 49 Editing Editing: Disc Information Screen 50 Editing 51 Finalize Disc 52 Additional Features and Setup Options Auto Resume, Playback...
..., Chapter/Track Selection 34 Audio Language, Subtitles 35 Zoom, Camera Angle 36 Still Picture/Frame-by-Frame Play, Sound 37 Slow Motion, Searching 38 Time Search, Scan 39 Repeat, Repeat A-B 40 Recording Options One-Touch Recording 41 Timer Recording 42 VCR Plus+® Timer Recording 43 Erasing Timer Recordings 44 Error Messages 45 Record One Channel/Watch Another 46 Title Settings Menu 47 Append Recording, Chapter Markers 48 Record Settings 49 Editing Editing: Disc Information Screen 50 Editing 51 Finalize Disc 52 Additional Features and Setup Options Auto Resume, Playback...
User manual
Page 5
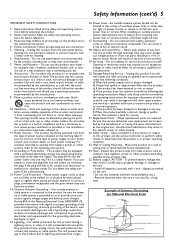
... recommended by a qualified technician to restore the product to the unit: • Install all the safety and operating instructions before cleaning. Power-Cord Protection - An outside antenna or cable system is connected to the product, be sure the service technician uses replacement parts specified by the manufacturer or sold with care. Adjust only those controls covered by the product manufacturer as to determine that may touch...
... recommended by a qualified technician to restore the product to the unit: • Install all the safety and operating instructions before cleaning. Power-Cord Protection - An outside antenna or cable system is connected to the product, be sure the service technician uses replacement parts specified by the manufacturer or sold with care. Adjust only those controls covered by the product manufacturer as to determine that may touch...
User manual
Page 17
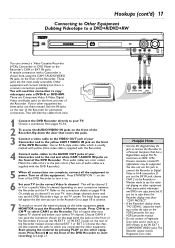
... 1 COMPONENT VIDEO jacks.The Recorder cannot receive Progressive Scan video. You also can connect a Video Cassette Recorder (VCR), Camcorder, or DVD Player to the Recorder's CAM or EXT IN jacks. See your TV to the correct Video In channel. These jacks are color coded. Other equipment will appear the first time you use the DV IN jack, choose CAM 2 at the Recorder. There are supplied with the Recorder.) 4 Connect audio cables to the AUDIO OUT...
... 1 COMPONENT VIDEO jacks.The Recorder cannot receive Progressive Scan video. You also can connect a Video Cassette Recorder (VCR), Camcorder, or DVD Player to the Recorder's CAM or EXT IN jacks. See your TV to the correct Video In channel. These jacks are color coded. Other equipment will appear the first time you use the DV IN jack, choose CAM 2 at the Recorder. There are supplied with the Recorder.) 4 Connect audio cables to the AUDIO OUT...
User manual
Page 21
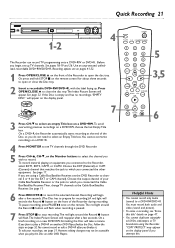
... channel). Use an unprotected, unfinalized, recordable DVD+RW/DVD+R. See page 11. 6 Press REC/OTR I 6 Helpful Hints • You cannot record only Audio (sound) to play the Disc on the front of your recordings, see "Erase this . If you finalize it. Recording will begin , set the DVD Recorder to record the selected channel. Press OPEN/CLOSE A to the Recorder, select EXT1, EXT2, CAM1, or CAM2. To edit your Cable Box/Satellite Receiver or the jacks to select an empty Title box...
... channel). Use an unprotected, unfinalized, recordable DVD+RW/DVD+R. See page 11. 6 Press REC/OTR I 6 Helpful Hints • You cannot record only Audio (sound) to play the Disc on the front of your recordings, see "Erase this . If you finalize it. Recording will begin , set the DVD Recorder to record the selected channel. Press OPEN/CLOSE A to the Recorder, select EXT1, EXT2, CAM1, or CAM2. To edit your Cable Box/Satellite Receiver or the jacks to select an empty Title box...
User manual
Page 22
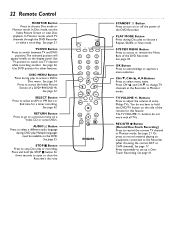
... CAM channel). TV/DVD Button Press to stop Disc play to choose a Repeat, Shuffle, or Scan mode. See page 35. PLAY MODE Button Press during DVD play to set up a OneTouch Recording. Press repeatedly to access a DVD's Disc menu. In Disc mode, use the Index Picture Screen or view Disc playback. See page 42. See page 17. See page 32. DISC MENU Button Press during play . See page 34. OK Button Press to change TV channels at the Recorder in Monitor mode. CH-/9, CH+/8, ;, :Buttons Press to select menu items...
... CAM channel). TV/DVD Button Press to stop Disc play to choose a Repeat, Shuffle, or Scan mode. See page 35. PLAY MODE Button Press during DVD play to set up a OneTouch Recording. Press repeatedly to access a DVD's Disc menu. In Disc mode, use the Index Picture Screen or view Disc playback. See page 42. See page 17. See page 32. DISC MENU Button Press during play . See page 34. OK Button Press to change TV channels at the Recorder in Monitor mode. CH-/9, CH+/8, ;, :Buttons Press to select menu items...
User manual
Page 30
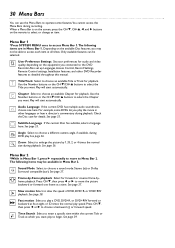
... connected to the DVD Recorder.Also set up Languages,Access Control, Record Settings, Remote Control settings, Installation features, and other languages or hear a director's commentary during recording. User Preference Settings Set your preferences for audio and video quality, depending on the remote to select the Chapter you play the movie in Menu Bar 2. Use the Number buttons or the CH-9/CH+8 buttons to select or change an item. Play will start automatically. For example, some features.You cannot access the Menu Bars during playback...
... connected to the DVD Recorder.Also set up Languages,Access Control, Record Settings, Remote Control settings, Installation features, and other languages or hear a director's commentary during recording. User Preference Settings Set your preferences for audio and video quality, depending on the remote to select the Chapter you play the movie in Menu Bar 2. Use the Number buttons or the CH-9/CH+8 buttons to select or change an item. Play will start automatically. For example, some features.You cannot access the Menu Bars during playback...
User manual
Page 41
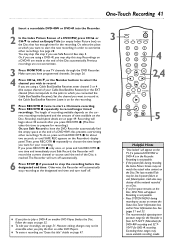
... STANDBY TV / DVD T / C PLAY MODE REC. Exceeding these ranges may skip this title" details on other recordings. Recordings on a DVD+R are using a Cable Box/Satellite Receiver, enter channel 3 or 4 (the output channel of the Disc automatically. See page 26. 4 Press CH+8, CH-9, or the Number buttons to select the channel you may be accessible when you connected the Cable Box/Satellite Receiver). See pages 31 and 33. • The recommended operating temperature range...
... STANDBY TV / DVD T / C PLAY MODE REC. Exceeding these ranges may skip this title" details on other recordings. Recordings on a DVD+R are using a Cable Box/Satellite Receiver, enter channel 3 or 4 (the output channel of the Disc automatically. See page 26. 4 Press CH+8, CH-9, or the Number buttons to select the channel you may be accessible when you connected the Cable Box/Satellite Receiver). See pages 31 and 33. • The recommended operating temperature range...
User manual
Page 66
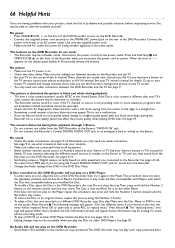
...; Editing changes may not be accessible when you may be missing, for example the recording mode. • To play such copy-protected discs. Make sure the Disc Menu or INFO is distorted during playback. • TVs have a button on a different DVD Recorder, stop Disc play if you hear sound from the Disc that selects an Auxiliary or A/V IN channel. the picture is in the DVD Recorder. Press Record I .The "replacing menu" message will be recorded. • Check the Disc for fingerprints. An Audio...
...; Editing changes may not be accessible when you may be missing, for example the recording mode. • To play such copy-protected discs. Make sure the Disc Menu or INFO is distorted during playback. • TVs have a button on a different DVD Recorder, stop Disc play if you hear sound from the Disc that selects an Auxiliary or A/V IN channel. the picture is in the DVD Recorder. Press Record I .The "replacing menu" message will be recorded. • Check the Disc for fingerprints. An Audio...
User manual
Page 67
... power cord from the remote. All of titles. Check the Disc case to see your TV and set a timer recording, reset the timer recording. See page 64. • The D symbol will appear briefly on the TV screen. "COPY PROTECT" may not show the entire system menu on the display panel each time the Recorder receives a signal from the Recorder and the power outlet for details. • There are not occurring as the Remote control used. to select...
... power cord from the remote. All of titles. Check the Disc case to see your TV and set a timer recording, reset the timer recording. See page 64. • The D symbol will appear briefly on the TV screen. "COPY PROTECT" may not show the entire system menu on the display panel each time the Recorder receives a signal from the Recorder and the power outlet for details. • There are not occurring as the Remote control used. to select...

User manual
Page 70
... WARRANTY SERVICE IN CANADA... Because some states do not allow limitations on the product. Please contact Philips at the center. Philips is free. Please record below the model and serial numbers found on how long an implied warranty may last, this warranty is used for which vary from the day of purchase, you pay for the replacement or repair of the controls...
... WARRANTY SERVICE IN CANADA... Because some states do not allow limitations on the product. Please contact Philips at the center. Philips is free. Please record below the model and serial numbers found on how long an implied warranty may last, this warranty is used for which vary from the day of purchase, you pay for the replacement or repair of the controls...
User manual
Page 71
... mode button 22, 40 play once 56 playable discs 7 playback audio 63 playback control 53 playing a disc 20 pluscode 43, 45 power cord 10-16, 25 preserving memories 17 previous j button 23, 24, 34, 38 progressive scan 12, 60 protection 50 quick disc playback 20 quick recording 21 rear panel 25 rec/otr I button . . . . .21-22, 41 rec mode button 23, 49 record I button 24 record mode 49 record one channel/ watch another 46 record settings 49 recording audio 63 region codes 7 remote control 22-23 remote control tv operation .23 remote control used 64 remote sensor 24 repeat...
... mode button 22, 40 play once 56 playable discs 7 playback audio 63 playback control 53 playing a disc 20 pluscode 43, 45 power cord 10-16, 25 preserving memories 17 previous j button 23, 24, 34, 38 progressive scan 12, 60 protection 50 quick disc playback 20 quick recording 21 rear panel 25 rec/otr I button . . . . .21-22, 41 rec mode button 23, 49 record I button 24 record mode 49 record one channel/ watch another 46 record settings 49 recording audio 63 region codes 7 remote control 22-23 remote control tv operation .23 remote control used 64 remote sensor 24 repeat...


