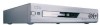
Quick start guide
Page 5
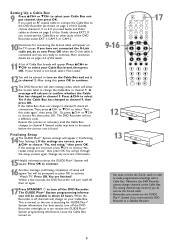
... GUIDE Plus+® System programming information will appear. Leave the Cable Box turned on your brand is found. STOP Ç PLAY TV VOLUME SLOW PAUSE H k G 17 CLEAR MUTE 12 13 BCOABXLE BCOABXLE • You must connect the G-Link cable in about 24 hours.
... GUIDE Plus+® System programming information will appear. Leave the Cable Box turned on your brand is found. STOP Ç PLAY TV VOLUME SLOW PAUSE H k G 17 CLEAR MUTE 12 13 BCOABXLE BCOABXLE • You must connect the G-Link cable in about 24 hours.
Quick start guide
Page 8
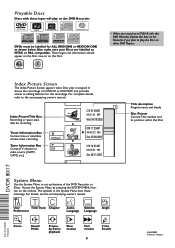
.... • When you plan to play the Disc on the remote.The symbols in Hungary 3103 605 20832 3194/000 (WwnN N wnwWNnwNwn NnwWnwWnN) DVDR 80/17 M6 Sun 05/11/2003 4 Title description Program name and details Disc Pointer Current Title number and its position within the Disc System Menu Use...
.... • When you plan to play the Disc on the remote.The symbols in Hungary 3103 605 20832 3194/000 (WwnN N wnwWNnwNwn NnwWnwWnN) DVDR 80/17 M6 Sun 05/11/2003 4 Title description Program name and details Disc Pointer Current Title number and its position within the Disc System Menu Use...
User manual
Page 3
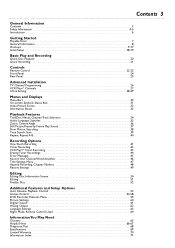
Contents 3 General Information Contents 3 Safety Information 4-5 Introduction 6 Getting Started Playable Discs 7 General Information 8 Hookups 9-17 Initial Setup 18-19 Basic Play and Recording Quick Disc Playback 20 Quick Recording 21 Controls Remote Control 22-23 Front Panel 24 Rear Panel ...
Contents 3 General Information Contents 3 Safety Information 4-5 Introduction 6 Getting Started Playable Discs 7 General Information 8 Hookups 9-17 Initial Setup 18-19 Basic Play and Recording Quick Disc Playback 20 Quick Recording 21 Controls Remote Control 22-23 Front Panel 24 Rear Panel ...
User manual
Page 5
... voltage surges and built-up static charges. Use only with the product. Move a product and cart combination with them , paying particular attention to be fatal. 17. Do not block or cover these openings. Never push objects of other similar surface. Adjust only those controls covered by the manufacturer or sold with...
... voltage surges and built-up static charges. Use only with the product. Move a product and cart combination with them , paying particular attention to be fatal. 17. Do not block or cover these openings. Never push objects of other similar surface. Adjust only those controls covered by the manufacturer or sold with...
User manual
Page 9
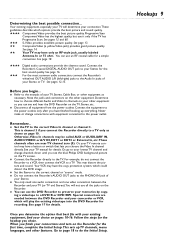
... not connect the Recorder's AUDIO OUT jacks to choose different Audio and Video In channels on pages 10-16. When you can see the blue Philips DVD background picture on the Recorder for details. Hookups 9 q Set the TV to the TV. Your VCR may be called AUX or AUXILIARY IN, AUDIO... the power outlets. See pages 12-15. This is channel 3 if you connect the Recorder directly to the correct channel or "source" mode. See page 17 for the first time, complete the Initial Setup.This sets up everything. For example, do the Initial Setup. Determining the best possible connection...
... not connect the Recorder's AUDIO OUT jacks to choose different Audio and Video In channels on pages 10-16. When you can see the blue Philips DVD background picture on the Recorder for details. Hookups 9 q Set the TV to the TV. Your VCR may be called AUX or AUXILIARY IN, AUDIO... the power outlets. See pages 12-15. This is channel 3 if you connect the Recorder directly to the correct channel or "source" mode. See page 17 for the first time, complete the Initial Setup.This sets up everything. For example, do the Initial Setup. Determining the best possible connection...
User manual
Page 17
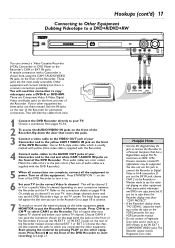
... video source (such as a DVD Player) to a Personal Computer that has a Digital Video output.The PC must have an IEEE 1394 Firewire connector. Hookups (cont'd) 17 Connecting to Other Equipment Dubbing Videotape to a DVD+R/DVD+RW STANDBY-ON OPEN/CLOSE You can use this page (with the jacks on the front...
... video source (such as a DVD Player) to a Personal Computer that has a Digital Video output.The PC must have an IEEE 1394 Firewire connector. Hookups (cont'd) 17 Connecting to Other Equipment Dubbing Videotape to a DVD+R/DVD+RW STANDBY-ON OPEN/CLOSE You can use this page (with the jacks on the front...
User manual
Page 21
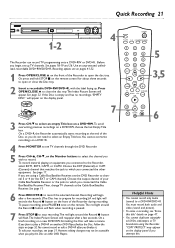
... plan to stop recording.The red light around the Record I button on the front of your recordings, see "Erase this . See page 32. See page 17. If you connected the other DVD Players. Quick Recording 21 STANDBY-ON OPEN/CLOSE 1-2 OPEN 4 The Recorder can record TV programming onto a DVD+RW or...
... plan to stop recording.The red light around the Record I button on the front of your recordings, see "Erase this . See page 32. See page 17. If you connected the other DVD Players. Quick Recording 21 STANDBY-ON OPEN/CLOSE 1-2 OPEN 4 The Recorder can record TV programming onto a DVD+RW or...
User manual
Page 22
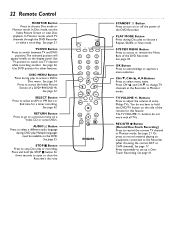
...-/9, CH+/8, ;, :Buttons Press to select menu items. Press CH+8 and CH-9 to access the Index Picture Screen of the DVD Recorder. TV VOLUME +/- See page 17. Press to change TV channels at the Recorder in Monitor mode. Multiple languages must be available on or off the power of some DVDs. See... VOLUME +/- See page 21. See page 41. See page 46. See page 34. Press and hold the DVD/TV button on a Video CD or some Philips TVs. SYSTEM MENU Button Press to turn on the DVD. REC/OTR I STOP AUDIO REC/OTR PAUSE STANDBY y Button Press to access or remove the...
...-/9, CH+/8, ;, :Buttons Press to select menu items. Press CH+8 and CH-9 to access the Index Picture Screen of the DVD Recorder. TV VOLUME +/- See page 17. Press to change TV channels at the Recorder in Monitor mode. Multiple languages must be available on or off the power of some DVDs. See... VOLUME +/- See page 21. See page 41. See page 46. See page 34. Press and hold the DVD/TV button on a Video CD or some Philips TVs. SYSTEM MENU Button Press to turn on the DVD. REC/OTR I STOP AUDIO REC/OTR PAUSE STANDBY y Button Press to access or remove the...
User manual
Page 24
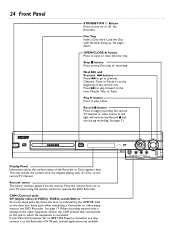
... recording material that is connected. Load the Disc with the label facing up. Play : button Press to the next Chapter,Title, or Track. See page 17. Disc Tray Insert a Disc here. Next G and Previous H buttons Press H to go to previous Chapters,Titles, or Tracks or to the beginning of the Recorder...
... recording material that is connected. Load the Disc with the label facing up. Play : button Press to the next Chapter,Title, or Track. See page 17. Disc Tray Insert a Disc here. Next G and Previous H buttons Press H to go to previous Chapters,Titles, or Tracks or to the beginning of the Recorder...
User manual
Page 25
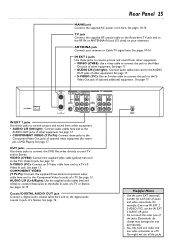
...sound from other equipment. • AUDIO L/R (left /right): Connect audio cables here and to the Audio In jacks of a TV or Stereo. See page 17. • S-VIDEO (Y-C): Use an S-video cable to connect this jack to the RF IN or ANTENNA IN jack (75 ohm) on your television. ANTENNA ... L/R (Left/Right): Use the supplied audio cables (red and white) to connect these jacks to receive picture and sound from other equipment. See page 17. • COMPONENT VIDEO (Y PB PR): Connect these jacks to connect the DVD Recorder directly to the Component Video Out jacks of optional video equipment (for...
...sound from other equipment. • AUDIO L/R (left /right): Connect audio cables here and to the Audio In jacks of a TV or Stereo. See page 17. • S-VIDEO (Y-C): Use an S-video cable to connect this jack to the RF IN or ANTENNA IN jack (75 ohm) on your television. ANTENNA ... L/R (Left/Right): Use the supplied audio cables (red and white) to connect these jacks to receive picture and sound from other equipment. See page 17. • COMPONENT VIDEO (Y PB PR): Connect these jacks to connect the DVD Recorder directly to the Component Video Out jacks of optional video equipment (for...
User manual
Page 33
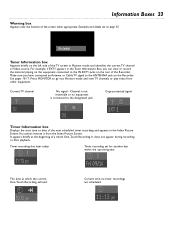
... example, if EXT1 appears in the Tuner Information Box, you have connected an Antenna or Cable TV signal to the designated jack. See pages 10-17. Channel is connected to the ANTENNA jack on the rear of the TV screen in the Index Picture Screen.You cannot remove it from other...
... example, if EXT1 appears in the Tuner Information Box, you have connected an Antenna or Cable TV signal to the designated jack. See pages 10-17. Channel is connected to the ANTENNA jack on the rear of the TV screen in the Index Picture Screen.You cannot remove it from other...
User manual
Page 57
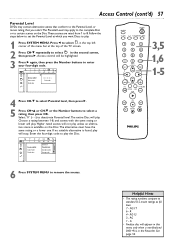
....The Parental Level may contain alternative scenes that conform to the Parental Level, or movie rating, that you want Discs to play the Disc. NC-17 6 - G • Finalize disc will play . Press ; W X YZ a ~ 1 2 1en off no off Access control Auto resume Finalize disc Child lock 2 Parental level Change country Change code...
....The Parental Level may contain alternative scenes that conform to the Parental Level, or movie rating, that you want Discs to play the Disc. NC-17 6 - G • Finalize disc will play . Press ; W X YZ a ~ 1 2 1en off no off Access control Auto resume Finalize disc Child lock 2 Parental level Change country Change code...

User manual
Page 69
Uncompressed digital (SPDIF - Sony Philips Digital Interface) • PCM 2-channel - 16, 20, 24 bit fs 48, 96 kHz AUDIO PERFORMANCE DA Converter AD Converter DVD Video CD Audio CD Signal-... Y: 1 Vpp into 75 Ohm C: 0.300 Vpp into 75 Ohm Y: 1 Vpp into 75 Ohm PB: 0.7 Vpp into 75 Ohm PR: 0.7 Vpp into 75 Ohm CABINET Dimensions (w x h x d): 17 x 3 x 13 inches Net weight: 8.8 lbs. Specifications 69 AUDIO FORMAT Compressed digital • Dolby Digital (AC-3) • DTS • MPEG1 • MPEG2 Play Multi-channel Multi...
Uncompressed digital (SPDIF - Sony Philips Digital Interface) • PCM 2-channel - 16, 20, 24 bit fs 48, 96 kHz AUDIO PERFORMANCE DA Converter AD Converter DVD Video CD Audio CD Signal-... Y: 1 Vpp into 75 Ohm C: 0.300 Vpp into 75 Ohm Y: 1 Vpp into 75 Ohm PB: 0.7 Vpp into 75 Ohm PR: 0.7 Vpp into 75 Ohm CABINET Dimensions (w x h x d): 17 x 3 x 13 inches Net weight: 8.8 lbs. Specifications 69 AUDIO FORMAT Compressed digital • Dolby Digital (AC-3) • DTS • MPEG1 • MPEG2 Play Multi-channel Multi...
User manual
Page 71
... .30, 37 front panel 24 fss button 23, 48, 51 glossary 65 helpful hints 66-67 hidden chapter 51 home videotape duplication . .17 hookups 9-17 in ext 1/2 jacks 25 index picture screen 32 information boxes 33 initial setup 18-19 insert chapter marker 51 installation 26-29 "IS TV...49 auto resume 20, 53 automatic channel programming 26 batteries 8 black level shift 60 cable box 11 cam1/cam2 jacks . . . . .17, 21, 24 camcorder 17 camera angle 36 change code 54 change country 58 channel buttons 22 channel programming 26 chapter 30 chapter markers 48, 51 chapter/track selection...
... .30, 37 front panel 24 fss button 23, 48, 51 glossary 65 helpful hints 66-67 hidden chapter 51 home videotape duplication . .17 hookups 9-17 in ext 1/2 jacks 25 index picture screen 32 information boxes 33 initial setup 18-19 insert chapter marker 51 installation 26-29 "IS TV...49 auto resume 20, 53 automatic channel programming 26 batteries 8 black level shift 60 cable box 11 cam1/cam2 jacks . . . . .17, 21, 24 camcorder 17 camera angle 36 change code 54 change country 58 channel buttons 22 channel programming 26 chapter 30 chapter markers 48, 51 chapter/track selection...

