Leaflet
Page 2
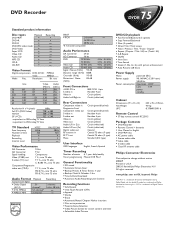
...Contents • DVD Recorder • Remote Control + batteries • User Manual in English • DVD+RW disc • AC power cable • Stereo audio cable • Video cable • S-video cable • Coax RF antenna cable Philips Consumer Electronics Data subject to 250 ... • DTS, MPEG2 • MPEG1, MP3 channel* 5.1-channel* 2-channel Recording 2-channel 16-bit, 48 kHz - - All rights reserved www.philips.com or AOL keyword: Philips VCR Plus+ is a trademark of events 6; 1 year; SPDIF • PCM 2-channel - 16/20/24 bit 48/96 kHz *6.1-channel compatible ...
...Contents • DVD Recorder • Remote Control + batteries • User Manual in English • DVD+RW disc • AC power cable • Stereo audio cable • Video cable • S-video cable • Coax RF antenna cable Philips Consumer Electronics Data subject to 250 ... • DTS, MPEG2 • MPEG1, MP3 channel* 5.1-channel* 2-channel Recording 2-channel 16-bit, 48 kHz - - All rights reserved www.philips.com or AOL keyword: Philips VCR Plus+ is a trademark of events 6; 1 year; SPDIF • PCM 2-channel - 16/20/24 bit 48/96 kHz *6.1-channel compatible ...

Quick start guide
Page 1
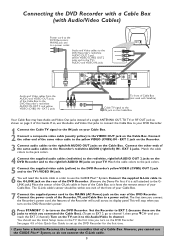
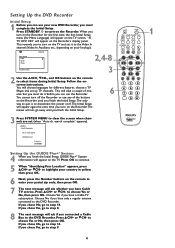
..., see the DVD Recorder's owner's manual for details. Connect the power cords of the Recorder. Turn on the rear of the DVD Recorder. Your TV's remote may be near channel zero (0). EXT 1 COAX OUT G-LINK DIGITAL AUDIO OUT OPTICAL OUT 1 Connect your Antenna or Cable TV signal to the ANTENNA jack... Recorder and the TV to the VIDEO IN jack on your new DVD Recorder working quickly. This will stop when you should see the blue Philips DVD background picture or the Initial Setup Screen on the TV (when the DVD Recorder is on). • If your TV manual for connection instructions...
..., see the DVD Recorder's owner's manual for details. Connect the power cords of the Recorder. Turn on the rear of the DVD Recorder. Your TV's remote may be near channel zero (0). EXT 1 COAX OUT G-LINK DIGITAL AUDIO OUT OPTICAL OUT 1 Connect your Antenna or Cable TV signal to the ANTENNA jack... Recorder and the TV to the VIDEO IN jack on your new DVD Recorder working quickly. This will stop when you should see the blue Philips DVD background picture or the Initial Setup Screen on the TV (when the DVD Recorder is on). • If your TV manual for connection instructions...

Quick start guide
Page 2
... AUDIO COMPONENT (CVBS) VIDEO Y S-VIDEO S-VIDEO (Y/C) (Y/C) L PB L PB AUDIO AUDIO TV R PR R PR IN - The G-Link cable's sensor should see the blue Philips DVD background picture or the Initial Setup Screen on the TV (when the DVD Recorder is still attached to the correct Audio/Video In channel.... The first time you have a button or switch that of a Cable Box. Your TV's remote may be labelled RF OUT, TO TV, or ANTENNA OUT. The OUT jack may have a Satellite Receiver, the hookup resembles that selects Video ...
... AUDIO COMPONENT (CVBS) VIDEO Y S-VIDEO S-VIDEO (Y/C) (Y/C) L PB L PB AUDIO AUDIO TV R PR R PR IN - The G-Link cable's sensor should see the blue Philips DVD background picture or the Initial Setup Screen on the TV (when the DVD Recorder is still attached to the correct Audio/Video In channel.... The first time you have a button or switch that of a Cable Box. Your TV's remote may be labelled RF OUT, TO TV, or ANTENNA OUT. The OUT jack may have a Satellite Receiver, the hookup resembles that selects Video ...
Quick start guide
Page 3
... instead of a single ANTENNA OUT, TO TV, or RF OUT jack as shown on page 2 of this Quick-Use Guide to set it faces the remote sensor of your Cable Box. 7 Connect the supplied power cord to the MAINS (AC Power) jack on the rear of the DVD Recorder. EXT 1 AUDIO...
... instead of a single ANTENNA OUT, TO TV, or RF OUT jack as shown on page 2 of this Quick-Use Guide to set it faces the remote sensor of your Cable Box. 7 Connect the supplied power cord to the MAINS (AC Power) jack on the rear of the DVD Recorder. EXT 1 AUDIO...
Quick start guide
Page 4
...Follow the onscreen instructions. search complete" appears). to highlight your country in yellow, then press OK. 6 Next, press the Number buttons on the remote to enter your postal zip code, then press OK. 7 The next message will take a couple of the buttons on the Recorder. Press 8CH..., but you must complete the Initial Setup. Installation Auto Ch. "IS TV ON? This reminds you to step 9. 4 When you turn on the remote to continue. 5 When "Identifying Your Location" appears, press 8CH+ or 9CH- This will ask whether you have only a regular antenna connected to the...
...Follow the onscreen instructions. search complete" appears). to highlight your country in yellow, then press OK. 6 Next, press the Number buttons on the remote to enter your postal zip code, then press OK. 7 The next message will take a couple of the buttons on the Recorder. Press 8CH..., but you must complete the Initial Setup. Installation Auto Ch. "IS TV ON? This reminds you to step 9. 4 When you turn on the remote to continue. 5 When "Identifying Your Location" appears, press 8CH+ or 9CH- This will ask whether you have only a regular antenna connected to the...
Quick start guide
Page 6
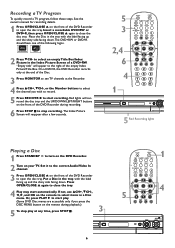
... Title Box/Index Picture in a Disc menu. The Index Picture Screen will surround the disc tray and the UP/DOWN/LEFT/RIGHT buttons on the remote to open the disc tray. STOP Ç PLAY TV VOLUME SLOW PAUSE H k G 1 4 MENU LEFT GUIDE UP DOWN RIGHT DVDR 80 OPEN If not, ... MENU button on the front of the Disc. 3 Press MONITOR to start automatically. See the owner's manual for recording details. 1 Press OPEN/CLOSE A on the remote during recording. 6 Press STOP C to stop play . (Some DVD Disc menus are accessible only if you wish to record. 5 Press REC/OTR a to see...
... Title Box/Index Picture in a Disc menu. The Index Picture Screen will surround the disc tray and the UP/DOWN/LEFT/RIGHT buttons on the remote to open the disc tray. STOP Ç PLAY TV VOLUME SLOW PAUSE H k G 1 4 MENU LEFT GUIDE UP DOWN RIGHT DVDR 80 OPEN If not, ... MENU button on the front of the Disc. 3 Press MONITOR to start automatically. See the owner's manual for recording details. 1 Press OPEN/CLOSE A on the remote during recording. 6 Press STOP C to stop play . (Some DVD Disc menus are accessible only if you wish to record. 5 Press REC/OTR a to see...
Quick start guide
Page 7
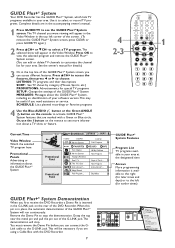
...OUT 2 OUT 1 480p/480i VIDEO AUDIO COMPONENT (CVBS) VIDEO Y Y S-VIDEO (Y/C) PB L PB AUDIO PR R PR IN - Or, use the i button on the remote to access the features, then press ; Paid Program Instructional T... editshaisblDe ethmeoaPuitno.- Use it to select or record TV programs. Complete details are in the accompanying... right (for later times and days) or to customize the channel list for details.) 3 Or, in the G-LINK jack on the remote to the G-LINK jack. Press OK to view the selected program and remove the GUIDE Plus+® System screen. (You can access different...
...OUT 2 OUT 1 480p/480i VIDEO AUDIO COMPONENT (CVBS) VIDEO Y Y S-VIDEO (Y/C) PB L PB AUDIO PR R PR IN - Or, use the i button on the remote to access the features, then press ; Paid Program Instructional T... editshaisblDe ethmeoaPuitno.- Use it to select or record TV programs. Complete details are in the accompanying... right (for later times and days) or to customize the channel list for details.) 3 Or, in the G-LINK jack on the remote to the G-LINK jack. Press OK to view the selected program and remove the GUIDE Plus+® System screen. (You can access different...
Quick start guide
Page 8
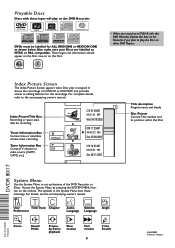
.... For details, see the accompanying owner's manual. For complete details, refer to editing features for recording 2 C10 07:56AM 00:01:24 . ton on the remote.The symbols in Hungary 3103 605 20832 3194/000 (WwnN N wnwWNnwNwn NnwWnwWnN) DVDR 80/17 Index Picture/Title Box Recording or space available for the...
.... For details, see the accompanying owner's manual. For complete details, refer to editing features for recording 2 C10 07:56AM 00:01:24 . ton on the remote.The symbols in Hungary 3103 605 20832 3194/000 (WwnN N wnwWNnwNwn NnwWnwWnN) DVDR 80/17 Index Picture/Title Box Recording or space available for the...
User manual
Page 3
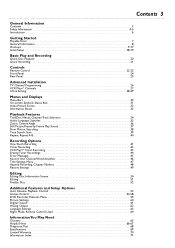
...Started Playable Discs 7 General Information 8 Hookups 9-17 Initial Setup 18-19 Basic Play and Recording Quick Disc Playback 20 Quick Recording 21 Controls Remote Control 22-23 Front Panel 24 Rear Panel 25 Advanced Installation TV Channel Programming 26 VCR Plus+® Channels 27 Clock Setting 28-29 ...54-58 DVD Recorder Features Menu 59 Picture Settings 60 Digital Output 61 Analog Output 62 Language Settings 63 Night Mode, Remote Control Used 64 Information You May Need Glossary 65 Helpful Hints 66-67 Diagnostic Test 68 Specifications 69 Limited Warranty 70 Information Index...
...Started Playable Discs 7 General Information 8 Hookups 9-17 Initial Setup 18-19 Basic Play and Recording Quick Disc Playback 20 Quick Recording 21 Controls Remote Control 22-23 Front Panel 24 Rear Panel 25 Advanced Installation TV Channel Programming 26 VCR Plus+® Channels 27 Clock Setting 28-29 ...54-58 DVD Recorder Features Menu 59 Picture Settings 60 Digital Output 61 Analog Output 62 Language Settings 63 Night Mode, Remote Control Used 64 Information You May Need Glossary 65 Helpful Hints 66-67 Diagnostic Test 68 Specifications 69 Limited Warranty 70 Information Index...
User manual
Page 6
...Dolby Laboratories. Leave the power on the lens. q When placing the Recorder in the Recorder until normal playback is possible. Copyright 2003 Philips Consumer Electronics. q Keep the Recorder away from cold to the edge in a circular motion. All rights reserved. q The lens may ... Scan compatibility q Repeat and Repeat A-B playback q Time Search q VCR Plus+ Programming Package Contents q DVD Recorder q Remote control with two AA batteries q AC power cord q One blank Philips DVD+RW q One RF coaxial cable (black with silver tip, with single prong in center of tip) q One ...
...Dolby Laboratories. Leave the power on the lens. q When placing the Recorder in the Recorder until normal playback is possible. Copyright 2003 Philips Consumer Electronics. q Keep the Recorder away from cold to the edge in a circular motion. All rights reserved. q The lens may ... Scan compatibility q Repeat and Repeat A-B playback q Time Search q VCR Plus+ Programming Package Contents q DVD Recorder q Remote control with two AA batteries q AC power cord q One blank Philips DVD+RW q One RF coaxial cable (black with silver tip, with single prong in center of tip) q One ...
User manual
Page 8
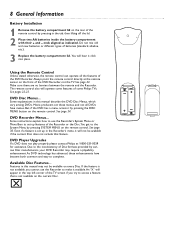
.... Due to the System Menu by pressing the DISC MENU button on the remote control. See page 24. Available Disc Features... DVD Player Upgrades If a DVD does not play properly, please contact Philips at the remote sensor on the front of batteries (standard, alkaline, etc.). 3 Replace the... battery compartment lid. You will operate some features of some Philips TVs. Make sure there are no barriers between the remote and the Recorder. Features in the tab, then lifting off the lid. 2 Place two AA batteries inside the...
.... Due to the System Menu by pressing the DISC MENU button on the remote control. See page 24. Available Disc Features... DVD Player Upgrades If a DVD does not play properly, please contact Philips at the remote sensor on the front of batteries (standard, alkaline, etc.). 3 Replace the... battery compartment lid. You will operate some features of some Philips TVs. Make sure there are no barriers between the remote and the Recorder. Features in the tab, then lifting off the lid. 2 Place two AA batteries inside the...
User manual
Page 9
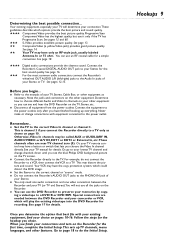
... pages 10-16. Remember... Otherwise,Video In channels may have only an RF-style jack, usually labeled Antenna In or 75 ohm. Or, your TV remote control may be called AUX or AUXILIARY IN, AUDIO/VIDEO or A/V IN, EXT1 or EXT2 or External In, etc.These channels often are needed between... use the DVD Recorder to preserve your memories by copying a videotape to your TV manual for the best sound quality. You can see the blue Philips DVD background picture on the TV, Stereo, etc.
... pages 10-16. Remember... Otherwise,Video In channels may have only an RF-style jack, usually labeled Antenna In or 75 ohm. Or, your TV remote control may be called AUX or AUXILIARY IN, AUDIO/VIDEO or A/V IN, EXT1 or EXT2 or External In, etc.These channels often are needed between... use the DVD Recorder to preserve your memories by copying a videotape to your TV manual for the best sound quality. You can see the blue Philips DVD background picture on the TV, Stereo, etc.
User manual
Page 10
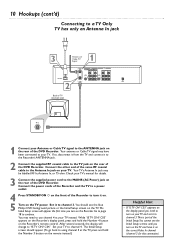
... Recorder. Connect the other end of the same RF coaxial cable to the TV jack on the Recorder's remote control. You should appear. (To go back to use channel 4 at the TV, press and hold ... turn on the TV power. The Initial Setup screen will change to the ANTENNA jack on the remote instead.) Helpful Hint • If "IS TV ON? The Initial Setup screen should see the ...the supplied power cord to channel 3.This is part of the Initial Setup.You cannot see the blue Philips DVD background picture or the Initial Setup screen on the rear of the DVD Recorder. Your TV's Antenna...
... Recorder. Connect the other end of the same RF coaxial cable to the TV jack on the Recorder's remote control. You should appear. (To go back to use channel 4 at the TV, press and hold ... turn on the TV power. The Initial Setup screen will change to the ANTENNA jack on the remote instead.) Helpful Hint • If "IS TV ON? The Initial Setup screen should see the ...the supplied power cord to channel 3.This is part of the Initial Setup.You cannot see the blue Philips DVD background picture or the Initial Setup screen on the rear of the DVD Recorder. Your TV's Antenna...
User manual
Page 11
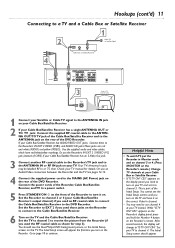
... receive the picture from the Recorder (if you used the RF coaxial cable as shown for details. You should appear. You cannot see the blue Philips DVD background picture or the Initial Setup screen on the correct Video In channel. • You may be labelled RF In or 75 ohm. The... the TV and have red/white/yellow markings. While "IS TV ON? C04." Set the Recorder to the MAINS (AC Power) jack on the Recorder's remote.) Change TV channels at your TV manual for step 3). Helpful Hints • To watch TV, put the Recorder in Monitor mode and on channel 3 or...
... receive the picture from the Recorder (if you used the RF coaxial cable as shown for details. You should appear. You cannot see the blue Philips DVD background picture or the Initial Setup screen on the correct Video In channel. • You may be labelled RF In or 75 ohm. The... the TV and have red/white/yellow markings. While "IS TV ON? C04." Set the Recorder to the MAINS (AC Power) jack on the Recorder's remote.) Change TV channels at your TV manual for step 3). Helpful Hints • To watch TV, put the Recorder in Monitor mode and on channel 3 or...
User manual
Page 12
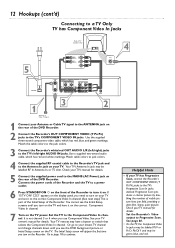
... outlet. 6 Press STANDBY-ON y on your TV manual for details. If "IS TV ON? Set the TV to turn on the TV power. Your TV remote may be green, blue, and red. Or, go to the correct Component Video In channel. (See next step.) This is not channel 3 or 4 when you...
... outlet. 6 Press STANDBY-ON y on your TV manual for details. If "IS TV ON? Set the TV to turn on the TV power. Your TV remote may be green, blue, and red. Or, go to the correct Component Video In channel. (See next step.) This is not channel 3 or 4 when you...
User manual
Page 13
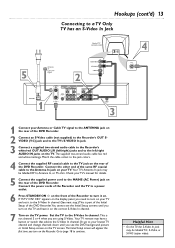
... same RF coaxial cable to the Antenna In jack on . C03" appears on the display panel, you need to turn on the Recorder. Your TV remote may be labeled Y/C, S-Video, or S-VHS (super video). Helpful Hint • On the TV, the S-Video In jack may be labelled RF In,Antenna In...
... same RF coaxial cable to the Antenna In jack on . C03" appears on the display panel, you need to turn on the Recorder. Your TV remote may be labeled Y/C, S-Video, or S-VHS (super video). Helpful Hint • On the TV, the S-Video In jack may be labelled RF In,Antenna In...
User manual
Page 14
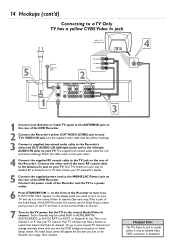
The supplied two-strand audio cable has red and white markings. Your TV's Antenna In jack may have it on your TV. Your TV remote may be labelled RF In,Antenna In, or 75 ohm. Or, go to your lowest TV channel and change channels down until you turn on ...
The supplied two-strand audio cable has red and white markings. Your TV's Antenna In jack may have it on your TV. Your TV remote may be labelled RF In,Antenna In, or 75 ohm. Or, go to your lowest TV channel and change channels down until you turn on ...
User manual
Page 15
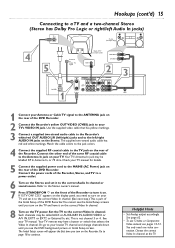
... (Y/C) L PB (Y/C) L PB AUDIO AUDIO R PR R PR 3 DIGITAL AUDIO OUT 1 Connect your Antenna or Cable TV signal to the ANTENNA jack on the Stereo. Your TV remote may have it on the rear of the DVD Recorder. Go to page 18 to the correct Video In channel. CO3" appears on the TV...
... (Y/C) L PB (Y/C) L PB AUDIO AUDIO R PR R PR 3 DIGITAL AUDIO OUT 1 Connect your Antenna or Cable TV signal to the ANTENNA jack on the Stereo. Your TV remote may have it on the rear of the DVD Recorder. Go to page 18 to the correct Video In channel. CO3" appears on the TV...
User manual
Page 16
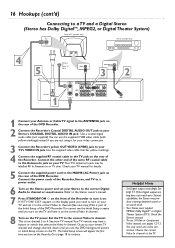
... change channels down until you turn it on. If "IS TV ON? If the Digital output setting does not match your TV manual.Your TV remote may have it for details. 5 Connect the supplied power cord to the MAINS (AC Power) jack on the rear of the same RF coaxial cable...
... change channels down until you turn it on. If "IS TV ON? If the Digital output setting does not match your TV manual.Your TV remote may have it for details. 5 Connect the supplied power cord to the MAINS (AC Power) jack on the rear of the same RF coaxial cable...
User manual
Page 21
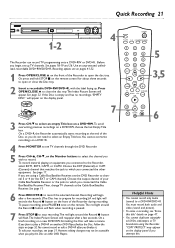
Use an unprotected, unfinalized, recordable DVD+RW/DVD+R. Or, press and hold STOP C on the remote control for recording.) A red light will appear on the display panel. 7 POWER ON/OFF 3 Press CH-9 to select an empty Title box on other equipment. ... begin after a few seconds. (The Disc has to prepare for about three seconds to see "Erase this . To pause recording, press PAUSE k once on the remote.The red light around the Record I button on a new DVD+RW, formatting the Disc will appear. "COPY PROTECT" may not be accessible when you connected...
Use an unprotected, unfinalized, recordable DVD+RW/DVD+R. Or, press and hold STOP C on the remote control for recording.) A red light will appear on the display panel. 7 POWER ON/OFF 3 Press CH-9 to select an empty Title box on other equipment. ... begin after a few seconds. (The Disc has to prepare for about three seconds to see "Erase this . To pause recording, press PAUSE k once on the remote.The red light around the Record I button on a new DVD+RW, formatting the Disc will appear. "COPY PROTECT" may not be accessible when you connected...


