Leaflet
Page 2
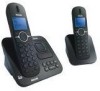
...8670 000 38173 UPC: 6 09585 14497 2 © 2009 Koninklijke Philips Electronics N.V. or their respective owners. Trademarks are subject to change without notice. Specifications are the property of Koninklijke Philips Electronics N.V. Enhanced Hi Def Voice Enjoy high quality conversation, with own... AC 120V - 60Hz • Number of batteries: 2 per handset • Standby time: Up to 150 hours • Talk time: Up to 12 hours Accessories • Detachable belt-clip • CD4552B/17 Highlights Enhanced speakerphone Combine a high quality speaker, sophisticated signal ...
...8670 000 38173 UPC: 6 09585 14497 2 © 2009 Koninklijke Philips Electronics N.V. or their respective owners. Trademarks are subject to change without notice. Specifications are the property of Koninklijke Philips Electronics N.V. Enhanced Hi Def Voice Enjoy high quality conversation, with own... AC 120V - 60Hz • Number of batteries: 2 per handset • Standby time: Up to 150 hours • Talk time: Up to 12 hours Accessories • Detachable belt-clip • CD4552B/17 Highlights Enhanced speakerphone Combine a high quality speaker, sophisticated signal ...
User manual
Page 1
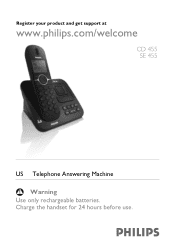
Warning Use only rechargeable batteries. Charge the handset for 24 hours before use. Register your product and get support at www.philips.com/welcome CD 455 SE 455 To insert with US Telephone Answering Machine !
Warning Use only rechargeable batteries. Charge the handset for 24 hours before use. Register your product and get support at www.philips.com/welcome CD 455 SE 455 To insert with US Telephone Answering Machine !
User manual
Page 3
...the base station 11 6.1 3.4 Display icons 12 6.2 3.5 The menus 12 6.3 4 Getting started 4.1 Connect the base station 4.2 Connect your charger 4.3 Install your handset 13 7 13 7.1 13 7.2 15 4.4 Checking the battery level 16 8 4.5 Setting the clock 16 8.1 4.6 What is standby mode? 17 8.2 4.7 Checking ... During a call 23 Using the speaker or handsfree 23 Making a second call 24 Intercom and Conference Calls 25 Calling another handset 25 Transferring a call 25 Making a conference call 25 Text and Numbers 27 Entering text and numbers 27 Switching between uppercase...
...the base station 11 6.1 3.4 Display icons 12 6.2 3.5 The menus 12 6.3 4 Getting started 4.1 Connect the base station 4.2 Connect your charger 4.3 Install your handset 13 7 13 7.1 13 7.2 15 4.4 Checking the battery level 16 8 4.5 Setting the clock 16 8.1 4.6 What is standby mode? 17 8.2 4.7 Checking ... During a call 23 Using the speaker or handsfree 23 Making a second call 24 Intercom and Conference Calls 25 Calling another handset 25 Transferring a call 25 Making a conference call 25 Text and Numbers 27 Entering text and numbers 27 Switching between uppercase...
User manual
Page 5
Table of contents 14.3 Keypad lock 43 18 Technical Data 52 14.4 Missing handset(s) 15 The System 43 19 Frequently asked questions 53 44 15.1 Registering handset(s) 44 20 Appendix 55 15.2 Un-registering a handset 44 20.1 Equipment approval Information 55 15.3 Changing your PIN 44 20.2 Notification to the local 15.4 Restoring default...
Table of contents 14.3 Keypad lock 43 18 Technical Data 52 14.4 Missing handset(s) 15 The System 43 19 Frequently asked questions 53 44 15.1 Registering handset(s) 44 20 Appendix 55 15.2 Un-registering a handset 44 20.1 Equipment approval Information 55 15.3 Changing your PIN 44 20.2 Notification to the local 15.4 Restoring default...
User manual
Page 6
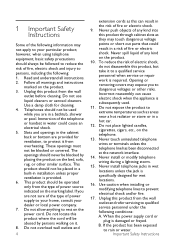
... specifically designed for wet locations. 16. Unplug this product from the type of power source indicated on the telephone. 13. Immersion of the telephone or handset in water could result in a hot car. 12. Opening or removing covers may expose you to a qualified service personnel when service or repair work is...
... specifically designed for wet locations. 16. Unplug this product from the type of power source indicated on the telephone. 13. Immersion of the telephone or handset in water could result in a hot car. 12. Opening or removing covers may expose you to a qualified service personnel when service or repair work is...
User manual
Page 8
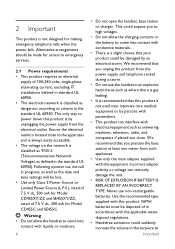
...least one meter from such appliances. • Use only the main adapter supplied with liquids or moisture. 6 • Do not open the handset, base station or charger. Use the recommended type supplied with this equipment. We recommend that this product is by unplugging the power supply from ..., and computers if placed too close to criteria in the earpiece to come into contact with this product. Warning • Do not allow the handset to come into contact with conductive materials. • There is a slight chance that you to high voltages. • Do not allow the ...
...least one meter from such appliances. • Use only the main adapter supplied with liquids or moisture. 6 • Do not open the handset, base station or charger. Use the recommended type supplied with this equipment. We recommend that this product is by unplugging the power supply from ..., and computers if placed too close to criteria in the earpiece to come into contact with this product. Warning • Do not allow the handset to come into contact with conductive materials. • There is a slight chance that you to high voltages. • Do not allow the ...
User manual
Page 9
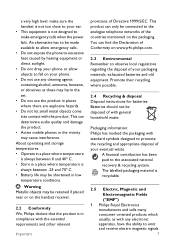
... ear. • This equipment is not designed to make sure the handset is recyclable. 2.5 Electric, Magnetic and Electromagnetic Fields ("EMF") 1. a very high level: make emergency calls when the power fails. Philips Royal Electronics manufactures and sells many consumer oriented products which usually, as ... explosive hazards. • Do not let small metal objects come into contact with standard symbols designed to fall on the handset receiver. 2.2 Conformity We, Philips declare that the product is always between -25 and 70º C. • Battery life may be shortened in the...
... ear. • This equipment is not designed to make sure the handset is recyclable. 2.5 Electric, Magnetic and Electromagnetic Fields ("EMF") 1. a very high level: make emergency calls when the power fails. Philips Royal Electronics manufactures and sells many consumer oriented products which usually, as ... explosive hazards. • Do not let small metal objects come into contact with standard symbols designed to fall on the handset receiver. 2.2 Conformity We, Philips declare that the product is always between -25 and 70º C. • Battery life may be shortened in the...

User manual
Page 11
.../welcome. 3.1 What's in the box. To fully benefit from the support that Philips offers, register your purchase and welcome to Philips! Your phone 9 In multi-handset packs, you have to connect the line adapter to the line cord first before plugging the line cord to the ...line adapter in the box Base station with power supply units and additional rechargeable batteries. You may find one or more additional handsets, chargers with Bracket Handset Battery door Belt clip Power supply NiMH AAA Rechargeable Batteries x 2 Line Cord* User Manual Guarantee Quick start guide Note *...
.../welcome. 3.1 What's in the box. To fully benefit from the support that Philips offers, register your purchase and welcome to Philips! Your phone 9 In multi-handset packs, you have to connect the line adapter to the line cord first before plugging the line cord to the ...line adapter in the box Base station with power supply units and additional rechargeable batteries. You may find one or more additional handsets, chargers with Bracket Handset Battery door Belt clip Power supply NiMH AAA Rechargeable Batteries x 2 Line Cord* User Manual Guarantee Quick start guide Note *...
User manual
Page 12
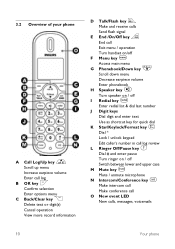
... operation View more record information r D Talk/Flash key Make and receive calls e Send flash signal E End /On/Off key End call Exit menu / operation m Turn handset on/off F Menu key d Access main menu G Phonebook/Down key Scroll down menu Decrease earpiece volume v Enter phonebook H Speaker key l Turn speaker on / off I Redial...
... operation View more record information r D Talk/Flash key Make and receive calls e Send flash signal E End /On/Off key End call Exit menu / operation m Turn handset on/off F Menu key d Access main menu G Phonebook/Down key Scroll down menu Decrease earpiece volume v Enter phonebook H Speaker key l Turn speaker on / off I Redial...

User manual
Page 13
Turn the answering machine on/off B Volume down f Decrease speaker volume C Delete key + Delete messages D Volume up R Increase speaker volume E Previous key p Skip backward during playback F Play/Stop key Play messages s Stop message playback G Next key V Skip forward during playback H Handset locator key Locate handset(s) Enter registration mode I Message counter Display message number Display answering machine operation Your phone 11 3.3 Overview of the base station P Loudspeaker Q Battery door R Headset jack A On/Off key o -
Turn the answering machine on/off B Volume down f Decrease speaker volume C Delete key + Delete messages D Volume up R Increase speaker volume E Previous key p Skip backward during playback F Play/Stop key Play messages s Stop message playback G Next key V Skip forward during playback H Handset locator key Locate handset(s) Enter registration mode I Message counter Display message number Display answering machine operation Your phone 11 3.3 Overview of the base station P Loudspeaker Q Battery door R Headset jack A On/Off key o -
User manual
Page 14
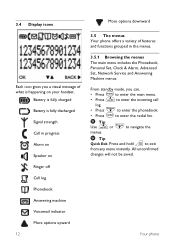
... Machine menus. 3.4 Display icons Each icon gives you can, m • Press to enter the redial list. Battery is fully charged Battery is happening on your handset. to enter the main menu.
... Machine menus. 3.4 Display icons Each icon gives you can, m • Press to enter the redial list. Battery is fully charged Battery is happening on your handset. to enter the main menu.
User manual
Page 17
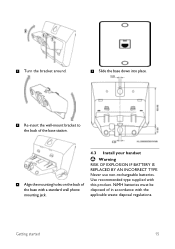
NiMH batteries must be disposed of the base with the applicable waste disposal regulations. 2 Turn the bracket around. 5 Slide the base down into place. 3 Re-insert the wall-mount bracket to the back of the base station. 4 Align the mounting holes on the back of in accordance with a standard wall phone mounting jack. 4.3 Install your handset ! Never use non-rechargeable batteries. Getting started 15 Use recommended type supplied with this product. Warning RISK OF EXPLOSION IF BATTERY IS REPLACED BY AN INCORRECT TYPE.
NiMH batteries must be disposed of the base with the applicable waste disposal regulations. 2 Turn the bracket around. 5 Slide the base down into place. 3 Re-insert the wall-mount bracket to the back of the base station. 4 Align the mounting holes on the back of in accordance with a standard wall phone mounting jack. 4.3 Install your handset ! Never use non-rechargeable batteries. Getting started 15 Use recommended type supplied with this product. Warning RISK OF EXPLOSION IF BATTERY IS REPLACED BY AN INCORRECT TYPE.

User manual
Page 18
... . 2 Select CLOCK & ALARM > SET FORMAT. Press OK. 3 Select DATE FORMAT or TIME FORMAT. 4 Select the setting you will hear warning tones. Your handset may take a few seconds to power up. 4.4 Checking the battery level The battery icon displays the current battery level. Press OK. 3 Use the digit keys... Battery empty. Warning Check the battery polarity when inserting in 12-hour format. 6 Press OK. • The setting is empty. Note Charge the handset(s) for 24 hours before initial use ! ! Set the clock before initial use of the phone. 2 Slide the battery door firmly into the battery ...
... . 2 Select CLOCK & ALARM > SET FORMAT. Press OK. 3 Select DATE FORMAT or TIME FORMAT. 4 Select the setting you will hear warning tones. Your handset may take a few seconds to power up. 4.4 Checking the battery level The battery icon displays the current battery level. Press OK. 3 Use the digit keys... Battery empty. Warning Check the battery polarity when inserting in 12-hour format. 6 Press OK. • The setting is empty. Note Charge the handset(s) for 24 hours before initial use ! ! Set the clock before initial use of the phone. 2 Slide the battery door firmly into the battery ...
User manual
Page 19
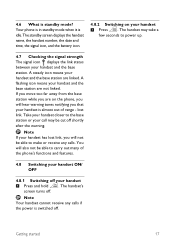
... not be able to power up. 4.7 Checking the signal strength The signal icon displays the link status between your handset and the base station are not linked. Note Your handset cannot receive any calls. A steady icon means your call may take a few seconds to make or receive any calls... if the power is almost out of the phone's functions and features. 4.8 Switching your handset ON/ OFF e 4.8.1 Switching off your handset is switched off. Take your handset closer to carry out many of range - 4.6 What is idle. Your phone is in standby mode when it ...
... not be able to power up. 4.7 Checking the signal strength The signal icon displays the link status between your handset and the base station are not linked. Note Your handset cannot receive any calls. A steady icon means your call may take a few seconds to make or receive any calls... if the power is almost out of the phone's functions and features. 4.8 Switching your handset ON/ OFF e 4.8.1 Switching off your handset is switched off. Take your handset closer to carry out many of range - 4.6 What is idle. Your phone is in standby mode when it ...
User manual
Page 20
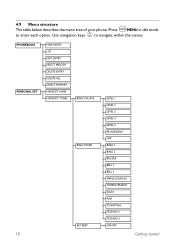
PHONEBOOK PERSONAL SET NEW ENTRY LIST EDIT ENTRY SELECT MELODY DELETE ENTRY DELETE ALL DIRECT MEMORY HANDSET NAME HANDSET TONES RING VOLUME RING TONES KEY BEEP 18 LEVEL 1 LEVEL 2 LEVEL 3 LEVEL 4 LEVEL 5 PROGRESSIVE OFF RING 1 RING 2 BUZZER BELL 1 BELL 2 MAPLE LEAF RAG TURKISH MARCH SALSA ASIA TCHATCHA TECHNO 1 TECHNO 2 ON/OFF Getting started 4.9 Menu structure m The table below describes the menu tree of your phone. Press MENU in idle mode : to navigate within the menus. Use navigation keys to enter each option.
PHONEBOOK PERSONAL SET NEW ENTRY LIST EDIT ENTRY SELECT MELODY DELETE ENTRY DELETE ALL DIRECT MEMORY HANDSET NAME HANDSET TONES RING VOLUME RING TONES KEY BEEP 18 LEVEL 1 LEVEL 2 LEVEL 3 LEVEL 4 LEVEL 5 PROGRESSIVE OFF RING 1 RING 2 BUZZER BELL 1 BELL 2 MAPLE LEAF RAG TURKISH MARCH SALSA ASIA TCHATCHA TECHNO 1 TECHNO 2 ON/OFF Getting started 4.9 Menu structure m The table below describes the menu tree of your phone. Press MENU in idle mode : to navigate within the menus. Use navigation keys to enter each option.
User manual
Page 21
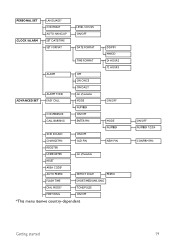
.../OFF NUMBER CONFERENCE ON/OFF CALL BARRING ENTER PIN MODE NUMBER XHD SOUND ON/OFF CHANGE PIN OLD PIN NEW PIN REGISTER UNREGISTER List of handsets RESET AREA CODE* AUTO PREFIX DETECT DIGIT PREFIX FLASH TIME SHORT/MEDIUM/LONG DIAL MODE* TONE/PULSE FIRST RING ON/OFF *This menu item is...
.../OFF NUMBER CONFERENCE ON/OFF CALL BARRING ENTER PIN MODE NUMBER XHD SOUND ON/OFF CHANGE PIN OLD PIN NEW PIN REGISTER UNREGISTER List of handsets RESET AREA CODE* AUTO PREFIX DETECT DIGIT PREFIX FLASH TIME SHORT/MEDIUM/LONG DIAL MODE* TONE/PULSE FIRST RING ON/OFF *This menu item is...

User manual
Page 24
... 31. 1 Press . 2 Select CALL LIST. The number is dialed out. 5.1.4 Calling from the incoming (received or missed) call . 1 Enter the phone number. Charge your handset or your handset is dialed out. l 5.1.3 Calling from the call log You can make a call . 5 Call Note Emergency Call. r 2 Select the record you want to r call. 4 Press...
... 31. 1 Press . 2 Select CALL LIST. The number is dialed out. 5.1.4 Calling from the incoming (received or missed) call . 1 Enter the phone number. Charge your handset or your handset is dialed out. l 5.1.3 Calling from the call log You can make a call . 5 Call Note Emergency Call. r 2 Select the record you want to r call. 4 Press...
User manual
Page 25
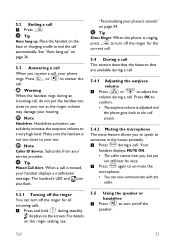
... someone in the house privately. 1 Press during standby. Press or to your ear as the ringer volume may damage your handset displays a notification message. Warning When the handset rings during a call automatically. Press OK to confirm. • The earpiece volume is not too close to answer the...displays on page 34. Handsfree activation can turn on the base or charging cradle to a very high level. Call 23 Make sure the handset is adjusted and the phone goes back to the call screen. 5.4.2 Muting the microphone The mute feature allows you M can still hear ...
... someone in the house privately. 1 Press during standby. Press or to your ear as the ringer volume may damage your handset displays a notification message. Warning When the handset rings during a call automatically. Press OK to confirm. • The earpiece volume is not too close to answer the...displays on page 34. Handsfree activation can turn on the base or charging cradle to a very high level. Call 23 Make sure the handset is adjusted and the phone goes back to the call screen. 5.4.2 Muting the microphone The mute feature allows you M can still hear ...

User manual
Page 27
... base station. i 6.1.2 To toggle between the calls 1 Press to switch between you can press to call the other i handset instantly. 1 Press . Press OK. Press OK. 3 Press after the called handset to answer your house. The handset(s) available for intercom is displayed. • The external caller is automatically being put on hold on your...
... base station. i 6.1.2 To toggle between the calls 1 Press to switch between you can press to call the other i handset instantly. 1 Press . Press OK. Press OK. 3 Press after the called handset to answer your house. The handset(s) available for intercom is displayed. • The external caller is automatically being put on hold on your...
User manual
Page 28
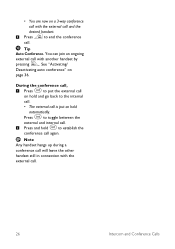
... in connection with the external call with the external call and the e desired handset. 5 Press to the internal call. • The external call is put the external call on hold and go back to end the conference call. Tip ...Auto Conference. i During the conference call, 1 Press to put on hold i automatically. • You are now on a 3-way conference call with another handset by pressing . You can join an ongoing r external call . 26 Intercom and Conference Calls See "Activating/ Deactivating auto conference" on page 36. Press to toggle...
... in connection with the external call with the external call and the e desired handset. 5 Press to the internal call. • The external call is put the external call on hold and go back to end the conference call. Tip ...Auto Conference. i During the conference call, 1 Press to put on hold i automatically. • You are now on a 3-way conference call with another handset by pressing . You can join an ongoing r external call . 26 Intercom and Conference Calls See "Activating/ Deactivating auto conference" on page 36. Press to toggle...


