
Leaflet
Page 2
...; Base Station keys: Paging key • Battery charging indication • Call Management: Call Waiting, Caller ID, Conference Call, Explicit Call Transfer, Microphone mute • Ease of Koninklijke Philips Electronics N.V. Trademarks are subject to change without holding the phone to speak and listen during a call without notice. All Rights reserved. Memory Capacity • Call log entries: 10 • Phonebook: 50 names and numbers • Redial List Capacity: 5 Connectivity • Headset: Via Jack Connector (Handset) Dimensions • Base...
...; Base Station keys: Paging key • Battery charging indication • Call Management: Call Waiting, Caller ID, Conference Call, Explicit Call Transfer, Microphone mute • Ease of Koninklijke Philips Electronics N.V. Trademarks are subject to change without holding the phone to speak and listen during a call without notice. All Rights reserved. Memory Capacity • Call log entries: 10 • Phonebook: 50 names and numbers • Redial List Capacity: 5 Connectivity • Headset: Via Jack Connector (Handset) Dimensions • Base...
User manual
Page 3
... 20 2.4 Recycle your batteries 7 6.5 Using your phonebook 21 2.5 Service Centers 8 6.6 Using the redial list 23 3 Your phone 9 6.7 Using the call log 23 3.1 What's in the box 9 6.8 Using the intercom 24 3.2 Overview of your phone 10 6.9 Handset locating 26 3.3 Display icons 12 7 Personal settings 27 3.4 Overview of the base station 12 7.1 Change the handset name 27 4 Getting started 13 7.2 Handset Tones 27 4.1 Connect the base station 13 7.3 Change the display language 28 4.2 Wall mounting the base 13 7.4 Activate/deactivate...
... 20 2.4 Recycle your batteries 7 6.5 Using your phonebook 21 2.5 Service Centers 8 6.6 Using the redial list 23 3 Your phone 9 6.7 Using the call log 23 3.1 What's in the box 9 6.8 Using the intercom 24 3.2 Overview of your phone 10 6.9 Handset locating 26 3.3 Display icons 12 7 Personal settings 27 3.4 Overview of the base station 12 7.1 Change the handset name 27 4 Getting started 13 7.2 Handset Tones 27 4.1 Connect the base station 13 7.3 Change the display language 28 4.2 Wall mounting the base 13 7.4 Activate/deactivate...
User manual
Page 4
Table of contents 8 Clock and Alarm 29 8.1 Set date and time 29 8.2 Set date/time format 29 8.3 Set alarm 29 8.4 Set alarm tone 30 9 Advanced settings 31 9.1 Change Master PIN 31 9.2 Registration 31 9.3 Unregister 31 9.4 Reset unit 32 9.5 Set area code 32 9.6 Set prefix 32 9.7 Change flash time 33 9.8 Change the dial mode 33 9.9 Set first ring 33 9.10 Default settings 34 10 Technical data 35 11 Frequently asked questions 36 12 Index 38 2 Table of contents
Table of contents 8 Clock and Alarm 29 8.1 Set date and time 29 8.2 Set date/time format 29 8.3 Set alarm 29 8.4 Set alarm tone 30 9 Advanced settings 31 9.1 Change Master PIN 31 9.2 Registration 31 9.3 Unregister 31 9.4 Reset unit 32 9.5 Set area code 32 9.6 Set prefix 32 9.7 Change flash time 33 9.8 Change the dial mode 33 9.9 Set first ring 33 9.10 Default settings 34 10 Technical data 35 11 Frequently asked questions 36 12 Index 38 2 Table of contents
User manual
Page 11
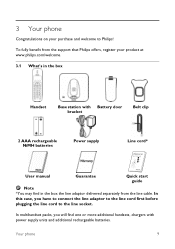
... box the line adaptor delivered separately from the support that Philips offers, register your purchase and welcome to the line socket. In this case, you will find in the box Handset Base station with Battery door bracket Belt clip 2 AAA rechargeable NiMH batteries Power supply Line cord* User manual Guarantee Quick start guide Note *You may find one or more additional handsets, chargers with power supply units and additional rechargeable batteries. To fully...
... box the line adaptor delivered separately from the support that Philips offers, register your purchase and welcome to the line socket. In this case, you will find in the box Handset Base station with Battery door bracket Belt clip 2 AAA rechargeable NiMH batteries Power supply Line cord* User manual Guarantee Quick start guide Note *You may find one or more additional handsets, chargers with power supply units and additional rechargeable batteries. To fully...
User manual
Page 12
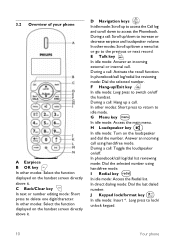
... volume. During a call using l handsfree mode. In phonebook/call log/redial list reviewing e mode: Dial the selected number. In direct dialing mode: Dial the last dialed * number. In other modes: Select the function displayed on /off the handset. In phonebook/call log/dial list reviewing mode: Dial the selected number using handsfree mode. Long press to delete one digit/character. H Loudspeaker key In idle mode: Turn on /off . I Redial key In idle mode: Access the Redial list. 3.2 Overview of your phone < A Earpiece B OK key In other modes...
... volume. During a call using l handsfree mode. In phonebook/call log/redial list reviewing e mode: Dial the selected number. In direct dialing mode: Dial the last dialed * number. In other modes: Select the function displayed on /off the handset. In phonebook/call log/dial list reviewing mode: Dial the selected number using handsfree mode. Long press to delete one digit/character. H Loudspeaker key In idle mode: Turn on /off . I Redial key In idle mode: Access the Redial list. 3.2 Overview of your phone < A Earpiece B OK key In other modes...
User manual
Page 14
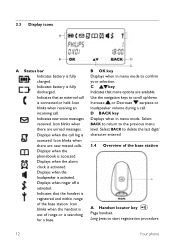
... messages. Displays when the loudspeaker is fully charged. Increase or Decrease earpiece or loudspeaker volume during a call . Icon blinks when there are new missed calls. Use the navigation keys to start registration procedure. 12 Your phone Long press to scroll up/down. 3.3 Display icons A Status bar Indicates battery is activated. Icon blinks when receiving an incoming call . Displays when the phonebook is registered and within range of the base station. Indicates that the handset is accessed. C key Indicates...
... messages. Displays when the loudspeaker is fully charged. Increase or Decrease earpiece or loudspeaker volume during a call . Icon blinks when there are new missed calls. Use the navigation keys to start registration procedure. 12 Your phone Long press to scroll up/down. 3.3 Display icons A Status bar Indicates battery is activated. Icon blinks when receiving an incoming call . Displays when the phonebook is registered and within range of the base station. Indicates that the handset is accessed. C key Indicates...
User manual
Page 18
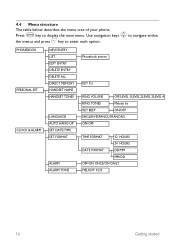
... menus and press key to display the main menu. 4.4 Menu structure m : The table below describes the menu tree of your phone. PHONEBOOK PERSONAL SET CLOCK & ALARM NEW ENTRY LIST EDIT ENTRY DELETE ENTRY DELETE ALL DIRECT MEMORY HANDSET NAME HANDSET TONES LANGUAGE AUTO HANG-UP SET DATE/TIME SET FORMAT ALARM ALARM TONE Phonebook entries KEY 1/2 RING VOLUME OFF/LEVEL 1/LEVEL 2/LEVEL 3/LEVEL 4 RING TONES Melody list KEY BEEP ON/OFF ENGLISH/ESPANOL/FRANCAIS ON/OFF...
... menus and press key to display the main menu. 4.4 Menu structure m : The table below describes the menu tree of your phone. PHONEBOOK PERSONAL SET CLOCK & ALARM NEW ENTRY LIST EDIT ENTRY DELETE ENTRY DELETE ALL DIRECT MEMORY HANDSET NAME HANDSET TONES LANGUAGE AUTO HANG-UP SET DATE/TIME SET FORMAT ALARM ALARM TONE Phonebook entries KEY 1/2 RING VOLUME OFF/LEVEL 1/LEVEL 2/LEVEL 3/LEVEL 4 RING TONES Melody list KEY BEEP ON/OFF ENGLISH/ESPANOL/FRANCAIS ON/OFF...
User manual
Page 20
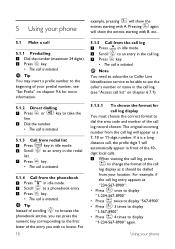
...; Press 4 times to locate. The original incoming number from the call log u 1 Press in the call log. Using your predial number, see "Access call list" on chapter 9.6 for call log display You must choose the correct format to an entry in idle mode. : 2 Scroll to dial the area code and number of your phone Tip You may insert a prefix number to the beginning of the call log record chosen.
...; Press 4 times to locate. The original incoming number from the call log u 1 Press in the call log. Using your predial number, see "Access call list" on chapter 9.6 for call log display You must choose the correct format to an entry in idle mode. : 2 Scroll to dial the area code and number of your phone Tip You may insert a prefix number to the beginning of the call log record chosen.
User manual
Page 21
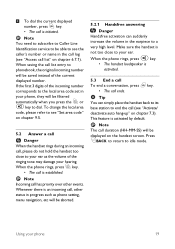
... its base station to end the call list entry to phonebook, the original incoming number will be filtered r automatically when you press the or v key to a very high level. Using your ear. Note You need to subscribe to Caller Line Identification service to be saved instead of the r ringing tone may damage your phone, they will be able to see "Access call list" on chapter 9.5. 5.2 Answer a call...
... its base station to end the call list entry to phonebook, the original incoming number will be filtered r automatically when you press the or v key to a very high level. Using your ear. Note You need to subscribe to Caller Line Identification service to be saved instead of the r ringing tone may damage your phone, they will be able to see "Access call list" on chapter 9.5. 5.2 Answer a call...
User manual
Page 27
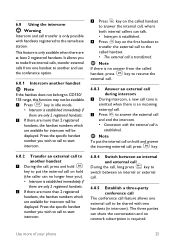
... caller can talk. Press the specific handset number you wish to CD150/ i 155 range, this function may not be displayed. Use more than 2 registered handsets, the handset numbers which are more of your phone 25 This feature is established immediately if there are only 2 registered handsets. 2 If there are more than 2 registered handsets, the handset numbers which are at least 2 registered handsets. r 3 Press key on the called handset to answer the internal call to start intercom...
... caller can talk. Press the specific handset number you wish to CD150/ i 155 range, this function may not be displayed. Use more than 2 registered handsets, the handset numbers which are more of your phone 25 This feature is established immediately if there are only 2 registered handsets. 2 If there are more than 2 registered handsets, the handset numbers which are at least 2 registered handsets. r 3 Press key on the called handset to answer the internal call to start intercom...
User manual
Page 28
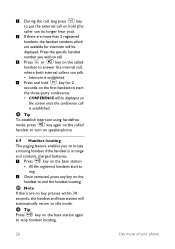
... caller can talk. i • Intercom is in range V and contains charged batteries. 1 Press key on the base station. • All the registered handsets start the three-party conference. • CONFERENCE will be displayed. Tip v To establish intercom using handsfree mode, press key again on the screen once the conference call is established. Press the specific handset r v number you ). 2 If there are no longer hear you wish to call. 3 Press or key on the called handset to turn on speakerphone. 6.9 Handset...
... caller can talk. i • Intercom is in range V and contains charged batteries. 1 Press key on the base station. • All the registered handsets start the three-party conference. • CONFERENCE will be displayed. Tip v To establish intercom using handsfree mode, press key again on the screen once the conference call is established. Press the specific handset r v number you ). 2 If there are no longer hear you wish to call. 3 Press or key on the called handset to turn on speakerphone. 6.9 Handset...
User manual
Page 29
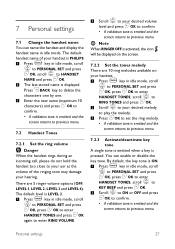
... press OK. m 1 Press key in idle mode. 7 Personal settings 7.1 Change the handset name You can enable or disable the key tone. The default handset name of the ringing tone may damage your handset. There are 10 ring melodies available on the screen. 7.2.2 Set the tones melody There are 5 ringer volume options (OFF, LEVEL 1, LEVEL 2, LEVEL 3 and LEVEL 4). You can name the handset and display the handset name in idle mode, scroll : to PERSONAL...
... press OK. m 1 Press key in idle mode. 7 Personal settings 7.1 Change the handset name You can enable or disable the key tone. The default handset name of the ringing tone may damage your handset. There are 10 ring melodies available on the screen. 7.2.2 Set the tones melody There are 5 ringer volume options (OFF, LEVEL 1, LEVEL 2, LEVEL 3 and LEVEL 4). You can name the handset and display the handset name in idle mode, scroll : to PERSONAL...
User manual
Page 33
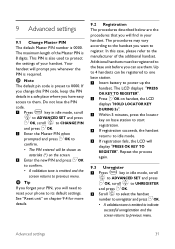
... tone is preset to previous menu. Note The default pin code is emitted to indicate successful unregistration and the screen returns to 0000. Up to 4 handsets can use them . This PIN is also used to protect the settings of your phone to confirm. • The PIN entered will prompt you whenever the PIN is 0000. If you will display "PRESS OK KEY TO REGISTER". See "Reset unit" on base station to...
... tone is preset to previous menu. Note The default pin code is emitted to indicate successful unregistration and the screen returns to 0000. Up to 4 handsets can use them . This PIN is also used to protect the settings of your phone to confirm. • The PIN entered will prompt you whenever the PIN is 0000. If you will display "PRESS OK KEY TO REGISTER". See "Reset unit" on base station to...
User manual
Page 34
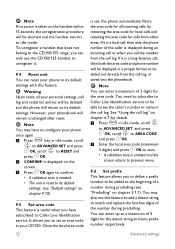
... unit is reset to its default settings with this feature to add a detect string to unregister it is taken on chapter 5.1.1). m 1 Press key in the call log, or saved into the phonebook. You may have subscribed to Caller Line Identification service. Note If no action is a long distance call, then both the area code and phone number will be displayed in a proper format to be dialed out directly...
... unit is reset to its default settings with this feature to add a detect string to unregister it is taken on chapter 5.1.1). m 1 Press key in the call log, or saved into the phonebook. You may have subscribed to Caller Line Identification service. Note If no action is a long distance call, then both the area code and phone number will be displayed in a proper format to be dialed out directly...
User manual
Page 35
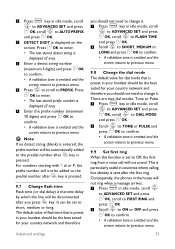
Press OK to enter. • The last stored detect string is displayed (if any). < 3 Enter a detect string number (maximum 5 digits) and press OK to PREFIX. Press 1 m Press key in idle mode, scroll : to ADVANCED SET and press < : OK, scroll to AUTO PREFIX < and press OK. < 2 DETECT DIGIT is emitted and the screen returns to previous menu. : 4 Press to scroll to confirm. • A validation tone is displayed on the screen.
Press OK to enter. • The last stored detect string is displayed (if any). < 3 Enter a detect string number (maximum 5 digits) and press OK to PREFIX. Press 1 m Press key in idle mode, scroll : to ADVANCED SET and press < : OK, scroll to AUTO PREFIX < and press OK. < 2 DETECT DIGIT is emitted and the screen returns to previous menu. : 4 Press to scroll to confirm. • A validation tone is displayed on the screen.
User manual
Page 38
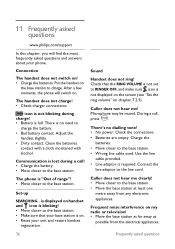
... base station. • Make sure that the RING VOLUME is not set to RINGER OFF, and make sure icon is "Out of range"! • Move closer to the base station. Caller does not hear me clearly! • Move closer to the base station. • Wrong line cable used: Use the line cable provided. • Line adaptor is on. • Reset your phone. M Microphone may be muted: During a call ! • Charge the battery • Move closer to charge...
... base station. • Make sure that the RING VOLUME is not set to RINGER OFF, and make sure icon is "Out of range"! • Move closer to the base station. Caller does not hear me clearly! • Move closer to the base station. • Wrong line cable used: Use the line cable provided. • Line adaptor is on. • Reset your phone. M Microphone may be muted: During a call ! • Charge the battery • Move closer to charge...
User manual
Page 39
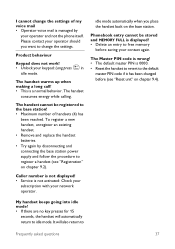
.... To register a new handset, unregister an existing handset. • Remove and replace the handset batteries. • Try again by your network operator. Phonebook entry cannot be registered to the base station! • Maximum number of my voice mail • Operator voice mail is displayed! • Delete an entry to register a handset (see "Reset unit" on chapter 9.4). The handset warms up when making a long call! • This is not activated: Check your subscription with your operator and not the phone itself. It...
.... To register a new handset, unregister an existing handset. • Remove and replace the handset batteries. • Try again by your network operator. Phonebook entry cannot be registered to the base station! • Maximum number of my voice mail • Operator voice mail is displayed! • Delete an entry to register a handset (see "Reset unit" on chapter 9.4). The handset warms up when making a long call! • This is not activated: Check your subscription with your operator and not the phone itself. It...
User manual
Page 40
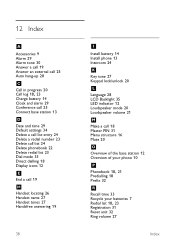
... Conference call 25 Connect base station 13 D Date and time 29 Default settings 34 Delete a call list entry 24 Delete a redial number 23 Delete call list 24 Delete phonebook 22 Delete redial list 23 Dial mode 33 Direct dialling 18 Display icons 12 E End a call 19 H Handset locating 26 Handset name 27 Handset tones 27 Handsfree answering 19 38 I Install battery 14 Install phone 13 Intercom 24 K Key tone 27 Keypad lock/unlock 20 L Language 28 LCD Backlight 35 LED indicator 12 Loudspeaker mode 20 Loudspeaker volume 21 M Make a call...
... Conference call 25 Connect base station 13 D Date and time 29 Default settings 34 Delete a call list entry 24 Delete a redial number 23 Delete call list 24 Delete phonebook 22 Delete redial list 23 Dial mode 33 Direct dialling 18 Display icons 12 E End a call 19 H Handset locating 26 Handset name 27 Handset tones 27 Handsfree answering 19 38 I Install battery 14 Install phone 13 Intercom 24 K Key tone 27 Keypad lock/unlock 20 L Language 28 LCD Backlight 35 LED indicator 12 Loudspeaker mode 20 Loudspeaker volume 21 M Make a call...
Quick start guide
Page 1
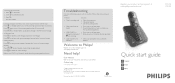
... the User Manual that came with your phone. Online help ? Call from any electrical appliances • SEARCHING... o Press again to Philips! p Press on the answering machine (the LED is not displayed! • Check your subscription with your network operator Welcome to turn on the base station to delete the current message. is displayed on ). Register your unit and restart the handset registration • Calller number is turned on handset and icon is blinking! • Move closer to the base station...
... the User Manual that came with your phone. Online help ? Call from any electrical appliances • SEARCHING... o Press again to Philips! p Press on the answering machine (the LED is not displayed! • Check your subscription with your network operator Welcome to turn on the base station to delete the current message. is displayed on ). Register your unit and restart the handset registration • Calller number is turned on handset and icon is blinking! • Move closer to the base station...
Quick start guide
Page 2
... power supply units and additional rechargeable batteries. Connect the other end of the line cord and power cable to their corresponding connectors at the back of the base station. 3. Scroll to your phone. 1 Connect Connect the base station 1. r Answer a call To end a conversation, press key. Press key in idle mode, scroll to PERSONAL SET and press OK, : < : scroll to HANDSET TONES and press OK, scroll to RING < TONES and press OK. : 2. Adjust earpiece volume : During a call r Dial...
... power supply units and additional rechargeable batteries. Connect the other end of the line cord and power cable to their corresponding connectors at the back of the base station. 3. Scroll to your phone. 1 Connect Connect the base station 1. r Answer a call To end a conversation, press key. Press key in idle mode, scroll to PERSONAL SET and press OK, : < : scroll to HANDSET TONES and press OK, scroll to RING < TONES and press OK. : 2. Adjust earpiece volume : During a call r Dial...


