
PVD4743 User Guide
Page 2
... a qualified service technician. 2 IF REPLACEMENT PARTS ARE REQUIRED Make sure the service technician uses only parts specified by a qualified service technician. Important Safeguards and Precautions FOR YOUR SAFETY, READ AND RETAIN ALL SAFETY AND OPERATING INSTRUCTIONS. Overloaded outlets and extension cords are hazardous and should happen to fall causing serious injury to a child or adult and damage to open or remove covers, or make sure...
... a qualified service technician. 2 IF REPLACEMENT PARTS ARE REQUIRED Make sure the service technician uses only parts specified by a qualified service technician. Important Safeguards and Precautions FOR YOUR SAFETY, READ AND RETAIN ALL SAFETY AND OPERATING INSTRUCTIONS. Overloaded outlets and extension cords are hazardous and should happen to fall causing serious injury to a child or adult and damage to open or remove covers, or make sure...
PVD4743 User Guide
Page 5
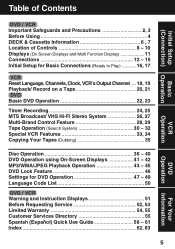
... Using 4 DECK & Cassette Information 6 , 7 Location of Controls 8 ~ 10 Displays (On Screen Displays and Multi Function Display 11 Connections 12 ~ 15 Initial Setup for Basic Connections (Ready to Play 16, 17 VCR Reset Language, Channels, Clock, VCR's Output Channel ... 18, 19 Playback/ Record on a Tape 20, 21 DVD Basic DVD Operation 22, 23 Timer Recording 24, 25 MTS Broadcast/ VHS Hi-Fi Stereo System 26, 27 Multi-Brand Control Feature 28, 29 Tape Operation (Search System 30 ~ 32 Special VCR Features 33, 34 Copying Your...
... Using 4 DECK & Cassette Information 6 , 7 Location of Controls 8 ~ 10 Displays (On Screen Displays and Multi Function Display 11 Connections 12 ~ 15 Initial Setup for Basic Connections (Ready to Play 16, 17 VCR Reset Language, Channels, Clock, VCR's Output Channel ... 18, 19 Playback/ Record on a Tape 20, 21 DVD Basic DVD Operation 22, 23 Timer Recording 24, 25 MTS Broadcast/ VHS Hi-Fi Stereo System 26, 27 Multi-Brand Control Feature 28, 29 Tape Operation (Search System 30 ~ 32 Special VCR Features 33, 34 Copying Your...

PVD4743 User Guide
Page 7
.... This DECK also supports Video CDs with incredible playback quality. Patents and other rights owners. Playback Control:With Video CD (version 2.0), scenes or information may be used to be quickly located. Specifications Initial Setup (Connection) Power Source: Power Consumption: 120 V AC, 60 Hz Power On: Approx. 32 watts, Power Off: Approx. 4 watts Video Signal: EIA Standard NTSC color Video Recording System: 4 rotary heads helical scanning system Audio Track: Tuner: Broadcast Channels: CABLE Channels: 1 track (Normal), 2 channel (Hi-Fi Audio Sound...
.... This DECK also supports Video CDs with incredible playback quality. Patents and other rights owners. Playback Control:With Video CD (version 2.0), scenes or information may be used to be quickly located. Specifications Initial Setup (Connection) Power Source: Power Consumption: 120 V AC, 60 Hz Power On: Approx. 32 watts, Power Off: Approx. 4 watts Video Signal: EIA Standard NTSC color Video Recording System: 4 rotary heads helical scanning system Audio Track: Tuner: Broadcast Channels: CABLE Channels: 1 track (Normal), 2 channel (Hi-Fi Audio Sound...

PVD4743 User Guide
Page 9
... tray. FAST FORWARD/SEARCH p. 20 PLAY p. 20 Over 2 inches Over 2 inches REWIND/SEARCH p. 20 POWER Cassette Disc Tray Compartment OPEN/CLOSE p. 22 Audio/Video Input Connector 2 (LINE 2) p. 35 CHANNEL / TRACKING/V-LOCK pp. 6, 21 REC p. 21 Multi Function Display p. 11 Remote Sensor Reset All Memory Functions PROGRESSIVE p. 10 PAUSE p. 23 SKIP SKIP p. 23 PLAY p. 22 STOP p. 22 Use when moving DECK to new location, or if a mistake was made in the Initial Setup section (return to Factory Setting). • Make...
... tray. FAST FORWARD/SEARCH p. 20 PLAY p. 20 Over 2 inches Over 2 inches REWIND/SEARCH p. 20 POWER Cassette Disc Tray Compartment OPEN/CLOSE p. 22 Audio/Video Input Connector 2 (LINE 2) p. 35 CHANNEL / TRACKING/V-LOCK pp. 6, 21 REC p. 21 Multi Function Display p. 11 Remote Sensor Reset All Memory Functions PROGRESSIVE p. 10 PAUSE p. 23 SKIP SKIP p. 23 PLAY p. 22 STOP p. 22 Use when moving DECK to new location, or if a mistake was made in the Initial Setup section (return to Factory Setting). • Make...

PVD4743 User Guide
Page 11
... pressed. Displays (On Screen & Multi Function) Initial Setup (Connection) On Screen Displays (VCR) Function & Channel Displays CH 0 8 When a function button is selected. Briefly displays the channel number, or "L1" or "L2" when a channel or line input is pressed, e.g. PLAY, or you change channels, a 5-second display appears. Blank Tape/ No Video Signal Indications Whenever a blank section of a tape comes up when Hi-Fi audio is set , but a tape has not been inserted into DECK and when a power interruption occurs during recording. Hi...
... pressed. Displays (On Screen & Multi Function) Initial Setup (Connection) On Screen Displays (VCR) Function & Channel Displays CH 0 8 When a function button is selected. Briefly displays the channel number, or "L1" or "L2" when a channel or line input is pressed, e.g. PLAY, or you change channels, a 5-second display appears. Blank Tape/ No Video Signal Indications Whenever a blank section of a tape comes up when Hi-Fi audio is set , but a tape has not been inserted into DECK and when a power interruption occurs during recording. Hi...
PVD4743 User Guide
Page 13
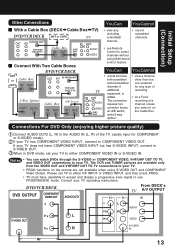
... COMPONENT VIDEO INPUT but has S-VIDEO INPUT, connect to S-VIDEO OUT. 3 When in DVD mode, set TV to the AUDIO IN (L, R) of a channel unless you select it on the remote are available only from the VIDEO OUT and VHF/UHF OUT TO TV connections to your TV does not have capability to accept and display a progressive scan signal to use Remote Control to COMPONENT VIDEO OUT. This connection requires: two converter boxes, an A/B switch, and a 2-way splitter. • view a channel...
... COMPONENT VIDEO INPUT but has S-VIDEO INPUT, connect to S-VIDEO OUT. 3 When in DVD mode, set TV to the AUDIO IN (L, R) of a channel unless you select it on the remote are available only from the VIDEO OUT and VHF/UHF OUT TO TV connections to your TV does not have capability to accept and display a progressive scan signal to use Remote Control to COMPONENT VIDEO OUT. This connection requires: two converter boxes, an A/B switch, and a 2-way splitter. • view a channel...
PVD4743 User Guide
Page 14
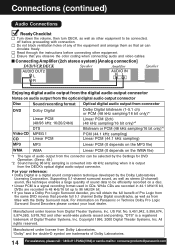
... that provide full 5.1 channel Dolby Digital soundtracks, as well as stereo (2-channel) sound, this technique enables a large quantity of audio output from the same DVD movies that air can be efficiently recorded on the WMA file) *1 The type of sound data to : consumerproducts@panasonic.com For your local dealer. US Pat. Read through the instructions before proceeding with the Dolby Surround mark. "DTS" is a signal recording format used in 48 kHz...
... that provide full 5.1 channel Dolby Digital soundtracks, as well as stereo (2-channel) sound, this technique enables a large quantity of audio output from the same DVD movies that air can be efficiently recorded on the WMA file) *1 The type of sound data to : consumerproducts@panasonic.com For your local dealer. US Pat. Read through the instructions before proceeding with the Dolby Surround mark. "DTS" is a signal recording format used in 48 kHz...

PVD4743 User Guide
Page 21
...-screen and on the remote (change to resume recording. • You cannot view another channel during recording, ➛ press DVD, and then press PLAY. PAUSE mode), ➛ press VCR/TV on Multi Function Display. 4 Press REC to start Recording. This video recorder, equipped with existing VHS equipment. Note Remove loose or peeling labels from DVD/ Video CD/ CD to VHS tape using Cable Box or DSS Receiver. • After 5 minutes in Pause mode, DECK stops to set to "OFF," press VCR...
...-screen and on the remote (change to resume recording. • You cannot view another channel during recording, ➛ press DVD, and then press PLAY. PAUSE mode), ➛ press VCR/TV on Multi Function Display. 4 Press REC to start Recording. This video recorder, equipped with existing VHS equipment. Note Remove loose or peeling labels from DVD/ Video CD/ CD to VHS tape using Cable Box or DSS Receiver. • After 5 minutes in Pause mode, DECK stops to set to "OFF," press VCR...

PVD4743 User Guide
Page 23
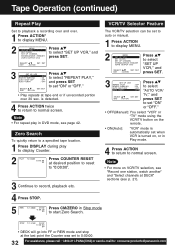
... 1. Basic Operation I Still Picture or Pause Press PAUSE/STILL during play . Press VSS in DVD mode. • The Surround sound effects can be displayed. Press PLAY to release. Press PLAY to release. PLEASE INSERT A DIFFERENT DISC" is displayed. • Remove disc and press DECK POWER off after play . Reverse Skip Forward Skip I Forward/Reverse Scene Search Press FF/SLOW+ or REW/SLOWduring play . Notes Auto-Power Off Function Power turns off when not in Stop mode (DVD) for...
... 1. Basic Operation I Still Picture or Pause Press PAUSE/STILL during play . Press VSS in DVD mode. • The Surround sound effects can be displayed. Press PLAY to release. Press PLAY to release. PLEASE INSERT A DIFFERENT DISC" is displayed. • Remove disc and press DECK POWER off after play . Reverse Skip Forward Skip I Forward/Reverse Scene Search Press FF/SLOW+ or REW/SLOWduring play . Notes Auto-Power Off Function Power turns off when not in Stop mode (DVD) for...

PVD4743 User Guide
Page 25
...; When recording programs via an antenna or cable, DSS Receiver must be left on the remote and try the button again. Be sure a cassette with record tab is loaded and DECK is not in VCR mode for a few seconds to cancel the Timer Recording. (The "TIMER" Indicator goes out on Multi Function Display.) • Any future daily or weekly recording will not be canceled. Cable Box power must be set new programs. SELECT : SET : SET END...
...; When recording programs via an antenna or cable, DSS Receiver must be left on the remote and try the button again. Be sure a cassette with record tab is loaded and DECK is not in VCR mode for a few seconds to cancel the Timer Recording. (The "TIMER" Indicator goes out on Multi Function Display.) • Any future daily or weekly recording will not be canceled. Cable Box power must be set new programs. SELECT : SET : SET END...

PVD4743 User Guide
Page 26
.... STOP 12 : 0 0AM CH 02 0 : 00 : 00 STEREO SP SAP MONO MONO broadcast Normal monaural sound broadcast. MTS Broadcast/ VHS Hi-Fi Stereo System Connection Make the Audio/Video Connection as shown on pp. 12 ~ 15. • You can use TV connected to : consumerproducts@panasonic.com The signal being received, ➛ press DISPLAY*. To display the broadcast signal being received is indicated with an " " mark while the selected audio mode...
.... STOP 12 : 0 0AM CH 02 0 : 00 : 00 STEREO SP SAP MONO MONO broadcast Normal monaural sound broadcast. MTS Broadcast/ VHS Hi-Fi Stereo System Connection Make the Audio/Video Connection as shown on pp. 12 ~ 15. • You can use TV connected to : consumerproducts@panasonic.com The signal being received, ➛ press DISPLAY*. To display the broadcast signal being received is indicated with an " " mark while the selected audio mode...
PVD4743 User Guide
Page 28
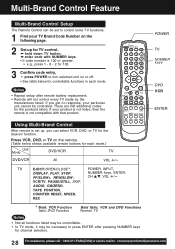
... controlled. Press VCR, DVD, or TV on or off. • See table below shows available remote buttons for each mode. There are NO additional codes for controllable functions in each mode.) Unit Mode DVD/VCR TV DVD/VCR All VOL +/- TV EJECT/OPEN/CLOSE *, DISPLAY, PLAY, STOP, FF/SLOW+, REW/SLOW-, POWER, INPUT, NUMBER keys, ENTER, CH / , VOL +/- Multi-Brand Control Feature Multi-Brand Control Setup The Remote Control can select VCR, DVD, or TV for the desired function. Notes • Repeat setup after pressing NUMBER keys for channel selection...
... controlled. Press VCR, DVD, or TV on or off. • See table below shows available remote buttons for each mode. There are NO additional codes for controllable functions in each mode.) Unit Mode DVD/VCR TV DVD/VCR All VOL +/- TV EJECT/OPEN/CLOSE *, DISPLAY, PLAY, STOP, FF/SLOW+, REW/SLOW-, POWER, INPUT, NUMBER keys, ENTER, CH / , VOL +/- Multi-Brand Control Feature Multi-Brand Control Setup The Remote Control can select VCR, DVD, or TV for the desired function. Notes • Repeat setup after pressing NUMBER keys for channel selection...
PVD4743 User Guide
Page 32
... selection can be set to auto or manual. 1 Press ACTION to display MENU. 2 MENU SET UP VCR SET CLOCK SET UP CHANNEL IDIOMA/LANGUE : ENGLISH VCR'S OUTPUT CH:3 SELECT : SET : SET EXIT : ACTION Press to select "SET UP VCR," and press SET. 3 SET UP VCR REPEAT PLAY REMOTE WARN I NG AUTO SHUT-OFF AUTO VCR/TV : OFF : ON : OFF : OFF SELECT : SET: SET END : ACT I ON Press to select "AUTO VCR/ TV," and press SET to set "ON" or "OFF." • OFF(Manual): You select "VCR" or "TV" mode using the VCR/TV button on VCR/TV selection...
... selection can be set to auto or manual. 1 Press ACTION to display MENU. 2 MENU SET UP VCR SET CLOCK SET UP CHANNEL IDIOMA/LANGUE : ENGLISH VCR'S OUTPUT CH:3 SELECT : SET : SET EXIT : ACTION Press to select "SET UP VCR," and press SET. 3 SET UP VCR REPEAT PLAY REMOTE WARN I NG AUTO SHUT-OFF AUTO VCR/TV : OFF : ON : OFF : OFF SELECT : SET: SET END : ACT I ON Press to select "AUTO VCR/ TV," and press SET to set "ON" or "OFF." • OFF(Manual): You select "VCR" or "TV" mode using the VCR/TV button on VCR/TV selection...
PVD4743 User Guide
Page 35
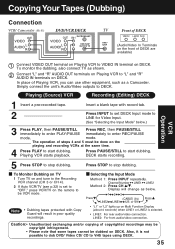
... . Selecting the Input Mode Method 1: Press INPUT repeatedly. Also, it is set DECK Input mode to start dubbing. To monitor the dubbing, also connect TV as shown. 2 Connect "L" and "R" AUDIO OUT terminals on Playing VCR to start dubbing. Simply connect the unit's Audio/Video outputs to stop dubbing. Insert a blank tape with Copy Guard will change as a Camcorder. Display will result in poor quality recordings. Press PAUSE/STILL to "L" and "R" AUDIO IN terminals on DECK. Channel Number...
... . Selecting the Input Mode Method 1: Press INPUT repeatedly. Also, it is set DECK Input mode to start dubbing. To monitor the dubbing, also connect TV as shown. 2 Connect "L" and "R" AUDIO OUT terminals on Playing VCR to start dubbing. Simply connect the unit's Audio/Video outputs to stop dubbing. Insert a blank tape with Copy Guard will change as a Camcorder. Display will result in poor quality recordings. Press PAUSE/STILL to "L" and "R" AUDIO IN terminals on DECK. Channel Number...

PVD4743 User Guide
Page 39
... VIDEO CD 01 : 35 : 12 SET : SET NEXT : DISPLAY 3 Press DISPLAY to display DECK Information screen. 4 Press SET to select "DISC." (DECK Information Screen) CLEAR ALL SELECT : SET : SET END : ACTION START sequence selected. • To cancel, press STOP PLAY REPEAT : DISC PROGRAM PLAY during play of play. 1 Press ACTION to display DVD MAIN MENU. 2 DVD MAIN MENU DISC LANGUAGES AUDIO OUTPUT ST I L L MODE : AUTO TV MODE : 4:3 Letterbox PARENTAL LOCK :LEVEL 8 PLAY MODE SELECT SET END : : SET : ACTION Press to select "PLAY MODE," and press SET to display. 3 PLAY MODE...
... VIDEO CD 01 : 35 : 12 SET : SET NEXT : DISPLAY 3 Press DISPLAY to display DECK Information screen. 4 Press SET to select "DISC." (DECK Information Screen) CLEAR ALL SELECT : SET : SET END : ACTION START sequence selected. • To cancel, press STOP PLAY REPEAT : DISC PROGRAM PLAY during play of play. 1 Press ACTION to display DVD MAIN MENU. 2 DVD MAIN MENU DISC LANGUAGES AUDIO OUTPUT ST I L L MODE : AUTO TV MODE : 4:3 Letterbox PARENTAL LOCK :LEVEL 8 PLAY MODE SELECT SET END : : SET : ACTION Press to select "PLAY MODE," and press SET to display. 3 PLAY MODE...

PVD4743 User Guide
Page 40
...DVD mode, press DVD. *Important: If a remote control button does not work when pressed, press the DVD button on Multi Function Display (about 3 seconds) when press VOL.ADJ. Disc Operation (continued) Random Play (Video CD/CD only) Tracks are recorded in a random order. 1 Press ACTION* to display DVD MAIN MENU. 2 DVD MAIN MENU DISC LANGUAGES AUDIO OUTPUT ST I L L MODE : AUTO TV MODE : 4:3 Letterbox PARENTAL LOCK :LEVEL 8 PLAY MODE SELECT SET END : : SET : ACTION Press to select "PLAY MODE," and press SET to display. 3 PLAY MODE PROGRAM PLAY RANDOM PLAY SELECT SET END : : SET...
...DVD mode, press DVD. *Important: If a remote control button does not work when pressed, press the DVD button on Multi Function Display (about 3 seconds) when press VOL.ADJ. Disc Operation (continued) Random Play (Video CD/CD only) Tracks are recorded in a random order. 1 Press ACTION* to display DVD MAIN MENU. 2 DVD MAIN MENU DISC LANGUAGES AUDIO OUTPUT ST I L L MODE : AUTO TV MODE : 4:3 Letterbox PARENTAL LOCK :LEVEL 8 PLAY MODE SELECT SET END : : SET : ACTION Press to select "PLAY MODE," and press SET to display. 3 PLAY MODE PROGRAM PLAY RANDOM PLAY SELECT SET END : : SET...

PVD4743 User Guide
Page 51
... played. (Appears during a Timer Recording... 25 (visible in VCR mode only) If head cleaning becomes necessary while playing back a tape... 6 If you press a function button other than STOP/ EJECT or POWER while DECK is prohibited.) 43 If you press PLAY, and DECK reads data from a stained or scratched disc in VCR Lock mode... An unusable disc is inserted in the DECK. 4 This file format cannot be played back. (Playback is 33 in DVD mode. 4 Playback of a disc with no record...
... played. (Appears during a Timer Recording... 25 (visible in VCR mode only) If head cleaning becomes necessary while playing back a tape... 6 If you press a function button other than STOP/ EJECT or POWER while DECK is prohibited.) 43 If you press PLAY, and DECK reads data from a stained or scratched disc in VCR Lock mode... An unusable disc is inserted in the DECK. 4 This file format cannot be played back. (Playback is 33 in DVD mode. 4 Playback of a disc with no record...
PVD4743 User Guide
Page 52
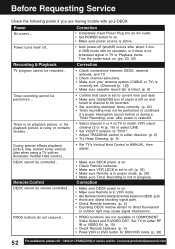
... match VCR output channel (3 or 4) (p. 16) or select LINE. • Set VCR/TV selector to on . • Check Remote batteries. • Make sure VCR LOCK is not in COMPONENT Video Output and S-VIDEO OUT. Remote Control • Make sure DECK power is on . • Make sure power source is intact. (p. 6) Timer recording cannot be controlled... Correction • Completely insert Power Plug into an AC outlet. • Set POWER button to "VCR." • Adjust TRACKING control in TV or Playback mode. Power No power... Before Requesting Service Check...
... match VCR output channel (3 or 4) (p. 16) or select LINE. • Set VCR/TV selector to on . • Check Remote batteries. • Make sure VCR LOCK is not in COMPONENT Video Output and S-VIDEO OUT. Remote Control • Make sure DECK power is on . • Make sure power source is intact. (p. 6) Timer recording cannot be controlled... Correction • Completely insert Power Plug into an AC outlet. • Set POWER button to "VCR." • Adjust TRACKING control in TV or Playback mode. Power No power... Before Requesting Service Check...
PVD4743 User Guide
Page 53
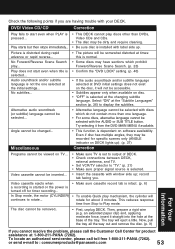
...) to output of the tray. Picture is not the one language. • For some discs, alternative language cannot be selected with discs which prohibit Forward/Reverse Scene Search. (p. 23) • Confirm the "DVD LOCK" setting. (p. 46) • If the audio soundtrack and/or subtitle language selected at the changing subtitle language. Alternative audio soundtrack (or subtitle) language cannot be removed.. • First, unplug DECK. Video cassette cannot be inserted... • Make sure TV is set to display the subtitles...
...) to output of the tray. Picture is not the one language. • For some discs, alternative language cannot be selected with discs which prohibit Forward/Reverse Scene Search. (p. 23) • Confirm the "DVD LOCK" setting. (p. 46) • If the audio soundtrack and/or subtitle language selected at the changing subtitle language. Alternative audio soundtrack (or subtitle) language cannot be removed.. • First, unplug DECK. Video cassette cannot be inserted... • Make sure TV is set to display the subtitles...
PVD4743 User Guide
Page 62
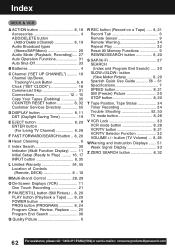
... Program End Search) ..... 30 SLOW+/SLOW- Index DECK & VCR A ACTION button 8, 18 Accessories 4 ADD/DELETE button (Add or Delete a Channel 8, 19 Audio Broadcast types (Stereo/SAP/Mono 26 Audio Mode (Playback, Recording) .... 27 Auto Operation Functions 31 Auto Shut-Off 33 B Batteries 4 C Channel ("SET UP CHANNEL 18 Channel Up/Down, Tracking/V-Lock Button 6, 8 Clock ("SET CLOCK 18 Commercial Skip 31 Connections 12 ~ 15 Copy Your Tapes (Dubbing 35 COUNTER RESET button 8, 32 Customer Services Directory 55 D DISPLAY button 8, 11 DST (Daylight Saving Time 19 E EJECT button...
... Program End Search) ..... 30 SLOW+/SLOW- Index DECK & VCR A ACTION button 8, 18 Accessories 4 ADD/DELETE button (Add or Delete a Channel 8, 19 Audio Broadcast types (Stereo/SAP/Mono 26 Audio Mode (Playback, Recording) .... 27 Auto Operation Functions 31 Auto Shut-Off 33 B Batteries 4 C Channel ("SET UP CHANNEL 18 Channel Up/Down, Tracking/V-Lock Button 6, 8 Clock ("SET CLOCK 18 Commercial Skip 31 Connections 12 ~ 15 Copy Your Tapes (Dubbing 35 COUNTER RESET button 8, 32 Customer Services Directory 55 D DISPLAY button 8, 11 DST (Daylight Saving Time 19 E EJECT button...


