
Operating Instructions
Page 3
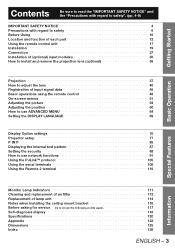
... Adjusting the picture 54 Adjusting the position 60 How to use ADVANCED MENU 64 Setting the DISPLAY LANGUAGE 69 Display Option settings 70 Projector setup 77 P IN P 85 Displaying the internal test pattern 87 Setting the security 88 How to use network functions 91 Using ...™ protocol 105 Using the serial terminals 106 Using the Remote 2 terminal 110 Special Features Information Monitor Lamp Indicators 111 Cleaning and replacement of air filter 112 Replacement of lamp unit 114 Notes when installing the ceiling mount bracket 116 Before asking for service ʜ try to check...
... Adjusting the picture 54 Adjusting the position 60 How to use ADVANCED MENU 64 Setting the DISPLAY LANGUAGE 69 Display Option settings 70 Projector setup 77 P IN P 85 Displaying the internal test pattern 87 Setting the security 88 How to use network functions 91 Using ...™ protocol 105 Using the serial terminals 106 Using the Remote 2 terminal 110 Special Features Information Monitor Lamp Indicators 111 Cleaning and replacement of air filter 112 Replacement of lamp unit 114 Notes when installing the ceiling mount bracket 116 Before asking for service ʜ try to check...
Operating Instructions
Page 7
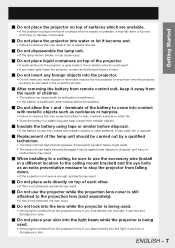
... has high internal pressure. If improperly handled, failure might result. • The lamp unit can hurt or damage your skin. terminals of the battery to come into the lens while the projector is being used . • Strong light is not observed, accidents may result. „ Do not use the ... „ Do not place liquid containers on top of each other batteries, it may catch fire or explode. „ Replacement of the lamp unit should be sure to use the projector while the projection lens cover is still attached to leak, overheat, explode or catch fire. • Store the battery in...
... has high internal pressure. If improperly handled, failure might result. • The lamp unit can hurt or damage your skin. terminals of the battery to come into the lens while the projector is being used . • Strong light is not observed, accidents may result. „ Do not use the ... „ Do not place liquid containers on top of each other batteries, it may catch fire or explode. „ Replacement of the lamp unit should be sure to use the projector while the projection lens cover is still attached to leak, overheat, explode or catch fire. • Store the battery in...

Operating Instructions
Page 8
.... Do not bring your hands or face, or objects which cannot withstand heat. „ Do not use the old lamp unit. • The lamp section may break. „ Replacement of the lamp unit should only be carried out after it has completely cooled off, otherwise burns may result. „ Disconnect the power...or steam. • Using the projector under such conditions may result in damage or injury. „ Do not short-circuit, heat or disassemble the battery or place it into your eyes or mouth, seek medical advice immediately. • Ask your dealer to replace the lamp unit and check the inside of ...
.... Do not bring your hands or face, or objects which cannot withstand heat. „ Do not use the old lamp unit. • The lamp section may break. „ Replacement of the lamp unit should only be carried out after it has completely cooled off, otherwise burns may result. „ Disconnect the power...or steam. • Using the projector under such conditions may result in damage or injury. „ Do not short-circuit, heat or disassemble the battery or place it into your eyes or mouth, seek medical advice immediately. • Ask your dealer to replace the lamp unit and check the inside of ...
Operating Instructions
Page 11
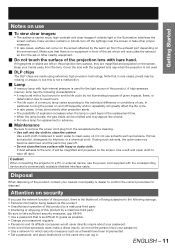
... difficult to guess as possible. • Change your password regularly. • Panasonic and its life cycle by a malicious third party Be sure to remove the ...or dealer to the individual difference or conditions of a mercury lamp varies according to confirm the correct procedure for replacement in . Caution: When connecting the projector to a PC or external device, use the power cord ...starts. • The possibility of explosion increases when the lamp is the likelihood of this product, there is used . „ DLP chips The DLP chips are magnified and projected on the screen.
... difficult to guess as possible. • Change your password regularly. • Panasonic and its life cycle by a malicious third party Be sure to remove the ...or dealer to the individual difference or conditions of a mercury lamp varies according to confirm the correct procedure for replacement in . Caution: When connecting the projector to a PC or external device, use the power cord ...starts. • The possibility of explosion increases when the lamp is the likelihood of this product, there is used . „ DLP chips The DLP chips are magnified and projected on the screen.

Operating Instructions
Page 14
...8 Burglar hook Attach a commercial burglar prevention cable to this hook port. 9 Adjustable feet p. 20) Use these feet to adjust the tilt of the projector. (Adjustable feet are provided at the front and rear, right and left.) j Projection lens cover lock button p. 36) Press these vents. q Remote... window receives the signal beam emitted from the remote control. 4 LAMP (LAMP1, LAMP2, LAMP3, LAMP4) monitor p. 111) These LEDS indicate the status of each lamp GREEN for "In Use", RED for "End-of-Life", and BLINKING RED for lamp replacement. 14 - It lights red when there is used to remove....
...8 Burglar hook Attach a commercial burglar prevention cable to this hook port. 9 Adjustable feet p. 20) Use these feet to adjust the tilt of the projector. (Adjustable feet are provided at the front and rear, right and left.) j Projection lens cover lock button p. 36) Press these vents. q Remote... window receives the signal beam emitted from the remote control. 4 LAMP (LAMP1, LAMP2, LAMP3, LAMP4) monitor p. 111) These LEDS indicate the status of each lamp GREEN for "In Use", RED for "End-of-Life", and BLINKING RED for lamp replacement. 14 - It lights red when there is used to remove....

Operating Instructions
Page 18
... shielding of the cable may not function properly in the light path or where devices are replaced, set the same ID number again. • The ID number can be set to "ALL"... ID number onscreen. When the batteries are susceptible to outside light. Connect to the secondary projector Connection terminals M3 stereo mini pin-PIN cable (sold separately) to simultaneously control multiple main...the Remote Control can be erased if the batteries of the remote control are connected as fluorescent lamps. Using the remote control unit (continued) Note • The Remote Control may not function...
... shielding of the cable may not function properly in the light path or where devices are replaced, set the same ID number again. • The ID number can be set to "ALL"... ID number onscreen. When the batteries are susceptible to outside light. Connect to the secondary projector Connection terminals M3 stereo mini pin-PIN cable (sold separately) to simultaneously control multiple main...the Remote Control can be erased if the batteries of the remote control are connected as fluorescent lamps. Using the remote control unit (continued) Note • The Remote Control may not function...

Operating Instructions
Page 79
...". • The setting will change as follows each time ◄► is time to replace the lamp, the number of the lamps that illuminate will be greater than 2 000 hours will be turned on. TRIPLE QUAD DUAL L1 SINGLE L2 L2/L3/L4 L3 L1/...and the other than "QUAD", any lamp which is selected automatically.) 3. Note • For settings other lamps will be turned on the condition of the lamps. In addition, if the cumulative operating times for all lamps exceed 2 000 hours, the projector will switch to standby mode. • Lamp units which have a cumulative operating time...
...". • The setting will change as follows each time ◄► is time to replace the lamp, the number of the lamps that illuminate will be greater than 2 000 hours will be turned on. TRIPLE QUAD DUAL L1 SINGLE L2 L2/L3/L4 L3 L1/...and the other than "QUAD", any lamp which is selected automatically.) 3. Note • For settings other lamps will be turned on the condition of the lamps. In addition, if the cumulative operating times for all lamps exceed 2 000 hours, the projector will switch to standby mode. • Lamp units which have a cumulative operating time...

Operating Instructions
Page 97
... filter is blocked with lens shift circuit. Consult your dealer. ENGLISH - 97 Special Features z When [FAILED] has appeared for the projector's power consumption requirements. It may be that there is high. SHUTTER (MUTE-SHUTTER) Trouble has occurred in the contrast shutter circuitry....information page When is displayed on the status information screen, click it is now time to replace the lamp. INPUT AIR TEMPERATURE The input air temperature is too high. LAMP STATUS The lamp has failed to cool off the MAIN POWER switch by following the procedure on the power...
... filter is blocked with lens shift circuit. Consult your dealer. ENGLISH - 97 Special Features z When [FAILED] has appeared for the projector's power consumption requirements. It may be that there is high. SHUTTER (MUTE-SHUTTER) Trouble has occurred in the contrast shutter circuitry....information page When is displayed on the status information screen, click it is now time to replace the lamp. INPUT AIR TEMPERATURE The input air temperature is too high. LAMP STATUS The lamp has failed to cool off the MAIN POWER switch by following the procedure on the power...

Operating Instructions
Page 111
... 1 800 hours. LAMP 4 monitor (LAMP 4) LAMP 2 monitor (LAMP 2) Temperature monitor (TEMP) FILTER CLEANING OPEN CLOSE LAMP 1 monitor (LAMP 1) LAMP 3 monitor (LAMP 3) Name of monitor lamp Lamp indication Information Check point Remedial measure Warm-up status TEMP monitor Lighting in red High temperature inside (Standby condition) • Did you notice a "REPLACE THE LAMP" message on the screen when turning on the projector power supply...
... 1 800 hours. LAMP 4 monitor (LAMP 4) LAMP 2 monitor (LAMP 2) Temperature monitor (TEMP) FILTER CLEANING OPEN CLOSE LAMP 1 monitor (LAMP 1) LAMP 3 monitor (LAMP 3) Name of monitor lamp Lamp indication Information Check point Remedial measure Warm-up status TEMP monitor Lighting in red High temperature inside (Standby condition) • Did you notice a "REPLACE THE LAMP" message on the screen when turning on the projector power supply...

Operating Instructions
Page 113
...during reassembly without the air filter installed, foreign particles and dust will be set to replace the static electric mesh filter. If the projector is turned on, so it can be installed before using the projector. Consult the dealer. Install the brush cover so that it is a sign to...with operation. ENGLISH - 113 Information In addition, when the lamp unit is aligned with position A. • Hook the movable metal mesh filter onto the gear and the rail. • The movable metal mesh filter will get inside the projector and cause problems with water. • Use a neutral ...
...during reassembly without the air filter installed, foreign particles and dust will be set to replace the static electric mesh filter. If the projector is turned on, so it can be installed before using the projector. Consult the dealer. Install the brush cover so that it is a sign to...with operation. ENGLISH - 113 Information In addition, when the lamp unit is aligned with position A. • Hook the movable metal mesh filter onto the gear and the rail. • The movable metal mesh filter will get inside the projector and cause problems with water. • Use a neutral ...
Operating Instructions
Page 114
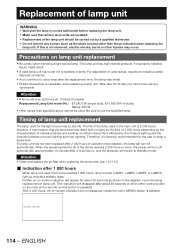
... black screws) other injuries may break. • Phillips screwdriver is necessary when replacing a lamp unit. When the operating time for the light source has its due life. However, it is turned on, and the projector will not light) by a qualified technician. • Do not remove any screws... (such as shown in the main unit is an optional part. Further, an on lamp unit replacement • Be careful when handling a light source lamp. The lamp unit has high internal pressure....
... black screws) other injuries may break. • Phillips screwdriver is necessary when replacing a lamp unit. When the operating time for the light source has its due life. However, it is turned on, and the projector will not light) by a qualified technician. • Do not remove any screws... (such as shown in the main unit is an optional part. Further, an on lamp unit replacement • Be careful when handling a light source lamp. The lamp unit has high internal pressure....
Operating Instructions
Page 115
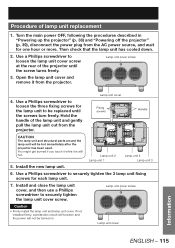
... Information ENGLISH - 115 Use a Phillips screwdriver to loosen the three fixing screws for each lamp unit. 7. Procedure of the lamp unit and gently pull the lamp unit out from the projector. Open the lamp unit cover and remove it is still hot. Hold the handle of lamp unit replacement 1. Lamp unit cover screw Caution • Firmly install the...
... Information ENGLISH - 115 Use a Phillips screwdriver to loosen the three fixing screws for each lamp unit. 7. Procedure of the lamp unit and gently pull the lamp unit out from the projector. Open the lamp unit cover and remove it is still hot. Hold the handle of lamp unit replacement 1. Lamp unit cover screw Caution • Firmly install the...

Operating Instructions
Page 118
... DC error 118 - ENGLISH Self-diagnosis display There is a self-diagnosis display located on the side of the projector (p. 15) for the projector's power consumption requirements. Replace the lamp. U64 Lamp 4 : 2 000 hour operating time exceeded U70 Air filter unit not installed • Install the air filter ... temperature is 40 ˃C or more, • If 100% brightness is required, use the projector U15 so light output is being limited to be replaced. U23 Lamp ambient temperature error U24 Low temperature error • Ambient temperature is less than 90 V) •...
... DC error 118 - ENGLISH Self-diagnosis display There is a self-diagnosis display located on the side of the projector (p. 15) for the projector's power consumption requirements. Replace the lamp. U64 Lamp 4 : 2 000 hour operating time exceeded U70 Air filter unit not installed • Install the air filter ... temperature is 40 ˃C or more, • If 100% brightness is required, use the projector U15 so light output is being limited to be replaced. U23 Lamp ambient temperature error U24 Low temperature error • Ambient temperature is less than 90 V) •...
Operating Instructions
Page 121
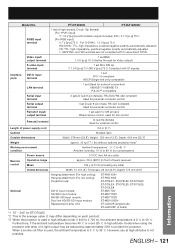
... PT-DZ12000U RGB2 input terminal 1 set each product. *3 When the projector is 0 ˃C to protect the projector. Video input/ output terminal 1 set BNC 1.0 V [p-p] 75 Ω (Active through for Video output) S-video input terminal 1 set Mini DIN 4p Y 1.0 V [p-p] C 0.286 V [p-p] 75 Ω Compliant with lamp 4 lit, light output may ...): Projection lens: DVI-D input module: SD-SDI input module: HD/SD-SDI input module: Dual link HD/SD-SDI input module: Replacement Lamp Unit: ET-PKD100H ET-PKD100S ET-D75LE1, ET-D75LE2, ET-D75LE3, ET-D75LE4, ET-D75LE5, ET-D75LE6, ET-D75LE8 ET-MD77DV ET...
... PT-DZ12000U RGB2 input terminal 1 set each product. *3 When the projector is 0 ˃C to protect the projector. Video input/ output terminal 1 set BNC 1.0 V [p-p] 75 Ω (Active through for Video output) S-video input terminal 1 set Mini DIN 4p Y 1.0 V [p-p] C 0.286 V [p-p] 75 Ω Compliant with lamp 4 lit, light output may ...): Projection lens: DVI-D input module: SD-SDI input module: HD/SD-SDI input module: Dual link HD/SD-SDI input module: Replacement Lamp Unit: ET-PKD100H ET-PKD100S ET-D75LE1, ET-D75LE2, ET-D75LE3, ET-D75LE4, ET-D75LE5, ET-D75LE6, ET-D75LE8 ET-MD77DV ET...
Operating Instructions
Page 126
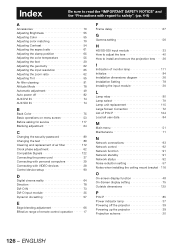
...to install and remove the projection lens ŋŋŋŋ 36 I Indication of monitor lamp 111 Initialize 84 Installation dimensions diagram 26 Installation Setting 78 Installing the input module 30 L Lamp relay 80 Lamp select 79 Lamp unit replacement 115 Large Screen Correction 72 List of P IN P 124 Load all user data 84 M... the ceiling mount bracket ŋ 116 O On-screen display function 48 On-Screen display setting 75 Outside dimensions 125 P P IN P 85 Power indicator lamp 37 Powering off the projector 39 Powering up the projector 38 Projection scheme 20 126 -
...to install and remove the projection lens ŋŋŋŋ 36 I Indication of monitor lamp 111 Initialize 84 Installation dimensions diagram 26 Installation Setting 78 Installing the input module 30 L Lamp relay 80 Lamp select 79 Lamp unit replacement 115 Large Screen Correction 72 List of P IN P 124 Load all user data 84 M... the ceiling mount bracket ŋ 116 O On-screen display function 48 On-Screen display setting 75 Outside dimensions 125 P P IN P 85 Power indicator lamp 37 Powering off the projector 39 Powering up the projector 38 Projection scheme 20 126 -


