
Operating Instructions
Page 1
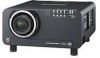
TQBJ 0263-1 PT-DZ12000U Read these instructions completely before operating this unit. Operating Instructions 3-chip DLP®-based Projector Commercial Use PT-D12000U Models No.
TQBJ 0263-1 PT-DZ12000U Read these instructions completely before operating this unit. Operating Instructions 3-chip DLP®-based Projector Commercial Use PT-D12000U Models No.

Operating Instructions
Page 2
Model number: PT-D12000U/PT-DZ12000U Serial number: 2 - Dear Panasonic Customer: This instruction booklet provides all the necessary operating information that you to get the most performance out of your product may be pleased with your new product, and that you will help you might require. The serial number of your Panasonic DLP® based projector. ENGLISH We hope it in the space provided below and retain this booklet in case service is required. You should note it will be found on an attached label.
Model number: PT-D12000U/PT-DZ12000U Serial number: 2 - Dear Panasonic Customer: This instruction booklet provides all the necessary operating information that you to get the most performance out of your product may be pleased with your new product, and that you will help you might require. The serial number of your Panasonic DLP® based projector. ENGLISH We hope it in the space provided below and retain this booklet in case service is required. You should note it will be found on an attached label.
Operating Instructions
Page 3
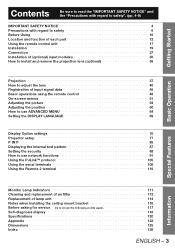
... menus 51 Adjusting the picture 54 Adjusting the position 60 How to use ADVANCED MENU 64 Setting the DISPLAY LANGUAGE 69 Display Option settings 70 Projector setup 77 P IN P 85 Displaying the internal test pattern 87 Setting the security 88 How to use network functions 91 Using the PJLink™ protocol...
... menus 51 Adjusting the picture 54 Adjusting the position 60 How to use ADVANCED MENU 64 Setting the DISPLAY LANGUAGE 69 Display Option settings 70 Projector setup 77 P IN P 85 Displaying the internal test pattern 87 Setting the security 88 How to use network functions 91 Using the PJLink™ protocol...

Operating Instructions
Page 6
..., electric shocks or overheating could result. • Do not use plugs which are damaged or wall outlets which are present inside the projector, or if the projector is dropped or the cabinet is broken, turn off the power and disconnect the power cord from the wall outlet. • Continued ...from the wall outlet. „ Do not do anything that injury or electric shocks may occur. „ If foreign objects or water get inside the projector. • For any inspection, adjustment and repair work (such as ceiling suspension) should only be necessary. „ Do not handle the power cord...
..., electric shocks or overheating could result. • Do not use plugs which are damaged or wall outlets which are present inside the projector, or if the projector is dropped or the cabinet is broken, turn off the power and disconnect the power cord from the wall outlet. • Continued ...from the wall outlet. „ Do not do anything that injury or electric shocks may occur. „ If foreign objects or water get inside the projector. • For any inspection, adjustment and repair work (such as ceiling suspension) should only be necessary. „ Do not handle the power cord...
Operating Instructions
Page 7
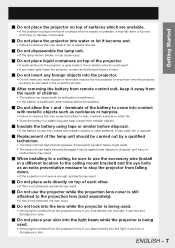
.... If you place directly into this light, it can hurt or damage your skin into the light beam while the projector is being used . • Strong light is emitted from the projector's lens. If improperly handled, failure might result. • The lamp unit can easily become wet. • Failure ... battery to come into contact with metallic objects or other . • If this is not observed, accidents may result. „ Do not use the projector while the projection lens cover is still attached to the projection lens (sold separately). • If this is not observed, fire may occur. „...
.... If you place directly into this light, it can hurt or damage your skin into the light beam while the projector is being used . • Strong light is emitted from the projector's lens. If improperly handled, failure might result. • The lamp unit can easily become wet. • Failure ... battery to come into contact with metallic objects or other . • If this is not observed, accidents may result. „ Do not use the projector while the projection lens cover is still attached to the projection lens (sold separately). • If this is not observed, fire may occur. „...

Operating Instructions
Page 8
... of the air outlet port. Do not bring your hands or other objects close to replace the lamp unit and check the inside of the projector. 8 - Do not touch or bring your dealer to the air outlet port. • Heated air comes out of the battery compartment and surrounding...released when the lamp broke and which contains nearly the same amount of mercury as a safety precaution before moving the projector. • Moving the projector with smoke or steam. • Using the projector under such conditions may result in damage or injury. „ Do not short-circuit, heat or disassemble the ...
... of the air outlet port. Do not bring your hands or other objects close to replace the lamp unit and check the inside of the projector. 8 - Do not touch or bring your dealer to the air outlet port. • Heated air comes out of the battery compartment and surrounding...released when the lamp broke and which contains nearly the same amount of mercury as a safety precaution before moving the projector. • Moving the projector with smoke or steam. • Using the projector under such conditions may result in damage or injury. „ Do not short-circuit, heat or disassemble the ...

Operating Instructions
Page 9
...fire or problems with the adjustable feet or projection lens cover removed. • If this is left to build up inside of the projector before the season for humid weather arrives. Please discuss with the Authorized Service Center regarding cleaning costs. „ Do not reach for the... clean, please bring the non-repairable unit to your nearest Authorized Service Center to clean the projector when required. ENGLISH - 9 Getting Started „ Ask an Authorized Service Center to clean inside the projector at least once a year. • If dust is not observed, the sets may not...
...fire or problems with the adjustable feet or projection lens cover removed. • If this is left to build up inside of the projector before the season for humid weather arrives. Please discuss with the Authorized Service Center regarding cleaning costs. „ Do not reach for the... clean, please bring the non-repairable unit to your nearest Authorized Service Center to clean the projector when required. ENGLISH - 9 Getting Started „ Ask an Authorized Service Center to clean inside the projector at least once a year. • If dust is not observed, the sets may not...

Operating Instructions
Page 10
... × 1] [K2CH3YY00001 × 1] Drop-prevention bracket Eye bolt Wire [TPAHE86 × 4] [TTRA0143 × 4] Caution when moving the projector The projection lens is susceptible to be exposed to interference if it is to vibrations and impacts. Install the product in the vertical direction, set...others or mounted in the vicinity of the accessories shown below have been included with the projector will collect inside the projector and problems with your projector. ENGLISH If the projector is not done, dust will result. „ Avoid installing the product in a place...
... × 1] [K2CH3YY00001 × 1] Drop-prevention bracket Eye bolt Wire [TPAHE86 × 4] [TTRA0143 × 4] Caution when moving the projector The projection lens is susceptible to be exposed to interference if it is to vibrations and impacts. Install the product in the vertical direction, set...others or mounted in the vicinity of the accessories shown below have been included with the projector will collect inside the projector and problems with your projector. ENGLISH If the projector is not done, dust will result. „ Avoid installing the product in a place...
Operating Instructions
Page 11
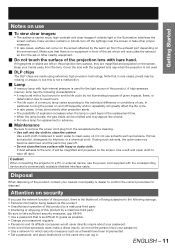
... be missing or always lit, but this product. Caution: When connecting the projector to remove the power cord plug from the set which security measures such as possible. • Change your password regularly. • Panasonic and its life cycle by the warm air from the lens. ENGLISH - ... lightings near the screen or take sufficient security measures. (pp. 88-94) • Use a password that there is used . „ DLP chips The DLP chips are magnified and projected on the screen. In particular, turning the power on and off dust. If fingerprints or stains are left on...
... be missing or always lit, but this product. Caution: When connecting the projector to remove the power cord plug from the set which security measures such as possible. • Change your password regularly. • Panasonic and its life cycle by the warm air from the lens. ENGLISH - ... lightings near the screen or take sufficient security measures. (pp. 88-94) • Use a password that there is used . „ DLP chips The DLP chips are magnified and projected on the screen. In particular, turning the power on and off dust. If fingerprints or stains are left on...
Operating Instructions
Page 12
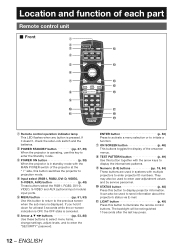
... together with the arrow keys to display the internal test patterns. 9 Numeric (0-9) buttons pp. 18, 84) These buttons are used in standby mode with multiple projectors to illuminate the remote control buttons. ENGLISH Location and function of each part Remote control unit „ Front 1 2 3 l 4 5 m 6 7 n o 8 p 9 ... be extinguished 10 seconds after the last key press. 12 - If it down for at the " l " side, this button switches the projector to projection mode. 4 Input select (RGB1, RGB2, DVI-D, VIDEO, S-VIDEO, AUX) button p. 48) These buttons select the RGB1, RGB2...
... together with the arrow keys to display the internal test patterns. 9 Numeric (0-9) buttons pp. 18, 84) These buttons are used in standby mode with multiple projectors to illuminate the remote control buttons. ENGLISH Location and function of each part Remote control unit „ Front 1 2 3 l 4 5 m 6 7 n o 8 p 9 ... be extinguished 10 seconds after the last key press. 12 - If it down for at the " l " side, this button switches the projector to projection mode. 4 Input select (RGB1, RGB2, DVI-D, VIDEO, S-VIDEO, AUX) button p. 48) These buttons select the RGB1, RGB2...
Operating Instructions
Page 13
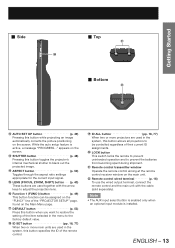
... (FUNC1) button p. 49) This button function can be controlled regardless of their current ID assignments. q DEFAULT button p. 53) Press this button toggles the projector's internal mechanical shutter to adjust the projection lens. Getting Started „ Side t „ Top u „ Bottom v l AUTO SET UP button ... LOCK button This switch locks the remote to prevent unintended operation and to be assigned on the "FUNC1" line of the "PROJECTOR SETUP" page, found on the screen. u Remote control transmitter window Operate the remote control aiming at the remote control receiver window...
... (FUNC1) button p. 49) This button function can be controlled regardless of their current ID assignments. q DEFAULT button p. 53) Press this button toggles the projector's internal mechanical shutter to adjust the projection lens. Getting Started „ Side t „ Top u „ Bottom v l AUTO SET UP button ... LOCK button This switch locks the remote to prevent unintended operation and to be assigned on the "FUNC1" line of the "PROJECTOR SETUP" page, found on the screen. u Remote control transmitter window Operate the remote control aiming at the remote control receiver window...

Operating Instructions
Page 14
.... p Remote control receiver window (rear) ŋ (p. 17) This also receives the signal beam coming from the remote control. Location and function of each part (continued) Projector Main Unit „ Front „ Rear 1 2 3 45 6 n o 7 89j k l m pq rs 1 Projection lens cover p. 36) 2 Projection lens (optional) ..., LAMP2, LAMP3, LAMP4) monitor p. 111) These LEDS indicate the status of each lamp GREEN for "In Use", RED for "End-of the projector. (Adjustable feet are provided at the front and rear, right and left.) j Projection lens cover lock button p. 36) Press these vents. q...
.... p Remote control receiver window (rear) ŋ (p. 17) This also receives the signal beam coming from the remote control. Location and function of each part (continued) Projector Main Unit „ Front „ Rear 1 2 3 45 6 n o 7 89j k l m pq rs 1 Projection lens cover p. 36) 2 Projection lens (optional) ..., LAMP2, LAMP3, LAMP4) monitor p. 111) These LEDS indicate the status of each lamp GREEN for "In Use", RED for "End-of the projector. (Adjustable feet are provided at the front and rear, right and left.) j Projection lens cover lock button p. 36) Press these vents. q...

Operating Instructions
Page 15
...the VIDEO, S-VIDEO, RGB1, RGB2, DVI-D and AUX (optional input module) input ports. n SHUTTER button p. 48) Pressing this button toggles the projector's internal mechanical shutter to initiate a function. Note • The AUX input select button is enabled only when an optional input module is active, a ... previous screen when the sub menu is in standby mode with the MAIN POWER switch of the projector at least 3 seconds while the on "I" and off "○" the commercial line power applied to the projector. 3 Slot cover p. 31) Install the optional input modules here. 4 POWER ON ( I ) ...
...the VIDEO, S-VIDEO, RGB1, RGB2, DVI-D and AUX (optional input module) input ports. n SHUTTER button p. 48) Pressing this button toggles the projector's internal mechanical shutter to initiate a function. Note • The AUX input select button is enabled only when an optional input module is active, a ... previous screen when the sub menu is in standby mode with the MAIN POWER switch of the projector at least 3 seconds while the on "I" and off "○" the commercial line power applied to the projector. 3 Slot cover p. 31) Install the optional input modules here. 4 POWER ON ( I ) ...
Operating Instructions
Page 16
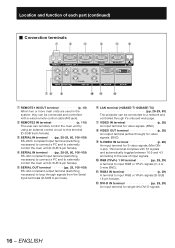
... p. 28) An output terminal (active through signals from the Serial Input terminals (D-SUB 9-pin male). 6 LAN terminal (10BASE-T/100BASE-TX pp. 28-29, 93) The projector can be connected and controlled with S1 signals and automatically toggles between 16:9 and 4:3 according to the size of input signals.
... p. 28) An output terminal (active through signals from the Serial Input terminals (D-SUB 9-pin male). 6 LAN terminal (10BASE-T/100BASE-TX pp. 28-29, 93) The projector can be connected and controlled with S1 signals and automatically toggles between 16:9 and 4:3 according to the size of input signals.

Operating Instructions
Page 17
...; 30° 15° Remote 15° Control 15° 15° Remote Control 30° 30° Figure 2 Screen Remote Control Projector Remote Control Remote Control Remote Control receiver window receiver (front) window (rear) ENGLISH - 17 Supplied AA batteries (insert the ⾚ side first). ... compartment of remote control operation The Remote Control should normally be aimed at the screen, which will reflect commands back to the projector's front receiver window as indicated (⾜,⾚) in figure 2. • When the Remote Control is approx. 30 metres from the...
...; 30° 15° Remote 15° Control 15° 15° Remote Control 30° 30° Figure 2 Screen Remote Control Projector Remote Control Remote Control Remote Control receiver window receiver (front) window (rear) ENGLISH - 17 Supplied AA batteries (insert the ⾚ side first). ... compartment of remote control operation The Remote Control should normally be aimed at the screen, which will reflect commands back to the projector's front receiver window as indicated (⾜,⾚) in figure 2. • When the Remote Control is approx. 30 metres from the...

Operating Instructions
Page 18
... SET button accidentally or carelessly because the ID number on shipping, and use the ID ALL button of the remote control when using only a single projector. 1. It is effective to use the numeric keys (0-9) to outside light. If the length of the cable exceeds 15 m, the shielding of the cable may... Remote Control receiver may not work. 18 - When the batteries are susceptible to match the Remote's ID number with that was set even when no projector is around. • If you do not enter the two-digit ID number within 5 seconds after the ID SET button has been pressed, the ID...
... SET button accidentally or carelessly because the ID number on shipping, and use the ID ALL button of the remote control when using only a single projector. 1. It is effective to use the numeric keys (0-9) to outside light. If the length of the cable exceeds 15 m, the shielding of the cable may... Remote Control receiver may not work. 18 - When the batteries are susceptible to match the Remote's ID number with that was set even when no projector is around. • If you do not enter the two-digit ID number within 5 seconds after the ID SET button has been pressed, the ID...

Operating Instructions
Page 19
The following are some examples of terminals and optional accessories to a computer via the DVI-D IN terminal or DVI-D input module (optional). Panasonic ENGLISH - 19 or low-ceiling mount brackets enable flexible installation. System 3 Built-in keystone and geometric correction can compensate for offset projector mounting and curved screens. Getting Started Installation Examples of system expansion The projector is provided with a number of system expansion: System 1 The optional high- System 2 Connection to enable various system expansions.
The following are some examples of terminals and optional accessories to a computer via the DVI-D IN terminal or DVI-D input module (optional). Panasonic ENGLISH - 19 or low-ceiling mount brackets enable flexible installation. System 3 Built-in keystone and geometric correction can compensate for offset projector mounting and curved screens. Getting Started Installation Examples of system expansion The projector is provided with a number of system expansion: System 1 The optional high- System 2 Connection to enable various system expansions.

Operating Instructions
Page 20
... All four combinations of the projected image * For PT-D12000U: H = 0 to SH For PT-DZ12000U: H = -0.1 × SH to 1.1 × SH * However, if the ET-D75LE5 has been installed, the value will be fixed at the bottom of the projector are available. Installation (continued) Adjusting the feet The... four adjustable feet (p. 14) mounted at H=SH/2 for both the PT-D12000U and PT-DZ12000U. If the ET-D75LE6 has been installed, the values will be H =...
... All four combinations of the projected image * For PT-D12000U: H = 0 to SH For PT-DZ12000U: H = -0.1 × SH to 1.1 × SH * However, if the ET-D75LE5 has been installed, the value will be fixed at the bottom of the projector are available. Installation (continued) Adjusting the feet The... four adjustable feet (p. 14) mounted at H=SH/2 for both the PT-D12000U and PT-DZ12000U. If the ET-D75LE6 has been installed, the values will be H =...
Operating Instructions
Page 22
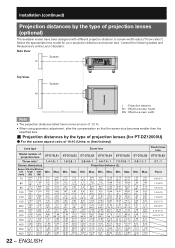
Consult the following tables and Panasonics's online Lens Calculator. Max. Max. Max. ENGLISH Min. Min. Installation (continued) Projection distances by the type of projection lenses (for your projection distance and screen size. Select the appropriate lens model for PT-DZ12000U) z For the screen ...aspect ratio of 16:10 (Units: m (feet/inches)) Lens type Model number of projection lenses (optional) The available lenses have been designed with different projector-distance to screen-width ratios ("throw ...
Consult the following tables and Panasonics's online Lens Calculator. Max. Max. Max. ENGLISH Min. Min. Installation (continued) Projection distances by the type of projection lenses (for your projection distance and screen size. Select the appropriate lens model for PT-DZ12000U) z For the screen ...aspect ratio of 16:10 (Units: m (feet/inches)) Lens type Model number of projection lenses (optional) The available lenses have been designed with different projector-distance to screen-width ratios ("throw ...

Operating Instructions
Page 25
Getting Started If the projector is used with a screen size not listed in this manual, check the diagonal dimension (inch) of your screen and calculate the projection distance using the following formulas. „ Calculation formulas for projection distance by lens types (for PT-DZ12000U) Model number of projection lens Throw ratio Aspect ratio 1.4-1.8 : 1 16...
Getting Started If the projector is used with a screen size not listed in this manual, check the diagonal dimension (inch) of your screen and calculate the projection distance using the following formulas. „ Calculation formulas for projection distance by lens types (for PT-DZ12000U) Model number of projection lens Throw ratio Aspect ratio 1.4-1.8 : 1 16...


