
Operating Instructions
Page 1
PT-DZ12000U Read these instructions completely before operating this unit. TQBJ 0263-1 Operating Instructions 3-chip DLP®-based Projector Commercial Use PT-D12000U Models No.
PT-DZ12000U Read these instructions completely before operating this unit. TQBJ 0263-1 Operating Instructions 3-chip DLP®-based Projector Commercial Use PT-D12000U Models No.

Operating Instructions
Page 2
ENGLISH We hope it in the space provided below and retain this booklet in case service is required. Dear Panasonic Customer: This instruction booklet provides all the necessary operating information that you will help you to get the most performance out of your product may be pleased with your new product, and that you might require. Model number: PT-D12000U/PT-DZ12000U Serial number: 2 - You should note it will be found on an attached label. The serial number of your Panasonic DLP® based projector.
ENGLISH We hope it in the space provided below and retain this booklet in case service is required. Dear Panasonic Customer: This instruction booklet provides all the necessary operating information that you will help you to get the most performance out of your product may be pleased with your new product, and that you might require. Model number: PT-D12000U/PT-DZ12000U Serial number: 2 - You should note it will be found on an attached label. The serial number of your Panasonic DLP® based projector.

Operating Instructions
Page 20
... - Installation (continued) Adjusting the feet The four adjustable feet (p. 14) mounted at H=SH/2 for both the PT-D12000U and PT-DZ12000U. Use the INSTALLATION menu to choose the desired projection scheme. (p. 78) Installation geometry When planning the projector and screen geometry, refer to SH for reference. When attaching an optional ceiling mount bracket (ET...
... - Installation (continued) Adjusting the feet The four adjustable feet (p. 14) mounted at H=SH/2 for both the PT-D12000U and PT-DZ12000U. Use the INSTALLATION menu to choose the desired projection scheme. (p. 78) Installation geometry When planning the projector and screen geometry, refer to SH for reference. When attaching an optional ceiling mount bracket (ET...
Operating Instructions
Page 22
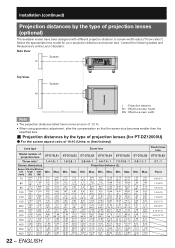
... the appropriate lens model for PT-DZ12000U) z For the screen aspect ratio of 16:10 (Units: m (feet/inches)) Lens type Model number of projection lenses (optional) The available lenses have been designed with different projector-distance to screen-width ratios ("throw ratios"). Min. Max. Consult the following tables and Panasonics's online Lens Calculator. Max...
... the appropriate lens model for PT-DZ12000U) z For the screen aspect ratio of 16:10 (Units: m (feet/inches)) Lens type Model number of projection lenses (optional) The available lenses have been designed with different projector-distance to screen-width ratios ("throw ratios"). Min. Max. Consult the following tables and Panasonics's online Lens Calculator. Max...

Operating Instructions
Page 25
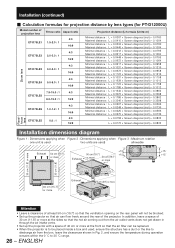
Getting Started If the projector is used with a screen size not listed in this manual, check the diagonal dimension (inch) of your screen and calculate the projection distance using the following formulas. „ Calculation formulas for projection distance by lens types (for PT-DZ12000U) Model number of projection lens Throw ratio Aspect ratio 1.4-1.8 : 1 16...
Getting Started If the projector is used with a screen size not listed in this manual, check the diagonal dimension (inch) of your screen and calculate the projection distance using the following formulas. „ Calculation formulas for projection distance by lens types (for PT-DZ12000U) Model number of projection lens Throw ratio Aspect ratio 1.4-1.8 : 1 16...
Operating Instructions
Page 26
... the box, leave the clearances shown in through the air intake vents. • Set up the projector with a space of 40 cm or more Attention • Leave a clearance of at the front so... that air can be blocked. • Set up the projector so that the air filter can flow freely around the rear of projection lens ET-D75LE1 Throw ratio Aspect ratio 4:3 ... the rear panel will not be replaced. • When the projector is to 35 ˃C range. 26 - Installation (continued) „ Calculation formulas for projection distance by ...
... the box, leave the clearances shown in through the air intake vents. • Set up the projector with a space of 40 cm or more Attention • Leave a clearance of at the front so... that air can be blocked. • Set up the projector so that the air filter can flow freely around the rear of projection lens ET-D75LE1 Throw ratio Aspect ratio 4:3 ... the rear panel will not be replaced. • When the projector is to 35 ˃C range. 26 - Installation (continued) „ Calculation formulas for projection distance by ...
Operating Instructions
Page 30
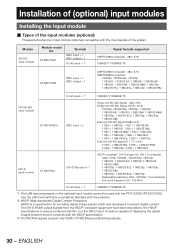
...the input modules (optional) Prepare beforehand an input module (optional) compatible with the PT-D12000U/PT-DZ12000U. Use the LAN terminal that is provided as standard with the projector. *2: HDCP (High-bandwidth Digital Content Protection) HDCP is a specification for encoding ...digital image signals which was developed to ensure content protection, but the DVI-D input module is capable of displaying the digital images properly since it complies with the HDCP specification. *3: The WUXGA...
...the input modules (optional) Prepare beforehand an input module (optional) compatible with the PT-D12000U/PT-DZ12000U. Use the LAN terminal that is provided as standard with the projector. *2: HDCP (High-bandwidth Digital Content Protection) HDCP is a specification for encoding ...digital image signals which was developed to ensure content protection, but the DVI-D input module is capable of displaying the digital images properly since it complies with the HDCP specification. *3: The WUXGA...
Operating Instructions
Page 33
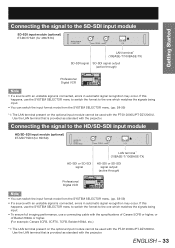
Use the LAN terminal that is provided as standard with the projector. Use the LAN terminal that is provided as standard with the projector. ENGLISH - 33 Getting Started Connecting the signal to the SD-SDI input module SD-SDI input module (optional) ET-MD77SD1 (for HD/...(For example: Canare 5CFB, 5CFTX, 7CFB, Belden1694A, etc.) *1: The LAN terminal present on the optional input module cannot be used with the PT-D12000U/PT-DZ12000U. Connecting the signal to the one which matches the signals being input. • You can switch the input format mode from the SYSTEM SELECTOR menu...
Use the LAN terminal that is provided as standard with the projector. Use the LAN terminal that is provided as standard with the projector. ENGLISH - 33 Getting Started Connecting the signal to the SD-SDI input module SD-SDI input module (optional) ET-MD77SD1 (for HD/...(For example: Canare 5CFB, 5CFTX, 7CFB, Belden1694A, etc.) *1: The LAN terminal present on the optional input module cannot be used with the PT-D12000U/PT-DZ12000U. Connecting the signal to the one which matches the signals being input. • You can switch the input format mode from the SYSTEM SELECTOR menu...
Operating Instructions
Page 35
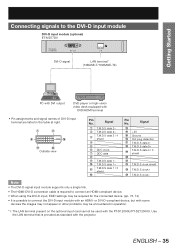
... images may not appear or other problems may be required for the connected device. (pp. 73, 74) • It is provided as standard with the projector. Signal 1 T.M.D.S data 2- 2 T.M.D.S data 2+ 3 T.M.D.S data 2 / 4 shield 4 5 6 DDC clock 7 DDC data 8 9 T.M.D.S data 1- Use the LAN terminal that is possible to connect the DVI-D input module with an... and signal names of DVI-D input terminal are listed in operation. *1: The LAN terminal present on the optional input card cannot be used with the PT-D12000U/PT-DZ12000U.
... images may not appear or other problems may be required for the connected device. (pp. 73, 74) • It is provided as standard with the projector. Signal 1 T.M.D.S data 2- 2 T.M.D.S data 2+ 3 T.M.D.S data 2 / 4 shield 4 5 6 DDC clock 7 DDC data 8 9 T.M.D.S data 1- Use the LAN terminal that is possible to connect the DVI-D input module with an... and signal names of DVI-D input terminal are listed in operation. *1: The LAN terminal present on the optional input card cannot be used with the PT-D12000U/PT-DZ12000U.
Operating Instructions
Page 41
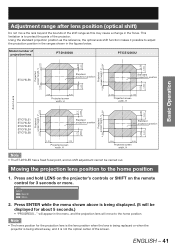
... lens position to the home position. ENGLISH - 41 Press ENTER while the menu shown above is not the optical center of projection lens PT-D12000U PT-DZ12000U 0.15V 0.50V Projected 0.15V screen height, V0.15V 0.12V 0.40V 0.12V screen height, V Projected Basic Operation ET-D75LE6 0.12V ...The ET-D75LE5 has a fixed focal point, and so shift adjustment cannot be displayed for 3 seconds or more. Press and hold LENS on the projector's controls or SHIFT on the remote control for about 5 seconds.) • "PROGRESS..." will appear in the focus. Note • The home...
... lens position to the home position. ENGLISH - 41 Press ENTER while the menu shown above is not the optical center of projection lens PT-D12000U PT-DZ12000U 0.15V 0.50V Projected 0.15V screen height, V0.15V 0.12V 0.40V 0.12V screen height, V Projected Basic Operation ET-D75LE6 0.12V ...The ET-D75LE5 has a fixed focal point, and so shift adjustment cannot be displayed for 3 seconds or more. Press and hold LENS on the projector's controls or SHIFT on the remote control for about 5 seconds.) • "PROGRESS..." will appear in the focus. Note • The home...
Operating Instructions
Page 61
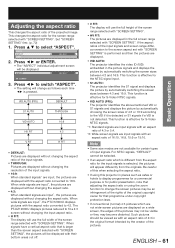
... types of the input signals. • 16:9: When standard signals*1 are input, the pictures are displayed. • VID AUTO: The projector identifies the video ID (VID) embedded in the full screen range selected with "SCREEN SETTING". Press ▲▼ to fit a 4:3 ... • If conventional (normal) 4:3 pictures which is pressed. This function is effective for that is not detected. ASPECT DEFAULT CHANGE 3. The PT-DZ12000U displays pictures reduced to select "ASPECT". ENGLISH - 61 Basic Operation Set "SCREEN SETTING" first. (p. 72) 1. Such pictures should be an ...
... types of the input signals. • 16:9: When standard signals*1 are input, the pictures are displayed. • VID AUTO: The projector identifies the video ID (VID) embedded in the full screen range selected with "SCREEN SETTING". Press ▲▼ to fit a 4:3 ... • If conventional (normal) 4:3 pictures which is pressed. This function is effective for that is not detected. ASPECT DEFAULT CHANGE 3. The PT-DZ12000U displays pictures reduced to select "ASPECT". ENGLISH - 61 Basic Operation Set "SCREEN SETTING" first. (p. 72) 1. Such pictures should be an ...
Operating Instructions
Page 72
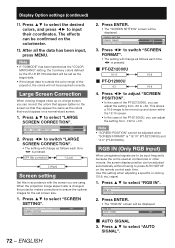
...to +131. Press ▲▼ to input their coordinates. Press ▲▼ to adjust "SCREEN POSITION". • In the case of the PT-DZ12000U, you are to switch "SCREEN FORMAT". • The setting will change as the colors that would appear on the colorimeter. 12. RGB IN (... are using. Large Screen Correction When viewing images close up and down within the 16:10 screen. • In the case of the projector, the colors will be projected correctly. Press ◄► to be displayed. Press ◄► to select "AUTO SIGNAL". Use this...
...to +131. Press ▲▼ to input their coordinates. Press ▲▼ to adjust "SCREEN POSITION". • In the case of the PT-DZ12000U, you are to switch "SCREEN FORMAT". • The setting will change as the colors that would appear on the colorimeter. 12. RGB IN (... are using. Large Screen Correction When viewing images close up and down within the 16:10 screen. • In the case of the projector, the colors will be projected correctly. Press ◄► to be displayed. Press ◄► to select "AUTO SIGNAL". Use this...
Operating Instructions
Page 121
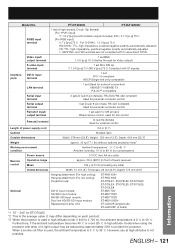
...707;C. Model No. Furthermore, if the ambient temperature becomes 40 ˃C or more (35 ˃C in high altitude mode) when using the projector with 3-value direct SYNC. ENGLISH - 121 Video input/ output terminal 1 set BNC 1.0 V [p-p] 75 Ω (Active through for Video output... (in high altitude mode (1 400 to 2 700 m), the ambient temperature is 0 ˃C to protect the projector. PT-D12000U PT-DZ12000U RGB2 input terminal 1 set each product. *3 When the projector is used in front of beam receiver) 134 g (0.31 lb) (including dry cells) Outside dimensions Width: 51 ...
...707;C. Model No. Furthermore, if the ambient temperature becomes 40 ˃C or more (35 ˃C in high altitude mode) when using the projector with 3-value direct SYNC. ENGLISH - 121 Video input/ output terminal 1 set BNC 1.0 V [p-p] 75 Ω (Active through for Video output... (in high altitude mode (1 400 to 2 700 m), the ambient temperature is 0 ˃C to protect the projector. PT-D12000U PT-DZ12000U RGB2 input terminal 1 set each product. *3 When the projector is used in front of beam receiver) 134 g (0.31 lb) (including dry cells) Outside dimensions Width: 51 ...


