Dlp Projector - Multi Language
Page 3
... each part 12 Using the remote control unit 17 Installation...19 Connection...24 Installation of input module (optional 27 How to install and remove the projection lens (optional 33 Projection ...34 How to adjust the lens ...37 Automatic adjustment (AUTO SETUP 39 Registration of input signal data 40 Basic operations using the remote control 43 On-screen menus ...46 Adjusting the picture...49 Adjusting the position...56 How to use ADVANCED MENU 60 Setting the DISPLAY LANGUAGE 66 Option1 settings ...67 Option2 settings ...75 Displaying the...
... each part 12 Using the remote control unit 17 Installation...19 Connection...24 Installation of input module (optional 27 How to install and remove the projection lens (optional 33 Projection ...34 How to adjust the lens ...37 Automatic adjustment (AUTO SETUP 39 Registration of input signal data 40 Basic operations using the remote control 43 On-screen menus ...46 Adjusting the picture...49 Adjusting the position...56 How to use ADVANCED MENU 60 Setting the DISPLAY LANGUAGE 66 Option1 settings ...67 Option2 settings ...75 Displaying the...
Dlp Projector - Multi Language
Page 11
... a loud sound or end its instructions. ● Do not clean the lens surface with high internal pressure is no equipment in warm water to the individual difference or conditions of a mercury lamp varies according to clean away oil. Draw window curtains or blinds, turn off dust. Make sure that there is used hours. ● The life cycle of use ■ To view clear images: ●...
... a loud sound or end its instructions. ● Do not clean the lens surface with high internal pressure is no equipment in warm water to the individual difference or conditions of a mercury lamp varies according to clean away oil. Draw window curtains or blinds, turn off dust. Make sure that there is used hours. ● The life cycle of use ■ To view clear images: ●...

Dlp Projector - Multi Language
Page 12
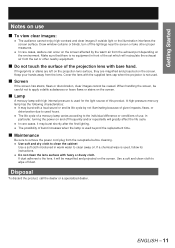
...-D, VIDEO, S-VIDEO and AUX (module input) input ports. ( MENU button pp. 46, 48) Displays and clears the Main Menu. ENGLISH * ON SCREEN button p. 43) This button turns on and off about the projector's status via E-mail. / LIGHT button p. 44) When this button switches the projector to projection mode. & Input select (RGB1, RGB2, DVI-D, VIDEO, S-VIDEO, AUX) button p. 43) Use to change setting and adjust the level. ENTER button p. 48) Press this button to display projector information. Numeric (0-9) buttons pp. 18, 82) These buttons are also used by service...
...-D, VIDEO, S-VIDEO and AUX (module input) input ports. ( MENU button pp. 46, 48) Displays and clears the Main Menu. ENGLISH * ON SCREEN button p. 43) This button turns on and off about the projector's status via E-mail. / LIGHT button p. 44) When this button switches the projector to projection mode. & Input select (RGB1, RGB2, DVI-D, VIDEO, S-VIDEO, AUX) button p. 43) Use to change setting and adjust the level. ENTER button p. 48) Press this button to display projector information. Numeric (0-9) buttons pp. 18, 82) These buttons are also used by service...

Dlp Projector - Multi Language
Page 14
... green when the POWER ON button of the remote control or the main unit is being cleaned. Projection lens cover lock button p. 33) This button toggles between lock and unlock of the detachable cover for projecting images on ). Adjustable feet p. 20) Use these feet to replace the lamp unit. It also blinks if something unusual occurs in the lamp circuit. ( Temperature monitor (TEMP p. 107) Lighting or blinking of this hook port. - It lights red when there is a problem with the air filter. 1 Air filter...
... green when the POWER ON button of the remote control or the main unit is being cleaned. Projection lens cover lock button p. 33) This button toggles between lock and unlock of the detachable cover for projecting images on ). Adjustable feet p. 20) Use these feet to replace the lamp unit. It also blinks if something unusual occurs in the lamp circuit. ( Temperature monitor (TEMP p. 107) Lighting or blinking of this hook port. - It lights red when there is a problem with the air filter. 1 Air filter...
Dlp Projector - Multi Language
Page 15
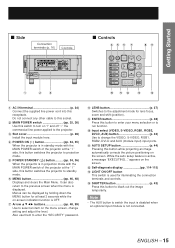
... menu screen, change the VIDEO, S-VIDEO, RGB1, RGB2, DVI-D and AUX (module input) input ports. / AUTO SETUP button p. 44) Pressing this receptacle. It can be displayed by holding down the MENU button for lens focus, zoom and shift (position). - While the auto setup feature is not connected. Do not connect any other cable to this socket. $ MAIN POWER switch pp. 35, 36) Use this switch to turn on "I" and off "○" the commercial line power applied to the projector...
... menu screen, change the VIDEO, S-VIDEO, RGB1, RGB2, DVI-D and AUX (module input) input ports. / AUTO SETUP button p. 44) Pressing this receptacle. It can be displayed by holding down the MENU button for lens focus, zoom and shift (position). - While the auto setup feature is not connected. Do not connect any other cable to this socket. $ MAIN POWER switch pp. 35, 36) Use this switch to turn on "I" and off "○" the commercial line power applied to the projector...
Dlp Projector - Multi Language
Page 25
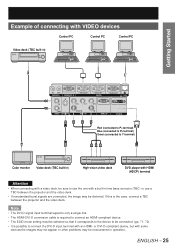
... to use a TBC between the projector and the video deck. Getting Started Example of connecting with VIDEO devices Control PC Control PC Control PC Video deck (TBC built-in) IN OUT REMOTE 1 REMOTE 2 IN RS-232C IN RS-422 IN SERIAL RS-422 OUT LAN IN OUT VIDEO S-VIDEO IN R/PR G/Y SYNC/HD RGB 1 IN B/PB VD RGB 2 IN DVI-D IN Red (connected to PR terminal) Blue (connected to PB terminal) Green (connected...
... to use a TBC between the projector and the video deck. Getting Started Example of connecting with VIDEO devices Control PC Control PC Control PC Video deck (TBC built-in) IN OUT REMOTE 1 REMOTE 2 IN RS-232C IN RS-422 IN SERIAL RS-422 OUT LAN IN OUT VIDEO S-VIDEO IN R/PR G/Y SYNC/HD RGB 1 IN B/PB VD RGB 2 IN DVI-D IN Red (connected to PR terminal) Blue (connected to PB terminal) Green (connected...

Dlp Projector - Multi Language
Page 35
... the projector will flash in red. Fit the image size to the screen size. (p. 37) / Adjust the focus. (p. 37) 0 Display the zoom adjustment menu again and adjust the zoom to fit the image size to toggle through RGB1, RGB2, DVI-D, VIDEO, S-VIDEO and AUX. (p. 43) • The AUX button is disabled when an optional input module is RGB signal. (p. 44) . Powering up period. Press AUTO SETUP if the input signal is not connected. * Adjust the tilt of the lens. (p. 37...
... the projector will flash in red. Fit the image size to the screen size. (p. 37) / Adjust the focus. (p. 37) 0 Display the zoom adjustment menu again and adjust the zoom to fit the image size to toggle through RGB1, RGB2, DVI-D, VIDEO, S-VIDEO and AUX. (p. 43) • The AUX button is disabled when an optional input module is RGB signal. (p. 44) . Powering up period. Press AUTO SETUP if the input signal is not connected. * Adjust the tilt of the lens. (p. 37...
Dlp Projector - Multi Language
Page 39
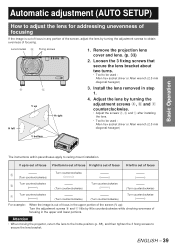
... checking evenness of focusing in the upper and lower portions. Install the lens removed in any portion of the screen, adjust the lens by turning the adjustment screws a, b and c counterclockwise. • Adjust the screws a, b and c after installing the lens. • Tool to be used : Allen hex socket driver or Allen wrench (2.5 mm diagonal hexagon) V bottom Basic Operation The instructions within parentheses apply to ceiling mount installation. Adjust the lens by turning the adjustment screws to secure the lens...
... checking evenness of focusing in the upper and lower portions. Install the lens removed in any portion of the screen, adjust the lens by turning the adjustment screws a, b and c counterclockwise. • Adjust the screws a, b and c after installing the lens. • Tool to be used : Allen hex socket driver or Allen wrench (2.5 mm diagonal hexagon) V bottom Basic Operation The instructions within parentheses apply to ceiling mount installation. Adjust the lens by turning the adjustment screws to secure the lens...

Dlp Projector - Multi Language
Page 41
... switching and white balance using the same signal source. A3:SXGA+60-A3 RGB1 --- A7:1080i/60i-A7 RGB1 --- A8:1080/24p-A8 RGB1 --- NAME MEMORY NO INPUT fH fV SYNC.STATE SVGA72-A2 A2 RGB1 48.08kHz 72.17Hz H(POS) V(POS) ENTER EXECUTE MENU CANCEL 3. Use this function when the user needs adjustment of picture quality such as screen aspect ratio and image adjustment data...
... switching and white balance using the same signal source. A3:SXGA+60-A3 RGB1 --- A7:1080i/60i-A7 RGB1 --- A8:1080/24p-A8 RGB1 --- NAME MEMORY NO INPUT fH fV SYNC.STATE SVGA72-A2 A2 RGB1 48.08kHz 72.17Hz H(POS) V(POS) ENTER EXECUTE MENU CANCEL 3. Use this function when the user needs adjustment of picture quality such as screen aspect ratio and image adjustment data...
Dlp Projector - Multi Language
Page 44
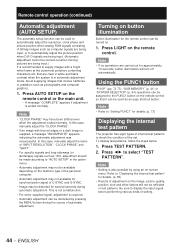
... by using an on . 1. ENGLISH In this case, manually adjust the "CLOCK PHASE". • If an image with a bright white frame at the outermost periphery containing characters etc. Turning on button illumination Button illumination for approximately 10 seconds, button illumination will not be turned on -screen menu. Press ◄► to check the condition of adjustment on the remote control or the main unit. • A message "COMPLETE...
... by using an on . 1. ENGLISH In this case, manually adjust the "CLOCK PHASE". • If an image with a bright white frame at the outermost periphery containing characters etc. Turning on button illumination Button illumination for approximately 10 seconds, button illumination will not be turned on -screen menu. Press ◄► to check the condition of adjustment on the remote control or the main unit. • A message "COMPLETE...

Dlp Projector - Multi Language
Page 49
MENU Press to select "PICTURE". PICTURE PICTURE MODE CONTRAST BRIGHTNESS COLOR TINT COLOR TEMP. GAMMA SHARPNESS NOISE REDUCTION DYNAMIC IRIS SYSTEM SELECTOR NATURAL 0 0 10 1 DEFAULT DEFAULT 0 OFF OFF AUTO 1 MENU SELECT CHANGE ENTER REGISTER 2. Press ◄► to switch "PICTURE MODE". • The setting will be adjusted. and GAMMA settings can be saved and used . 1. Note • Factory defaults are input. ENGLISH - 49 MAIN MENU PICTURE POSITION ADVANCED MENU DISPLAY LANGUAGE OPTION1 OPTION2 TEST PATTERN SIGNAL LIST NETWORK SECURITY MENU SELECT...
MENU Press to select "PICTURE". PICTURE PICTURE MODE CONTRAST BRIGHTNESS COLOR TINT COLOR TEMP. GAMMA SHARPNESS NOISE REDUCTION DYNAMIC IRIS SYSTEM SELECTOR NATURAL 0 0 10 1 DEFAULT DEFAULT 0 OFF OFF AUTO 1 MENU SELECT CHANGE ENTER REGISTER 2. Press ◄► to switch "PICTURE MODE". • The setting will be adjusted. and GAMMA settings can be saved and used . 1. Note • Factory defaults are input. ENGLISH - 49 MAIN MENU PICTURE POSITION ADVANCED MENU DISPLAY LANGUAGE OPTION1 OPTION2 TEST PATTERN SIGNAL LIST NETWORK SECURITY MENU SELECT...
Dlp Projector - Multi Language
Page 67
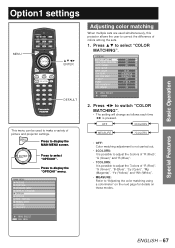
...; 3COLORS: It is possible to adjust the 3colors of "R (Red)", "G (Green)" and "B (Blue)". • 7COLORS: It is pressed. Special Features ENGLISH - 67 MAIN MENU PICTURE POSITION ADVANCED MENU DISPLAY LANGUAGE OPTION1 OPTION2 TEST PATTERN SIGNAL LIST NETWORK SECURITY MENU SELECT ENTER SUB MENU Adjusting color matching When multiple sets are used to make a variety of picture and projector settings. OPTION1 COLOR MATCHING LARGE SCREEN CORRECTION AUTO SIGNAL AUTO SETUP BACK COLOR DVI EDID AUX DVI EDID...
...; 3COLORS: It is possible to adjust the 3colors of "R (Red)", "G (Green)" and "B (Blue)". • 7COLORS: It is pressed. Special Features ENGLISH - 67 MAIN MENU PICTURE POSITION ADVANCED MENU DISPLAY LANGUAGE OPTION1 OPTION2 TEST PATTERN SIGNAL LIST NETWORK SECURITY MENU SELECT ENTER SUB MENU Adjusting color matching When multiple sets are used to make a variety of picture and projector settings. OPTION1 COLOR MATCHING LARGE SCREEN CORRECTION AUTO SIGNAL AUTO SETUP BACK COLOR DVI EDID AUX DVI EDID...

Dlp Projector - Multi Language
Page 70
... signal source into "DISPLAY DOTS". 5. A message "PROGRESS..." OPTION1 COLOR MATCHING LARGE SCREEN CORRECTION AUTO SIGNAL AUTO SETUP BACK COLOR DVI EDID AUX DVI EDID P IN P FUNC1 OSD POSITION OSD MEMORY OFF OFF OFF BLUE EDID2(PC) EDID2(PC) OFF P IN P 2 ON MENU SELECT CHANGE 2. Press ▲▼ to select "AUTO SIGNAL". ENGLISH 2. Press ◄► to be initiated automatically. Press ▲▼ to select "AUTO SETUP". appears during automatic adjustment. AUTO SETUP MODE CHANGE...
... signal source into "DISPLAY DOTS". 5. A message "PROGRESS..." OPTION1 COLOR MATCHING LARGE SCREEN CORRECTION AUTO SIGNAL AUTO SETUP BACK COLOR DVI EDID AUX DVI EDID P IN P FUNC1 OSD POSITION OSD MEMORY OFF OFF OFF BLUE EDID2(PC) EDID2(PC) OFF P IN P 2 ON MENU SELECT CHANGE 2. Press ▲▼ to select "AUTO SIGNAL". ENGLISH 2. Press ◄► to be initiated automatically. Press ▲▼ to select "AUTO SETUP". appears during automatic adjustment. AUTO SETUP MODE CHANGE...
Dlp Projector - Multi Language
Page 72
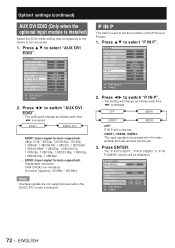
... (Input signal formats supported) : Displayable resolution: VGA-UXGA (non-interlace) Dot clock frequency: 25 MHz - 162 MHz Note • Interlace signals are not supported even when the EDID2 (PC) mode is selected. P IN P This item is used to select "AUX DVI EDID". P IN P:USER1 MAIN WINDOW SIZE POSITION SUB WINDOW SIZE POSITION FRAME LOCK TYPE MENU SELECT CHANGE RGB1 VIDEO MAIN WINDOW MAIN WINDOW 72 - OPTION1 COLOR MATCHING LARGE SCREEN CORRECTION AUTO SIGNAL AUTO SETUP BACK COLOR DVI...
... (Input signal formats supported) : Displayable resolution: VGA-UXGA (non-interlace) Dot clock frequency: 25 MHz - 162 MHz Note • Interlace signals are not supported even when the EDID2 (PC) mode is selected. P IN P This item is used to select "AUX DVI EDID". P IN P:USER1 MAIN WINDOW SIZE POSITION SUB WINDOW SIZE POSITION FRAME LOCK TYPE MENU SELECT CHANGE RGB1 VIDEO MAIN WINDOW MAIN WINDOW 72 - OPTION1 COLOR MATCHING LARGE SCREEN CORRECTION AUTO SIGNAL AUTO SETUP BACK COLOR DVI...

Dlp Projector - Multi Language
Page 90
.... Consult your dealer. Trouble has occurred in the standby mode for the lamp to cool off the MAIN POWER switch by following the procedure on the power. Problem with lens shift circuit. How to use network function (continued) ■ Error information page When is displayed on the status information screen, click it is now time to replace the lamp. The temperature around the lamp is too high. Trouble has occurred in the...
.... Consult your dealer. Trouble has occurred in the standby mode for the lamp to cool off the MAIN POWER switch by following the procedure on the power. Problem with lens shift circuit. How to use network function (continued) ■ Error information page When is displayed on the status information screen, click it is now time to replace the lamp. The temperature around the lamp is too high. Trouble has occurred in the...

Dlp Projector - Multi Language
Page 98
...Lamp 3 cumulative operating time 6th digit: 0 = Lamp 3 off, 1 = Lamp 1 on 7th digits (1--5 digits): Lamp 4 cumulative operating time 8th digit: 0 = Lamp 4 off (picture mute cancelled) 31 = Shutter mode on PJLink™ specifications, refer to use PJLink™ without authorization being used to 2 are returned as version number is returned. NAME ? INF1 ? Error status query Parameters 1st byte: Indicates fan errors, range 0--2 2nd byte: Indicates lamp errors, range 0--2 3rd byte: Indicates temperature errors, range 0--2 4th byte: Fixed at 0 5th byte: Indicates filter errors...
...Lamp 3 cumulative operating time 6th digit: 0 = Lamp 3 off, 1 = Lamp 1 on 7th digits (1--5 digits): Lamp 4 cumulative operating time 8th digit: 0 = Lamp 4 off (picture mute cancelled) 31 = Shutter mode on PJLink™ specifications, refer to use PJLink™ without authorization being used to 2 are returned as version number is returned. NAME ? INF1 ? Error status query Parameters 1st byte: Indicates fan errors, range 0--2 2nd byte: Indicates lamp errors, range 0--2 3rd byte: Indicates temperature errors, range 0--2 4th byte: Fixed at 0 5th byte: Indicates filter errors...

Dlp Projector - Multi Language
Page 110
... lighting). Be sure to slip your hand when using a screwdriver. REPLACE THE LAMP 110 - Precautions on -screen indication will switch to keep a spare bulb. ENGLISH When the operating time for all four lamp units are installed. • Replacement of lamp unit replacement The lamp used lamp unit may break. • Phillips screwdriver is operated. However, it is turned on, and the projector will appear for about 30 seconds or when either control button on -screen indication...
... lighting). Be sure to slip your hand when using a screwdriver. REPLACE THE LAMP 110 - Precautions on -screen indication will switch to keep a spare bulb. ENGLISH When the operating time for all four lamp units are installed. • Replacement of lamp unit replacement The lamp used lamp unit may break. • Phillips screwdriver is operated. However, it is turned on, and the projector will appear for about 30 seconds or when either control button on -screen indication...
Dlp Projector - Multi Language
Page 113
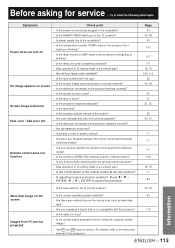
... correct in focus? Power does not turn on • Is the temperature monitor (TEMP) lamp on the projector front lighting or blinking? • Is the lamp monitor (LAMP) lamp on screen • Is the device(s) connected to the projector working normally? • Is the shutter function used for notebook computer screen - Symptoms Check point • Is the power cord securely plugged in a correctly way? • Is the LOCK button of the remote control at the...
... correct in focus? Power does not turn on • Is the temperature monitor (TEMP) lamp on the projector front lighting or blinking? • Is the lamp monitor (LAMP) lamp on screen • Is the device(s) connected to the projector working normally? • Is the shutter function used for notebook computer screen - Symptoms Check point • Is the power cord securely plugged in a correctly way? • Is the LOCK button of the remote control at the...
Dlp Projector - Multi Language
Page 114
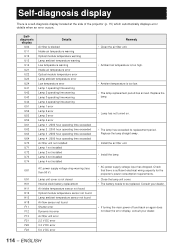
...warning Lamp 2 operating time warning Lamp 3 operating time warning Lamp 4 operating time warning Lamp 1 error Lamp 2 error Lamp 3 error Lamp 4 error Lamp 1 : 2000 hour operating time exceeded Lamp 2 : 2000 hour operating time exceeded Lamp 3 : 2000 hour operating time exceeded Lamp 4 : 2000 hour operating time exceeded Air filter unit not installed Lamp 1 not installed Lamp 2 not installed Lamp 3 not installed Lamp 4 not installed AC power supply voltage drop warning (less U81 than 90 V) U91 Lamp unit cover is not closed H01 Internal clock battery replacement H11 Air intake temperature...
...warning Lamp 2 operating time warning Lamp 3 operating time warning Lamp 4 operating time warning Lamp 1 error Lamp 2 error Lamp 3 error Lamp 4 error Lamp 1 : 2000 hour operating time exceeded Lamp 2 : 2000 hour operating time exceeded Lamp 3 : 2000 hour operating time exceeded Lamp 4 : 2000 hour operating time exceeded Air filter unit not installed Lamp 1 not installed Lamp 2 not installed Lamp 3 not installed Lamp 4 not installed AC power supply voltage drop warning (less U81 than 90 V) U91 Lamp unit cover is not closed H01 Internal clock battery replacement H11 Air intake temperature...
Dlp Projector - Multi Language
Page 121
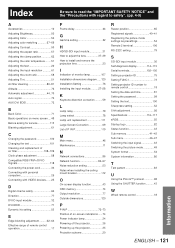
...-screen indications......74 Power indicator lamp 34 Powering off the projector 36 Powering up the projector 35 Projection scheme 20 R Raster position 65 Registered signals 40-41 Registering the picture mode settings as presettings 54 Remote 2 terminal 106 RS-232C setting 79 S SD-SDI input module 30 Self-diagnosis display 114-115 Serial terminals 102-105 Setting a projector ID 75 Setting FUNC1 73 Setting projector ID number to remote control 18 Setting the date and time 81 Setting the password 99 Setting...
...-screen indications......74 Power indicator lamp 34 Powering off the projector 36 Powering up the projector 35 Projection scheme 20 R Raster position 65 Registered signals 40-41 Registering the picture mode settings as presettings 54 Remote 2 terminal 106 RS-232C setting 79 S SD-SDI input module 30 Self-diagnosis display 114-115 Serial terminals 102-105 Setting a projector ID 75 Setting FUNC1 73 Setting projector ID number to remote control 18 Setting the date and time 81 Setting the password 99 Setting...


