Dlp Projector - Multi Language
Page 3
... (optional 33 Projection ...34 How to adjust the lens ...37 Automatic adjustment (AUTO SETUP 39 Registration of lamp unit 110 Notes when installing the ceiling mount bracket 112 Before asking for service ...
... (optional 33 Projection ...34 How to adjust the lens ...37 Automatic adjustment (AUTO SETUP 39 Registration of lamp unit 110 Notes when installing the ceiling mount bracket 112 Before asking for service ...

Dlp Projector - Multi Language
Page 7
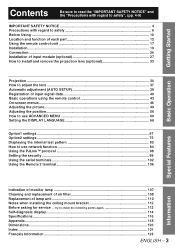
...contact with metallic objects or other batteries, it may catch fire or explode. ■ Replacement of the lamp unit should be sure to use the projector while the projection lens cover is still attached to the projection lens (sold separately). • If this is not observed, fire may occur. ENGLISH...top of surfaces which are unstable. • If the projector is placed on top of each other. • If this is not observed, accidents may result. ■ Do not use the accessory wire (install in a different location to the ceiling mount bracket) and the eye bolts as necklaces or hairpins. ...
...contact with metallic objects or other batteries, it may catch fire or explode. ■ Replacement of the lamp unit should be sure to use the projector while the projection lens cover is still attached to the projection lens (sold separately). • If this is not observed, fire may occur. ENGLISH...top of surfaces which are unstable. • If the projector is placed on top of each other. • If this is not observed, accidents may result. ■ Do not use the accessory wire (install in a different location to the ceiling mount bracket) and the eye bolts as necklaces or hairpins. ...
Dlp Projector - Multi Language
Page 10
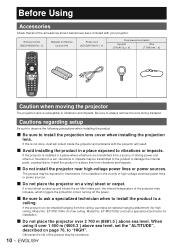
If the projector is installed in a place where vibrations are transmitted from a source of driving power and others or mounted in a car, vibrations or impacts may increase, which triggers the protection circuit, turning off the power. ■ Be sure to ask a... to vibrations and impacts. Install the product in a place free from the ceiling, purchase an optional hanging attachment (for installation. ■ Do not place the projector over 1 400 m (4605.3´) above sea level. ET-PKD100H) (for Remote Control (AA) Power cord [K2CG3YY00015 × 1] Drop-prevention bracket Eye bolt [...
If the projector is installed in a place where vibrations are transmitted from a source of driving power and others or mounted in a car, vibrations or impacts may increase, which triggers the protection circuit, turning off the power. ■ Be sure to ask a... to vibrations and impacts. Install the product in a place free from the ceiling, purchase an optional hanging attachment (for installation. ■ Do not place the projector over 1 400 m (4605.3´) above sea level. ET-PKD100H) (for Remote Control (AA) Power cord [K2CG3YY00015 × 1] Drop-prevention bracket Eye bolt [...

Dlp Projector - Multi Language
Page 19
Getting Started Installation Examples of system expansion The projector is provided with a number of system expansion: System 1 The optional high- System 2 Connection to enable various system expansions. or low-ceiling mount bracket flexibly fits the projector in individual site conditions. ENGLISH - 19 The following are provided to all terminals on the main unit. Both input and output are some examples of terminals and optional accessories to a computer via the DVI-D IN terminal or DVI-D input module (optional).
Getting Started Installation Examples of system expansion The projector is provided with a number of system expansion: System 1 The optional high- System 2 Connection to enable various system expansions. or low-ceiling mount bracket flexibly fits the projector in individual site conditions. ENGLISH - 19 The following are provided to all terminals on the main unit. Both input and output are some examples of terminals and optional accessories to a computer via the DVI-D IN terminal or DVI-D input module (optional).
Dlp Projector - Multi Language
Page 20
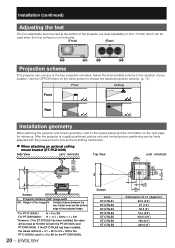
... H = 0.1 × SH to 0.9 × SH for the PT-D10000U, and H = 0 to SH for the PT-DW10000U. 20 - Installation (continued) Adjusting the feet The four adjustable feet mounted at H=SH/2 for both the PT-D10000U and PT-DW10000U. After the projector is not horizontal. (Front) (Rear) Projection scheme This projector can be finely adjusted with the powered zoom...
... H = 0.1 × SH to 0.9 × SH for the PT-D10000U, and H = 0 to SH for the PT-DW10000U. 20 - Installation (continued) Adjusting the feet The four adjustable feet mounted at H=SH/2 for both the PT-D10000U and PT-DW10000U. After the projector is not horizontal. (Front) (Rear) Projection scheme This projector can be finely adjusted with the powered zoom...
Dlp Projector - Multi Language
Page 39
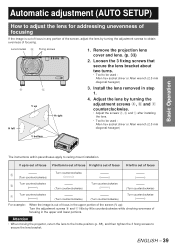
...bottom is out of focus H right is out of focus H left H right 1. ENGLISH - 39 Attention • When moving the projector, return the lens to the home position (p. 38), and then tighten the 3 fixing screws to secure the lens bracket. Loosen the .... • Tool to be used : Allen hex socket driver or Allen wrench (2.5 mm diagonal hexagon) V bottom Basic Operation The instructions within parentheses apply to ceiling mount installation. Lens bracket a Fixing screws b c V up H left is out of focus a (Turn counterclockwise) Turn counterclockwise ( ) ( ) ( ) b Turn ...
...bottom is out of focus H right is out of focus H left H right 1. ENGLISH - 39 Attention • When moving the projector, return the lens to the home position (p. 38), and then tighten the 3 fixing screws to secure the lens bracket. Loosen the .... • Tool to be used : Allen hex socket driver or Allen wrench (2.5 mm diagonal hexagon) V bottom Basic Operation The instructions within parentheses apply to ceiling mount installation. Lens bracket a Fixing screws b c V up H left is out of focus a (Turn counterclockwise) Turn counterclockwise ( ) ( ) ( ) b Turn ...

Dlp Projector - Multi Language
Page 76
... 2 FRONT-F LOW H QUAD OFF LOGO1 2. ENGLISH Press ▲▼ to select "ALTITUDE". OPTION2 PROJECTOR ID INSTALLATION ALTITUDE DIRECTION LAMP SELECT LAMP RELAY RS-232C SYSTEM INFORMATION AIR FILTER CLEANING DATE AND TIME STARTUP...mount front projection (FRONT-C) Floor mount rear projection (REAR-F) Ceiling mount rear projection (REAR-C) 3. Press ▲▼ to select "INSTALLATION". Press ◄► to switch "ALTITUDE". • The setting will change the projection scheme. • Select the setting by displaying the on-screen indications using the projector...
... 2 FRONT-F LOW H QUAD OFF LOGO1 2. ENGLISH Press ▲▼ to select "ALTITUDE". OPTION2 PROJECTOR ID INSTALLATION ALTITUDE DIRECTION LAMP SELECT LAMP RELAY RS-232C SYSTEM INFORMATION AIR FILTER CLEANING DATE AND TIME STARTUP...mount front projection (FRONT-C) Floor mount rear projection (REAR-F) Ceiling mount rear projection (REAR-C) 3. Press ▲▼ to select "INSTALLATION". Press ◄► to switch "ALTITUDE". • The setting will change the projection scheme. • Select the setting by displaying the on-screen indications using the projector...

Dlp Projector - Multi Language
Page 112
... technician by following the procedure given below. • Panasonic takes no responsibility for any used products as soon as possible by Panasonic, or if damage to the projector occurs as a result of using a ceiling mount bracket not manufactured by asking a qualified technician for installing... the ceiling mount bracket, even if the projector's warranty period has not yet expired. •...
... technician by following the procedure given below. • Panasonic takes no responsibility for any used products as soon as possible by Panasonic, or if damage to the projector occurs as a result of using a ceiling mount bracket not manufactured by asking a qualified technician for installing... the ceiling mount bracket, even if the projector's warranty period has not yet expired. •...
Dlp Projector - Multi Language
Page 116
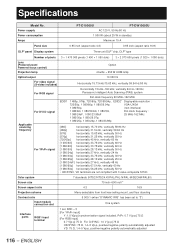
...-600 inch*2 Screen aspect ratio 4:3 16:9 Projection scheme Menu-selectable from front/rear/ceiling mount, and floor standing Contrast ratio Input module connection slot Interface ports RGB1 input terminal 5 000... PT-DW10000U AC 120 V, 50 Hz/60 Hz 1 500 W (about 25 W in standby) Maximum 15 A Panel size 0.95 inch (aspect ratio 4:3) 0.95 inch (aspect ratio 16:9) DLP® panel Display system Three-unit DLP® chip, DLP&#... For RGB signal Horizontally 15 kHz-100 kHz, vertically 24 Hz-120 Hz, Panasonic Intelligent Auto Scanning (PIAS) system Dot clock frequency 20 MHz-162 MHz For...
...-600 inch*2 Screen aspect ratio 4:3 16:9 Projection scheme Menu-selectable from front/rear/ceiling mount, and floor standing Contrast ratio Input module connection slot Interface ports RGB1 input terminal 5 000... PT-DW10000U AC 120 V, 50 Hz/60 Hz 1 500 W (about 25 W in standby) Maximum 15 A Panel size 0.95 inch (aspect ratio 4:3) 0.95 inch (aspect ratio 16:9) DLP® panel Display system Three-unit DLP® chip, DLP&#... For RGB signal Horizontally 15 kHz-100 kHz, vertically 24 Hz-120 Hz, Panasonic Intelligent Auto Scanning (PIAS) system Dot clock frequency 20 MHz-162 MHz For...
Dlp Projector - Multi Language
Page 121
...IN P 119 M Main menu 46 Maintenance 11 N Network connections 86 Network function 84-97 Noise reduction setting 53 Notes when installing the ceiling mount bracket 112 O On-screen display function 43 OSD memory 74 Output resolution 77 Outside dimensions 120 P P IN P 72-73 Position of ...on-screen indications......74 Power indicator lamp 34 Powering off the projector 36 Powering up the projector 35 Projection scheme 20 R Raster position 65 Registered signals 40-41 Registering the picture mode settings as presettings 54 Remote 2...
...IN P 119 M Main menu 46 Maintenance 11 N Network connections 86 Network function 84-97 Noise reduction setting 53 Notes when installing the ceiling mount bracket 112 O On-screen display function 43 OSD memory 74 Output resolution 77 Outside dimensions 120 P P IN P 72-73 Position of ...on-screen indications......74 Power indicator lamp 34 Powering off the projector 36 Powering up the projector 35 Projection scheme 20 R Raster position 65 Registered signals 40-41 Registering the picture mode settings as presettings 54 Remote 2...
