Owner Manual
Page 1
Please read this manual thoroughly before making connections and plugging in this manual for purchasing an Onkyo AV Receiver. AV Receiver TX-SR308 Instruction Manual Thank you to obtain optimum performance and listening enjoyment from your new AV Receiver. Please retain this manual will enable you for future reference. Contents Introduction 2 Connections 11 Turning On & Basic Operations ......18 Advanced Operations 28 Controlling iPod & Other Components 37 Others 44 En Following the instructions in the unit.
Please read this manual thoroughly before making connections and plugging in this manual for purchasing an Onkyo AV Receiver. AV Receiver TX-SR308 Instruction Manual Thank you to obtain optimum performance and listening enjoyment from your new AV Receiver. Please retain this manual will enable you for future reference. Contents Introduction 2 Connections 11 Turning On & Basic Operations ......18 Advanced Operations 28 Controlling iPod & Other Components 37 Others 44 En Following the instructions in the unit.
Owner Manual
Page 4
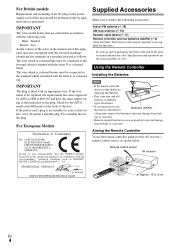
...remove the batteries to prevent damage from leakage or corrosion. Check for this unit.) * In catalogs and on packaging, the letter at the AV receiver's remote control sensor, as EN60065, EN55013, EN55020 and EN61000-3-2, -3-3. Specifications and operations are coloured in accordance with the following accessories: Indoor... for the remote controller is not supplied for the ASTA mark or the BSI mark on the body of Conformity We, ONKYO EUROPE ELECTRONICS GmbH LIEGNITZERSTRASSE 6, 82194 GROEBENZELL, GERMANY declare in own responsibility, that indicated on the plug. The wire which is...
...remove the batteries to prevent damage from leakage or corrosion. Check for this unit.) * In catalogs and on packaging, the letter at the AV receiver's remote control sensor, as EN60065, EN55013, EN55020 and EN61000-3-2, -3-3. Specifications and operations are coloured in accordance with the following accessories: Indoor... for the remote controller is not supplied for the ASTA mark or the BSI mark on the body of Conformity We, ONKYO EUROPE ELECTRONICS GmbH LIEGNITZERSTRASSE 6, 82194 GROEBENZELL, GERMANY declare in own responsibility, that indicated on the plug. The wire which is...
Owner Manual
Page 5
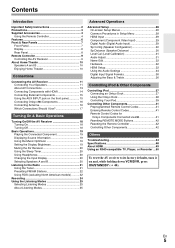
...B 10 Enjoying Home Theater 10 Connections Connecting the AV Receiver 11 Connecting Your Speakers 11 About AV Connections 13 Connecting Components with HDMI 14 Connecting External Components 15 Using the AUX INPUT jack on the front panel 15 Connecting Onkyo V Components 16 Connecting Antenna 16 Which Connections Should... I Use 17 Turning On & Basic Operations Turning On/Off the AV Receiver 18 Turning On 18 Turning Off 18 Basic Operations 19 Playing the...
...B 10 Enjoying Home Theater 10 Connections Connecting the AV Receiver 11 Connecting Your Speakers 11 About AV Connections 13 Connecting Components with HDMI 14 Connecting External Components 15 Using the AUX INPUT jack on the front panel 15 Connecting Onkyo V Components 16 Connecting Antenna 16 Which Connections Should... I Use 17 Turning On & Basic Operations Turning On/Off the AV Receiver 18 Turning On 18 Turning Off 18 Basic Operations 19 Playing the...
Owner Manual
Page 8
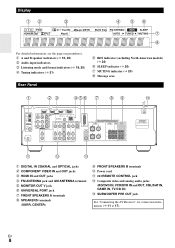
... audio jacks (BD/DVD IN, VCR/DVR IN and OUT, CBL/SAT IN, GAME IN, TV/CD IN) N SUBWOOFER PRE OUT jack See "Connecting the AV Receiver" for connection information (➔ 11 to 17).
... audio jacks (BD/DVD IN, VCR/DVR IN and OUT, CBL/SAT IN, GAME IN, TV/CD IN) N SUBWOOFER PRE OUT jack See "Connecting the AV Receiver" for connection information (➔ 11 to 17).
Owner Manual
Page 9
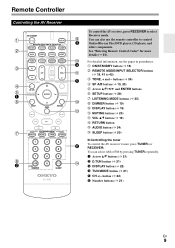
...; 19) M RETURN button N AUDIO button (➔ 34) O SLEEP button (➔ 20) ■ Controlling the tuner G To control the AV receiver's tuner, press TUNER (or RECEIVER). B Arrow R/X buttons (➔ 21) O C D.TUN button (➔ 21) D DISPLAY button (➔ 22) E TUN MODE button (&#...Arrow R/X/F/S and ENTER buttons G SETUP button (➔ 28) H LISTENING MODE buttons (➔ 25) M I C To control the AV receiver, press RECEIVER to control D Onkyo Blu-ray Disc/DVD player, CD player, and other components. E B ON/STANDBY button (➔ 18) L C REMOTE MODE/INPUT...
...; 19) M RETURN button N AUDIO button (➔ 34) O SLEEP button (➔ 20) ■ Controlling the tuner G To control the AV receiver's tuner, press TUNER (or RECEIVER). B Arrow R/X buttons (➔ 21) O C D.TUN button (➔ 21) D DISPLAY button (➔ 22) E TUN MODE button (&#...Arrow R/X/F/S and ENTER buttons G SETUP button (➔ 28) H LISTENING MODE buttons (➔ 25) M I C To control the AV receiver, press RECEIVER to control D Onkyo Blu-ray Disc/DVD player, CD player, and other components. E B ON/STANDBY button (➔ 18) L C REMOTE MODE/INPUT...
Owner Manual
Page 10
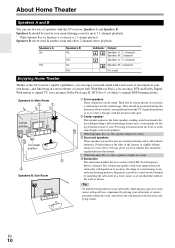
...movies it close to create a triangle, with the listener at about 2 to 3 feet (60 to the AV receiver's superb capabilities, you can enjoy Dolby Pro Logic II, DTS Neo:6, or Onkyo's original DSP listening modes. Ideally they should be equidistant from the TV. En 10 With Blu-ray Discs...on , this speaker outputs no sound. D Surround speakers These speakers are used for your subwoofer, while playing a movie or some music with the AV receiver: Speakers A and Speakers B. In general, a good bass sound can use two sets of movement in your subwoofer at various positions within the room,...
...movies it close to create a triangle, with the listener at about 2 to 3 feet (60 to the AV receiver's superb capabilities, you can enjoy Dolby Pro Logic II, DTS Neo:6, or Onkyo's original DSP listening modes. Ideally they should be equidistant from the TV. En 10 With Blu-ray Discs...on , this speaker outputs no sound. D Surround speakers These speakers are used for your subwoofer, while playing a movie or some music with the AV receiver: Speakers A and Speakers B. In general, a good bass sound can use two sets of movement in your subwoofer at various positions within the room,...
Owner Manual
Page 11
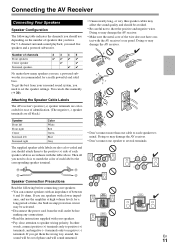
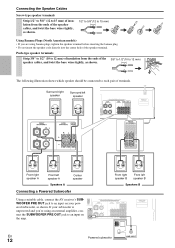
...so may affect the sound quality and should be avoided. • Be careful not to the corresponding speaker terminal. Connecting the AV Receiver Connecting Your Speakers Speaker Configuration The following before making any connections. • Read the instructions supplied with your speakers: •...speakers 2345 ✔✔✔✔ ✔ ✔ ✔✔ No matter how many speakers you have contact with the AV receiver's rear panel. If you get the best from the wall outlet before connecting your speakers. • Pay close attention to several...
...so may affect the sound quality and should be avoided. • Be careful not to the corresponding speaker terminal. Connecting the AV Receiver Connecting Your Speakers Speaker Configuration The following before making any connections. • Read the instructions supplied with your speakers: •...speakers 2345 ✔✔✔✔ ✔ ✔ ✔✔ No matter how many speakers you have contact with the AV receiver's rear panel. If you get the best from the wall outlet before connecting your speakers. • Pay close attention to several...
Owner Manual
Page 12
... the 3/8" to 1/2"(10 to each pair of terminals. Front right speaker B Front left speaker A Center speaker Speakers A Connecting a Powered Subwoofer Using a suitable cable, connect the AV receiver's SUBWOOFER PRE OUT jack to an input on your subwoofer is unpowered and you are using an external amplifier, connect the SUBWOOFER PRE OUT jack...
... the 3/8" to 1/2"(10 to each pair of terminals. Front right speaker B Front left speaker A Center speaker Speakers A Connecting a Powered Subwoofer Using a suitable cable, connect the AV receiver's SUBWOOFER PRE OUT jack to an input on your subwoofer is unpowered and you are using an external amplifier, connect the SUBWOOFER PRE OUT jack...
Owner Manual
Page 13
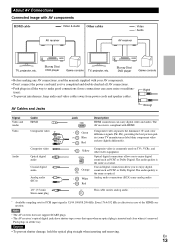
...Orange L White R Red Composite video is inserted and close when it's removed. Note • The AV receiver does not support SCART plugs. • The AV receiver's optical digital jacks have shutter-type covers that open when an optical plug is commonly used on TVs,.... * Available sampling rate for PCM input signal is the same as coaxial. About AV Connections Connected image with AV components HDMI cable : Video & Audio Other cables AV receiver : Video : Audio AV receiver TV, projector, etc. Component video separates the luminance (Y) and color difference signals (...
...Orange L White R Red Composite video is inserted and close when it's removed. Note • The AV receiver does not support SCART plugs. • The AV receiver's optical digital jacks have shutter-type covers that open when an optical plug is commonly used on TVs,.... * Available sampling rate for PCM input signal is the same as coaxial. About AV Connections Connected image with AV components HDMI cable : Video & Audio Other cables AV receiver : Video : Audio AV receiver TV, projector, etc. Component video separates the luminance (Y) and color difference signals (...
Owner Manual
Page 14
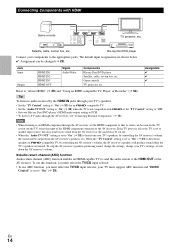
... setting is not compatible with HDMI Game console TV, projector, etc. The default input assignments are muted. Tip To listen to audio received by controlling the AV receiver's volume, the sound will produce sound while the TV's speakers are shown below. ✔: Assignment can be seen on the TV ...send the audio stream to the HDMI OUT of the HDMI component connected to hear from speakers of Q-compatible TV, by controlling the AV receiver's volume, the AV receiver's speakers will be changed (➔ 29). To use ARC function, you must select the TV/CD input selector, your TV must...
... setting is not compatible with HDMI Game console TV, projector, etc. The default input assignments are muted. Tip To listen to audio received by controlling the AV receiver's volume, the sound will produce sound while the TV's speakers are shown below. ✔: Assignment can be seen on the TV ...send the audio stream to the HDMI OUT of the HDMI component connected to hear from speakers of Q-compatible TV, by controlling the AV receiver's volume, the AV receiver's speakers will be changed (➔ 29). To use ARC function, you must select the TV/CD input selector, your TV must...
Owner Manual
Page 15
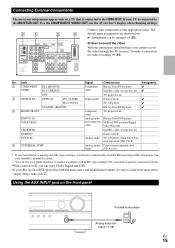
... Satellite, cable, set -top box, etc. See your phono equalizer's manual for details. • With connection #, you can also use the AV receiver's display when changing settings. #" Connect your components to the appropriate jacks. Using the AUX INPUT jack on a TV that is connected to the ... Dolby Digital and DTS. • If your turntable has a moving coil (MC) type cartridge, you cannot record the video through the AV receiver. Connecting External Components The on-screen setup menus appear only on the front panel Portable audio player Analog audio line output (➔ 13) ...
... Satellite, cable, set -top box, etc. See your phono equalizer's manual for details. • With connection #, you can also use the AV receiver's display when changing settings. #" Connect your components to the appropriate jacks. Using the AUX INPUT jack on a TV that is connected to the ... Dolby Digital and DTS. • If your turntable has a moving coil (MC) type cartridge, you cannot record the video through the AV receiver. Connecting External Components The on-screen setup menus appear only on the front panel Portable audio player Analog audio line output (➔ 13) ...
Owner Manual
Page 16
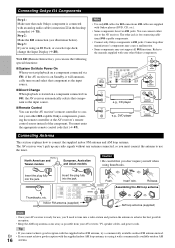
...9632; Remote Control You can use , you cannot achieve good reception with Onkyo players (DVD, CD, etc.). • Some components have two V jacks. You can use the tuner. The AV receiver won't pick up any radio signals without any antenna connected, so you...) (➔ 15). Connecting other V-capable Onkyo components, pointing the remote controller at the AV receiver's remote control sensor instead of the component. Note • Use only V cables for use the AV receiver's remote controller to control your other Onkyo components. North American and Taiwan models European,...
...9632; Remote Control You can use , you cannot achieve good reception with Onkyo players (DVD, CD, etc.). • Some components have two V jacks. You can use the tuner. The AV receiver won't pick up any radio signals without any antenna connected, so you...) (➔ 15). Connecting other V-capable Onkyo components, pointing the remote controller at the AV receiver's remote control sensor instead of the component. Note • Use only V cables for use the AV receiver's remote controller to control your other Onkyo components. North American and Taiwan models European,...
Owner Manual
Page 17
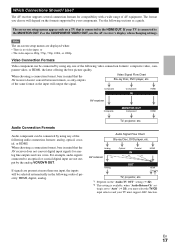
... player, etc. ting is set - When choosing a connection format, bear in the following audio connection formats: analog, optical, coaxial, or HDMI. Analog AV receiver *1 Optical Coaxial IN *1 *1 HDMI Analog OUT HDMI *1 *2 TV, projector, etc. *1 Depends on a TV that is available, when "Audio Return... video, or HDMI, the latter offering the best picture quality. When choosing a connection format, bear in mind that the AV receiver does not convert digital input signals for compatibility with a wide range of priority: HDMI, digital, analog. Audio Signal Flow Chart...
... player, etc. ting is set - When choosing a connection format, bear in the following audio connection formats: analog, optical, coaxial, or HDMI. Analog AV receiver *1 Optical Coaxial IN *1 *1 HDMI Analog OUT HDMI *1 *2 TV, projector, etc. *1 Depends on a TV that is available, when "Audio Return... video, or HDMI, the latter offering the best picture quality. When choosing a connection format, bear in mind that the AV receiver does not convert digital input signals for compatibility with a wide range of priority: HDMI, digital, analog. Audio Signal Flow Chart...
Owner Manual
Page 18
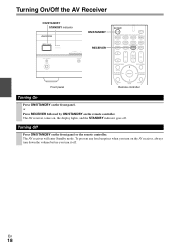
or Press RECEIVER followed by ON/STANDBY on , the display lights, and the STANDBY indicator goes off . The AV receiver comes on the remote controller. The AV receiver will enter Standby mode. To prevent any loud surprises when you turn on the front panel. Turning On/Off the AV Receiver ON/STANDBY STANDBY indicator ON/STANDBY RECEIVER Front panel Remote controller Turning On Press ON/STANDBY on the AV receiver, always turn down the volume before you turn it off . En 18 Turning Off Press ON/STANDBY on the front panel or the remote controller.
or Press RECEIVER followed by ON/STANDBY on , the display lights, and the STANDBY indicator goes off . The AV receiver comes on the remote controller. The AV receiver will enter Standby mode. To prevent any loud surprises when you turn on the front panel. Turning On/Off the AV Receiver ON/STANDBY STANDBY indicator ON/STANDBY RECEIVER Front panel Remote controller Turning On Press ON/STANDBY on the AV receiver, always turn down the volume before you turn it off . En 18 Turning Off Press ON/STANDBY on the front panel or the remote controller.
Owner Manual
Page 19
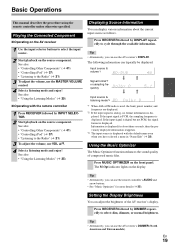
..." (➔ 41) • "Controlling iPod" (➔ 37) • "Listening to the Radio" (➔ 21) 3 To adjust the volume, use the AV receiver's DISPLAY. Tip • Alternatively, you have selected a name in "Name Edit" (➔ 32). En 19 See also: • "Controlling Other Components" (➔...VOLUME control. 4 Select a listening mode and enjoy! Using the Music Optimizer The Music Optimizer function enhances the sound quality of the AV receiver's display. Input source & volume*1 Signal format*2 or sampling frequency Input source & listening mode*3 *1 When AM or FM radio ...
..." (➔ 41) • "Controlling iPod" (➔ 37) • "Listening to the Radio" (➔ 21) 3 To adjust the volume, use the AV receiver's DISPLAY. Tip • Alternatively, you have selected a name in "Name Edit" (➔ 32). En 19 See also: • "Controlling Other Components" (➔...VOLUME control. 4 Select a listening mode and enjoy! Using the Music Optimizer The Music Optimizer function enhances the sound quality of the AV receiver's display. Input source & volume*1 Signal format*2 or sampling frequency Input source & listening mode*3 *1 When AM or FM radio ...

Owner Manual
Page 20
... jack. This setting can temporarily mute the output of stereo headphones with the AV receiver: Speakers A for up to 5.1-channel playback in your head- Changing the Input Display When you connect an V-capable Onkyo component, you can work properly. Press RECEIVER followed by 10 minutes. Repeat this order: VCR/DVR ↔ DOCK Note •...
... jack. This setting can temporarily mute the output of stereo headphones with the AV receiver: Speakers A for up to 5.1-channel playback in your head- Changing the Input Display When you connect an V-capable Onkyo component, you can work properly. Press RECEIVER followed by 10 minutes. Repeat this order: VCR/DVR ↔ DOCK Note •...
Owner Manual
Page 22
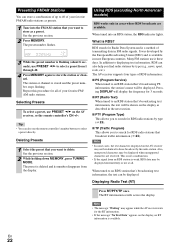
...as a preset. Pressing DISPLAY will display the frequency for the RT information. • If the message "No Text Data" appears on the AV receiver may be displayed when unsupported characters are available. The preset number flashes. 3 While the preset number is available in FM radio signals. In ... tuned to an RDS station that broadcast traffic information (➔ 23). It was developed by type (e.g., news, sport, rock, etc.). The AV receiver supports four types of RDS information: ■ PS (Program Service) When tuned to an RDS station that you want to store as described ...
...as a preset. Pressing DISPLAY will display the frequency for the RT information. • If the message "No Text Data" appears on the AV receiver may be displayed when unsupported characters are available. The preset number flashes. 3 While the preset number is available in FM radio signals. In ... tuned to an RDS station that broadcast traffic information (➔ 23). It was developed by type (e.g., news, sport, rock, etc.). The AV receiver supports four types of RDS information: ■ PS (Program Service) When tuned to an RDS station that you want to store as described ...

Owner Manual
Page 23
...TP three times. If the current radio station is broadcasting TP (Traffic Program), "[TP]" will be heard as and when it's broadcast. The AV receiver searches until it finds a station of the type you want . If "TP" without square brackets appears, this chapter. 3 To start the ...Social affairs Religion Phone in this means that the station is not broadcasting TP. 2 To locate a station that is found, press ENTER. The AV receiver searches until it stops briefly before continuing with the search. 4 When a station you specified, at which point it finds a station that's broadcasting...
...TP three times. If the current radio station is broadcasting TP (Traffic Program), "[TP]" will be heard as and when it's broadcast. The AV receiver searches until it finds a station of the type you want . If "TP" without square brackets appears, this chapter. 3 To start the ...Social affairs Religion Phone in this means that the station is not broadcasting TP. 2 To locate a station that is found, press ENTER. The AV receiver searches until it stops briefly before continuing with the search. 4 When a station you specified, at which point it finds a station that's broadcasting...
Owner Manual
Page 24
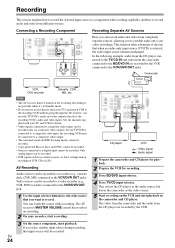
...recording, that input source will be recorded as the video source. 5 Start recording on the VCR and start playback. Note • The AV receiver must be connected to a composite video output. • The surround sound and DSP listening modes cannot be recorded. • Copy-protected ... camcorder and CD player for playback. 2 Prepare the VCR for recording. 3 Press BD/DVD input selector. 4 Press TV/CD input selector. The AV receiver's MASTER VOLUME control has no effect on recording. 2 On your recorder, start recording. 3 On the source component, start playback on for recording. ...
...recording, that input source will be recorded as the video source. 5 Start recording on the VCR and start playback. Note • The AV receiver must be connected to a composite video output. • The surround sound and DSP listening modes cannot be recorded. • Copy-protected ... camcorder and CD player for playback. 2 Prepare the VCR for recording. 3 Press BD/DVD input selector. 4 Press TV/CD input selector. The AV receiver's MASTER VOLUME control has no effect on recording. 2 On your recorder, start recording. 3 On the source component, start playback on for recording. ...
Owner Manual
Page 25
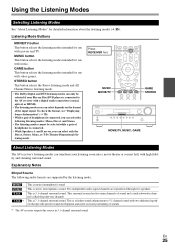
...stunning surround sound. Two independent audio signal channels are supported by the listening mode. This is a further sound enhancement to the AV receiver with a digital audio connection (coaxial, optical, or HDMI). • The listening modes you can select depends on the format... This is 5.1-channel surround sound. This is mono (monophonic) sound. This surround system has five main channels of sounds. *1 The AV receiver outputs this source in 5.1-channel surround sound. Using the Listening Modes Selecting Listening Modes See "About Listening Modes" for use with video games...
...stunning surround sound. Two independent audio signal channels are supported by the listening mode. This is a further sound enhancement to the AV receiver with a digital audio connection (coaxial, optical, or HDMI). • The listening modes you can select depends on the format... This is 5.1-channel surround sound. This is mono (monophonic) sound. This surround system has five main channels of sounds. *1 The AV receiver outputs this source in 5.1-channel surround sound. Using the Listening Modes Selecting Listening Modes See "About Listening Modes" for use with video games...


