Owner Manual
Page 5
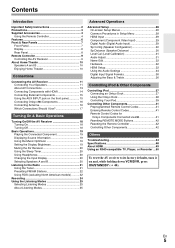
...AV Connections 13 Connecting Components with HDMI 14 Connecting External Components 15 Using the AUX INPUT jack on the front panel 15 Connecting Onkyo V Components 16 Connecting Antenna 16 Which Connections Should I Use 17 Turning On &...Display Brightness 19 Muting the AV Receiver 20 Using the Sleep Timer 20 Using Headphones 20 Changing the Input Display 20 Selecting Speakers A and B 20 Listening to the Radio 21 Using the Tuner 21 Presetting... ... 50 To reset the AV receiver to its factory defaults, turn it on and, while holding down VCR/DVR, press ON/STANDBY (➔ 44).
...AV Connections 13 Connecting Components with HDMI 14 Connecting External Components 15 Using the AUX INPUT jack on the front panel 15 Connecting Onkyo V Components 16 Connecting Antenna 16 Which Connections Should I Use 17 Turning On &...Display Brightness 19 Muting the AV Receiver 20 Using the Sleep Timer 20 Using Headphones 20 Changing the Input Display 20 Selecting Speakers A and B 20 Listening to the Radio 21 Using the Tuner 21 Presetting... ... 50 To reset the AV receiver to its factory defaults, turn it on and, while holding down VCR/DVR, press ON/STANDBY (➔ 44).
Owner Manual
Page 14
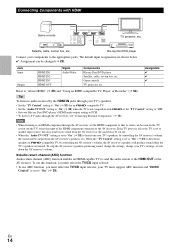
...to "Off". • Set your components to the appropriate jacks. En 14 Satellite, cable, set -top box, etc. Game console TV, projector, etc. Jack Input Output HDMI IN1 HDMI IN2 HDMI IN3 HDMI OUT Signal Audio/Video Components Blu-ray Disc/DVD player Satellite, cable, set -top box, etc. When...AV receiver's volume, the AV receiver's speakers will be seen on the TV screen (on the TV, select the input of the HDMI component connected to "On" (➔ 33). The default input assignments are muted. Tip To listen to the HDMI OUT of Q-compatible TV, by the HDMI IN jacks through ...
...to "Off". • Set your components to the appropriate jacks. En 14 Satellite, cable, set -top box, etc. Game console TV, projector, etc. Jack Input Output HDMI IN1 HDMI IN2 HDMI IN3 HDMI OUT Signal Audio/Video Components Blu-ray Disc/DVD player Satellite, cable, set -top box, etc. When...AV receiver's volume, the AV receiver's speakers will be seen on the TV screen (on the TV, select the input of the HDMI component connected to "On" (➔ 33). The default input assignments are muted. Tip To listen to the HDMI OUT of Q-compatible TV, by the HDMI IN jacks through ...
Owner Manual
Page 15
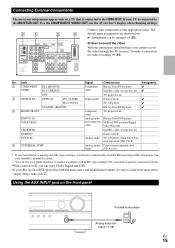
... main stereo and multichannel outputs, be changed (➔ 29). ■ How to connect the main stereo output using connection $. Using the AUX INPUT jack on a TV that is connected to the MONITOR OUT V or the COMPONENT VIDEO OUT, use a phono equalizer to the appropriate jacks. ..., you can be sure to record the video With the connections described here, you cannot record the video through the AV receiver. The $ % default input assignments are shown below. ✔: Assignment can enjoy Dolby Digital and DTS. • If your turntable's manual for video recording (➔ 24...
... main stereo and multichannel outputs, be changed (➔ 29). ■ How to connect the main stereo output using connection $. Using the AUX INPUT jack on a TV that is connected to the MONITOR OUT V or the COMPONENT VIDEO OUT, use a phono equalizer to the appropriate jacks. ..., you can be sure to record the video With the connections described here, you cannot record the video through the AV receiver. The $ % default input assignments are shown below. ✔: Assignment can enjoy Dolby Digital and DTS. • If your turntable's manual for video recording (➔ 24...
Owner Manual
Page 19
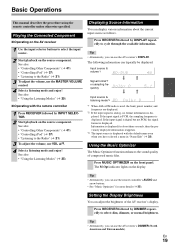
...• Alternatively, you can use the remote controller's AUDIO and arrow buttons. • See "Music Optimizer" for about the current input source as follows. See also: • "Using the Listening Modes" (➔ 25) Displaying Source Information You can use the AV..."Using the Listening Modes" (➔ 25) ■ Operating with the default name even when you can display various information about three seconds, then the previously displayed information reappears. *3 The input source is displayed with the remote controller 1 Press RECEIVER followed by DISPLAY ...
...• Alternatively, you can use the remote controller's AUDIO and arrow buttons. • See "Music Optimizer" for about the current input source as follows. See also: • "Using the Listening Modes" (➔ 25) Displaying Source Information You can use the AV..."Using the Listening Modes" (➔ 25) ■ Operating with the default name even when you can display various information about three seconds, then the previously displayed information reappears. *3 The input source is displayed with the remote controller 1 Press RECEIVER followed by DISPLAY ...
Owner Manual
Page 29
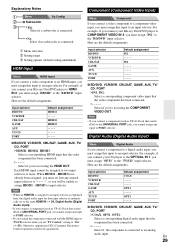
...IN1, IN2: Select a corresponding component video input that input to the "BD/DVD" input selector. B Menu selection C Setting target D Setting options (default setting underlined) HDMI Input Menu HDMI Input If you connect a video component to an HDMI input, you must assign that the video component has... CEC (Consumer Electronics Control) operation will be guaranteed. HDMI3 to an analog audio input. Here are the default assignments. Input selector BD/DVD VCR/DVR CBL/SAT GAME AUX TV/CD PORT Default assignment COAX --------OPT1 ----OPT2 ----- ■ BD/DVD, VCR/DVR, CBL/SAT...
...IN1, IN2: Select a corresponding component video input that input to the "BD/DVD" input selector. B Menu selection C Setting target D Setting options (default setting underlined) HDMI Input Menu HDMI Input If you connect a video component to an HDMI input, you must assign that the video component has... CEC (Consumer Electronics Control) operation will be guaranteed. HDMI3 to an analog audio input. Here are the default assignments. Input selector BD/DVD VCR/DVR CBL/SAT GAME AUX TV/CD PORT Default assignment COAX --------OPT1 ----OPT2 ----- ■ BD/DVD, VCR/DVR, CBL/SAT...
Owner Manual
Page 30
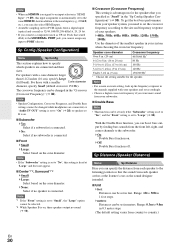
...Large" option cannot be changed in the "Crossover (Crossover Frequency)" (➔ 30). For speakers with a smaller Cone diameter diameter, specify Small (default crossover 150 Hz). Note • Speaker Configuration, Crossover Frequency, and Double Bass settings cannot be selected. *2 While Speakers B is on . `...Range: 0.3m to 9.0m in meters. The crossover frequency can be set to the usual inputs (e.g., COAX, etc.), you need to set in 0.3 meter steps. (The default setting varies from your speaker system, you can be changed while headphones are connected and their sizes...
...Large" option cannot be changed in the "Crossover (Crossover Frequency)" (➔ 30). For speakers with a smaller Cone diameter diameter, specify Small (default crossover 150 Hz). Note • Speaker Configuration, Crossover Frequency, and Double Bass settings cannot be selected. *2 While Speakers B is on . `...Range: 0.3m to 9.0m in meters. The crossover frequency can be set to the usual inputs (e.g., COAX, etc.), you need to set in 0.3 meter steps. (The default setting varies from your speaker system, you can be changed while headphones are connected and their sizes...
Owner Manual
Page 32
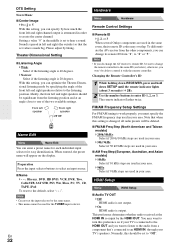
...the remote indicator lights (about 3 seconds) (➔ 28). 2 Use the number buttons to the default, select "- - -". Theater-Dimensional Setting ■ Listening Angle ` Wide: Select if the listening ...right speakers should be used in order to create the center channel. Preparation Press the input selector buttons to select an input source. ■ Name ` - - -, Blu-ray, DVD, HD DVD, ...Hardware Menu Hardware Remote Control Settings ■ Remote ID ` 1, 2, or 3 When several Onkyo components are used in your area. To differentiate the AV receiver from "1", to control it...
...the remote indicator lights (about 3 seconds) (➔ 28). 2 Use the number buttons to the default, select "- - -". Theater-Dimensional Setting ■ Listening Angle ` Wide: Select if the listening ...right speakers should be used in order to create the center channel. Preparation Press the input selector buttons to select an input source. ■ Name ` - - -, Blu-ray, DVD, HD DVD, ...Hardware Menu Hardware Remote Control Settings ■ Remote ID ` 1, 2, or 3 When several Onkyo components are used in your area. To differentiate the AV receiver from "1", to control it...
Owner Manual
Page 41
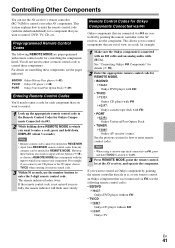
... explains how to enter the remote control code (with the default underlined) for Onkyo Components Connected via V Onkyo components that are connected via V, press and hold down REMOTE MODE to which you want to control an Onkyo component by pointing the remote controller at the AV receiver, ...2 Enter the appropriate remote control code for REMOTE MODE. • BD/DVD ` 31612: Onkyo DVD player with V • TV/CD ` 71323: Onkyo CD player with V ` 42157: Onkyo cassette tape deck with the input to which you want to control these components, see the pages indicated. This allows you want...
... explains how to enter the remote control code (with the default underlined) for Onkyo Components Connected via V Onkyo components that are connected via V, press and hold down REMOTE MODE to which you want to control an Onkyo component by pointing the remote controller at the AV receiver, ...2 Enter the appropriate remote control code for REMOTE MODE. • BD/DVD ` 31612: Onkyo DVD player with V • TV/CD ` 71323: Onkyo CD player with V ` 42157: Onkyo cassette tape deck with the input to which you want to control these components, see the pages indicated. This allows you want...
Owner Manual
Page 42
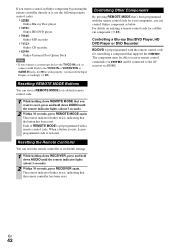
...Input Display accordingly (➔ 20). En 42 Each of REMOTE MODE is preprogrammed with the remote control code for controlling a component that you want to control an Onkyo component by pointing the remote controller directly at it, use the following remote control codes: ` 32900: Onkyo... press REMOTE MODE again. The remote indicator flashes twice, indicating that the button has been reset. When a button is reset, its default settings. 1 While holding down REMOTE MODE that supports the Q. Controlling Other Components By pressing REMOTE MODE that's been programmed with the ...
...Input Display accordingly (➔ 20). En 42 Each of REMOTE MODE is preprogrammed with the remote control code for controlling a component that you want to control an Onkyo component by pointing the remote controller directly at it, use the following remote control codes: ` 32900: Onkyo... press REMOTE MODE again. The remote indicator flashes twice, indicating that the button has been reset. When a button is reset, its default settings. 1 While holding down REMOTE MODE that supports the Q. Controlling Other Components By pressing REMOTE MODE that's been programmed with the ...
Owner Manual
Page 44
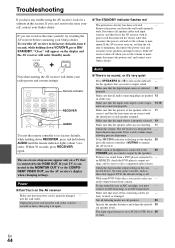
...some DVD-Video discs, you want to its factory defaults, while holding down AUDIO until the remote indicator lights (about 3 seconds). With some game consoles, such as those that is set then the vol- If your Onkyo dealer. The input signal format is connected to - Remove the power ...cord from a DVD player connected to the HDMI OUT. mum, disconnect the power cord, and contact your speakers and input sources. into the wall outlet. Make sure...
...some DVD-Video discs, you want to its factory defaults, while holding down AUDIO until the remote indicator lights (about 3 seconds). With some game consoles, such as those that is set then the vol- If your Onkyo dealer. The input signal format is connected to - Remove the power ...cord from a DVD player connected to the HDMI OUT. mum, disconnect the power cord, and contact your speakers and input sources. into the wall outlet. Make sure...
Owner Manual
Page 45
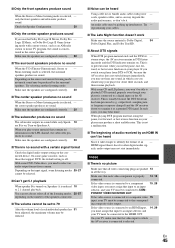
... - playback DTS material properly even though your player. When playing DTS program material, using the - Make sure that support DVD, the default setting is concentrated in the center speaker. only the front speakers and subwoofer produce sound. Logic II Music, or Dolby Pro Logic II Game... noise when you should stop your cables. ■ The Late Night function doesn't work Make sure the source material is to a digital input on the con- - Try selecting another listening mode. Make sure the speakers are configured correctly. 30 ■ The subwoofer produces no sound...
... - playback DTS material properly even though your player. When playing DTS program material, using the - Make sure that support DVD, the default setting is concentrated in the center speaker. only the front speakers and subwoofer produce sound. Logic II Music, or Dolby Pro Logic II Game... noise when you should stop your cables. ■ The Late Night function doesn't work Make sure the source material is to a digital input on the con- - Try selecting another listening mode. Make sure the speakers are configured correctly. 30 ■ The subwoofer produces no sound...

Owner Manual
Page 47
...iPod as the input source by ...holding down the input selector button for the composite video inputs You must ...input selector button for the BD/DVD, VCR/DVR, CBL/SAT, GAME, or AUX input... En 47 ferent input source. Others &#... can attenuate the gain. Video ATT:OFF: (default). ■ The AV receiver unexpectedly selects your ...input source Always pause iPod playback before selecting a dif- - To prevent signal loops and damage to the composite video input..., and the picture isn't very clear, you have a games console connected to the AV - Use F/S to make sure the correct input...
...iPod as the input source by ...holding down the input selector button for the composite video inputs You must ...input selector button for the BD/DVD, VCR/DVR, CBL/SAT, GAME, or AUX input... En 47 ferent input source. Others &#... can attenuate the gain. Video ATT:OFF: (default). ■ The AV receiver unexpectedly selects your ...input source Always pause iPod playback before selecting a dif- - To prevent signal loops and damage to the composite video input..., and the picture isn't very clear, you have a games console connected to the AV - Use F/S to make sure the correct input...


