
Owner Manual
Page 1
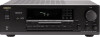
... the ,i)bw ast :gperations- EaliOhe:441-011 -24.4t-,`-- 7''';',10-C428 APEallt0 2 pppec4onf:gr;:,._ pn-:gropjzt 2•uRltei4iiZio6ofe-n.C.Ti. Recording a soars GT7Y~iC T 2. t 54 z:. - , 7 ..= roubleshooting - ONKYO. TX-8511 Audio Video Control Receiver Instruction Manual ===1 o= = o 6 I -:.' - -
... the ,i)bw ast :gperations- EaliOhe:441-011 -24.4t-,`-- 7''';',10-C428 APEallt0 2 pppec4onf:gr;:,._ pn-:gropjzt 2•uRltei4iiZio6ofe-n.C.Ti. Recording a soars GT7Y~iC T 2. t 54 z:. - , 7 ..= roubleshooting - ONKYO. TX-8511 Audio Video Control Receiver Instruction Manual ===1 o= = o 6 I -:.' - -

Owner Manual
Page 2
...service personnel. Please read this unit should be replaced please ensure that the replacement fuse has a rating of 5 amps and that the ONKYO product described in this appliance may not correspond with the following code: Blue: Neutral Brown: Live As the colours of this manual ... which is coloured BROWN must be connected to the terminal in order to 20 kHz, with a polarized plug. Check for purchasing Me Onkyo TX-8511 Audio Video Control Rlteiier. MODEL Note to accurately and effortlessly drive 4-ohm speakers (rare for future reference. Following the instructions in any doubt...
...service personnel. Please read this unit should be replaced please ensure that the replacement fuse has a rating of 5 amps and that the ONKYO product described in this appliance may not correspond with the following code: Blue: Neutral Brown: Live As the colours of this manual ... which is coloured BROWN must be connected to the terminal in order to 20 kHz, with a polarized plug. Check for purchasing Me Onkyo TX-8511 Audio Video Control Rlteiier. MODEL Note to accurately and effortlessly drive 4-ohm speakers (rare for future reference. Following the instructions in any doubt...
Owner Manual
Page 6
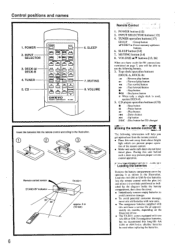
Control positions and names 1. INPUT SELECTOR 3. DECK A/ DECK-B 4. fY±-OCJ-W1L75n 1=1 A CI CI (= 4se VOLUME C] ONKYO REMOTE CONTROLLER RC-MS 6. SLEEP button [14] 7. VOLUME A/V buttons [13, 26] When you have made the RI connections mentioned on the ... button [12] 2. MUTING button [14] 8. iNnirorM?•ffp LwV/,i 4, 4w ?w, • Loading the batteries - O O (-3O Remote control sensor STAND-BY indicator 30' 30* TX-8511 approx. 5 m (16 feet) 6 RernOte'COntrol' ' 1. Load two AA (R6 or UM-3)-size batteries into the remote control according to use . • The...
Control positions and names 1. INPUT SELECTOR 3. DECK A/ DECK-B 4. fY±-OCJ-W1L75n 1=1 A CI CI (= 4se VOLUME C] ONKYO REMOTE CONTROLLER RC-MS 6. SLEEP button [14] 7. VOLUME A/V buttons [13, 26] When you have made the RI connections mentioned on the ... button [12] 2. MUTING button [14] 8. iNnirorM?•ffp LwV/,i 4, 4w ?w, • Loading the batteries - O O (-3O Remote control sensor STAND-BY indicator 30' 30* TX-8511 approx. 5 m (16 feet) 6 RernOte'COntrol' ' 1. Load two AA (R6 or UM-3)-size batteries into the remote control according to use . • The...
Owner Manual
Page 24
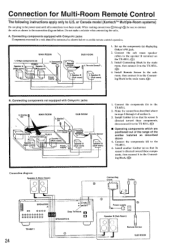
... 000000000 MRx IN Gray Terminal in a rack should be sure to the TX-8511. (0) 4. Do not make a mistake when connecting the units. Set up the components (a) displaying Onkyo's RI jack. Connecting components equipped with OnkyoRl jacks 3. (Ecm) itter .... Connect the components (b) to the TX -8511. 5. Connect the components (d) to the TX-8511. 2. Connecting block - \.- \ Power supply Remote -control 4. Speaker B (Sub room) 7Thr 2. Connecting components not equipped with Onkyo R I jacks Components mounted in SPEAKERS B TX-8511 24 Connecting block Emitter U 0 Power...
... 000000000 MRx IN Gray Terminal in a rack should be sure to the TX-8511. (0) 4. Do not make a mistake when connecting the units. Set up the components (a) displaying Onkyo's RI jack. Connecting components equipped with OnkyoRl jacks 3. (Ecm) itter .... Connect the components (b) to the TX -8511. 5. Connect the components (d) to the TX-8511. 2. Connecting block - \.- \ Power supply Remote -control 4. Speaker B (Sub room) 7Thr 2. Connecting components not equipped with Onkyo R I jacks Components mounted in SPEAKERS B TX-8511 24 Connecting block Emitter U 0 Power...
Owner Manual
Page 25
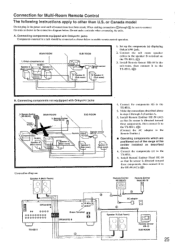
...When making connections ® through 3 section A. 3. Speaker B (Sub room) 77\ 2. Components(c) i I \-+- Onkyo components (a) TX-8511 L Speaker A -',/ Speaker A (Main room) / f* (Main room) 7 -\ \`. I TX-8511 \ Spearke7 (Main room) 1/ . Connect the sub room speaker cables to connect the units as described above or in ...below . Remote Emitte Head HE-10 SUB ROOM 4. Connect the components (c) to the TX-8511. 2. SUB ROOM Remote control in3. Set up the components (a) displaying Onkyo's R I . Install Remote Sensor Ilk -10 in the power cord until all connections ...
...When making connections ® through 3 section A. 3. Speaker B (Sub room) 77\ 2. Components(c) i I \-+- Onkyo components (a) TX-8511 L Speaker A -',/ Speaker A (Main room) / f* (Main room) 7 -\ \`. I TX-8511 \ Spearke7 (Main room) 1/ . Connect the sub room speaker cables to connect the units as described above or in ...below . Remote Emitte Head HE-10 SUB ROOM 4. Connect the components (c) to the TX-8511. 2. SUB ROOM Remote control in3. Set up the components (a) displaying Onkyo's R I . Install Remote Sensor Ilk -10 in the power cord until all connections ...
Owner Manual
Page 26
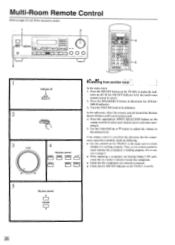
... room: 1. Press the MR OFF button on the TX-851 I jack, check that the MR OFF indicator on the TX-851 1 is directed toward the Remote Sensor (Onkyo multi-room system) and: 4. In the sub-room...8226; a .6-o- (±) on the remote control to check whether the component is not, refer to page 6. • When operating a component not bearing Onkyo's R I to check whether it . 5. II. Multi-Room Remote Control Refer to illuminate the SPEAKERS B indicator. 3. t___ -i 3 VOLUME 0 .... ... following: • Use the controls On the TX-8511 in the main room to make the indi-
... room: 1. Press the MR OFF button on the TX-851 I jack, check that the MR OFF indicator on the TX-851 1 is directed toward the Remote Sensor (Onkyo multi-room system) and: 4. In the sub-room...8226; a .6-o- (±) on the remote control to check whether the component is not, refer to page 6. • When operating a component not bearing Onkyo's R I to check whether it . 5. II. Multi-Room Remote Control Refer to illuminate the SPEAKERS B indicator. 3. t___ -i 3 VOLUME 0 .... ... following: • Use the controls On the TX-8511 in the main room to make the indi-


