
T-100 Instruction Manual (English)
Page 10
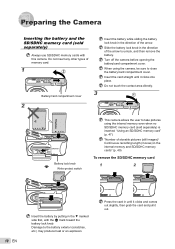
... lock knob Write-protect switch This camera allows the user to take pictures using the camera, be sure to close the battery/card compartment cover. Turn off the camera before opening the battery/card compartment cover. Damage to unlock, and then remove the battery. Do not insert any other types of...
... lock knob Write-protect switch This camera allows the user to take pictures using the camera, be sure to close the battery/card compartment cover. Turn off the camera before opening the battery/card compartment cover. Damage to unlock, and then remove the battery. Do not insert any other types of...
T-100 Instruction Manual (English)
Page 11
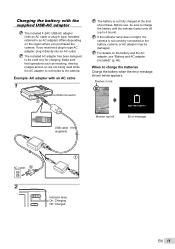
... the AC adapter is not correctly connected or the battery, camera, or AC adapter may be sure to charge the battery until the indicator lamp turns off (up to the camera. If the indicator lamp does not light, the camera is connected to 4 hours). Make sure that operations such as AC...
... the AC adapter is not correctly connected or the battery, camera, or AC adapter may be sure to charge the battery until the indicator lamp turns off (up to the camera. If the indicator lamp does not light, the camera is connected to 4 hours). Make sure that operations such as AC...
T-100 Instruction Manual (English)
Page 12
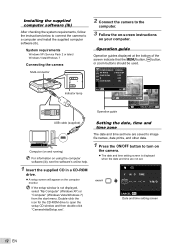
... SET OK SEL. System requirements Windows XP (Service Pack 2 or later)/ Windows Vista/Windows 7 Connecting the camera Multi-connector Indicator lamp 2 Connect the camera to turn on the camera. ● The date and time setting screen is not displayed, select "My Computer" (Windows XP) or "Computer" (Windows Vista/Windows 7) from the...
... SET OK SEL. System requirements Windows XP (Service Pack 2 or later)/ Windows Vista/Windows 7 Connecting the camera Multi-connector Indicator lamp 2 Connect the camera to turn on the camera. ● The date and time setting screen is not displayed, select "My Computer" (Windows XP) or "Computer" (Windows Vista/Windows 7) from the...
T-100 Instruction Manual (English)
Page 13
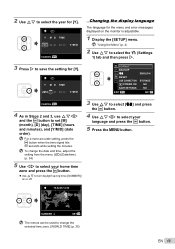
... off. 3 Use FG to select [W] and press the H button. 4 Use FGHI to select your home time zone and press the H button. ● Use FG to turn daylight saving time ([SUMMER]) on the monitor is adjustable. 1 Display the [SETUP] menu. To change the date and time, adjust the setting from the menu...
... off. 3 Use FG to select [W] and press the H button. 4 Use FGHI to select your home time zone and press the H button. ● Use FG to turn daylight saving time ([SUMMER]) on the monitor is adjustable. 1 Display the [SETUP] menu. To change the date and time, adjust the setting from the menu...
T-100 Instruction Manual (English)
Page 14
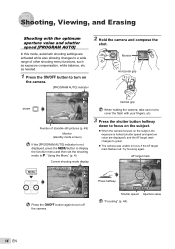
... aperture value are activated while also allowing changes to a wide range of other shooting menu functions, such as needed. 1 Press the n button to turn off the camera. Shooting, Viewing, and Erasing Shooting with your fingers, etc. 3 Press the shutter button halfway down to P. Try focusing ...again. AF target mark P 0.0 WB AUTO ISO AUTO 12M 4 Press the n button again to turn on the subject, the exposure is not displayed, press the m button to display the function menu and then set the shooting mode to focus on...
... aperture value are activated while also allowing changes to a wide range of other shooting menu functions, such as needed. 1 Press the n button to turn off the camera. Shooting, Viewing, and Erasing Shooting with your fingers, etc. 3 Press the shutter button halfway down to P. Try focusing ...again. AF target mark P 0.0 WB AUTO ISO AUTO 12M 4 Press the n button again to turn on the subject, the exposure is not displayed, press the m button to display the function menu and then set the shooting mode to focus on...
T-100 Instruction Manual (English)
Page 24
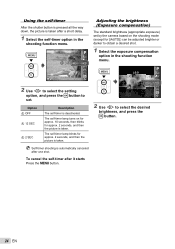
... [iAUTO]) can be adjusted brighter or darker to obtain a desired shot. 1 Select the exposure compensation option in the shooting function menu. The self-timer lamp turns on the shooting mode (except for approx. 2 seconds, and then the picture is deactivated. P Y OFF 2 12 0.0 WB AUTO ISO AUTO 12M 4 2 Use HI to select...
... [iAUTO]) can be adjusted brighter or darker to obtain a desired shot. 1 Select the exposure compensation option in the shooting function menu. The self-timer lamp turns on the shooting mode (except for approx. 2 seconds, and then the picture is deactivated. P Y OFF 2 12 0.0 WB AUTO ISO AUTO 12M 4 2 Use HI to select...
T-100 Instruction Manual (English)
Page 31
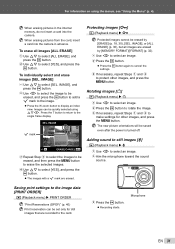
SEL. IMAGE R mark OK ERASE/CANCEL MENU 3 Repeat Step 2 to select the images to be saved even after the power is turned off. The new picture orientations will be erased, and then press the m button to erase the selected images. 4 Use FG to display an index view. ...
SEL. IMAGE R mark OK ERASE/CANCEL MENU 3 Repeat Step 2 to select the images to be saved even after the power is turned off. The new picture orientations will be erased, and then press the m button to erase the selected images. 4 Use FG to display an index view. ...

T-100 Instruction Manual (English)
Page 33
...Windows XP/Windows Vista/Windows 7/ Mac OS X v10.3 or later Even if a computer has USB ports, proper operation is turned on . EN 33 To turn on and starts the camera in the following cases. ● computers with USB ports installed using ib computer software This camera is...[SAVE SETTINGS] r (Settings 1) X SAVE SETTINGS Submenu 2 YES NO Application The shooting mode is saved when the camera is turned off and is reactivated the next time the camera is not turned on . Selecting a method for connecting the camera to other devices [USB CONNECTION] r (Settings 1) X USB CONNECTION Submenu ...
...Windows XP/Windows Vista/Windows 7/ Mac OS X v10.3 or later Even if a computer has USB ports, proper operation is turned on . EN 33 To turn on and starts the camera in the following cases. ● computers with USB ports installed using ib computer software This camera is...[SAVE SETTINGS] r (Settings 1) X SAVE SETTINGS Submenu 2 YES NO Application The shooting mode is saved when the camera is turned off and is reactivated the next time the camera is not turned on . Selecting a method for connecting the camera to other devices [USB CONNECTION] r (Settings 1) X USB CONNECTION Submenu ...

T-100 Instruction Manual (English)
Page 34
... To adjust the CCD and the image processing function Press the H button when [START] (Submenu 2) is turned off or on the surrounding brightness. Setting the operation sound [BEEP] s (Settings 2) X BEEP Submenu 2 OFF/ON Application Turns off during pixel mapping, be sure to select the date display order. Adjusting the brightness of the...
... To adjust the CCD and the image processing function Press the H button when [START] (Submenu 2) is turned off or on the surrounding brightness. Setting the operation sound [BEEP] s (Settings 2) X BEEP Submenu 2 OFF/ON Application Turns off during pixel mapping, be sure to select the date display order. Adjusting the brightness of the...
T-100 Instruction Manual (English)
Page 35
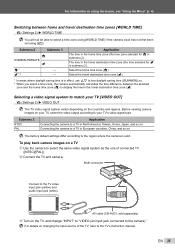
y*1, 2 - Select the travel destination time zone (y). *1 In areas where daylight saving time is sold separately) 3 Turn on the TV, and change "INPUT" to "VIDEO (an input jack connected to the camera)." For details on changing the input source of connected TV ... the region where the camera is in submenu 2). The time in the travel destination time zone (the time selected for x in effect, use FG to turn daylight saving time ([SUMMER]) on. *2 When you select a time zone, the camera automatically calculates the time difference between home and travel destination time zone (y). ...
y*1, 2 - Select the travel destination time zone (y). *1 In areas where daylight saving time is sold separately) 3 Turn on the TV, and change "INPUT" to "VIDEO (an input jack connected to the camera)." For details on changing the input source of connected TV ... the region where the camera is in submenu 2). The time in the travel destination time zone (the time selected for x in effect, use FG to turn daylight saving time ([SUMMER]) on. *2 When you select a time zone, the camera automatically calculates the time difference between home and travel destination time zone (y). ...
T-100 Instruction Manual (English)
Page 36
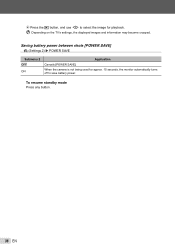
Saving battery power between shots [POWER SAVE] s (Settings 2) X POWER SAVE Submenu 2 OFF ON Application Cancels [POWER SAVE]. When the camera is not being used for playback. To resume standby mode Press any button. 36 EN Depending on the TV's settings, the displayed images and information may become cropped. 4 Press the q button, and use HI to select the image for approx. 10 seconds, the monitor automatically turns off to save battery power.
Saving battery power between shots [POWER SAVE] s (Settings 2) X POWER SAVE Submenu 2 OFF ON Application Cancels [POWER SAVE]. When the camera is not being used for playback. To resume standby mode Press any button. 36 EN Depending on the TV's settings, the displayed images and information may become cropped. 4 Press the q button, and use HI to select the image for approx. 10 seconds, the monitor automatically turns off to save battery power.
T-100 Instruction Manual (English)
Page 37
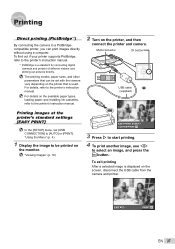
... and camera. For details, refer to [AUTO] or [PRINT]. Multi-connector I to start printing. 4 To print another image, use HI to the printer's instruction manual. 2 Turn on the available paper types, loading paper, and installing ink cassettes, refer to select an image, and press the H button. To find out if...
... and camera. For details, refer to [AUTO] or [PRINT]. Multi-connector I to start printing. 4 To print another image, use HI to the printer's instruction manual. 2 Turn on the available paper types, loading paper, and installing ink cassettes, refer to select an image, and press the H button. To find out if...
T-100 Instruction Manual (English)
Page 42
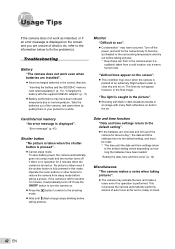
... "Charging the battery with many flash reflections on . Operate the zoom buttons or other buttons to low temperature. Press the n button to turn the camera on. ● Press the q button to switch to see". ● Condensation*1 may activate the lens and make a noise even if no ...you are unsure of the camera, and warm them by putting them in this mode. Troubleshooting Battery "The camera does not work as it automatically turns off. Take the batteries out of what to do not appear, however, in the final image. Card/Internal memory "An error message ...
... "Charging the battery with many flash reflections on . Operate the zoom buttons or other buttons to low temperature. Press the n button to turn the camera on. ● Press the q button to switch to see". ● Condensation*1 may activate the lens and make a noise even if no ...you are unsure of the camera, and warm them by putting them in this mode. Troubleshooting Battery "The camera does not work as it automatically turns off. Take the batteries out of what to do not appear, however, in the final image. Card/Internal memory "An error message ...
T-100 Instruction Manual (English)
Page 43
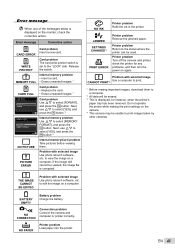
...selected image Use photo retouch software, etc. CARD ERROR WRITE PROTECT Card problem The card write-protect switch is displayed, for any problems, and then turn the power on a computer. to a computer. *2 All data will be used. If the image still cannot be unable to edit the image... This camera may be viewed, the image file is displayed on a computer. NO PAPER Printer problem Load paper into the printer. Printer problem Turn off the camera and printer, check the printer for instance, when the printer's paper tray has been removed. Next, use FG to select [YES...
...selected image Use photo retouch software, etc. CARD ERROR WRITE PROTECT Card problem The card write-protect switch is displayed, for any problems, and then turn the power on a computer. to a computer. *2 All data will be used. If the image still cannot be unable to edit the image... This camera may be viewed, the image file is displayed on a computer. NO PAPER Printer problem Load paper into the printer. Printer problem Turn off the camera and printer, check the printer for instance, when the printer's paper tray has been removed. Next, use FG to select [YES...

T-100 Instruction Manual (English)
Page 46
... rechargeable battery is well ventilated. • Periodically insert the battery and test the camera functions. Battery and AC adapter (included) • This camera uses one Olympus lithium ion battery (LI-80B). Other cameras cannot be used only with this camera. Monitor • Wipe gently with a lens cleaner. Dispose of time. •... used only for extended periods, remove the battery, AC adapter and card, and keep in type AC adapter: The included AC adapter is intended to turn off the lens with a commercial blower, then wipe gently with a soft cloth.
... rechargeable battery is well ventilated. • Periodically insert the battery and test the camera functions. Battery and AC adapter (included) • This camera uses one Olympus lithium ion battery (LI-80B). Other cameras cannot be used only with this camera. Monitor • Wipe gently with a lens cleaner. Dispose of time. •... used only for extended periods, remove the battery, AC adapter and card, and keep in type AC adapter: The included AC adapter is intended to turn off the lens with a commercial blower, then wipe gently with a soft cloth.
T-100 Instruction Manual (English)
Page 51
..., burning, exploding, or causing electrical shocks or burns. DANGER • The camera uses a lithium ion battery specified by turning it is operating normally. • Always observe the operating environment restrictions described in the rain. Caution for Usage Environment • To protect... a battery leaks fluid onto your eyes immediately with clear, cold running cold water immediately. After storage, test the camera by Olympus. Do not twist the camera. • Do not touch electric contacts on and pressing the shutter button to high temperatures in any way...
..., burning, exploding, or causing electrical shocks or burns. DANGER • The camera uses a lithium ion battery specified by turning it is operating normally. • Always observe the operating environment restrictions described in the rain. Caution for Usage Environment • To protect... a battery leaks fluid onto your eyes immediately with clear, cold running cold water immediately. After storage, test the camera by Olympus. Do not twist the camera. • Do not touch electric contacts on and pressing the shutter button to high temperatures in any way...
T-100 Instruction Manual (English)
Page 52
... use these written materials or software, or for the first time, or if it is made with respect to turn on the monitor. Olympus reserves the right to this unit lawfully, or any type of information storage and retrieval system, without obligation or advance notice... • This camera uses a lithium ion battery specified by erasing picture data. 52 EN Legal and Other Notices • Olympus makes no representations or warranties regarding any damages or any benefit expected by any means, electronic or mechanical, including photocopying and recording or...
... use these written materials or software, or for the first time, or if it is made with respect to turn on the monitor. Olympus reserves the right to this unit lawfully, or any type of information storage and retrieval system, without obligation or advance notice... • This camera uses a lithium ion battery specified by erasing picture data. 52 EN Legal and Other Notices • Olympus makes no representations or warranties regarding any damages or any benefit expected by any means, electronic or mechanical, including photocopying and recording or...
T-100 Instruction Manual (English)
Page 53
...;re or personal injury due to leakage, heating, ignition or damage to the battery. EN 53 If this equipment. Only the OLYMPUS-supplied USB cable should be determined by turning the equipment off and on, the user is encouraged to try to correct the interference by the manufacturer may cause harmful interference...
...;re or personal injury due to leakage, heating, ignition or damage to the battery. EN 53 If this equipment. Only the OLYMPUS-supplied USB cable should be determined by turning the equipment off and on, the user is encouraged to try to correct the interference by the manufacturer may cause harmful interference...
T-100 Instruction Manual (English)
Page 57
... with this product will be required to pay repair charge, even for safety, health, environment and customer protection. Provisions of Guarantee 1 "OLYMPUS IMAGING CORP., Shinjuku Monolith, 2-3-1 Nishi-Shinjuku, Shinjuku-ku, Tokyo 163-0914, Japan grants a one year period of consumer goods mentioned ... of the World Wide Guarantee the customer may turn the product in Europe. i. Compelling regulations by law remain unaffected by anyone other Olympus service station within the Guarantee period referred to the dealer or Olympus authorized service station at his own risk and shall...
... with this product will be required to pay repair charge, even for safety, health, environment and customer protection. Provisions of Guarantee 1 "OLYMPUS IMAGING CORP., Shinjuku Monolith, 2-3-1 Nishi-Shinjuku, Shinjuku-ku, Tokyo 163-0914, Japan grants a one year period of consumer goods mentioned ... of the World Wide Guarantee the customer may turn the product in Europe. i. Compelling regulations by law remain unaffected by anyone other Olympus service station within the Guarantee period referred to the dealer or Olympus authorized service station at his own risk and shall...


