
T-100 Instruction Manual (English)
Page 2
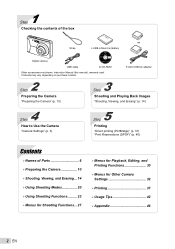
F-2AC USB-AC adapter 2 Step Preparing the Camera "Preparing the Camera" (p. 10) 3 Step Shooting and Playing Back Images "Shooting, Viewing, and Erasing" (p. 14) 4 Step How to Use the Camera "Camera Settings" (p. 3) 5 Step Printing "Direct printing (PictBridge)" (p. 37) "Print Reservations (DPOF)" (p. 40) Contents ¾ ...
F-2AC USB-AC adapter 2 Step Preparing the Camera "Preparing the Camera" (p. 10) 3 Step Shooting and Playing Back Images "Shooting, Viewing, and Erasing" (p. 14) 4 Step How to Use the Camera "Camera Settings" (p. 3) 5 Step Printing "Direct printing (PictBridge)" (p. 37) "Print Reservations (DPOF)" (p. 40) Contents ¾ ...
T-100 Instruction Manual (English)
Page 3
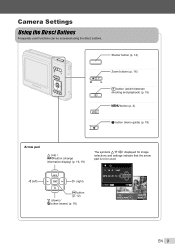
X Y M D TIME 2010. 02 . 26 12 : 30 Y/M/D 4/30 CANCEL MENU SET OK SINGLE PRINT NORM 12M FILE 100 0004 '10/02/26 12:30 PRINT OK MORE EN 3 Camera Settings Using the Direct Buttons Frequently used functions can be used. Shutter button (p. 14) ... guide) (p. 19) Arrow pad F (up) / INFO button (change information display) (p. 16, 19) H (left) I (right) H button (p. 12) G (down) / D button (erase) (p. 18) The symbols FGHI displayed for image selections and settings indicate that the arrow pad is to be accessed using the direct buttons.
X Y M D TIME 2010. 02 . 26 12 : 30 Y/M/D 4/30 CANCEL MENU SET OK SINGLE PRINT NORM 12M FILE 100 0004 '10/02/26 12:30 PRINT OK MORE EN 3 Camera Settings Using the Direct Buttons Frequently used functions can be used. Shutter button (p. 14) ... guide) (p. 19) Arrow pad F (up) / INFO button (change information display) (p. 16, 19) H (left) I (right) H button (p. 12) G (down) / D button (erase) (p. 18) The symbols FGHI displayed for image selections and settings indicate that the arrow pad is to be accessed using the direct buttons.
T-100 Instruction Manual (English)
Page 5
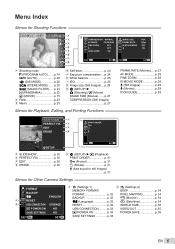
...Self-timer p. 24 5 Exposure compensation....p. 24 6 White balance p. 25 7 ISO p. 25 8 Image size (Still images) ...p. 26 9 o (SETUP) X z (Shooting) / A (Movie) IMAGE SIZE (Movies) .......p. 27 COMPRESSION (Still images) p. 27 IMAGE SIZE FRAME RATE IS MOVIE MODE 1R 2 VGA 30fps OFF ON EXIT MENU SET OK FRAME RATE ... MENU SET OK 5 o (SETUP) X q (Playback) PRINT ORDER p. 31 0 (Protect p. 31 y (Rotate p. 31 R (Add sound to still images) p. 31 Menus for Other Camera Settings FORMAT BACKUP W 1 1 RESET 2 2 USB CONNECTION q POWER ON SAVE SETTINGS EXIT MENU ENGLISH STORAGE NO NO SET OK...
...Self-timer p. 24 5 Exposure compensation....p. 24 6 White balance p. 25 7 ISO p. 25 8 Image size (Still images) ...p. 26 9 o (SETUP) X z (Shooting) / A (Movie) IMAGE SIZE (Movies) .......p. 27 COMPRESSION (Still images) p. 27 IMAGE SIZE FRAME RATE IS MOVIE MODE 1R 2 VGA 30fps OFF ON EXIT MENU SET OK FRAME RATE ... MENU SET OK 5 o (SETUP) X q (Playback) PRINT ORDER p. 31 0 (Protect p. 31 y (Rotate p. 31 R (Add sound to still images) p. 31 Menus for Other Camera Settings FORMAT BACKUP W 1 1 RESET 2 2 USB CONNECTION q POWER ON SAVE SETTINGS EXIT MENU ENGLISH STORAGE NO NO SET OK...

T-100 Instruction Manual (English)
Page 8
Monitor Shooting mode display 1 18 17 16 4 NORM 15 14 12 2 P 3 4 5 P0.0 6 7 WB AUTO 8 ISO AUTO 9 12M 10 1/100 F3.1 20 19 Still image 1 17 2 4 5 0.0 6 7 WB AUTO 16 0:34 VGA ON 10 15 9 13 12 11 Movie 1 Battery check p. 11 2 Shooting mode p. 14, 20 3 Flash ... 27 10 [SETUP] menu p. 4, 5 11 Recording with sound (movies) p. 29 12 World time p. 35 13 Digital image stabilization p. 28 14 Compression (still images p. 27 15 Number of storable pictures (still images p. 14 Continuous recording length (movies) p. 15 16 Current memory p. 48 17 AF target mark p. 14 18 Camera shake ...
Monitor Shooting mode display 1 18 17 16 4 NORM 15 14 12 2 P 3 4 5 P0.0 6 7 WB AUTO 8 ISO AUTO 9 12M 10 1/100 F3.1 20 19 Still image 1 17 2 4 5 0.0 6 7 WB AUTO 16 0:34 VGA ON 10 15 9 13 12 11 Movie 1 Battery check p. 11 2 Shooting mode p. 14, 20 3 Flash ... 27 10 [SETUP] menu p. 4, 5 11 Recording with sound (movies) p. 29 12 World time p. 35 13 Digital image stabilization p. 28 14 Compression (still images p. 27 15 Number of storable pictures (still images p. 14 Continuous recording length (movies) p. 15 16 Current memory p. 48 17 AF target mark p. 14 18 Camera shake ...

T-100 Instruction Manual (English)
Page 9
...; Normal display 1 2 34 56 10 4/30 1 4 '10/02/26 12:30 15 Still image 00:12/00:34 6 Movie ● Detailed display 1 2 34 56 78 9 10 11 10 4/30 1/1000 F3.1 2.0 P ISO WB AUTO AUTO NORM 12M FILE 100 0004 '10/02/26 12:30 1/1000 F3.1 2.0 P 18 17 ISO WB AUTO... AUTO 12 NORM 12M 13 FILE 100 0004 14 '10/02/26 12:30 15 16 1 Battery check p. 11 2 Print reservation/ number of prints p. 40/p. 39 3 Protect p. 31 4 Adding sound p. 29, 31 5 Current memory p. 48 6 Frame number/total number of images (still images p. 16 Elapsed time/total recording time (movies p. ...
...; Normal display 1 2 34 56 10 4/30 1 4 '10/02/26 12:30 15 Still image 00:12/00:34 6 Movie ● Detailed display 1 2 34 56 78 9 10 11 10 4/30 1/1000 F3.1 2.0 P ISO WB AUTO AUTO NORM 12M FILE 100 0004 '10/02/26 12:30 1/1000 F3.1 2.0 P 18 17 ISO WB AUTO... AUTO 12 NORM 12M 13 FILE 100 0004 14 '10/02/26 12:30 15 16 1 Battery check p. 11 2 Print reservation/ number of prints p. 40/p. 39 3 Protect p. 31 4 Adding sound p. 29, 31 5 Current memory p. 48 6 Frame number/total number of images (still images p. 16 Elapsed time/total recording time (movies p. ...
T-100 Instruction Manual (English)
Page 10
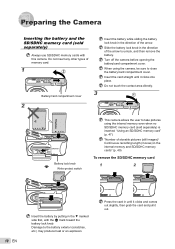
... comes out slightly, then grab the card and pull it clicks into place. "Using an SD/SDHC memory card" (p. 47) "Number of storable pictures (still images)/ Continuous recording length (movies) in the internal memory and SD/SDHC memory cards" (p. 49) To remove the SD/SDHC memory card 1 2 10 EN Insert the...
... comes out slightly, then grab the card and pull it clicks into place. "Using an SD/SDHC memory card" (p. 47) "Number of storable pictures (still images)/ Continuous recording length (movies) in the internal memory and SD/SDHC memory cards" (p. 49) To remove the SD/SDHC memory card 1 2 10 EN Insert the...
T-100 Instruction Manual (English)
Page 11
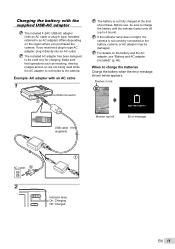
...; hereafter referred to be used while the AC adapter is connected to the camera. The included AC adapter has been designed to as shooting, viewing images and so on are not being used only for charging. If the indicator lamp does not light, the camera is not fully charged at the...
...; hereafter referred to be used while the AC adapter is connected to the camera. The included AC adapter has been designed to as shooting, viewing images and so on are not being used only for charging. If the indicator lamp does not light, the camera is not fully charged at the...
T-100 Instruction Manual (English)
Page 12
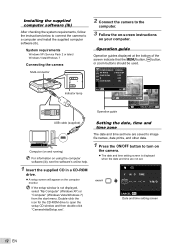
Operation guide Operation guides displayed at the bottom of the screen indicate that the m button, H button, or zoom buttons should be used. IMAGE SET OK Operation guide OK ERASE/CANCEL MENU USB cable (supplied) Computer (on and running) For information on using the computer software (ib), see ... time zone The date and time set here are not set. If the setup window is displayed when the date and time are saved to image file names, date prints, and other data. 1 Press the n button to the computer. 3 Follow the on-screen instructions on your computer. X Y M D TIME Y/M/D CANCEL...
Operation guide Operation guides displayed at the bottom of the screen indicate that the m button, H button, or zoom buttons should be used. IMAGE SET OK Operation guide OK ERASE/CANCEL MENU USB cable (supplied) Computer (on and running) For information on using the computer software (ib), see ... time zone The date and time set here are not set. If the setup window is displayed when the date and time are saved to image file names, date prints, and other data. 1 Press the n button to the computer. 3 Follow the on-screen instructions on your computer. X Y M D TIME Y/M/D CANCEL...
T-100 Instruction Manual (English)
Page 15
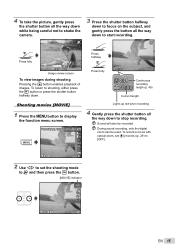
... q button or press the shutter button halfway down while being careful not to shake the camera. To return to stop recording. Press fully 1/400 F3.1 Image review screen To view images during shooting Pressing the q button enables playback of...
... q button or press the shutter button halfway down while being careful not to shake the camera. To return to stop recording. Press fully 1/400 F3.1 Image review screen To view images during shooting Pressing the q button enables playback of...
T-100 Instruction Manual (English)
Page 16
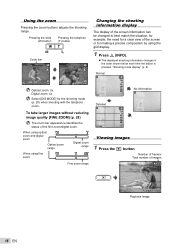
...information ISO AUTO 12M 4 Detailed P 0.0 WB AUTO ISO AUTO 12M 4 NORM Viewing images 1 Press the q button. Number of frames/ Total number of the fine zoom/digital zoom. To take larger images without reducing image quality [FINE ZOOM] (p. 28) The zoom bar appearance identifies the status... of images 4/30 '10/02/26 12:30 Playback image 16 EN Pressing the wide (W) button Pressing the telephoto (T) button ...
...information ISO AUTO 12M 4 Detailed P 0.0 WB AUTO ISO AUTO 12M 4 NORM Viewing images 1 Press the q button. Number of frames/ Total number of the fine zoom/digital zoom. To take larger images without reducing image quality [FINE ZOOM] (p. 28) The zoom bar appearance identifies the status... of images 4/30 '10/02/26 12:30 Playback image 16 EN Pressing the wide (W) button Pressing the telephoto (T) button ...

T-100 Instruction Manual (English)
Page 17
...to advance or and rewinding rewind one frame at a time. The rewinding speed increases each time H is pressed. Resuming Press the H button to select an image. Operations during pausing playback 00:14/00:34 During pause Cueing Press F to display the first frame and press G to a TV or PC. ... the H button. 4/30 MOVIE PLAY OK '10/02/26 12:30 Movie The sound recorded in movie mode cannot be changed. Displays previous image Displays next image Hold I to fast forward and hold H to rewind. Operations during pause, fast forward, or rewind, press the H button.
...to advance or and rewinding rewind one frame at a time. The rewinding speed increases each time H is pressed. Resuming Press the H button to select an image. Operations during pausing playback 00:14/00:34 During pause Cueing Press F to display the first frame and press G to a TV or PC. ... the H button. 4/30 MOVIE PLAY OK '10/02/26 12:30 Movie The sound recorded in movie mode cannot be changed. Displays previous image Displays next image Hold I to fast forward and hold H to rewind. Operations during pause, fast forward, or rewind, press the H button.

T-100 Instruction Manual (English)
Page 18
... '10/02/26 2 4 '10/02/26 12:30 W T '10/02/26 2 4 To select an image in index view Use FGHI to select an image, and press the H button to display the selected image in close -up view 4/30 2 Press FG to 10x magnification) allows checking of a desired... image. BACK MENU ALL ERASE SEL. IMAGE ERASE CANCEL SET OK Single-image view W 4/30 Close-up view Index view enables quick selection of image details. 1 Press the zoom buttons. To scroll an image in single-image view. Erasing images during playback (Single image erase) 1 Display the image you want to ...
... '10/02/26 2 4 '10/02/26 12:30 W T '10/02/26 2 4 To select an image in index view Use FGHI to select an image, and press the H button to display the selected image in close -up view 4/30 2 Press FG to 10x magnification) allows checking of a desired... image. BACK MENU ALL ERASE SEL. IMAGE ERASE CANCEL SET OK Single-image view W 4/30 Close-up view Index view enables quick selection of image details. 1 Press the zoom buttons. To scroll an image in single-image view. Erasing images during playback (Single image erase) 1 Display the image you want to ...
T-100 Instruction Manual (English)
Page 19
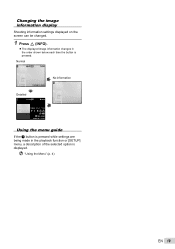
Normal 10 4/30 '10/02/26 12:30 Detailed 10 4/30 1/1000 F3.1 2.0 P ISO WB AUTO AUTO NORM 12M FILE 100 0004 '10/02/26 12:30 No information Using the menu guide If the E button is pressed while settings are being made in the order shown below each time the button is displayed. Changing the image information display Shooting information settings displayed on the screen can be changed. 1 Press F (INFO). ● The displayed image information changes in the playback function or [SETUP] menu, a description of the selected option is pressed. "Using the Menu" (p. 4) EN 19
Normal 10 4/30 '10/02/26 12:30 Detailed 10 4/30 1/1000 F3.1 2.0 P ISO WB AUTO AUTO NORM 12M FILE 100 0004 '10/02/26 12:30 No information Using the menu guide If the E button is pressed while settings are being made in the order shown below each time the button is displayed. Changing the image information display Shooting information settings displayed on the screen can be changed. 1 Press F (INFO). ● The displayed image information changes in the playback function or [SETUP] menu, a description of the selected option is pressed. "Using the Menu" (p. 4) EN 19
T-100 Instruction Manual (English)
Page 22
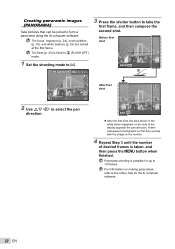
...;rst frame, and then compose the second shot. Panorama shooting is possible for the ib computer software. 22 EN Creating panoramic images [PANORAMA] Take pictures that they overlap with the image on the monitor. 4 Repeat Step 3 until the number of the display opposite the pan direction. The focus, exposure (p. 24), zoom position...
...;rst frame, and then compose the second shot. Panorama shooting is possible for the ib computer software. 22 EN Creating panoramic images [PANORAMA] Take pictures that they overlap with the image on the monitor. 4 Repeat Step 3 until the number of the display opposite the pan direction. The focus, exposure (p. 24), zoom position...
T-100 Instruction Manual (English)
Page 25
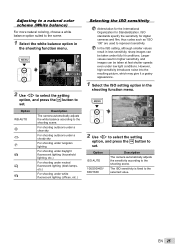
...automatically adjusts the white balance according to the shooting scene. Larger values result in less sensitivity, sharp images can be taken under low light conditions. Option ISO AUTO 100/200/400/ 800/1600 Description The camera automatically adjusts the sensitivity according to the shooting scene. The... balance option in the shooting function menu. In the ISO setting, although smaller values result in higher sensitivity, and images can be taken at fast shutter speeds even under fully lit conditions. However, high sensitivity introduces noise into the resulting...
...automatically adjusts the white balance according to the shooting scene. Larger values result in less sensitivity, sharp images can be taken under low light conditions. Option ISO AUTO 100/200/400/ 800/1600 Description The camera automatically adjusts the sensitivity according to the shooting scene. The... balance option in the shooting function menu. In the ISO setting, although smaller values result in higher sensitivity, and images can be taken at fast shutter speeds even under fully lit conditions. However, high sensitivity introduces noise into the resulting...
T-100 Instruction Manual (English)
Page 26
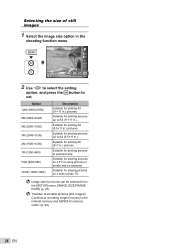
Selecting the size of storable pictures (still images)/ Continuous recording length (movies) in the internal memory and SD/SDHC memory cards" ...for printing pictures up to A4 (8.5×11 in emails and on a wide screen TV. Image size for viewing pictures on a TV or using pictures in .). Suitable for movies can be selected from the [SETUP] ...menu. [IMAGE SIZE/FRAME RATE] (p. 27) "Number of still images 1 Select the image size option in .) pictures. Option 12M (3968×2976) 8M (3264×2448) 5M (2560...
Selecting the size of storable pictures (still images)/ Continuous recording length (movies) in the internal memory and SD/SDHC memory cards" ...for printing pictures up to A4 (8.5×11 in emails and on a wide screen TV. Image size for viewing pictures on a TV or using pictures in .). Suitable for movies can be selected from the [SETUP] ...menu. [IMAGE SIZE/FRAME RATE] (p. 27) "Number of still images 1 Select the image size option in .) pictures. Option 12M (3968×2976) 8M (3264×2448) 5M (2560...
T-100 Instruction Manual (English)
Page 27
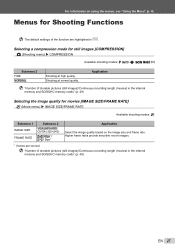
...SD/SDHC memory cards" (p. 49) EN 27 Selecting a compression mode for movies [IMAGE SIZE/FRAME RATE] A (Movie menu) X IMAGE SIZE/FRAME RATE Available shooting modes: A Submenu 1 IMAGE SIZE FRAME RATE Submenu 2 VGA (640×480)/ QVGA (320×240)... at high quality. Higher frame rates provide smoother movie images. *1 frames per second "Number of storable pictures (still images)/Continuous recording length (movies) in the internal memory and SD/SDHC memory cards" (p. 49) Selecting the image quality for still images [COMPRESSION] z (Shooting menu) X COMPRESSION Available shooting...
...SD/SDHC memory cards" (p. 49) EN 27 Selecting a compression mode for movies [IMAGE SIZE/FRAME RATE] A (Movie menu) X IMAGE SIZE/FRAME RATE Available shooting modes: A Submenu 1 IMAGE SIZE FRAME RATE Submenu 2 VGA (640×480)/ QVGA (320×240)... at high quality. Higher frame rates provide smoother movie images. *1 frames per second "Number of storable pictures (still images)/Continuous recording length (movies) in the internal memory and SD/SDHC memory cards" (p. 49) Selecting the image quality for still images [COMPRESSION] z (Shooting menu) X COMPRESSION Available shooting...
T-100 Instruction Manual (English)
Page 28
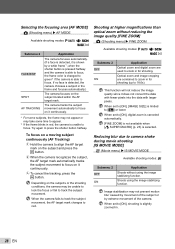
... camera shake during movie shooting [IS MOVIE MODE] A (Movie menu) X IS MOVIE MODE Available shooting modes: A Submenu 2 OFF ON Application Shoots without reducing the image quality [FINE ZOOM] z (Shooting menu) X FINE ZOOM Available shooting modes: P M N s P ~ Submenu 2 OFF ON Application Optical zoom and digital zoom ...on the subjects or the shooting conditions, the camera may not prevent motion blur caused by movement of the camera. Optical zoom and image cropping are used to track the subject movement. To focus on a moving subject continuously (AF Tracking) 1 Hold the camera to...
... camera shake during movie shooting [IS MOVIE MODE] A (Movie menu) X IS MOVIE MODE Available shooting modes: A Submenu 2 OFF ON Application Shoots without reducing the image quality [FINE ZOOM] z (Shooting menu) X FINE ZOOM Available shooting modes: P M N s P ~ Submenu 2 OFF ON Application Optical zoom and digital zoom ...on the subjects or the shooting conditions, the camera may not prevent motion blur caused by movement of the camera. Optical zoom and image cropping are used to track the subject movement. To focus on a moving subject continuously (AF Tracking) 1 Hold the camera to...

T-100 Instruction Manual (English)
Page 29
... in movie mode cannot be changed manually. 0.0 WB AUTO ISO AUTO 12M 4 Submenu 2 OFF ON Application No sound is taken. Recording sound when shooting still images [R] z (Shooting menu) X R Available shooting modes: P M N s Displaying icon guides [ICON GUIDE] z (Shooting menu) X ICON GUIDE Available shooting modes: P M N s P ~ A Submenu 2 OFF ON Application No sound is selected...
... in movie mode cannot be changed manually. 0.0 WB AUTO ISO AUTO 12M 4 Submenu 2 OFF ON Application No sound is taken. Recording sound when shooting still images [R] z (Shooting menu) X R Available shooting modes: P M N s Displaying icon guides [ICON GUIDE] z (Shooting menu) X ICON GUIDE Available shooting modes: P M N s P ~ A Submenu 2 OFF ON Application No sound is selected...
T-100 Instruction Manual (English)
Page 30
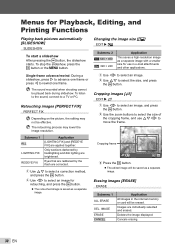
...for use FGHI to select the size, and press the H button. The sound recorded when shooting cannot be saved as a separate image. To listen to the sound, connect to rewind one frame. The retouching process may not be erased. Eyes that are reddened by...individually selected and erased. To stop the slideshow, press the H button or the m button. Erasing images [ERASE] ERASE Submenu 1 ALL ERASE SEL. Deletes the image displayed. IMAGE ERASE CANCEL Application All images in e-mail attachments and other applications. Single-frame advance/rewind: During a slideshow, press I to advance...
...for use FGHI to select the size, and press the H button. The sound recorded when shooting cannot be saved as a separate image. To listen to the sound, connect to rewind one frame. The retouching process may not be erased. Eyes that are reddened by...individually selected and erased. To stop the slideshow, press the H button or the m button. Erasing images [ERASE] ERASE Submenu 1 ALL ERASE SEL. Deletes the image displayed. IMAGE ERASE CANCEL Application All images in e-mail attachments and other applications. Single-frame advance/rewind: During a slideshow, press I to advance...


