
T-100 Instruction Manual (English)
Page 4
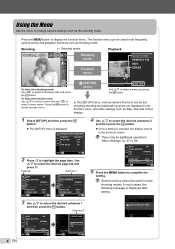
... 1X OFF 2 WORLD TIMEON VIDEO OUT NTSC POWER SAVE OFF BACK MENU SET OK 4 Use FG to select the desired submenu 2 and then press the H button. ● Once a setting is selected, the display returns to highlight the page tabs. Shooting mode Function menu SLIDESHOW PERFECT FIX EDIT ERASE o [SETUP] menu SETUP Use FG to set , including shooting and playback functions not displayed in some shooting modes. The function menu can be additional operations. In such cases, the following message is displayed.
... 1X OFF 2 WORLD TIMEON VIDEO OUT NTSC POWER SAVE OFF BACK MENU SET OK 4 Use FG to select the desired submenu 2 and then press the H button. ● Once a setting is selected, the display returns to highlight the page tabs. Shooting mode Function menu SLIDESHOW PERFECT FIX EDIT ERASE o [SETUP] menu SETUP Use FG to set , including shooting and playback functions not displayed in some shooting modes. The function menu can be additional operations. In such cases, the following message is displayed.
T-100 Instruction Manual (English)
Page 5
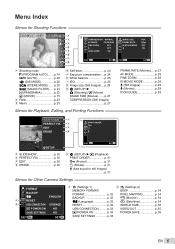
... ~ (PANORAMA p. 22 A (MOVIE p. 15 2 Flash p. 23 3 Macro p. 23 4 Self-timer p. 24 5 Exposure compensation....p. 24 6 White balance p. 25 7 ISO p. 25 8 Image size (Still images) ...p. 26 9 o (SETUP) X z (Shooting) / A (Movie) IMAGE SIZE (Movies) .......p. 27 COMPRESSION (Still images) p. 27 IMAGE SIZE FRAME RATE IS MOVIE MODE 1R 2 VGA 30fps OFF ON EXIT MENU SET OK FRAME RATE (Movies).....p. 27 AF MODE p. 28 FINE ZOOM p. 28 IS MOVIE MODE p. 28 R (Still images p. 29 R (Movies p. 29 ICON GUIDE p. 29 Menus for Playback, Editing, and Printing Functions SLIDESHOW 1 PERFECT FIX...
... ~ (PANORAMA p. 22 A (MOVIE p. 15 2 Flash p. 23 3 Macro p. 23 4 Self-timer p. 24 5 Exposure compensation....p. 24 6 White balance p. 25 7 ISO p. 25 8 Image size (Still images) ...p. 26 9 o (SETUP) X z (Shooting) / A (Movie) IMAGE SIZE (Movies) .......p. 27 COMPRESSION (Still images) p. 27 IMAGE SIZE FRAME RATE IS MOVIE MODE 1R 2 VGA 30fps OFF ON EXIT MENU SET OK FRAME RATE (Movies).....p. 27 AF MODE p. 28 FINE ZOOM p. 28 IS MOVIE MODE p. 28 R (Still images p. 29 R (Movies p. 29 ICON GUIDE p. 29 Menus for Playback, Editing, and Printing Functions SLIDESHOW 1 PERFECT FIX...

T-100 Instruction Manual (English)
Page 8
... 10 15 9 13 12 11 Movie 1 Battery check p. 11 2 Shooting mode p. 14, 20 3 Flash p. 23 Flash standby/flash charge p. 42 4 Macro p. 23 5 Self-timer p. 24 6 Exposure compensation p. 24 7 White balance p. 25 8 ISO p. 25 9 Image size p. 26, 27 10 [SETUP] menu p. 4, 5 11 Recording with sound (movies) p. 29 12 World time p. 35 13 Digital image stabilization p. 28 14 Compression (still images p. 27 15 Number of storable pictures (still images p. 14 Continuous recording length (movies) p. 15 16 Current memory p. 48 17 AF target mark...
... 10 15 9 13 12 11 Movie 1 Battery check p. 11 2 Shooting mode p. 14, 20 3 Flash p. 23 Flash standby/flash charge p. 42 4 Macro p. 23 5 Self-timer p. 24 6 Exposure compensation p. 24 7 White balance p. 25 8 ISO p. 25 9 Image size p. 26, 27 10 [SETUP] menu p. 4, 5 11 Recording with sound (movies) p. 29 12 World time p. 35 13 Digital image stabilization p. 28 14 Compression (still images p. 27 15 Number of storable pictures (still images p. 14 Continuous recording length (movies) p. 15 16 Current memory p. 48 17 AF target mark...
T-100 Instruction Manual (English)
Page 12
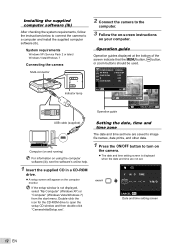
... displayed, select "My Computer" (Windows XP) or "Computer" (Windows Vista/Windows 7) from the start menu. System requirements Windows XP (Service Pack 2 or later)/ Windows Vista/Windows 7 Connecting the camera Multi-connector Indicator lamp 2 Connect the camera to turn on your computer. IMAGE SET OK Operation guide OK ERASE/CANCEL MENU USB cable (supplied) Computer (on and running) For information on using the computer software (ib), see the software's online help. 1 Insert the supplied CD in a CD-ROM drive. ● A setup screen...
... displayed, select "My Computer" (Windows XP) or "Computer" (Windows Vista/Windows 7) from the start menu. System requirements Windows XP (Service Pack 2 or later)/ Windows Vista/Windows 7 Connecting the camera Multi-connector Indicator lamp 2 Connect the camera to turn on your computer. IMAGE SET OK Operation guide OK ERASE/CANCEL MENU USB cable (supplied) Computer (on and running) For information on using the computer software (ib), see the software's online help. 1 Insert the supplied CD in a CD-ROM drive. ● A setup screen...
T-100 Instruction Manual (English)
Page 14
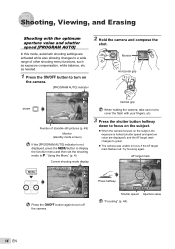
... m button to display the function menu and then set the shooting mode to P. as exposure compensation, white balance, etc. Press halfway 1/400 F3.1 Shutter speed Aperture value "Focusing" (p. 44) 14 EN Monitor Horizontal grip P Vertical grip 0.0 WB AUTO ISO AUTO 12M 4 Number of storable still pictures (p. 49) Monitor (standby mode screen) If the [PROGRAM AUTO] indicator is locked (shutter speed and aperture value are activated while also allowing changes to a wide range of other shooting menu functions, such as needed. 1 Press the n button...
... m button to display the function menu and then set the shooting mode to P. as exposure compensation, white balance, etc. Press halfway 1/400 F3.1 Shutter speed Aperture value "Focusing" (p. 44) 14 EN Monitor Horizontal grip P Vertical grip 0.0 WB AUTO ISO AUTO 12M 4 Number of storable still pictures (p. 49) Monitor (standby mode screen) If the [PROGRAM AUTO] indicator is locked (shutter speed and aperture value are activated while also allowing changes to a wide range of other shooting menu functions, such as needed. 1 Press the n button...
T-100 Instruction Manual (English)
Page 15
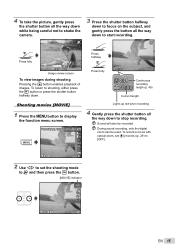
... set the shooting mode to shooting, either press the q button or press the shutter button halfway down. To return to A and then press the H button. [MOVIE] indicator 0.0 WB AUTO 0:34 VGA EN 15 Sound will also be used. During sound recording, only the digital zoom can be recorded. PROGRAM AUTO P 0.0 WB AUTO ISO AUTO 12M 4 Lights up red when recording 4 Gently press the shutter button all the way down to display the function menu screen. Press fully 1/400 F3.1 Image review screen To view images during shooting...
... set the shooting mode to shooting, either press the q button or press the shutter button halfway down. To return to A and then press the H button. [MOVIE] indicator 0.0 WB AUTO 0:34 VGA EN 15 Sound will also be used. During sound recording, only the digital zoom can be recorded. PROGRAM AUTO P 0.0 WB AUTO ISO AUTO 12M 4 Lights up red when recording 4 Gently press the shutter button all the way down to display the function menu screen. Press fully 1/400 F3.1 Image review screen To view images during shooting...
T-100 Instruction Manual (English)
Page 16
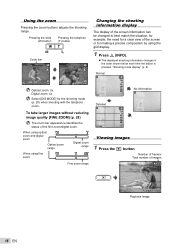
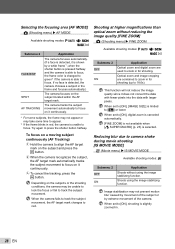
... need for a clear view of the screen or for the shooting mode (p. 20) when shooting with the telephoto zoom. "Shooting mode display" (p. 8) Normal P 0.0 WB AUTO No information ISO AUTO 12M 4 Detailed P 0.0 WB AUTO ISO AUTO 12M 4 NORM Viewing images 1 Press the q button. Number of frames/ Total number of the fine zoom/digital zoom. Using the zoom Pressing the zoom buttons adjusts the shooting range. Pressing the wide (W) button Pressing the telephoto (T) button Zoom bar P P 0.0 0.0 WB WB AUTO AUTO ISO ISO AUTO AUTO 12M 12M 4 4 Optical zoom: 3x Digital...
... need for a clear view of the screen or for the shooting mode (p. 20) when shooting with the telephoto zoom. "Shooting mode display" (p. 8) Normal P 0.0 WB AUTO No information ISO AUTO 12M 4 Detailed P 0.0 WB AUTO ISO AUTO 12M 4 NORM Viewing images 1 Press the q button. Number of frames/ Total number of the fine zoom/digital zoom. Using the zoom Pressing the zoom buttons adjusts the shooting range. Pressing the wide (W) button Pressing the telephoto (T) button Zoom bar P P 0.0 0.0 WB WB AUTO AUTO ISO ISO AUTO AUTO 12M 12M 4 4 Optical zoom: 3x Digital...
T-100 Instruction Manual (English)
Page 22
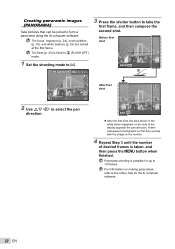
... the second shot. Panorama shooting is fixed to $ (FLASH OFF) mode. 1 Set the shooting mode to ~. 3 Press the shutter button to the online help for up to 10 frames. Before first shot 1 2 BACK MENU PANORAMA 0.0 WB AUTO ISO AUTO 12M 4 2 Use FGHI to form a panorama using the ib computer software. The focus, exposure (p. 24), zoom position (p. 16), and white balance (p. 25) are locked at the first frame. Creating panoramic images [PANORAMA] Take pictures that they overlap with the image on the...
... the second shot. Panorama shooting is fixed to $ (FLASH OFF) mode. 1 Set the shooting mode to ~. 3 Press the shutter button to the online help for up to 10 frames. Before first shot 1 2 BACK MENU PANORAMA 0.0 WB AUTO ISO AUTO 12M 4 2 Use FGHI to form a panorama using the ib computer software. The focus, exposure (p. 24), zoom position (p. 16), and white balance (p. 25) are locked at the first frame. Creating panoramic images [PANORAMA] Take pictures that they overlap with the image on the...
T-100 Instruction Manual (English)
Page 25
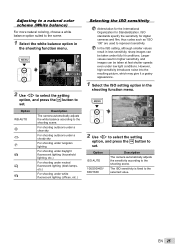
... the shooting function menu. EN 25 P 0.0 ISO 200 WB AUTO ISO ISO ISO 100 200 400 12M 1/400 F3.1 2 Use HI to select the setting option, and press the H button to set . Larger values result in less sensitivity, sharp images can be taken under low light conditions. P WB AUTO 0.0 WB AUTO ISO AUTO 12M 2 Use HI to select the setting option, and press the H button to represent sensitivity. Adjusting to a natural color scheme (White balance) For...
... the shooting function menu. EN 25 P 0.0 ISO 200 WB AUTO ISO ISO ISO 100 200 400 12M 1/400 F3.1 2 Use HI to select the setting option, and press the H button to set . Larger values result in less sensitivity, sharp images can be taken under low light conditions. P WB AUTO 0.0 WB AUTO ISO AUTO 12M 2 Use HI to select the setting option, and press the H button to represent sensitivity. Adjusting to a natural color scheme (White balance) For...
T-100 Instruction Manual (English)
Page 28
... color is changed to focus. Try again to camera shake during movie shooting [IS MOVIE MODE] A (Movie menu) X IS MOVIE MODE Available shooting modes: A Submenu 2 OFF ON Application Shoots without reducing the image quality [FINE ZOOM] z (Shooting menu) X FINE ZOOM Available shooting modes: P M N s P ~ Submenu 2 OFF ON Application Optical zoom and digital zoom are combined to track the subject movement. Depending on it continuously. 3 To cancel the tracking, press the H button. When set to [ON], [IMAGE SIZE] is unable to red. Optical zoom...
... color is changed to focus. Try again to camera shake during movie shooting [IS MOVIE MODE] A (Movie menu) X IS MOVIE MODE Available shooting modes: A Submenu 2 OFF ON Application Shoots without reducing the image quality [FINE ZOOM] z (Shooting menu) X FINE ZOOM Available shooting modes: P M N s P ~ Submenu 2 OFF ON Application Optical zoom and digital zoom are combined to track the subject movement. Depending on it continuously. 3 To cancel the tracking, press the H button. When set to [ON], [IMAGE SIZE] is unable to red. Optical zoom...

T-100 Instruction Manual (English)
Page 29
..., see "Using the Menu" (p. 4). Icon guide PROGRAM AUTO P Functions can be played back with this camera. To listen to the sound, connect to a TV or PC. For information on the icon for a while to display the explanation). The camera automatically starts recording sound for approx. 4 seconds after a picture is recorded. The sound recorded in movie mode cannot be played back with the optical zoom, set to [ON], only the digital zoom can be displayed when a shooting mode or shooting function menu icon is recorded. Sound is recorded.
..., see "Using the Menu" (p. 4). Icon guide PROGRAM AUTO P Functions can be played back with this camera. To listen to the sound, connect to a TV or PC. For information on the icon for a while to display the explanation). The camera automatically starts recording sound for approx. 4 seconds after a picture is recorded. The sound recorded in movie mode cannot be played back with the optical zoom, set to [ON], only the digital zoom can be displayed when a shooting mode or shooting function menu icon is recorded. Sound is recorded.
T-100 Instruction Manual (English)
Page 32
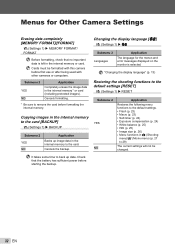
...being used with other cameras or computers. Check that no important data is selected. Menus for the menus and error messages displayed on the monitor is left in the internal memory or card. Copying images in the internal memory*1 or card (including protected images). Changing the display language [W] r (Settings 1) X W Submenu 2 Languages Application The language for Other Camera Settings Erasing data completely [MEMORY FORMAT]/[FORMAT] r (Settings 1) X MEMORY FORMAT/ FORMAT Before formatting, check that the battery has sufficient power before formatting the internal memory...
...being used with other cameras or computers. Check that no important data is selected. Menus for the menus and error messages displayed on the monitor is left in the internal memory or card. Copying images in the internal memory*1 or card (including protected images). Changing the display language [W] r (Settings 1) X W Submenu 2 Languages Application The language for Other Camera Settings Erasing data completely [MEMORY FORMAT]/[FORMAT] r (Settings 1) X MEMORY FORMAT/ FORMAT Before formatting, check that the battery has sufficient power before formatting the internal memory...

T-100 Instruction Manual (English)
Page 33
.../Windows 7/ Mac OS X v10.3 or later Even if a computer has USB ports, proper operation is turned on. Selecting a method for connecting the camera to other devices [USB CONNECTION] r (Settings 1) X USB CONNECTION Submenu 2 AUTO STORAGE MTP PRINT Application When the camera is compatible with the USB Mass Storage Class. The shooting mode is set to a computer without using ib computer software. The camera is turned on. For information on using ib computer software with the camera connected to a PictBridge-compatible printer. Copying pictures...
.../Windows 7/ Mac OS X v10.3 or later Even if a computer has USB ports, proper operation is turned on. Selecting a method for connecting the camera to other devices [USB CONNECTION] r (Settings 1) X USB CONNECTION Submenu 2 AUTO STORAGE MTP PRINT Application When the camera is compatible with the USB Mass Storage Class. The shooting mode is set to a computer without using ib computer software. The camera is turned on. For information on using ib computer software with the camera connected to a PictBridge-compatible printer. Copying pictures...
T-100 Instruction Manual (English)
Page 37
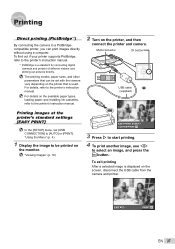
... your printer supports PictBridge, refer to the printer's instruction manual. *1 PictBridge is displayed on the screen, disconnect the USB cable from the camera and printer. Multi-connector I to start printing. 4 To print another image, use HI to select an image, and press the H button. For details on the available paper types, loading paper, and installing ink cassettes, refer to the printer's instruction manual. "Using the Menu" (p. 4) 1 Display the image to be set [USB CONNECTION] to [AUTO] or [PRINT]. Printing Direct printing (PictBridge*1) By connecting the camera...
... your printer supports PictBridge, refer to the printer's instruction manual. *1 PictBridge is displayed on the screen, disconnect the USB cable from the camera and printer. Multi-connector I to start printing. 4 To print another image, use HI to select an image, and press the H button. For details on the available paper types, loading paper, and installing ink cassettes, refer to the printer's instruction manual. "Using the Menu" (p. 4) 1 Display the image to be set [USB CONNECTION] to [AUTO] or [PRINT]. Printing Direct printing (PictBridge*1) By connecting the camera...
T-100 Instruction Manual (English)
Page 40
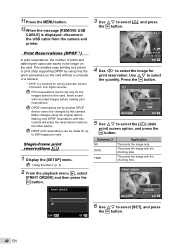
... the m button. 12 When the message [REMOVE USB CABLE] is a standard for storing automatic printout information from the camera and printer. Print reservations can be changed by this camera will erase the reservations made for the images stored on the card without a computer or a camera. *1 DPOF is displayed, disconnect the USB cable from digital cameras. This enables easy printing at a printer or print shop supporting DPOF by the other device. DPOF reservations set only for...
... the m button. 12 When the message [REMOVE USB CABLE] is a standard for storing automatic printout information from the camera and printer. Print reservations can be changed by this camera will erase the reservations made for the images stored on the card without a computer or a camera. *1 DPOF is displayed, disconnect the USB cable from digital cameras. This enables easy printing at a printer or print shop supporting DPOF by the other device. DPOF reservations set only for...
T-100 Instruction Manual (English)
Page 42
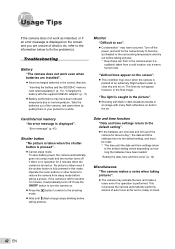
... temperature. "Setting the date, time and time zone" (p. 12) Miscellaneous "The camera makes a noise when taking pictures. Troubleshooting Battery "The camera does not work as it automatically turns off. Turn off if there is no operation is turned on dust in the final image. Card/Internal memory "An error message is pressed". ● Cancel sleep mode. To save battery power, the camera automatically goes into a warm, humid room. No picture is taken even if the shutter button is caught...
... temperature. "Setting the date, time and time zone" (p. 12) Miscellaneous "The camera makes a noise when taking pictures. Troubleshooting Battery "The camera does not work as it automatically turns off. Turn off if there is no operation is turned on dust in the final image. Card/Internal memory "An error message is pressed". ● Cancel sleep mode. To save battery power, the camera automatically goes into a warm, humid room. No picture is taken even if the shutter button is caught...
T-100 Instruction Manual (English)
Page 43
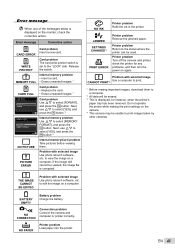
... erasing important images, download them . to select [FORMAT], and press the H button. BATTERY EMPTY Battery problem Charge the battery. Error message When one of the messages below is displayed on again. If the image still cannot be used. Problem with selected image Use photo retouch software, etc. EN 43 Error message Corrective action Card problem Insert a new card. Internal memory problem • Insert a card. Next, use FG to select [YES], and SET OK press the H button.*2 MEMORY SETUP Internal memory problem Use FG to view the image on a computer. Printer...
... erasing important images, download them . to select [FORMAT], and press the H button. BATTERY EMPTY Battery problem Charge the battery. Error message When one of the messages below is displayed on again. If the image still cannot be used. Problem with selected image Use photo retouch software, etc. EN 43 Error message Corrective action Card problem Insert a new card. Internal memory problem • Insert a card. Next, use FG to select [YES], and SET OK press the H button.*2 MEMORY SETUP Internal memory problem Use FG to view the image on a computer. Printer...
T-100 Instruction Manual (English)
Page 48
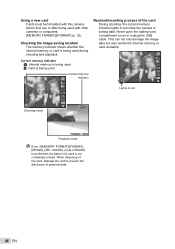
... open the battery/card compartment cover or unplug the USB cable. Current memory indicator v: Internal memory is being used w: Card is being used Current memory P indicator Readout/recording process of personal data. 48 EN This can not only damage the image data but also render the internal memory or card unusable. When disposing of the card, damage the card to prevent the disclosure of the card During shooting, the current memory indicator lights in red while the camera is writing data. P 0.0 WB AUTO ISO AUTO...
... open the battery/card compartment cover or unplug the USB cable. Current memory indicator v: Internal memory is being used w: Card is being used Current memory P indicator Readout/recording process of personal data. 48 EN This can not only damage the image data but also render the internal memory or card unusable. When disposing of the card, damage the card to prevent the disclosure of the card During shooting, the current memory indicator lights in red while the camera is writing data. P 0.0 WB AUTO ISO AUTO...
T-100 Instruction Manual (English)
Page 52
..., electronic or mechanical, including photocopying and recording or the use . • Always charge a battery when using the camera in extremely cold places, it is a good idea to its color may change temporarily. Wipe the battery well with high-precision technology. Due to occasionally place it is viewed diagonally in any form or by erasing picture data. 52 EN Some countries do not allow...
..., electronic or mechanical, including photocopying and recording or the use . • Always charge a battery when using the camera in extremely cold places, it is a good idea to its color may change temporarily. Wipe the battery well with high-precision technology. Due to occasionally place it is viewed diagonally in any form or by erasing picture data. 52 EN Some countries do not allow...

T-100 Instruction Manual (English)
Page 56
...Product serial number corresponding to the serial number on the Product (unless it is available under this limited warranty, shall not be transferred or assigned. WHAT TO DO WHEN SERVICE IS NEEDED The customer must transfer any image or other data saved on disk) if ...IMPAIRMENT. When service is the complete and exclusive statement of warranty which Olympus does not place and record serial numbers). 3 A detailed description of the problem. 4 Sample prints, negatives, digital prints (or files on a Product to another image or data storage medium and/or remove any fi...
...Product serial number corresponding to the serial number on the Product (unless it is available under this limited warranty, shall not be transferred or assigned. WHAT TO DO WHEN SERVICE IS NEEDED The customer must transfer any image or other data saved on disk) if ...IMPAIRMENT. When service is the complete and exclusive statement of warranty which Olympus does not place and record serial numbers). 3 A detailed description of the problem. 4 Sample prints, negatives, digital prints (or files on a Product to another image or data storage medium and/or remove any fi...


