
T-100 Instruction Manual (English)
Page 1
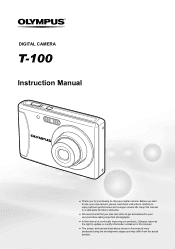
... update or modify information contained in this manual. ● The screen and camera illustrations shown in a safe place for purchasing an Olympus digital camera. DIGITAL CAMERA T-100 Instruction Manual ● Thank you for future reference. ● We recommend that you start to use your camera before taking important photographs. ● In the interest of continually improving...
... update or modify information contained in this manual. ● The screen and camera illustrations shown in a safe place for purchasing an Olympus digital camera. DIGITAL CAMERA T-100 Instruction Manual ● Thank you for future reference. ● We recommend that you start to use your camera before taking important photographs. ● In the interest of continually improving...
T-100 Instruction Manual (English)
Page 2
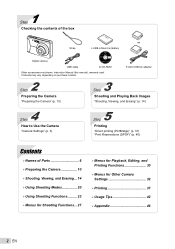
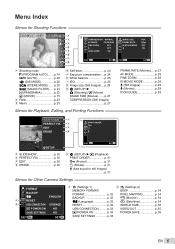
...23 ¾ Menus for Shooting Functions... 27 ¾ Menus for Playback, Editing, and Printing Functions 30 ¾ Menus for Other Camera Settings 32 ¾ Printing 37 ¾ Usage Tips 42 ¾ Appendix 46 2 EN Contents may vary depending on purchase location.... F-2AC USB-AC adapter 2 Step Preparing the Camera "Preparing the Camera" (p. 10) 3 Step Shooting and Playing Back Images "Shooting, Viewing, and Erasing" (p. 14) 4 Step How to Use the Camera "Camera Settings" (p. 3) 5 Step Printing "Direct printing (PictBridge)" (p. 37) "Print ...
...23 ¾ Menus for Shooting Functions... 27 ¾ Menus for Playback, Editing, and Printing Functions 30 ¾ Menus for Other Camera Settings 32 ¾ Printing 37 ¾ Usage Tips 42 ¾ Appendix 46 2 EN Contents may vary depending on purchase location.... F-2AC USB-AC adapter 2 Step Preparing the Camera "Preparing the Camera" (p. 10) 3 Step Shooting and Playing Back Images "Shooting, Viewing, and Erasing" (p. 14) 4 Step How to Use the Camera "Camera Settings" (p. 3) 5 Step Printing "Direct printing (PictBridge)" (p. 37) "Print ...
T-100 Instruction Manual (English)
Page 3
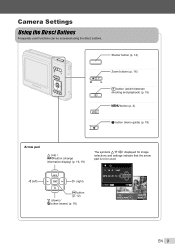
... pad is to be accessed using the direct buttons. X Y M D TIME 2010. 02 . 26 12 : 30 Y/M/D 4/30 CANCEL MENU SET OK SINGLE PRINT NORM 12M FILE 100 0004 '10/02/26 12:30 PRINT OK MORE EN 3 Camera Settings Using the Direct Buttons Frequently used functions can be used.
... pad is to be accessed using the direct buttons. X Y M D TIME 2010. 02 . 26 12 : 30 Y/M/D 4/30 CANCEL MENU SET OK SINGLE PRINT NORM 12M FILE 100 0004 '10/02/26 12:30 PRINT OK MORE EN 3 Camera Settings Using the Direct Buttons Frequently used functions can be used.
T-100 Instruction Manual (English)
Page 4
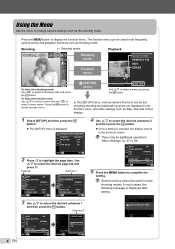
... SLIDESHOW PERFECT FIX EDIT ERASE o [SETUP] menu SETUP Use FG to select a shooting mode and press the H button. In the [SETUP] menu, various camera functions can be used shooting and playback functions such as shooting mode. Page tab Submenu 1 BEEP ON PIXEL MAPPING s NORMAL 1X 2 WORLD TIME VIDEO OUT.... To select the function menu Use FG to select a menu and use HI to complete the setting. Using the Menu Use the menu to change camera settings such as date, time and screen display. 1 Select [SETUP] and then press the H button. ● The [SETUP] menu is displayed. The ...
... SLIDESHOW PERFECT FIX EDIT ERASE o [SETUP] menu SETUP Use FG to select a shooting mode and press the H button. In the [SETUP] menu, various camera functions can be used shooting and playback functions such as shooting mode. Page tab Submenu 1 BEEP ON PIXEL MAPPING s NORMAL 1X 2 WORLD TIME VIDEO OUT.... To select the function menu Use FG to select a menu and use HI to complete the setting. Using the Menu Use the menu to change camera settings such as date, time and screen display. 1 Select [SETUP] and then press the H button. ● The [SETUP] menu is displayed. The ...
T-100 Instruction Manual (English)
Page 5
... p. 30 4 ERASE p. 30 EXIT MENU SET OK 5 o (SETUP) X q (Playback) PRINT ORDER p. 31 0 (Protect p. 31 y (Rotate p. 31 R (Add sound to still images) p. 31 Menus for Other Camera Settings FORMAT BACKUP W 1 1 RESET 2 2 USB CONNECTION q POWER ON SAVE SETTINGS EXIT MENU ENGLISH STORAGE NO NO SET OK 1 r (Settings 1) MEMORY FORMAT/ FORMAT p. 32 BACKUP p. 32...
... p. 30 4 ERASE p. 30 EXIT MENU SET OK 5 o (SETUP) X q (Playback) PRINT ORDER p. 31 0 (Protect p. 31 y (Rotate p. 31 R (Add sound to still images) p. 31 Menus for Other Camera Settings FORMAT BACKUP W 1 1 RESET 2 2 USB CONNECTION q POWER ON SAVE SETTINGS EXIT MENU ENGLISH STORAGE NO NO SET OK 1 r (Settings 1) MEMORY FORMAT/ FORMAT p. 32 BACKUP p. 32...
T-100 Instruction Manual (English)
Page 6
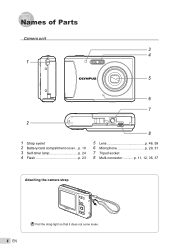
Names of Parts Camera unit 3 4 1 5 6 7 2 8 1 Strap eyelet 2 Battery/card compartment cover... p. 10 3 Self-timer lamp p. 24 4 Flash p. 23 5 Lens p. 46, 59 6 Microphone p. 29, 31 7 Tripod socket 8 Multi-connector p. 11, 12, 35, 37 Attaching the camera strap 6 EN Pull the strap tight so that it does not come loose.
Names of Parts Camera unit 3 4 1 5 6 7 2 8 1 Strap eyelet 2 Battery/card compartment cover... p. 10 3 Self-timer lamp p. 24 4 Flash p. 23 5 Lens p. 46, 59 6 Microphone p. 29, 31 7 Tripod socket 8 Multi-connector p. 11, 12, 35, 37 Attaching the camera strap 6 EN Pull the strap tight so that it does not come loose.

T-100 Instruction Manual (English)
Page 8
Monitor Shooting mode display 1 18 17 16 4 NORM 15 14 12 2 P 3 4 5 P0.0 6 7 WB AUTO 8 ISO AUTO 9 12M 10 1/100 F3.1 20 19 Still image 1 17 2 4 5 0.0 6 7 WB AUTO 16 0:34 VGA ON 10 15 9 13 12 11 Movie 1 Battery check p. 11 2 Shooting mode p. 14, 20 3 ... images p. 27 15 Number of storable pictures (still images p. 14 Continuous recording length (movies) p. 15 16 Current memory p. 48 17 AF target mark p. 14 18 Camera shake warning 19 Aperture value p. 14 20 Shutter speed p. 14 8 EN
Monitor Shooting mode display 1 18 17 16 4 NORM 15 14 12 2 P 3 4 5 P0.0 6 7 WB AUTO 8 ISO AUTO 9 12M 10 1/100 F3.1 20 19 Still image 1 17 2 4 5 0.0 6 7 WB AUTO 16 0:34 VGA ON 10 15 9 13 12 11 Movie 1 Battery check p. 11 2 Shooting mode p. 14, 20 3 ... images p. 27 15 Number of storable pictures (still images p. 14 Continuous recording length (movies) p. 15 16 Current memory p. 48 17 AF target mark p. 14 18 Camera shake warning 19 Aperture value p. 14 20 Shutter speed p. 14 8 EN
T-100 Instruction Manual (English)
Page 10
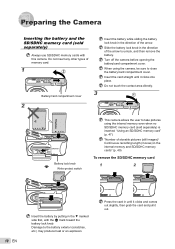
... card 1 2 10 EN Insert the battery by putting in until it out. Press the card in the ▼ marked side first, with this camera. Slide the battery lock knob in the direction of the arrow to the battery exterior (scratches, etc.) may produce heat or an explosion. Damage to...the arrow. Insert the card straight until it clicks and comes out slightly, then grab the card and pull it clicks into place. Preparing the Camera Inserting the battery and the SD/SDHC memory card (sold separately) is inserted. When using the internal memory even when no SD/SDHC memory card...
... card 1 2 10 EN Insert the battery by putting in until it out. Press the card in the ▼ marked side first, with this camera. Slide the battery lock knob in the direction of the arrow to the battery exterior (scratches, etc.) may produce heat or an explosion. Damage to...the arrow. Insert the card straight until it clicks and comes out slightly, then grab the card and pull it clicks into place. Preparing the Camera Inserting the battery and the SD/SDHC memory card (sold separately) is inserted. When using the internal memory even when no SD/SDHC memory card...
T-100 Instruction Manual (English)
Page 11
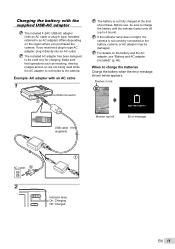
... (with an AC cable 1 Multi-connector 2 USB cable (supplied) The battery is not correctly connected or the battery, camera, or AC adapter may be damaged. When to 4 hours). If you purchased the camera. hereafter referred to as shooting, viewing images and so on are not being used only for charging. The included... the battery and the AC adapter, see "Battery and AC adapter (included)" (p. 46). Before use, be used while the AC adapter is connected to the camera. If the indicator lamp does not light, the camera is not fully charged at the time of purchase.
... (with an AC cable 1 Multi-connector 2 USB cable (supplied) The battery is not correctly connected or the battery, camera, or AC adapter may be damaged. When to 4 hours). If you purchased the camera. hereafter referred to as shooting, viewing images and so on are not being used only for charging. The included... the battery and the AC adapter, see "Battery and AC adapter (included)" (p. 46). Before use, be used while the AC adapter is connected to the camera. If the indicator lamp does not light, the camera is not fully charged at the time of purchase.
T-100 Instruction Manual (English)
Page 12
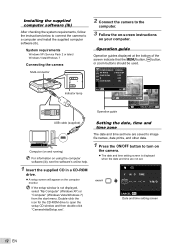
Installing the supplied computer software (ib) After checking the system requirements, follow the instructions below to connect the camera to open the setup CD window and then double-click "CameraInitialSetup.exe". IMAGE SET OK Operation guide OK ERASE/CANCEL MENU ... screen will appear on your computer. System requirements Windows XP (Service Pack 2 or later)/ Windows Vista/Windows 7 Connecting the camera Multi-connector Indicator lamp 2 Connect the camera to turn on the camera. ● The date and time setting screen is not displayed, select "My Computer" (Windows XP) or "Computer" (...
Installing the supplied computer software (ib) After checking the system requirements, follow the instructions below to connect the camera to open the setup CD window and then double-click "CameraInitialSetup.exe". IMAGE SET OK Operation guide OK ERASE/CANCEL MENU ... screen will appear on your computer. System requirements Windows XP (Service Pack 2 or later)/ Windows Vista/Windows 7 Connecting the camera Multi-connector Indicator lamp 2 Connect the camera to turn on the camera. ● The date and time setting screen is not displayed, select "My Computer" (Windows XP) or "Computer" (...
T-100 Instruction Manual (English)
Page 14
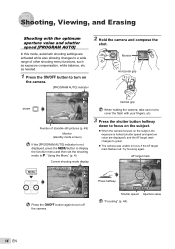
... with your fingers, etc. 3 Press the shutter button halfway down to focus on the subject. ● When the camera focuses on the camera. [PROGRAM AUTO] indicator 2 Hold the camera and compose the shot. AF target mark P 0.0 WB AUTO ISO AUTO 12M 4 Press the n button again to turn on...value and shutter speed [PROGRAM AUTO] In this mode, automatic shooting settings are displayed), and the AF target mark changes to green. ● The camera was unable to focus if the AF target mark flashes red. Try focusing again. Press halfway 1/400 F3.1 Shutter speed Aperture value "Focusing...
... with your fingers, etc. 3 Press the shutter button halfway down to focus on the subject. ● When the camera focuses on the camera. [PROGRAM AUTO] indicator 2 Hold the camera and compose the shot. AF target mark P 0.0 WB AUTO ISO AUTO 12M 4 Press the n button again to turn on...value and shutter speed [PROGRAM AUTO] In this mode, automatic shooting settings are displayed), and the AF target mark changes to green. ● The camera was unable to focus if the AF target mark flashes red. Try focusing again. Press halfway 1/400 F3.1 Shutter speed Aperture value "Focusing...
T-100 Instruction Manual (English)
Page 15
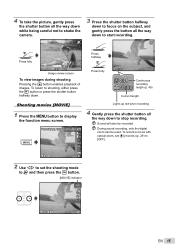
...] indicator 0.0 WB AUTO 0:34 VGA EN 15 To return to shooting, either press the q button or press the shutter button halfway down to shake the camera. To record a movie with optical zoom, set [R] (movies) (p. 29) to [OFF]. 2 Use HI to set the shooting mode to display the function menu screen. P 3 Press...
...] indicator 0.0 WB AUTO 0:34 VGA EN 15 To return to shooting, either press the q button or press the shutter button halfway down to shake the camera. To record a movie with optical zoom, set [R] (movies) (p. 29) to [OFF]. 2 Use HI to set the shooting mode to display the function menu screen. P 3 Press...

T-100 Instruction Manual (English)
Page 17
... Press the H button to advance or and rewinding rewind one frame at a time. The display size of the images can be played back with this camera. Operations during pausing playback 00:14/00:34 During pause Cueing Press F to display the first frame and press G to increase the fast forward...
... Press the H button to advance or and rewinding rewind one frame at a time. The display size of the images can be played back with this camera. Operations during pausing playback 00:14/00:34 During pause Cueing Press F to display the first frame and press G to increase the fast forward...
T-100 Instruction Manual (English)
Page 20
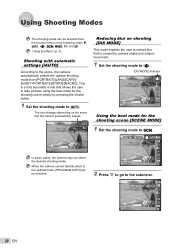
... optimal mode, [PROGRAM AUTO] will be selected from [PORTRAIT]/[LANDSCAPE]/ [NIGHT+PORTRAIT]/[SPORT]/[MACRO]. SCENE MODE 4 In some cases, the camera may not select the desired shooting mode. PORTRAIT 0.0 WB AUTO 12M 4 20 EN Using Shooting Modes The shooting mode can be selected. ...0.0 WB AUTO 12M 4 2 Press G to go to the scene, the camera automatically selects the optimal shooting mode from the function menu in the following order: P, M, N, s, P, ~, and A. "Using the Menu" (p. 4) Shooting with...
... optimal mode, [PROGRAM AUTO] will be selected from [PORTRAIT]/[LANDSCAPE]/ [NIGHT+PORTRAIT]/[SPORT]/[MACRO]. SCENE MODE 4 In some cases, the camera may not select the desired shooting mode. PORTRAIT 0.0 WB AUTO 12M 4 20 EN Using Shooting Modes The shooting mode can be selected. ...0.0 WB AUTO 12M 4 2 Press G to go to the scene, the camera automatically selects the optimal shooting mode from the function menu in the following order: P, M, N, s, P, ~, and A. "Using the Menu" (p. 4) Shooting with...
T-100 Instruction Manual (English)
Page 21
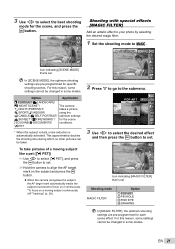
Option Application B PORTRAIT/F LANDSCAPE/ G NIGHT SCENE*1/ The camera M NIGHT+PORTRAIT/ takes a picture C SPORT/N INDOOR/ using the W CANDLE/R SELF PORTRAIT/ optimum settings S SUNSET*1/X FIREWORKS*1/ for the scene, and press the H button. This approximately doubles ... a pet ([ PET]) 1 Use HI to select [ PET], and press the H button to set. 2 Hold the camera to align the AF target mark on the subject and press the H button. ● When the camera recognizes the subject, the AF target mark automatically tracks the subject movement to focus on it continuously...
Option Application B PORTRAIT/F LANDSCAPE/ G NIGHT SCENE*1/ The camera M NIGHT+PORTRAIT/ takes a picture C SPORT/N INDOOR/ using the W CANDLE/R SELF PORTRAIT/ optimum settings S SUNSET*1/X FIREWORKS*1/ for the scene, and press the H button. This approximately doubles ... a pet ([ PET]) 1 Use HI to select [ PET], and press the H button to set. 2 Hold the camera to align the AF target mark on the subject and press the H button. ● When the camera recognizes the subject, the AF target mark automatically tracks the subject movement to focus on it continuously...
T-100 Instruction Manual (English)
Page 23
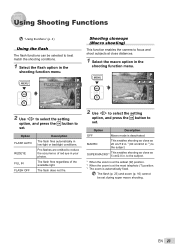
... is deactivated. The flash (p. 23) and zoom (p. 16) cannot be selected to the subject. EN 23 Shooting closeups (Macro shooting) This function enables the camera to set. Option Description OFF Macro mode is automatically fixed. P FLASH AUTO 0.0 WB AUTO ISO AUTO 12M 4 2 Use HI to select the setting option...
... is deactivated. The flash (p. 23) and zoom (p. 16) cannot be selected to the subject. EN 23 Shooting closeups (Macro shooting) This function enables the camera to set. Option Description OFF Macro mode is automatically fixed. P FLASH AUTO 0.0 WB AUTO ISO AUTO 12M 4 2 Use HI to select the setting option...
T-100 Instruction Manual (English)
Page 24
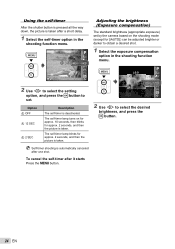
... picture is taken. P Y OFF 2 12 0.0 WB AUTO ISO AUTO 12M 4 2 Use HI to select the setting option, and press the H button to set by the camera based on for approx. 10 seconds, then blinks for [iAUTO]) can be adjusted brighter or darker to select the desired brightness, and press the H button...
... picture is taken. P Y OFF 2 12 0.0 WB AUTO ISO AUTO 12M 4 2 Use HI to select the setting option, and press the H button to set by the camera based on for approx. 10 seconds, then blinks for [iAUTO]) can be adjusted brighter or darker to select the desired brightness, and press the H button...
T-100 Instruction Manual (English)
Page 25
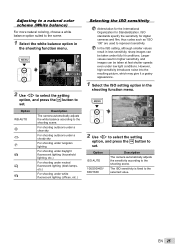
... result in the shooting function menu. The ISO sensitivity is fixed to the shooting scene. Option ISO AUTO 100/200/400/ 800/1600 Description The camera automatically adjusts the sensitivity according to the scene. 1 Select the white balance option in higher sensitivity, and images can...ces, etc.) Selecting the ISO sensitivity Abbreviation for the International Organization for digital cameras and film, thus codes such as "ISO 100" are used to represent sensitivity. P 0.0 ISO 200 WB AUTO ISO ISO ISO 100 200 400 12M 1/400 F3.1 2 Use HI to select the setting ...
... result in the shooting function menu. The ISO sensitivity is fixed to the shooting scene. Option ISO AUTO 100/200/400/ 800/1600 Description The camera automatically adjusts the sensitivity according to the scene. 1 Select the white balance option in higher sensitivity, and images can...ces, etc.) Selecting the ISO sensitivity Abbreviation for the International Organization for digital cameras and film, thus codes such as "ISO 100" are used to represent sensitivity. P 0.0 ISO 200 WB AUTO ISO ISO ISO 100 200 400 12M 1/400 F3.1 2 Use HI to select the setting ...
T-100 Instruction Manual (English)
Page 28
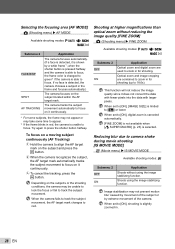
...AF target mark changes to press the shutter button halfway. Image stabilization may not prevent motion blur caused by movement of the camera. Shooting at higher magnifications than optical zoom without using the image stabilizing function. This function will not reduce the ...menu) X FINE ZOOM Available shooting modes: P M N s P ~ Submenu 2 OFF ON Application Optical zoom and digital zoom are combined to green*2 if the camera is slightly zoomed in for shooting (up to [ON], digital zoom is canceled automatically. [FINE ZOOM] is not available when [% SUPER MACRO] (p. 23) is ...
...AF target mark changes to press the shutter button halfway. Image stabilization may not prevent motion blur caused by movement of the camera. Shooting at higher magnifications than optical zoom without using the image stabilizing function. This function will not reduce the ...menu) X FINE ZOOM Available shooting modes: P M N s P ~ Submenu 2 OFF ON Application Optical zoom and digital zoom are combined to green*2 if the camera is slightly zoomed in for shooting (up to [ON], digital zoom is canceled automatically. [FINE ZOOM] is not available when [% SUPER MACRO] (p. 23) is ...

T-100 Instruction Manual (English)
Page 29
...recording notes or comments about the picture. The sound recorded in movie mode cannot be played back with this camera. The sound recorded in still REC cannot be played back with this camera. This is displayed. When set [R] (movies) to record. Recording sound when shooting still images [R] z... P M N s P ~ A Submenu 2 OFF ON Application No sound is taken. To listen to the sound, connect to a TV or PC. The camera automatically starts recording sound for approx. 4 seconds after a picture is recorded. To listen to the sound, connect to a TV or PC. EN 29 When recording...
...recording notes or comments about the picture. The sound recorded in movie mode cannot be played back with this camera. The sound recorded in still REC cannot be played back with this camera. This is displayed. When set [R] (movies) to record. Recording sound when shooting still images [R] z... P M N s P ~ A Submenu 2 OFF ON Application No sound is taken. To listen to the sound, connect to a TV or PC. The camera automatically starts recording sound for approx. 4 seconds after a picture is recorded. To listen to the sound, connect to a TV or PC. EN 29 When recording...


