SP-565UZ Instruction Manual (English)
Page 1
... update or modify information contained in this manual. ● The screen and camera illustrations shown in this manual in a safe place for purchasing an Olympus digital camera. Keep this manual were produced during the development stages and may differ from the actual product. DIGITAL CAMERA DIGITAL CAMERA Instruction Manual ● Thank you for future reference. ● We recommend...
... update or modify information contained in this manual. ● The screen and camera illustrations shown in this manual in a safe place for purchasing an Olympus digital camera. Keep this manual were produced during the development stages and may differ from the actual product. DIGITAL CAMERA DIGITAL CAMERA Instruction Manual ● Thank you for future reference. ● We recommend...

SP-565UZ Instruction Manual (English)
Page 2
... and Playing Back Images "Shooting, Playback and Erasing" (p. 14) 4 Step Printing Direct printing (PictBridge) (p. 64) Print reservations (DPOF) (p. 67) Contents Names of Parts 6 Preparing the Camera 10 Shooting, Playback and Erasing ........14 Using Shooting Modes 17 Using Shooting Functions 21 Using Playback Features 28 Menus for Shooting Functions...........31 Menus for...
... and Playing Back Images "Shooting, Playback and Erasing" (p. 14) 4 Step Printing Direct printing (PictBridge) (p. 64) Print reservations (DPOF) (p. 67) Contents Names of Parts 6 Preparing the Camera 10 Shooting, Playback and Erasing ........14 Using Shooting Modes 17 Using Shooting Functions 21 Using Playback Features 28 Menus for Shooting Functions...........31 Menus for...
SP-565UZ Instruction Manual (English)
Page 3
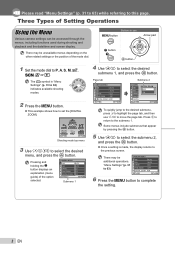
...playback and the date/time and screen display. Page tab CAMERA MENU 1 WB 2 ISO 3 DRIVE 4 FINE ZOOM 5 DIGITAL ZOOM EXIT MENU AUTO AUTO o OFF OFF SET OK Submenu 2 CAMERA MENU DIGITAL ZOOM 1 WB AUTO 2 ISO OFF AUTO 3 DRIVE ON o 4 FINE ZOOM OFF 5 DIGITAL ZOOM OFF BACK MENU SET OK To quickly jump to.... 2 Press the m button. ● This example shows how to select the desired menu, and press the o button. "Menu Settings" (p. 31 to 63) CAMERA MENU 1 WB 2 ISO 3 DRIVE 4 FINE ZOOM 5 DIGITAL ZOOM EXIT MENU AUTO AUTO o OFF ON SET OK 6 Press the m button to complete the setting. 3 EN
...playback and the date/time and screen display. Page tab CAMERA MENU 1 WB 2 ISO 3 DRIVE 4 FINE ZOOM 5 DIGITAL ZOOM EXIT MENU AUTO AUTO o OFF OFF SET OK Submenu 2 CAMERA MENU DIGITAL ZOOM 1 WB AUTO 2 ISO OFF AUTO 3 DRIVE ON o 4 FINE ZOOM OFF 5 DIGITAL ZOOM OFF BACK MENU SET OK To quickly jump to.... 2 Press the m button. ● This example shows how to select the desired menu, and press the o button. "Menu Settings" (p. 31 to 63) CAMERA MENU 1 WB 2 ISO 3 DRIVE 4 FINE ZOOM 5 DIGITAL ZOOM EXIT MENU AUTO AUTO o OFF ON SET OK 6 Press the m button to complete the setting. 3 EN
SP-565UZ Instruction Manual (English)
Page 4
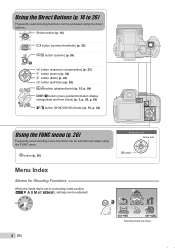
... (p. 14 to a shooting mode position (h P A S M r s n), settings can be set to 26) Frequently used shooting menu functions can be adjusted. 5 RESET 4 PANORAMA EXIT MENU 1 IMAGE QUALITY 2 CAMERA MENU 3 SCN 6 SETUP 7 SILENT MODE SET OK Shooting mode top menu 4 EN
... (p. 14 to a shooting mode position (h P A S M r s n), settings can be set to 26) Frequently used shooting menu functions can be adjusted. 5 RESET 4 PANORAMA EXIT MENU 1 IMAGE QUALITY 2 CAMERA MENU 3 SCN 6 SETUP 7 SILENT MODE SET OK Shooting mode top menu 4 EN
SP-565UZ Instruction Manual (English)
Page 5
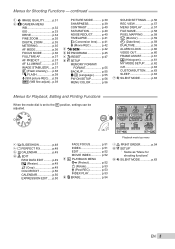
... RAW DATA EDIT .......... p.38 Q FLASH p.38 R (Still picture REC) .... p.63 SLEEP p.63 7 j SILENT MODE p.63 Menus for Shooting Functions - p.31 2 K CAMERA MENU WB p.32 ISO p.33 DRIVE p.34 FINE ZOOM p.35 DIGITAL ZOOM p.35 METERING p.35 AF MODE p.36 FOCUS MODE p.36 FULLTIME AF p.37 AF PREDICT p.37 AF ILLUMINAT p.37 IMAGE...
... RAW DATA EDIT .......... p.38 Q FLASH p.38 R (Still picture REC) .... p.63 SLEEP p.63 7 j SILENT MODE p.63 Menus for Shooting Functions - p.31 2 K CAMERA MENU WB p.32 ISO p.33 DRIVE p.34 FINE ZOOM p.35 DIGITAL ZOOM p.35 METERING p.35 AF MODE p.36 FOCUS MODE p.36 FULLTIME AF p.37 AF PREDICT p.37 AF ILLUMINAT p.37 IMAGE...
SP-565UZ Instruction Manual (English)
Page 6
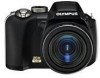
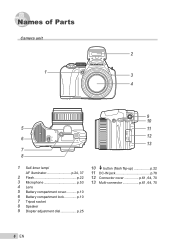
p.10 6 Battery compartment lock p.10 7 Tripod socket 8 Speaker 9 Diopter adjustment dial p.25 10 # button (flash flip-up p.22 11 DC-IN jack p.78 12 Connector cover p.61, 64, 70 13 Multi-connector p.61, 64, 70 6 EN Names of Parts Camera unit 2 1 3 4 9 10 5 11 6 12 13 7 8 1 Self-timer lamp/ AF illuminator p.24, 37 2 Flash p.22 3 Microphone p.53 4 Lens 5 Battery compartment cover...........
p.10 6 Battery compartment lock p.10 7 Tripod socket 8 Speaker 9 Diopter adjustment dial p.25 10 # button (flash flip-up p.22 11 DC-IN jack p.78 12 Connector cover p.61, 64, 70 13 Multi-connector p.61, 64, 70 6 EN Names of Parts Camera unit 2 1 3 4 9 10 5 11 6 12 13 7 8 1 Self-timer lamp/ AF illuminator p.24, 37 2 Flash p.22 3 Microphone p.53 4 Lens 5 Battery compartment cover...........

SP-565UZ Instruction Manual (English)
Page 8
... +2.0 1/400 F3.5 18 IN 4 19 20 26 25 24 23 22 21 Still image 1 Shooting mode p.17, 31 2 Flash mode p.23 3 Silent mode p.63 4 Digital image stabilization p.37 5 Macro/super macro mode p.24 6 SHADOW ADJ p.22 7 Noise reduction p.40 8 AE lock p.63 9 Battery check p.10, 73 10 AF lock (s... p.63 Manual focus (a p.36 AF predict p.37 11 Flash standby/camera shake warning/flash charge p.72 12 Flash intensity p.38 13 Saturation p.40 14 Sharpness p.39 15 Contrast p.40 16 Conversion lens p.41 17 Sound...
... +2.0 1/400 F3.5 18 IN 4 19 20 26 25 24 23 22 21 Still image 1 Shooting mode p.17, 31 2 Flash mode p.23 3 Silent mode p.63 4 Digital image stabilization p.37 5 Macro/super macro mode p.24 6 SHADOW ADJ p.22 7 Noise reduction p.40 8 AE lock p.63 9 Battery check p.10, 73 10 AF lock (s... p.63 Manual focus (a p.36 AF predict p.37 11 Flash standby/camera shake warning/flash charge p.72 12 Flash intensity p.38 13 Saturation p.40 14 Sharpness p.39 15 Contrast p.40 16 Conversion lens p.41 17 Sound...
SP-565UZ Instruction Manual (English)
Page 10
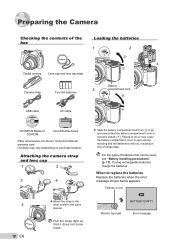
Attaching the camera strap and lens cap 1 2 3 4 ● Slide the battery compartment lock from ) to = and ensure that it does not come loose. Pull the strap tight so ... right Error message If using rechargeable batteries, charge the batteries. Preparing the Camera Checking the contents of the box Loading the batteries 1 2 Digital camera Lens cap and lens cap strap 3 Camera strap Four AA batteries Battery compartment lock USB cable AV cable OLYMPUS Master 2 CD-ROM microSD Attachment Other accessories not shown: Instruction Manual warranty...
Attaching the camera strap and lens cap 1 2 3 4 ● Slide the battery compartment lock from ) to = and ensure that it does not come loose. Pull the strap tight so ... right Error message If using rechargeable batteries, charge the batteries. Preparing the Camera Checking the contents of the box Loading the batteries 1 2 Digital camera Lens cap and lens cap strap 3 Camera strap Four AA batteries Battery compartment lock USB cable AV cable OLYMPUS Master 2 CD-ROM microSD Attachment Other accessories not shown: Instruction Manual warranty...

SP-565UZ Instruction Manual (English)
Page 11
...Number of the microSD Attachment and microSD card directly. Insert the card to the end. 1 o button 2 Insert the microSD Attachment into the camera. Card cover Notch 2 Notch 3 Contact area To remove the microSD card Contact area Insert the card straight in until it clicks and comes ...still pictures)/ recording length (movies) in the card until it out. Loading the xD-Picture Card™ (sold separately) into the camera This camera allows the user to take more pictures and record longer movies using an xD-Picture Card (sold separately) microSD card/microSDHC card (hereinafter...
...Number of the microSD Attachment and microSD card directly. Insert the card to the end. 1 o button 2 Insert the microSD Attachment into the camera. Card cover Notch 2 Notch 3 Contact area To remove the microSD card Contact area Insert the card straight in until it clicks and comes ...still pictures)/ recording length (movies) in the card until it out. Loading the xD-Picture Card™ (sold separately) into the camera This camera allows the user to take more pictures and record longer movies using an xD-Picture Card (sold separately) microSD card/microSDHC card (hereinafter...
SP-565UZ Instruction Manual (English)
Page 12
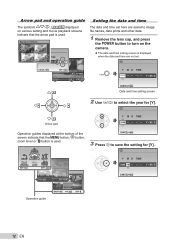
IMAGE QUALITY CAMERA RESET MENU SETUP PANORAMA EXIT MENU SCN SILENT MODE SET OK SEL. IMAGE IN WT SET1 OK 2 3 CANCEL MENU 3 Press : to select the year for [Y]. X ... here are saved to image file names, date prints and other data. 1 Remove the lens cap, and press the o button to turn on the camera. ● The date and time setting screen is used .
IMAGE QUALITY CAMERA RESET MENU SETUP PANORAMA EXIT MENU SCN SILENT MODE SET OK SEL. IMAGE IN WT SET1 OK 2 3 CANCEL MENU 3 Press : to select the year for [Y]. X ... here are saved to image file names, date prints and other data. 1 Remove the lens cap, and press the o button to turn on the camera. ● The date and time setting screen is used .
SP-565UZ Instruction Manual (English)
Page 13
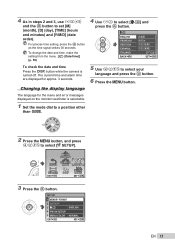
To check the date and time Press the g button while the camera is selectable. 1 Set the mode dial to a position other than R. 2 Press the m button, and press 789: to set [M] (month), [D] (day), [TIME] (hours and minutes) and [Y/M/D] (... to select your language and press the o button. 6 Press the m button. Changing the display language 5 Use 789: to select [W] and press the o button. IMAGE QUALITY CAMERA RESET MENU SETUP PANORAMA EXIT MENU SCN SILENT MODE SET OK 3 Press the o button. SETUP 1 MEMORY FORMAT 2 BACKUP 3 ENGLISH 4 PW ON SETUP 5 MENU COLOR NORMAL...
To check the date and time Press the g button while the camera is selectable. 1 Set the mode dial to a position other than R. 2 Press the m button, and press 789: to set [M] (month), [D] (day), [TIME] (hours and minutes) and [Y/M/D] (... to select your language and press the o button. 6 Press the m button. Changing the display language 5 Use 789: to select [W] and press the o button. IMAGE QUALITY CAMERA RESET MENU SETUP PANORAMA EXIT MENU SCN SILENT MODE SET OK 3 Press the o button. SETUP 1 MEMORY FORMAT 2 BACKUP 3 ENGLISH 4 PW ON SETUP 5 MENU COLOR NORMAL...
SP-565UZ Instruction Manual (English)
Page 14
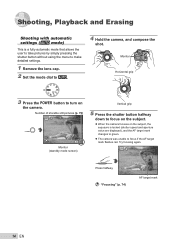
...10M NORM IN 4 Monitor (standby mode screen) Vertical grip 5 Press the shutter button halfway down to focus on the subject. ● When the camera focuses on the camera. AUTO $ Press halfway "Focusing" (p. 74) AF target mark 14 EN Try focusing again. Monitor AUTO $ 10M NORM IN 4 Horizontal grip ...shutter button without using the menu to make detailed settings. 1 Remove the lens cap. 2 Set the mode dial to h. 4 Hold the camera, and compose the shot. Shooting, Playback and Erasing Shooting with automatic settings (h mode) This is locked (shutter speed and aperture value are ...
...10M NORM IN 4 Monitor (standby mode screen) Vertical grip 5 Press the shutter button halfway down to focus on the subject. ● When the camera focuses on the camera. AUTO $ Press halfway "Focusing" (p. 74) AF target mark 14 EN Try focusing again. Monitor AUTO $ 10M NORM IN 4 Horizontal grip ...shutter button without using the menu to make detailed settings. 1 Remove the lens cap. 2 Set the mode dial to h. 4 Hold the camera, and compose the shot. Shooting, Playback and Erasing Shooting with automatic settings (h mode) This is locked (shutter speed and aperture value are ...
SP-565UZ Instruction Manual (English)
Page 15
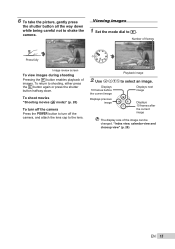
... way down . To return to shooting, either press the q button again or press the shutter button halfway down while being careful not to shake the camera. AUTO $ Viewing images 1 Set the mode dial to select an image. To shoot movies "Shooting movies (A mode)" (p. 20) To turn off the... camera Press the o button to turn off the camera, and attach the lens cap to the lens. 2008.10.26 12:30 NORM 10M 100-0001 IN 1 Playback image 2 Use 789...
... way down . To return to shooting, either press the q button again or press the shutter button halfway down while being careful not to shake the camera. AUTO $ Viewing images 1 Set the mode dial to select an image. To shoot movies "Shooting movies (A mode)" (p. 20) To turn off the... camera Press the o button to turn off the camera, and attach the lens cap to the lens. 2008.10.26 12:30 NORM 10M 100-0001 IN 1 Playback image 2 Use 789...
SP-565UZ Instruction Manual (English)
Page 17
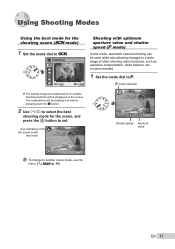
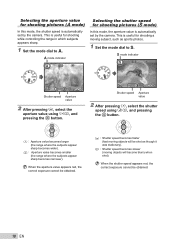
....5 IN 4 Shutter speed Aperture value 10M NORM IN 4 To change to set Shooting with optimum aperture value and shutter speed (P mode) In this mode, automatic camera shooting can be displayed on suitable shooting methods will be displayed as exposure compensation, white balance, etc. PORTRAIT EXIT MENU SET OK ● The sample...
....5 IN 4 Shutter speed Aperture value 10M NORM IN 4 To change to set Shooting with optimum aperture value and shutter speed (P mode) In this mode, automatic camera shooting can be displayed on suitable shooting methods will be displayed as exposure compensation, white balance, etc. PORTRAIT EXIT MENU SET OK ● The sample...
SP-565UZ Instruction Manual (English)
Page 18
... for shooting while controlling the range in which subjects appears sharp. 1 Set the mode dial to S. This is automatically set by the camera. This is automatically set by the camera. S mode indicator S NR 10M NORM 1/1000 F4.0 IN 4 Shutter speed Aperture value 2 After pressing 7, select the aperture value using 78, and pressing...
... for shooting while controlling the range in which subjects appears sharp. 1 Set the mode dial to S. This is automatically set by the camera. This is automatically set by the camera. S mode indicator S NR 10M NORM 1/1000 F4.0 IN 4 Shutter speed Aperture value 2 After pressing 7, select the aperture value using 78, and pressing...
SP-565UZ Instruction Manual (English)
Page 22
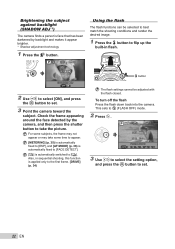
... the subject. To turn off the flash Press the flash down back into the camera. For some time to appear. [METERING] (p. 35) is automatically fixed to [ESP], and [AF MODE] (p. 36) is automatically fixed to [FACE DETECT]. [i] is ... press the o button to $ (FLASH OFF) mode. 2 Press : . Also, in flash. Brightening the subject against backlight (SHADOW ADJ*1) The camera finds a person's face that has been darkened by the camera, and then press the shutter button to take some subjects, the frame may not appear or may take the picture...
... the subject. To turn off the flash Press the flash down back into the camera. For some time to appear. [METERING] (p. 35) is automatically fixed to [ESP], and [AF MODE] (p. 36) is automatically fixed to [FACE DETECT]. [i] is ... press the o button to $ (FLASH OFF) mode. 2 Press : . Also, in flash. Brightening the subject against backlight (SHADOW ADJ*1) The camera finds a person's face that has been darkened by the camera, and then press the shutter button to take some subjects, the frame may not appear or may take the picture...
SP-565UZ Instruction Manual (English)
Page 23
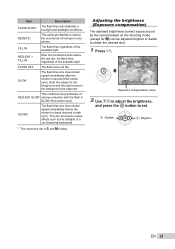
... SLOW red-eye reduction with the flash in low-light and backlight conditions. This can be adjusted brighter or darker to set by the camera based on the shooting mode (except for M) can be set in your photos. FLASH OFF The flash does not fire. SLOW2 The fl...
... SLOW red-eye reduction with the flash in low-light and backlight conditions. This can be adjusted brighter or darker to set by the camera based on the shooting mode (except for M) can be set in your photos. FLASH OFF The flash does not fire. SLOW2 The fl...
SP-565UZ Instruction Manual (English)
Page 24
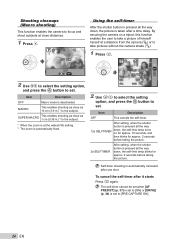
..., the self-time lamp blinks for approx. 2 seconds before taking the picture. 2s SELFTIMER After setting, when the shutter button is deactivated. By securing the camera on for approx. 10 seconds, and then blinks for approx. 2 seconds before taking the picture. P$ Y OFF SET OK 12s SELFTIMER 2s 10M OFF NORM 1/400... 12s SELFTIMER down , the picture is set to [ON] or [DRIVE] (p. 34) is taken after a time delay. Shooting closeups (Macro shooting) This function enables the camera to focus and shoot subjects at a distance from the...
..., the self-time lamp blinks for approx. 2 seconds before taking the picture. 2s SELFTIMER After setting, when the shutter button is deactivated. By securing the camera on for approx. 10 seconds, and then blinks for approx. 2 seconds before taking the picture. P$ Y OFF SET OK 12s SELFTIMER 2s 10M OFF NORM 1/400... 12s SELFTIMER down , the picture is set to [ON] or [DRIVE] (p. 34) is taken after a time delay. Shooting closeups (Macro shooting) This function enables the camera to focus and shoot subjects at a distance from the...
SP-565UZ Instruction Manual (English)
Page 25
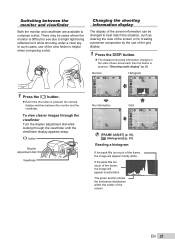
... adjustment dial Viewfinder Changing the shooting information display The display of the screen information can be cases where the monitor is pressed, the camera display switches between the monitor and viewfinder Both the monitor and viewfinder are available to bright light being reflected on it...
... adjustment dial Viewfinder Changing the shooting information display The display of the screen information can be cases where the monitor is pressed, the camera display switches between the monitor and viewfinder Both the monitor and viewfinder are available to bright light being reflected on it...
SP-565UZ Instruction Manual (English)
Page 27
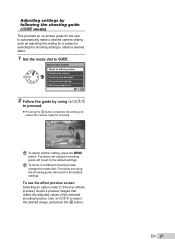
...OK 2 Follow the guide by following the shooting guide (R mode) This provides an on-screen guide for the user to automatically make a desired camera setting such as adjusting the setting for shooting. GUIDE # MODE CHANGED 10M NORM IN 17 To adjust another setting, press the m button. ... will revert to the default settings. EN 27 Functions set using 789: to proceed. ● Pressing the o button completes the setting and makes the camera ready for a subject or selecting the shooting setting to obtain a desired effect. 1 Set the mode dial to R. To shoot in a different shooting ...
...OK 2 Follow the guide by following the shooting guide (R mode) This provides an on-screen guide for the user to automatically make a desired camera setting such as adjusting the setting for shooting. GUIDE # MODE CHANGED 10M NORM IN 17 To adjust another setting, press the m button. ... will revert to the default settings. EN 27 Functions set using 789: to proceed. ● Pressing the o button completes the setting and makes the camera ready for a subject or selecting the shooting setting to obtain a desired effect. 1 Set the mode dial to R. To shoot in a different shooting ...


