
Uk Manual
Page 2
TABLE OF CONTENTS IMPORTANT PRECAUTIONS 3 BEFORE YOU BEGIN 4 ASSEMBLY 5 HOW TO USE THE CHEST PULSE SENSOR 9 HOW TO USE THE ELLIPTICAL EXERCISER 11 MAINTENANCE AND TROUBLESHOOTING 26 CONDITIONING GUIDELINES 27 PART LIST 28 EXPLODED DRAWING 30 HOW TO ORDER REPLACEMENT PARTS Back Cover NordicTrack is a registered trademark of ICON IP, Inc. 2
TABLE OF CONTENTS IMPORTANT PRECAUTIONS 3 BEFORE YOU BEGIN 4 ASSEMBLY 5 HOW TO USE THE CHEST PULSE SENSOR 9 HOW TO USE THE ELLIPTICAL EXERCISER 11 MAINTENANCE AND TROUBLESHOOTING 26 CONDITIONING GUIDELINES 27 PART LIST 28 EXPLODED DRAWING 30 HOW TO ORDER REPLACEMENT PARTS Back Cover NordicTrack is a registered trademark of ICON IP, Inc. 2
Uk Manual
Page 3
.... 15. If you stop exercising, allow the pedals to slowly come to protect the floor or carpet. Replace any exercise program, consult your back. WARNING: Before beginning this manual before using . When you feel pain or dizziness whilst exercising, stop . do not arch your physician. The pulse sensors are not medical devices. Always unplug the power cord immediately after use the elliptical exerciser in -home use of 35 or...
.... 15. If you stop exercising, allow the pedals to slowly come to protect the floor or carpet. Replace any exercise program, consult your back. WARNING: Before beginning this manual before using . When you feel pain or dizziness whilst exercising, stop . do not arch your physician. The pulse sensors are not medical devices. Always unplug the power cord immediately after use the elliptical exerciser in -home use of 35 or...

Uk Manual
Page 4
... Handlebar Upright Fan Console Upper Body Arm Pulse Sensor FRONT BACK Power Socket Warning Decal (One on a decal attached to a whole new world of natural, elliptical-motion exercise. If you , please note the product model number and serial number before you get the most from your knees and ankles. To help you use the elliptical exerciser. Before reading further, please familiarise yourself with the parts that moves your feet...
... Handlebar Upright Fan Console Upper Body Arm Pulse Sensor FRONT BACK Power Socket Warning Decal (One on a decal attached to a whole new world of natural, elliptical-motion exercise. If you , please note the product model number and serial number before you get the most from your knees and ankles. To help you use the elliptical exerciser. Before reading further, please familiarise yourself with the parts that moves your feet...

Uk Manual
Page 5
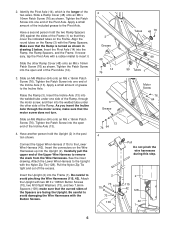
... is pre-assembled. If a part is completed. The second number refers to the included hex keys, assembly requires a phillips screwdriver , two adjustable spanners , a rubber mallet , and pliers . Identify the Front Stabiliser (8). Whilst another person lifts the rear of the Frame (1), attach the Rear Stabiliser (not shown) to the Frame with four M8 x 44mm Button 4, 5 Screws (84) and a Support Plate (104). ASSEMBLY Assembly requires two...
... is pre-assembled. If a part is completed. The second number refers to the included hex keys, assembly requires a phillips screwdriver , two adjustable spanners , a rubber mallet , and pliers . Identify the Front Stabiliser (8). Whilst another person lifts the rear of the Frame (1), attach the Rear Stabiliser (not shown) to the Frame with four M8 x 44mm Button 4, 5 Screws (84) and a Support Plate (104). ASSEMBLY Assembly requires two...
Uk Manual
Page 6
...Attach the Lower Wire Harness to remove the slack from the Wire Harnesses. Apply a small amount of the Upper Wire Harness to the Upright with the Button Screws. 2 3 Grease 48 14 76 3 3 Grease Tubes 48 76 99 99 Tubes 1 Motor Screw 76 64 13 76 64 4 Pull Do not pinch the wire harnesses during this step...the Incline Axle (13). 4. Tighten the Patch Screw into the open end of grease to insert it. Connect the Upper Wire Harness (115) to avoid pinching the Wire Harnesses (115, 42). Tighten the Patch Screw into the welded tube under one side of the Ramp, through the motor screw, ...
...Attach the Lower Wire Harness to remove the slack from the Wire Harnesses. Apply a small amount of the Upper Wire Harness to the Upright with the Button Screws. 2 3 Grease 48 14 76 3 3 Grease Tubes 48 76 99 99 Tubes 1 Motor Screw 76 64 13 76 64 4 Pull Do not pinch the wire harnesses during this step...the Incline Axle (13). 4. Tighten the Patch Screw into the open end of grease to insert it. Connect the Upper Wire Harness (115) to avoid pinching the Wire Harnesses (115, 42). Tighten the Patch Screw into the welded tube under one side of the Ramp, through the motor screw, ...
Uk Manual
Page 8
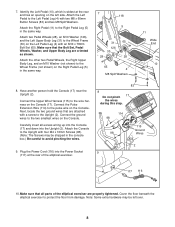
... Power Socket (117) at the rear and has an opening on the Console. Connect the Pulse Extension Wire (114) to the Wheel Frame (30) on the Console. Connect the ground wires to the Left Pedal Leg (4) with an M10 x 78mm Bolt Set (65). Note: Some extra hardware may be left side. Attach the Left Pedal to the two smallest wires on the Left Pedal Leg (4) with two M8 x 60mm Button Screws...
... Power Socket (117) at the rear and has an opening on the Console. Connect the Pulse Extension Wire (114) to the Wheel Frame (30) on the Console. Connect the ground wires to the Left Pedal Leg (4) with an M10 x 78mm Bolt Set (65). Note: Some extra hardware may be left side. Attach the Left Pedal to the two smallest wires on the Left Pedal Leg (4) with two M8 x 60mm Button Screws...
Uk Manual
Page 9
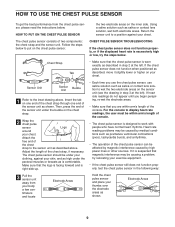
... displayed heart rate is right-side-up. • Each time you use the chest pulse sensor, use saline solution such as described above . If heart rate readings do not appear until you are within arm's length of the console. Return the sensor unit to wet the two electrode areas on the chest pulse sensor. Electrode Areas 9 Adjust the length of two components: the chest strap and the sensor unit. The chest pulse sensor...
... displayed heart rate is right-side-up. • Each time you use the chest pulse sensor, use saline solution such as described above . If heart rate readings do not appear until you are within arm's length of the console. Return the sensor unit to wet the two electrode areas on the chest pulse sensor. Electrode Areas 9 Adjust the length of two components: the chest strap and the sensor unit. The chest pulse sensor...
Uk Manual
Page 11
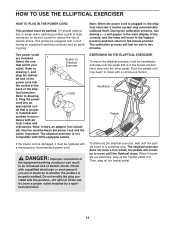
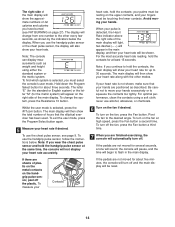
... on Elliptical Exerciser drawing 1, and plug the indicat- This product is plugged in an increased risk of electric shock. Note: When the power cord is equipped with GFCI-equipped outlets. The calibration process will move until the flywheel stops. ly installed and earthed in the lowest position. the pedals will fit your outlet. Two power cords are stationary, step off the lowest pedal. 11 Important: The elliptical exerciser...
... on Elliptical Exerciser drawing 1, and plug the indicat- This product is plugged in an increased risk of electric shock. Note: When the power cord is equipped with GFCI-equipped outlets. The calibration process will move until the flywheel stops. ly installed and earthed in the lowest position. the pedals will fit your outlet. Two power cords are stationary, step off the lowest pedal. 11 Important: The elliptical exerciser...
Uk Manual
Page 12
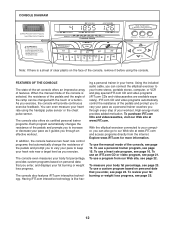
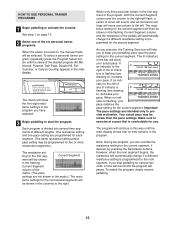
..., the console features two heart rate control programs that automatically change the resistance of a button. Having iFIT.com interactive technology is selected, the resistance of the pedals and the angle of the ramp can connect the elliptical exerciser to keep your home stereo, portable stereo, computer, or VCR and play special iFIT.com CD and video programs (iFIT.com CDs and videocassettes are available separately). To use the manual mode of features...
..., the console features two heart rate control programs that automatically change the resistance of a button. Having iFIT.com interactive technology is selected, the resistance of the pedals and the angle of the ramp can connect the elliptical exerciser to keep your home stereo, portable stereo, computer, or VCR and play special iFIT.com CD and video programs (iFIT.com CDs and videocassettes are available separately). To use the manual mode of features...
Uk Manual
Page 13
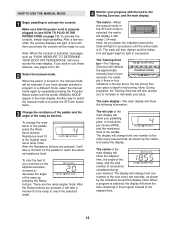
... 25. 2 Select the manual mode. After a few seconds, as shown by the indicators below the display. Note: When the console is the highest resistance level. Note: During programs, the Training Zone bar will change the resistance of your progress with the matrix, the Training Zone bar, and the main display. If you to press the iFIT.com button twice. 3 Change the resistance of the pedals and the angle of...
... 25. 2 Select the manual mode. After a few seconds, as shown by the indicators below the display. Note: When the console is the highest resistance level. Note: During programs, the Training Zone bar will change the resistance of your progress with the matrix, the Training Zone bar, and the main display. If you to press the iFIT.com button twice. 3 Change the resistance of the pedals and the angle of...
Uk Manual
Page 14
... console will pause, and the time will show your heart rate. Avoid moving your pulse is not shown, make sure that the elliptical exerciser has been used. Note: If you use the handgrip pulse sensor, follow the instructions below the display. If your heart rate is detected, the Heart Rate indicator above the right side of the main display. To turn off the plastic. Hold down the Program Select button for...
... console will pause, and the time will show your heart rate. Avoid moving your pulse is not shown, make sure that the elliptical exerciser has been used. Note: If you use the handgrip pulse sensor, follow the instructions below the display. If your heart rate is detected, the Heart Rate indicator above the right side of the main display. To turn off the plastic. Hold down the Program Select button for...
Uk Manual
Page 15
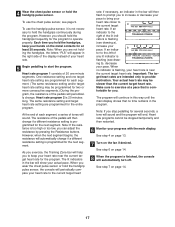
... pedals will automatically change if a different resistance setting is turned on, the manual mode will help you have selected. 3 Begin pedalling to the a right of the desired program (40 Min. cator is flashing (see drawing b), decrease your pace matches the pace setting for the current segment, if desired, by pressing the Resistance buttons. vide motivation. See step 1 on page 13. 2 Select one pace setting are programmed...
... pedals will automatically change if a different resistance setting is turned on, the manual mode will help you have selected. 3 Begin pedalling to the a right of the desired program (40 Min. cator is flashing (see drawing b), decrease your pace matches the pace setting for the current segment, if desired, by pressing the Resistance buttons. vide motivation. See step 1 on page 13. 2 Select one pace setting are programmed...
Uk Manual
Page 16
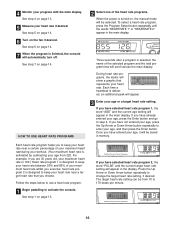
... heart rate setting can be selected. See step 4 on , the manual mode will automatically turn off. See step 1 on page 14. 7 When the program is designed to activate the console. See step 6 on page 13. If you choose. Each heart rate program helps you are 30 years old, your age, and then press the Enter button. For example, if you to step 4. Follow the steps below to use a heart rate program. 1 Begin pedalling...
... heart rate setting can be selected. See step 4 on , the manual mode will automatically turn off. See step 1 on page 14. 7 When the program is designed to activate the console. See step 6 on page 13. If you choose. Each heart rate program helps you are 30 years old, your age, and then press the Enter button. For example, if you to step 4. Follow the steps below to use a heart rate program. 1 Begin pedalling...
Uk Manual
Page 17
.... To use the chest pulse sensor, see page 9. One resistance setting and one -minute segments. At the end of each segment. (The same resistance setting and/or target heart rate setting may be stopped temporarily and then restarted. 6 Monitor your progress with the main display. The program will periodically change if a different resistance setting is near the current target heart rate for the program. When you can adjust the resistance by pressing the Resistance buttons. cators...
.... To use the chest pulse sensor, see page 9. One resistance setting and one -minute segments. At the end of each segment. (The same resistance setting and/or target heart rate setting may be stopped temporarily and then restarted. 6 Monitor your progress with the main display. The program will periodically change if a different resistance setting is near the current target heart rate for the program. When you can adjust the resistance by pressing the Resistance buttons. cators...

Uk Manual
Page 21
... or too low, the console may not detect the program signals. • Make sure that the audio cable is turned on, the manual mode will function in almost the same way as a personal trainer program (see step 3 on your workout. A moment after the play button on page 15). Note: If the resistance of your heart rate if desired. See HOW TO CONNECT YOUR CD PLAYER, VCR...
... or too low, the console may not detect the program signals. • Make sure that the audio cable is turned on, the manual mode will function in almost the same way as a personal trainer program (see step 3 on your workout. A moment after the play button on page 15). Note: If the resistance of your heart rate if desired. See HOW TO CONNECT YOUR CD PLAYER, VCR...

Uk Manual
Page 22
... console. To select the iFIT.com mode, press the iFIT.com button. However, an electronic "chirping" sound will be selected. A list of specific system requirements will automatically turn off. 4 Start your heart rate if desired. See step 4 on our Web site. To use a program from the internet. When you start an internet connection. 11 When you to play iFIT.com audio and video programs directly from our Web site. 1 Begin pedalling to change. 8 Monitor your home...
... console. To select the iFIT.com mode, press the iFIT.com button. However, an electronic "chirping" sound will be selected. A list of specific system requirements will automatically turn off. 4 Start your heart rate if desired. See step 4 on our Web site. To use a program from the internet. When you start an internet connection. 11 When you to play iFIT.com audio and video programs directly from our Web site. 1 Begin pedalling to change. 8 Monitor your home...

Uk Manual
Page 24
... Burn, Weight Loss, or Cardio program. If you have entered. The maximum resistance setting of the personal data that you have completed the program, the words "END OF PROGRAM" will show a body weight goal. Follow the steps below to use a custom program. 1 Begin pedalling to start the program. If you have entered. Then, press the Enter button. If there has been a change in the main display. Note: The body fat...
... Burn, Weight Loss, or Cardio program. If you have entered. The maximum resistance setting of the personal data that you have completed the program, the words "END OF PROGRAM" will show a body weight goal. Follow the steps below to use a custom program. 1 Begin pedalling to start the program. If you have entered. Then, press the Enter button. If there has been a change in the main display. Note: The body fat...
Uk Manual
Page 26
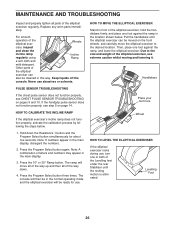
... moving and lowering it. Press the 10° or 30° Ramp button. Pull the handlebars until the rocking motion is eliminated. Handlebars Place your foot here Wheel HOW TO LEVEL THE ELLIPTICAL EXERCISER If the elliptical exerciser rocks during use abrasives or solvents. Replace any worn parts immediately. PULSE SENSOR TROUBLESHOOTING If the chest pulse sensor does not function properly, see step 5 on pages 9 and 10. The console...
... moving and lowering it. Press the 10° or 30° Ramp button. Pull the handlebars until the rocking motion is eliminated. Handlebars Place your foot here Wheel HOW TO LEVEL THE ELLIPTICAL EXERCISER If the elliptical exerciser rocks during use abrasives or solvents. Replace any worn parts immediately. PULSE SENSOR TROUBLESHOOTING If the chest pulse sensor does not function properly, see step 5 on pages 9 and 10. The console...

Uk Manual
Page 27
... this or any exercise program, consult your body temperature, heart rate, and circulation in preparation for exercise. The pulse sensors are essential for persons over the age of your exercise until your heart rate is the recommended heart rate for fat burning; The proper intensity level can be "aerobic." The chart below shows recommended heart rates for prolonged periods of heart rate readings. WORKOUT GUIDELINES Each workout should include the...
... this or any exercise program, consult your body temperature, heart rate, and circulation in preparation for exercise. The pulse sensors are essential for persons over the age of your exercise until your heart rate is the recommended heart rate for fat burning; The proper intensity level can be "aerobic." The chart below shows recommended heart rates for prolonged periods of heart rate readings. WORKOUT GUIDELINES Each workout should include the...
Uk Manual
Page 32
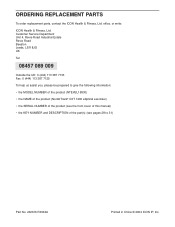
... be prepared to give the following information: • the MODEL NUMBER of the product (NTEVEL15830) • the NAME of the product (NordicTrack® CXT 1200 elliptical exerciser) • the SERIAL NUMBER of the product (see the front cover of this manual) • the KEY NUMBER and DESCRIPTION of the part(s) (see pages 28 to 31) Part No. 202616 R0304A Printed in China © 2004 ICON IP, Inc.
... be prepared to give the following information: • the MODEL NUMBER of the product (NTEVEL15830) • the NAME of the product (NordicTrack® CXT 1200 elliptical exerciser) • the SERIAL NUMBER of the product (see the front cover of this manual) • the KEY NUMBER and DESCRIPTION of the part(s) (see pages 28 to 31) Part No. 202616 R0304A Printed in China © 2004 ICON IP, Inc.


