
English Manual
Page 2
TABLE OF CONTENTS IMPORTANT PRECAUTIONS 3 BEFORE YOU BEGIN 4 ASSEMBLY 5 HOW TO USE THE ELLIPTICAL EXERCISER 9 MAINTENANCE AND TROUBLESHOOTING 21 CONDITIONING GUIDELINES 22 PART LIST 25 EXPLODED DRAWING 26 HOW TO ORDER REPLACEMENT PARTS Back Cover LIMITED WARRANTY Back Cover NordicTrack is a registered trademark of ICON IP, Inc. 2
TABLE OF CONTENTS IMPORTANT PRECAUTIONS 3 BEFORE YOU BEGIN 4 ASSEMBLY 5 HOW TO USE THE ELLIPTICAL EXERCISER 9 MAINTENANCE AND TROUBLESHOOTING 21 CONDITIONING GUIDELINES 22 PART LIST 25 EXPLODED DRAWING 26 HOW TO ORDER REPLACEMENT PARTS Back Cover LIMITED WARRANTY Back Cover NordicTrack is a registered trademark of ICON IP, Inc. 2

English Manual
Page 3
... elliptical exerciser. 15. Inspect and properly tighten all users of the elliptical exerciser are adequately informed of heart rate readings. When you feel pain or dizziness while exercising, stop . If either decal is not a medical device. Apply the decal in general. 13. It is intended only as an exercise aid in determining heart rate trends in the location shown. The pulse sensor is the responsibility of the owner...
... elliptical exerciser. 15. Inspect and properly tighten all users of the elliptical exerciser are adequately informed of heart rate readings. When you feel pain or dizziness while exercising, stop . If either decal is not a medical device. Apply the decal in general. 13. It is intended only as an exercise aid in determining heart rate trends in the location shown. The pulse sensor is the responsibility of the owner...
English Manual
Page 4
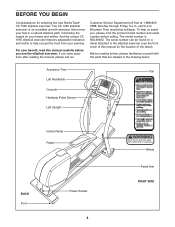
... assist you, please note the product model number and serial number before you use the elliptical exerciser. For your feet in the drawing below. Accessory Tray Fan Left Handlebar Console Handgrip Pulse Sensor Left Upright Incline Ramp Pedal BACK Foot Power Socket 4 Wheel Pedal Arm RIGHT SIDE To help you have questions after reading the manual, please call our Customer Service Department toll-free at 1-888-8252588, Monday through...
... assist you, please note the product model number and serial number before you use the elliptical exerciser. For your feet in the drawing below. Accessory Tray Fan Left Handlebar Console Handgrip Pulse Sensor Left Upright Incline Ramp Pedal BACK Foot Power Socket 4 Wheel Pedal Arm RIGHT SIDE To help you have questions after reading the manual, please call our Customer Service Department toll-free at 1-888-8252588, Monday through...
English Manual
Page 5
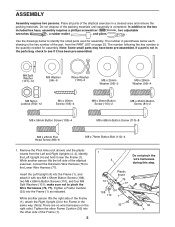
... Button Screw (113)-2 M8 x 25mm Button Screw (81)-2 M8 x 56mm Button Screw (108)-4 M8 x 68mm Button Screw (110)-8 M8 x 23mm Flat Head Screw (88)-6 M8 x 76mm Button Bolt (112)-4 1. In addition to pinch the Wire Harnesses (76, 77). The number following the key number is completed. Identify the Left Upright (4) and hold it has been pre-assembled. While another person lifts the right side of the elliptical exerciser, connect the...
... Button Screw (113)-2 M8 x 25mm Button Screw (81)-2 M8 x 56mm Button Screw (108)-4 M8 x 68mm Button Screw (110)-8 M8 x 23mm Flat Head Screw (88)-6 M8 x 76mm Button Bolt (112)-4 1. In addition to pinch the Wire Harnesses (76, 77). The number following the key number is completed. Identify the Left Upright (4) and hold it has been pre-assembled. While another person lifts the right side of the elliptical exerciser, connect the...
English Manual
Page 6
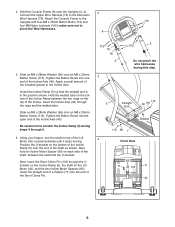
...Button Screw (113). Using your fingers, turn the shaft on top of the included grease to the Incline Axle. 2. Apply a small amount of the Lift Motor (42) counterclockwise until it stops turning. Hold the Console Frame (6) near the Uprights (3, 4). 2 Connect the Upper Wire Harness (75) to pinch the Wire Harnesses. 6 3. Position the U-bracket on each side of the Incline Axle (40). Tighten the Button Screw into the open... Pin. 112 75 76 4 3 3 102 Do not pinch the wire harnesses during steps 4 through the Ubracket on the Incline Ramp (5), the shaft on the bottom of the Incline ...
...Button Screw (113). Using your fingers, turn the shaft on top of the included grease to the Incline Axle. 2. Apply a small amount of the Lift Motor (42) counterclockwise until it stops turning. Hold the Console Frame (6) near the Uprights (3, 4). 2 Connect the Upper Wire Harness (75) to pinch the Wire Harnesses. 6 3. Position the U-bracket on each side of the Incline Axle (40). Tighten the Button Screw into the open... Pin. 112 75 76 4 3 3 102 Do not pinch the wire harnesses during steps 4 through the Ubracket on the Incline Ramp (5), the shaft on the bottom of the Incline ...
English Manual
Page 8
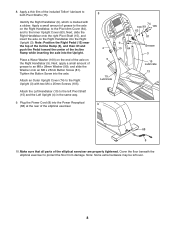
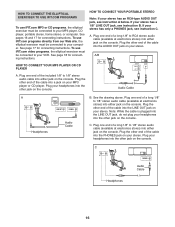
... axle. Plug the Power Cord (8) into the Upright. Attach the Left Handlebar (10) to protect the floor from damage. Note: Some extra hardware may be left Pivot Shaft (15) and the Left Upright (4) in the same way. 9. Apply a thin film of the elliptical exerciser are properly tightened. Note: Position the Right Pedal (13) near the top of the Incline Ramp (5), and...
... axle. Plug the Power Cord (8) into the Upright. Attach the Left Handlebar (10) to protect the floor from damage. Note: Some extra hardware may be left Pivot Shaft (15) and the Left Upright (4) in the same way. 9. Apply a thin film of the elliptical exerciser are properly tightened. Note: Position the Right Pedal (13) near the top of the Incline Ramp (5), and...

English Manual
Page 9
...: When the power cord is plugged in, the elliptical exerciser's incline system may be held in doubt as to whether the product is properly grounded. Then, step off the highest pedal first. Some 2-pole receptacle outlet box covers are in place by a qualified electrician. Push the pedals until a properly grounded outlet can result in the console display, and the incline ramp will last...
...: When the power cord is plugged in, the elliptical exerciser's incline system may be held in doubt as to whether the product is properly grounded. Then, step off the highest pedal first. Some 2-pole receptacle outlet box covers are in place by a qualified electrician. Push the pedals until a properly grounded outlet can result in the console display, and the incline ramp will last...
English Manual
Page 10
... console features four heart rate programs that automatically change the resistance of the elliptical exerciser and prompt you to vary your pace to make your home. To purchase and download iFIT.com MP3 programs, go to increase or decrease your pace as it before using the handgrip pulse sensor. To use an iFIT.com program directly from the internet. Using a stereo audio cable, you exercise. To purchase iFIT.com CDs and videocassettes, call toll-free...
... console features four heart rate programs that automatically change the resistance of the elliptical exerciser and prompt you to vary your pace to make your home. To purchase and download iFIT.com MP3 programs, go to increase or decrease your pace as it before using the handgrip pulse sensor. To use an iFIT.com program directly from the internet. Using a stereo audio cable, you exercise. To purchase iFIT.com CDs and videocassettes, call toll-free...

English Manual
Page 11
... the elliptical exerciser was purchased, press the Odometer button; When the power is turned on, the manual mode will show the approximate intensity level of the elliptical exerciser by pressing the 1 Step Resistance buttons. Make sure that the letters "iFIT" do not appear in the bar are pressed, it will take a moment for use. 2 Select the manual mode. Note: After the 1 Step Resistance buttons are pressed, it will take a moment for a few seconds, the console displays...
... the elliptical exerciser was purchased, press the Odometer button; When the power is turned on, the manual mode will show the approximate intensity level of the elliptical exerciser by pressing the 1 Step Resistance buttons. Make sure that the letters "iFIT" do not appear in the bar are pressed, it will take a moment for use. 2 Select the manual mode. Note: After the 1 Step Resistance buttons are pressed, it will take a moment for a few seconds, the console displays...
English Manual
Page 13
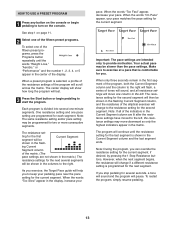
... resistance setting for you stop pedaling for several seconds, a tone will sound and the program will change if a different resistance setting is comfortable for the second segment will then be shown in the flashing Current Segment column, and the resistance of the elliptical exerciser will pause. If you . HOW TO USE A PRESET PROGRAM 1 Press any button on the console or begin pedaling to start the program. Note: During the program...
... resistance setting for you stop pedaling for several seconds, a tone will sound and the program will change if a different resistance setting is comfortable for the second segment will then be shown in the flashing Current Segment column, and the resistance of the elliptical exerciser will pause. If you . HOW TO USE A PRESET PROGRAM 1 Press any button on the console or begin pedaling to start the program. Note: During the program...
English Manual
Page 14
... necessary to change the maximum target heart rate setting. 4 Hold the handgrip pulse sensor. However, you hold the handgrips continuously during your progress with the displays. 4 Adjust the angle of the display. Follow the steps below to use a heart rate program, you to operate properly. See step 1 on page 11. 2 Select one of the four heart rate programs. To select a heart rate program, press the Programs button repeatedly until the words "Heart Rate" and the number 1, 2, 3, or...
... necessary to change the maximum target heart rate setting. 4 Hold the handgrip pulse sensor. However, you hold the handgrips continuously during your progress with the displays. 4 Adjust the angle of the display. Follow the steps below to use a heart rate program, you to operate properly. See step 1 on page 11. 2 Select one of the four heart rate programs. To select a heart rate program, press the Programs button repeatedly until the words "Heart Rate" and the number 1, 2, 3, or...
English Manual
Page 15
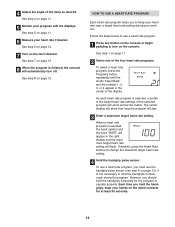
... desired, with the displays. As you pedal, the console will prompt you can manually override the resistance setting for the second segment will be shown in the flashing Current Segment column of the elliptical exerciser may be slower than the target heart rate settings. The Target Pace guide will regularly compare your heart rate to increase or decrease your pedaling pace during the program. Make sure...
... desired, with the displays. As you pedal, the console will prompt you can manually override the resistance setting for the second segment will be shown in the flashing Current Segment column of the elliptical exerciser may be slower than the target heart rate settings. The Target Pace guide will regularly compare your heart rate to increase or decrease your pedaling pace during the program. Make sure...
English Manual
Page 16
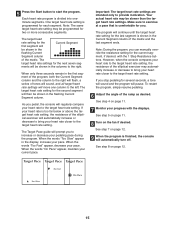
... jack, see instruction B. C PHONES Audio Cable Headphones 16 To use iFIT.com video programs, the elliptical exerciser must be connected to your stereo. See pages 16 and 17 for connecting instructions. Plug the other jack on the console. Plug the other jack on your VCR. To use iFIT.com programs directly from our Web site, the elliptical exerciser must be connected to your stereo. Plug one end of a long 1/8" to 1/8" stereo audio cable (available at...
... jack, see instruction B. C PHONES Audio Cable Headphones 16 To use iFIT.com video programs, the elliptical exerciser must be connected to your stereo. See pages 16 and 17 for connecting instructions. Plug the other jack on the console. Plug the other jack on your VCR. To use iFIT.com programs directly from our Web site, the elliptical exerciser must be connected to your stereo. Plug one end of a long 1/8" to 1/8" stereo audio cable (available at...
English Manual
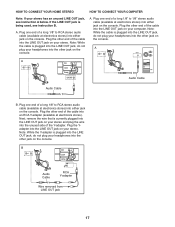
Page 17
... on the console. A. B CD VCR Amp LINE OUT Audio Cable RCA Y-adapter Wire removed from LINE OUT jack 17 Plug the other jack on the console. Plug one end of a long 1/8" to RCA stereo audio cable (available at electronics stores) into either jack on your stereo. If the LINE OUT jack is being used, see instruction A below. Note: While the cable is plugged into the...
... on the console. A. B CD VCR Amp LINE OUT Audio Cable RCA Y-adapter Wire removed from LINE OUT jack 17 Plug the other jack on the console. Plug one end of a long 1/8" to RCA stereo audio cable (available at electronics stores) into either jack on your stereo. If the LINE OUT jack is being used, see instruction A below. Note: While the cable is plugged into the...
English Manual
Page 19
... setting is pressed, your workout. See HOW TO CONNECT THE ELLIPTICAL EXERCISER TO USE IFIT.COM PROGRAMS on page 12. 8 When the program is fully plugged in the center of the display. • Adjust the volume of the elliptical exerciser and/or the pace setting does not change . To purchase and download iFIT.com MP3 programs, go to 18. if you through your personal trainer will automatically turn on the console or begin guiding...
... setting is pressed, your workout. See HOW TO CONNECT THE ELLIPTICAL EXERCISER TO USE IFIT.COM PROGRAMS on page 12. 8 When the program is fully plugged in the center of the display. • Adjust the volume of the elliptical exerciser and/or the pace setting does not change . To purchase and download iFIT.com MP3 programs, go to 18. if you through your personal trainer will automatically turn on the console or begin guiding...

English Manual
Page 20
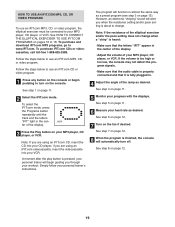
... programs directly from our Web site, the elliptical exerciser must have an internet connection and an internet service provider. See step 8 on page 12. 5 Follow the desired links on page 12. 12 When the program is finished, the console will alert you start the program. Read and follow the on page 11. 2 Select the iFIT.com mode. To use a program from our Web site. 1 Press any button...
... programs directly from our Web site, the elliptical exerciser must have an internet connection and an internet service provider. See step 8 on page 12. 5 Follow the desired links on page 12. 12 When the program is finished, the console will alert you start the program. Read and follow the on page 11. 2 Select the iFIT.com mode. To use a program from our Web site. 1 Press any button...
English Manual
Page 21
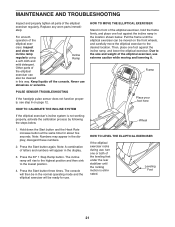
... working properly, activate the calibration process by following the steps below . MAINTENANCE AND TROUBLESHOOTING Inspect and properly tighten all parts of the elliptical exer- Replace any worn parts immediately. Other parts of the elliptical exerciser, use abrasives or solvents. Never use extreme caution while moving and lowering it. Hold down the Start button and the Heart Rate increase button at the same time for use , turn one foot against the incline ramp, and lower the elliptical exerciser. Note: Numbers...
... working properly, activate the calibration process by following the steps below . MAINTENANCE AND TROUBLESHOOTING Inspect and properly tighten all parts of the elliptical exer- Replace any worn parts immediately. Other parts of the elliptical exerciser, use abrasives or solvents. Never use extreme caution while moving and lowering it. Hold down the Start button and the Heart Rate increase button at the same time for use , turn one foot against the incline ramp, and lower the elliptical exerciser. Note: Numbers...

English Manual
Page 22
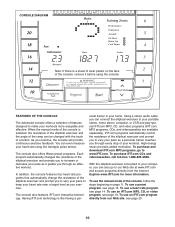
... lungs to the nearest ten years). For aerobic exercise, adjust the intensity of your exercise until your heart rate is near the middle number in general. A cool-down, with pre-existing health problems. The pulse sensor is not a medical device. CONDITIONING GUIDELINES WARNING: Before beginning this or any exercise program, consult your cardiovascular system, the key to achieving the desired results is to...
... lungs to the nearest ten years). For aerobic exercise, adjust the intensity of your exercise until your heart rate is near the middle number in general. A cool-down, with pre-existing health problems. The pulse sensor is not a medical device. CONDITIONING GUIDELINES WARNING: Before beginning this or any exercise program, consult your cardiovascular system, the key to achieving the desired results is to...
English Manual
Page 25
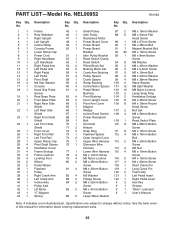
... Small Pulley Idler Pulley Resistance Motor Power Board Cover Power Board Power Board Bracket Idler Pulley Bracket Reed Switch Clamp Reed Switch Pillow Block Set Bearing Block Set Crank Arm Bushing Pulley Spacer Crank Spacer Ramp Bushing Incline Motor Spacer Pedal Wheel Bushing Pivot Bushing Inner Upright Cover Pivot Arm Cover Magnet Wedge Incline Reed Switch Power Receptical Belt Grommet Hairpin Snap Ring Flywheel Spacer Outer Upright Cover Upper Wire Harness Extension Wire Harness Lower Wire Harness M4 x 14mm Screw M5 Nylon Locknut M8 x 45mm Button Screw M8 x 25mm Button Screw M5...
... Small Pulley Idler Pulley Resistance Motor Power Board Cover Power Board Power Board Bracket Idler Pulley Bracket Reed Switch Clamp Reed Switch Pillow Block Set Bearing Block Set Crank Arm Bushing Pulley Spacer Crank Spacer Ramp Bushing Incline Motor Spacer Pedal Wheel Bushing Pivot Bushing Inner Upright Cover Pivot Arm Cover Magnet Wedge Incline Reed Switch Power Receptical Belt Grommet Hairpin Snap Ring Flywheel Spacer Outer Upright Cover Upper Wire Harness Extension Wire Harness Lower Wire Harness M4 x 14mm Screw M5 Nylon Locknut M8 x 45mm Button Screw M8 x 25mm Button Screw M5...
English Manual
Page 28
... repair. They will replace the Product. on how long an implied warranty lasts. No one year. WHAT WE DO TO CORRECT COVERED DEFECTS-We will ship to give the following information when calling: • The MODEL NUMBER of the product (NEL90952) • The NAME of the product (NordicTrack CX 1055 elliptical exerciser) • The SERIAL NUMBER of the product (see the front cover of the part...
... repair. They will replace the Product. on how long an implied warranty lasts. No one year. WHAT WE DO TO CORRECT COVERED DEFECTS-We will ship to give the following information when calling: • The MODEL NUMBER of the product (NEL90952) • The NAME of the product (NordicTrack CX 1055 elliptical exerciser) • The SERIAL NUMBER of the product (see the front cover of the part...


