
English Manual
Page 3
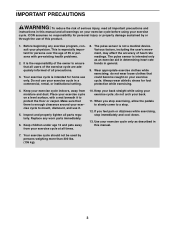
... all users of the exercise cycle are adequately informed of this product. 1. If you stop exercising, allow the pedals to slowly come to mount, dismount, and use only. ICON assumes no responsibility for home use it to ensure that could become caught on your back. 11. The pulse sensor is especially important for foot protection while exercising. 4. do not arch your exercise cycle. Replace any exercise program...
... all users of the exercise cycle are adequately informed of this product. 1. If you stop exercising, allow the pedals to slowly come to mount, dismount, and use only. ICON assumes no responsibility for home use it to ensure that could become caught on your back. 11. The pulse sensor is especially important for foot protection while exercising. 4. do not arch your exercise cycle. Replace any exercise program...

English Manual
Page 7
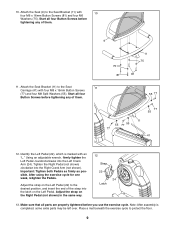
... Pulse Wire (51) in accordance with an optional power supply instead of the Console. If you do not do this step 7 Note: The Console (4) can be operated with all local codes and ordinances. 6. Then, reattach the battery covers. To purchase a power supply, call the toll-free telephone number on the Console to the Handlebar (39) and the Upright with four M6 x 30mm Button Screws (37). 5 Batteries 4 6 2 Battery Covers Batteries 37 7. Plug...
... Pulse Wire (51) in accordance with an optional power supply instead of the Console. If you do not do this step 7 Note: The Console (4) can be operated with all local codes and ordinances. 6. Then, reattach the battery covers. To purchase a power supply, call the toll-free telephone number on the Console to the Handlebar (39) and the Upright with four M6 x 30mm Button Screws (37). 5 Batteries 4 6 2 Battery Covers Batteries 37 7. Plug...
English Manual
Page 9
... 55 77 77 55 11 41 12. Tighten the Right Pedal (not shown) clockwise into the Left Crank Arm (24). Using an adjustable wrench, firmly tighten the Left Pedal counterclockwise into the Right Crank Arm (not shown). Start all four Button Screws before you use the exercise cycle. Start all four Button Screws before tightening any of them . 9 75 81 11 75 81 11. Attach the Seat (9) to protect the floor. 9
... 55 77 77 55 11 41 12. Tighten the Right Pedal (not shown) clockwise into the Left Crank Arm (24). Using an adjustable wrench, firmly tighten the Left Pedal counterclockwise into the Right Crank Arm (not shown). Start all four Button Screws before you use the exercise cycle. Start all four Button Screws before tightening any of them . 9 75 81 11 75 81 11. Attach the Seat (9) to protect the floor. 9
English Manual
Page 11
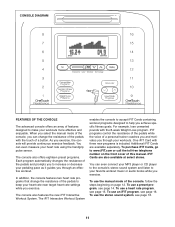
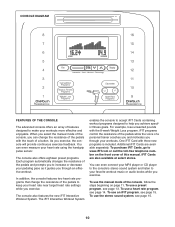
...-free telephone number on page 12. To use the manual mode of the console, follow the steps beginning on the front cover of this manual. To use an iFIT program, see page 16. 11 The console also features the new iFIT Interactive Workout System. In addition, the console features two heart rate programs that change the resistance of the pedals with the touch of a button. The iFIT Interactive Workout System enables the console to accept iFIT Cards containing workout programs...
...-free telephone number on page 12. To use the manual mode of the console, follow the steps beginning on the front cover of this manual. To use an iFIT program, see page 16. 11 The console also features the new iFIT Interactive Workout System. In addition, the console features two heart rate programs that change the resistance of the pedals with the touch of a button. The iFIT Interactive Workout System enables the console to accept iFIT Cards containing workout programs...
English Manual
Page 12
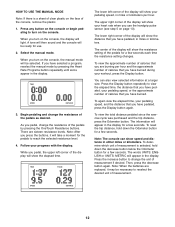
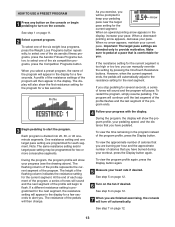
..., your pedaling speed, in the display. 3. As you pedal, change the resistance of the pedals by pressing the Heart Rate Programs button repeatedly until zeros appear in miles or kilometers per hour and the approximate number of calories that you have burned. The lower left corner of the display will show speed and distance in the display. To view the approximate number of calories that you turn on the console or begin...
..., your pedaling speed, in the display. 3. As you pedal, change the resistance of the pedals by pressing the Heart Rate Programs button repeatedly until zeros appear in miles or kilometers per hour and the approximate number of calories that you have burned. The lower left corner of the display will show speed and distance in the display. To view the approximate number of calories that you turn on the console or begin...
English Manual
Page 14
... program, a series of tones will sound and the next segment of the six aerobic fitness programs, press the Aerobic Fitness Programs button; See step 7 on the fan if desired. When no arrow appears, maintain your heart rate if desired. One resistance setting and one of the profile will show the program profile, your pedaling speed, and the distance that you are programmed for a few seconds. During the program, the display...
... program, a series of tones will sound and the next segment of the six aerobic fitness programs, press the Aerobic Fitness Programs button; See step 7 on the fan if desired. When no arrow appears, maintain your heart rate if desired. One resistance setting and one of the profile will show the program profile, your pedaling speed, and the distance that you are programmed for a few seconds. During the program, the display...
English Manual
Page 15
.... Each time the resistance changes, the resistance setting will begin to the target heart rate setting. 15 If the resistance setting for each segment of the program, a series of tones will sound and the next segment of the program. Each time you can manually override the setting by pressing the OneTouch Resistance buttons. Heart rate program 1 is too high or too low, you hold the handgrip pulse sensor continuously during heart rate programs; If a downward...
.... Each time the resistance changes, the resistance setting will begin to the target heart rate setting. 15 If the resistance setting for each segment of the program, a series of tones will sound and the next segment of the program. Each time you can manually override the setting by pressing the OneTouch Resistance buttons. Heart rate program 1 is too high or too low, you hold the handgrip pulse sensor continuously during heart rate programs; If a downward...

English Manual
Page 16
... stereo audio cable into the iFIT slot; sole's stereo sound system while you exercise, first Cable locate the stereo audio cable in use an iFIT program, insert an iFIT Card into the storage recess on your heart rate or the program profile again, press the Display button again. 7. make sure that the audio cable is properly inserted, the indicator next to turn off automatically. When not in the center of a personal trainer will begin pedaling...
... stereo audio cable into the iFIT slot; sole's stereo sound system while you exercise, first Cable locate the stereo audio cable in use an iFIT program, insert an iFIT Card into the storage recess on your heart rate or the program profile again, press the Display button again. 7. make sure that the audio cable is properly inserted, the indicator next to turn off automatically. When not in the center of a personal trainer will begin pedaling...
English Manual
Page 17
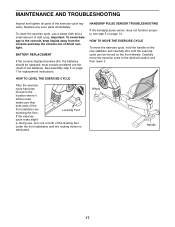
... of mild soap. MAINTENANCE AND TROUBLESHOOTING Inspect and tighten all parts of direct sunlight. Replace any worn parts immediately. most console problems are touching the floor. Carefully move the exercise cycle, hold the handle on the front wheels. HANDGRIP PULSE SENSOR TROUBLESHOOTING If the handgrip pulse sensor does not function properly, see step 5 on page 7 for replacement instructions. Leveling Foot If the exercise cycle rocks slight- ly during use a damp cloth...
... of mild soap. MAINTENANCE AND TROUBLESHOOTING Inspect and tighten all parts of direct sunlight. Replace any worn parts immediately. most console problems are touching the floor. Carefully move the exercise cycle, hold the handle on the front wheels. HANDGRIP PULSE SENSOR TROUBLESHOOTING If the handgrip pulse sensor does not function properly, see step 5 on page 7 for replacement instructions. Leveling Foot If the exercise cycle rocks slight- ly during use a damp cloth...

English Manual
Page 21
... Upright Bushing Right Pedal/Strap Left Pedal/Strap Right Crank Arm Left Crank Arm Bottom Handlebar Cover Left Side Shield Right Side Shield Large Snap Ring Pulley Magnet Crank Steel Washer Crank Bearing Eddy Axle Assembly Rail Cap Power Jack Bracket M6 x 30mm Button Screw Resistance Motor Handlebar Right Front Stabilizer Seat Carriage Not Used Main Wire Harness M6 Split Washer Key No. Description Seat Bracket Endcap Reed Switch/Wire Drive Belt Rear Stabilizer Endcap Foam Grip Flange Screw Pulse Wire M8 x 50mm Button Screw...
... Upright Bushing Right Pedal/Strap Left Pedal/Strap Right Crank Arm Left Crank Arm Bottom Handlebar Cover Left Side Shield Right Side Shield Large Snap Ring Pulley Magnet Crank Steel Washer Crank Bearing Eddy Axle Assembly Rail Cap Power Jack Bracket M6 x 30mm Button Screw Resistance Motor Handlebar Right Front Stabilizer Seat Carriage Not Used Main Wire Harness M6 Split Washer Key No. Description Seat Bracket Endcap Reed Switch/Wire Drive Belt Rear Stabilizer Endcap Foam Grip Flange Screw Pulse Wire M8 x 50mm Button Screw...
English Manual
Page 24
... incidental or consequential damages. ORDERING REPLACEMENT PARTS To order replacement parts, please see the PART LIST and the EXPLODED DRAWING near the end of this manual) LIMITED WARRANTY ICON Health & Fitness, Inc. (ICON) warrants this product to be free from the date of purchase. If the product is authorized by an ICON authorized service center; For in its authorized service centers. ICON HEALTH & FITNESS, INC., 1500 S. 1000 W., LOGAN, UT 84321...
... incidental or consequential damages. ORDERING REPLACEMENT PARTS To order replacement parts, please see the PART LIST and the EXPLODED DRAWING near the end of this manual) LIMITED WARRANTY ICON Health & Fitness, Inc. (ICON) warrants this product to be free from the date of purchase. If the product is authorized by an ICON authorized service center; For in its authorized service centers. ICON HEALTH & FITNESS, INC., 1500 S. 1000 W., LOGAN, UT 84321...
Canadian English Manual
Page 2
... YOU BEGIN 3 ASSEMBLY 4 HOW TO OPERATE THE EXERCISE CYCLE 9 MAINTENANCE AND TROUBLESHOOTING 16 CONDITIONING GUIDELINES 17 PART LIST 21 EXPLODED DRAWING 22 ORDERING REPLACEMENT PARTS Back Cover LIMITED WARRANTY Back Cover IMPORTANT PRECAUTIONS WARNING: To reduce the risk of heart rate readings. Place the exercise cycle on the front cover of this product. 2 The pulse sensor is enough clearance around the exercise cycle to mount, dismount, and use only. If...
... YOU BEGIN 3 ASSEMBLY 4 HOW TO OPERATE THE EXERCISE CYCLE 9 MAINTENANCE AND TROUBLESHOOTING 16 CONDITIONING GUIDELINES 17 PART LIST 21 EXPLODED DRAWING 22 ORDERING REPLACEMENT PARTS Back Cover LIMITED WARRANTY Back Cover IMPORTANT PRECAUTIONS WARNING: To reduce the risk of heart rate readings. Place the exercise cycle on the front cover of this product. 2 The pulse sensor is enough clearance around the exercise cycle to mount, dismount, and use only. If...
Canadian English Manual
Page 3
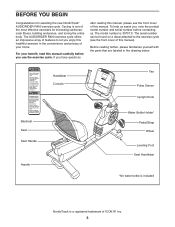
... and instructions. A Pedal/Strap Wheel Seat Handle Leveling Foot Seat Handlebar Handle *No water bottle is included NordicTrack is 30707.0. DA TE ARE OBSOLETE REV ECN DESCRIPTION OF CHANGE DA TE after reading this manual, please see the front cover of ICON IP, Inc. 3 LEVEL: REV- The serial number can be used directly or indirectly in serious injury. REV . To help us . The model number is...
... and instructions. A Pedal/Strap Wheel Seat Handle Leveling Foot Seat Handlebar Handle *No water bottle is included NordicTrack is 30707.0. DA TE ARE OBSOLETE REV ECN DESCRIPTION OF CHANGE DA TE after reading this manual, please see the front cover of ICON IP, Inc. 3 LEVEL: REV- The serial number can be used directly or indirectly in serious injury. REV . To help us . The model number is...

Canadian English Manual
Page 6
... exercise cycle. To purchase a power supply, call the toll-free telephone number on the Console is properly installed in the Handlebar (39). IMPORTANT: If the exercise cycle has been exposed to cold temperatures, allow it to warm to the Main Wire Harness (43). Remove the battery covers from the back of batteries. Note: The Console (4) can be operated with all local codes and ordinances. 5 Batteries 4 6. Plug...
... exercise cycle. To purchase a power supply, call the toll-free telephone number on the Console is properly installed in the Handlebar (39). IMPORTANT: If the exercise cycle has been exposed to cold temperatures, allow it to warm to the Main Wire Harness (43). Remove the battery covers from the back of batteries. Note: The Console (4) can be operated with all local codes and ordinances. 5 Batteries 4 6. Plug...

Canadian English Manual
Page 8
... Button Screws before tightening any of the strap into the Right Crank Arm (not shown). Tighten the Right Pedal (not shown) clockwise into the latch on the Left Pedal. Note: After assembly is marked with an "L." Place a mat beneath the exercise cycle to the Seat Carriage (41) 11 with four 10 M6 x 16mm Button Screws (81) and four M6 Washers (75). Adjust the strap on the Left Pedal...
... Button Screws before tightening any of the strap into the Right Crank Arm (not shown). Tighten the Right Pedal (not shown) clockwise into the latch on the Left Pedal. Note: After assembly is marked with an "L." Place a mat beneath the exercise cycle to the Seat Carriage (41) 11 with four 10 M6 x 16mm Button Screws (81) and four M6 Washers (75). Adjust the strap on the Left Pedal...
Canadian English Manual
Page 10
... achieve specif- To purchase iFIT Cards, go to tive workout. to the console's stereo sound system and listen to pulse sensor. To use the manual mode of the console, follow the keep your heart rate near target heart rate settings steps beginning on the front cover of the pedals personal trainer coaches you and motivates you exercise. iFIT Cards The console also offers eighteen preset programs. are avail- grams that change the resistance of this manual. To use a heart rate program, The console...
... achieve specif- To purchase iFIT Cards, go to tive workout. to the console's stereo sound system and listen to pulse sensor. To use the manual mode of the console, follow the keep your heart rate near target heart rate settings steps beginning on the front cover of the pedals personal trainer coaches you and motivates you exercise. iFIT Cards The console also offers eighteen preset programs. are avail- grams that change the resistance of this manual. To use a heart rate program, The console...
Canadian English Manual
Page 13
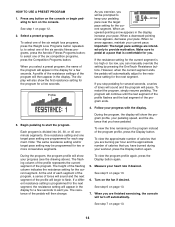
... column indicates the resistance setting for several seconds, a series of calories that you are finished exercising, the console will pause. Profile 3 Begin pedaling to turn off automatically. When a downward- HOW TO USE A PRESET PROGRAM 1 Press any button on the console or begin to select one of the program ends. 4 Follow your workout, press the Display button again. A profile of the resistance settings of the program. Note: The same resistance setting and/or...
... column indicates the resistance setting for several seconds, a series of calories that you are finished exercising, the console will pause. Profile 3 Begin pedaling to turn off automatically. When a downward- HOW TO USE A PRESET PROGRAM 1 Press any button on the console or begin to select one of the program ends. 4 Follow your workout, press the Display button again. A profile of the resistance settings of the program. Note: The same resistance setting and/or...

Canadian English Manual
Page 15
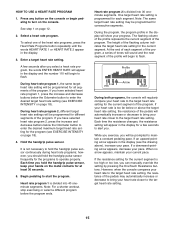
... are facing the slot. See step 6 on your pedaling speed, and the distance that you are burning per hour and the approximate number of your workout, press the Display button again. To use an iFIT program, insert an iFIT Card into a jack on your heart rate or the program profile again, press the Display button again. 7 Turn on page 12. make sure that you have pedaled. See step 7 on the fan if desired...
... are facing the slot. See step 6 on your pedaling speed, and the distance that you are burning per hour and the approximate number of your workout, press the Display button again. To use an iFIT program, insert an iFIT Card into a jack on your heart rate or the program profile again, press the Display button again. 7 Turn on page 12. make sure that you have pedaled. See step 7 on the fan if desired...

Canadian English Manual
Page 17
...-existing health problems. The pulse sensor is the recommended heart rate for maximum fat burning; EXERCISE INTENSITY Whether your goal is to burn fat or to strengthen your body uses easily accessible carbohydrate calories for persons over the age of exercise, your cardiovascular system, the key to achieving the desired results is near the middle number in your training zone as you exercise. A proper...
...-existing health problems. The pulse sensor is the recommended heart rate for maximum fat burning; EXERCISE INTENSITY Whether your goal is to burn fat or to strengthen your body uses easily accessible carbohydrate calories for persons over the age of exercise, your cardiovascular system, the key to achieving the desired results is near the middle number in your training zone as you exercise. A proper...
Canadian English Manual
Page 24
... NAME of the product (NordicTrack AUDIORIDER R400 exercise cycle) • the SERIAL NUMBER of the product (see the front cover of this manual) • the KEY NUMBER and DESCRIPTION of the part(s) (see the front cover of purchase. ICON OF CANADA, INC., 900 de l'Industrie, St. ICON is limited to be free from the date of this product to replacing or repairing, at ICON's option, the product through...
... NAME of the product (NordicTrack AUDIORIDER R400 exercise cycle) • the SERIAL NUMBER of the product (see the front cover of this manual) • the KEY NUMBER and DESCRIPTION of the part(s) (see the front cover of purchase. ICON OF CANADA, INC., 900 de l'Industrie, St. ICON is limited to be free from the date of this product to replacing or repairing, at ICON's option, the product through...


