User Manual
Page 9
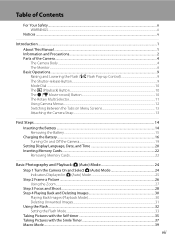
... ...1 Information and Precautions...2 Parts of the Camera...4 The Camera Body ...4 The Monitor...6 Basic Operations...9 Raising and Lowering the Flash (K Flash Pop-up Control 9 The Shutter-release Button...9 Mode Dial ...10 The c (Playback) Button...10 The b (e Movie-record) Button...10 The Rotary Multi Selector...11 Using Camera Menus...12 Switching Between the...
... ...1 Information and Precautions...2 Parts of the Camera...4 The Camera Body ...4 The Monitor...6 Basic Operations...9 Raising and Lowering the Flash (K Flash Pop-up Control 9 The Shutter-release Button...9 Mode Dial ...10 The c (Playback) Button...10 The b (e Movie-record) Button...10 The Rotary Multi Selector...11 Using Camera Menus...12 Switching Between the...

User Manual
Page 16
Introduction Parts of the Camera The Camera Body 1 2 3456 7 8 9 11 Flash raised 10 Lens cover closed Zoom control 27 f : wide 27 1 g : tele 27 h : thumbnail playback...........94, 96 i : playback zoom 97 j : help 61 2 Mode dial 45 3 Shutter-release button 9, 28 4 Self-timer lamp 35 AF-assist illuminator 181 5 Power switch/power-on lamp 19, 184 6 Speaker 126, 152 7 Microphone (stereo 125, 140 8 Flash 32 9 K (flash pop-up) control 32 10 Lens 196, 212 11 Lens cover 4
Introduction Parts of the Camera The Camera Body 1 2 3456 7 8 9 11 Flash raised 10 Lens cover closed Zoom control 27 f : wide 27 1 g : tele 27 h : thumbnail playback...........94, 96 i : playback zoom 97 j : help 61 2 Mode dial 45 3 Shutter-release button 9, 28 4 Self-timer lamp 35 AF-assist illuminator 181 5 Power switch/power-on lamp 19, 184 6 Speaker 126, 152 7 Microphone (stereo 125, 140 8 Flash 32 9 K (flash pop-up) control 32 10 Lens 196, 212 11 Lens cover 4
User Manual
Page 19
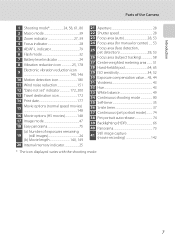
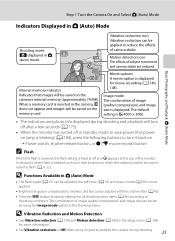
... balance 49 34 Continuous shooting mode 80 35 Self-timer 35 36 Smile timer 37 37 Continuous (pet portrait mode)......... 74 38 Pet portrait auto release 74 39 Backlighting (HDR 66 40 Panorama 73 41 Still image capture (movie recording 142 * The icon displayed varies with the shooting mode. 7
... balance 49 34 Continuous shooting mode 80 35 Self-timer 35 36 Smile timer 37 37 Continuous (pet portrait mode)......... 74 38 Pet portrait auto release 74 39 Backlighting (HDR 66 40 Panorama 73 41 Still image capture (movie recording 142 * The icon displayed varies with the shooting mode. 7

User Manual
Page 21
... Flash (K Flash Pop-up Control) Slide the K (flash pop-up) control (1) to take a picture 9 Introduction The Shutter-release Button The camera features a two-stage shutter-release button. Press halfway to set focus and exposure Press the rest of the way down to make the flash pop up (2). •...; If the flash will not be used, gently lower the flash until it clicks into place. While the shutter-release button is pressed halfway. To set . When the shutter-release button is pressed halfway, focus and exposure (shutter speed and aperture value) are set focus and exposure, press the...
... Flash (K Flash Pop-up Control) Slide the K (flash pop-up) control (1) to take a picture 9 Introduction The Shutter-release Button The camera features a two-stage shutter-release button. Press halfway to set focus and exposure Press the rest of the way down to make the flash pop up (2). •...; If the flash will not be used, gently lower the flash until it clicks into place. While the shutter-release button is pressed halfway. To set . When the shutter-release button is pressed halfway, focus and exposure (shutter speed and aperture value) are set focus and exposure, press the...
User Manual
Page 31
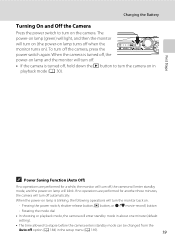
... standby mode, and the power-on the camera. When the power-on lamp is turned off , the camera will blink. Pressing the power switch, shutter-release button, c button, or b (e movie-record) button -
... standby mode, and the power-on the camera. When the power-on lamp is turned off , the camera will blink. Pressing the power switch, shutter-release button, c button, or b (e movie-record) button -
User Manual
Page 37
... in standby mode to save power (the poweron lamp is blinking) (A 184), press the following buttons to turn it back on. ➝ Power switch, shutter-release button, or b (e movie-record) button C Flash When the flash is lowered, the flash setting is fixed at off and W appears at the top of image...
... in standby mode to save power (the poweron lamp is blinking) (A 184), press the following buttons to turn it back on. ➝ Power switch, shutter-release button, or b (e movie-record) button C Flash When the flash is lowered, the flash setting is fixed at off and W appears at the top of image...

User Manual
Page 40
... the camera is in focus (up to the camera. Basic Photography and Playback: A (Auto) Mode Step 3 Focus and Shoot 1 Press the shutter-release button halfway. Shutter speed Aperture 1 / 2 5 0 F 3.5 Shutter speed Aperture The camera focuses at the center of the way down. Modify the... been acquired, the focus indicator (A 6) glows green. When a face is pressed halfway. This indicates that are in effect. While the shutter-release button is pressed halfway (A 9), the camera sets focus and exposure (shutter speed and aperture value). The shutter is not detected: • The...
... the camera is in focus (up to the camera. Basic Photography and Playback: A (Auto) Mode Step 3 Focus and Shoot 1 Press the shutter-release button halfway. Shutter speed Aperture 1 / 2 5 0 F 3.5 Shutter speed Aperture The camera focuses at the center of the way down. Modify the... been acquired, the focus indicator (A 6) glows green. When a face is pressed halfway. This indicates that are in effect. While the shutter-release button is pressed halfway (A 9), the camera sets focus and exposure (shutter speed and aperture value). The shutter is not detected: • The...

User Manual
Page 41
...Flash If the subject is dimly lit, the AF-assist illuminator (A 181) may light when the shutter-release button is pressed halfway, or the flash (A 32) may fire when the shutter-release button is very dark • Objects of sharply differing brightness are being saved, the number of data... No contrast between the subject and surroundings (e.g. B When the Subject Is Close to the Camera If the camera cannot focus, try pressing the shutter-release button halfway to the camera or card. Do not open the battery-chamber/memory card slot cover while images are included in the scene (e.g. B ...
...Flash If the subject is dimly lit, the AF-assist illuminator (A 181) may light when the shutter-release button is pressed halfway, or the flash (A 32) may fire when the shutter-release button is very dark • Objects of sharply differing brightness are being saved, the number of data... No contrast between the subject and surroundings (e.g. B When the Subject Is Close to the Camera If the camera cannot focus, try pressing the shutter-release button halfway to the camera or card. Do not open the battery-chamber/memory card slot cover while images are included in the scene (e.g. B ...
User Manual
Page 42
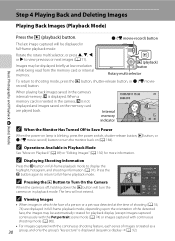
...Mode See "More on (A 184). Rotate the rotary multi selector, or press H, I, J, or K to shooting mode, press the c button, shutter-release button, or b (e movierecord) button. Images may be displayed briefly at the time of a person or a pet was detected at low resolution while being... memory. Internal memory indicator 4/ 4 C When the Monitor Has Turned Off to Save Power When the power-on lamp is blinking, press the power switch, shutter-release button, c button, or b (e movie-record) button to Turn On the Camera 1 / 2 5 0 F 3.5 When the camera is displayed (sequence display &#...
...Mode See "More on (A 184). Rotate the rotary multi selector, or press H, I, J, or K to shooting mode, press the c button, shutter-release button, or b (e movierecord) button. Images may be displayed briefly at the time of a person or a pet was detected at low resolution while being... memory. Internal memory indicator 4/ 4 C When the Monitor Has Turned Off to Save Power When the power-on lamp is blinking, press the power switch, shutter-release button, c button, or b (e movie-record) button to Turn On the Camera 1 / 2 5 0 F 3.5 When the camera is displayed (sequence display &#...
User Manual
Page 44
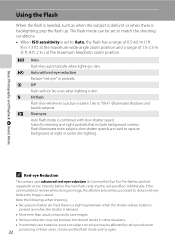
... of 1.5-2.5 m (5 ft.-8 ft. 2 in " (illuminate) shadows and backlit subjects. Pre-flashes are fired, there is a slight lag between when the shutter-release button is pressed and when the shutter is released. • More time than usual is saved. U Auto Flash fires automatically when lighting is set to reduce red-eye before the...
... of 1.5-2.5 m (5 ft.-8 ft. 2 in " (illuminate) shadows and backlit subjects. Pre-flashes are fired, there is a slight lag between when the shutter-release button is pressed and when the shutter is released. • More time than usual is saved. U Auto Flash fires automatically when lighting is set to reduce red-eye before the...

User Manual
Page 47
... displayed. When using a tripod to prevent camera shake. When a is selected, the camera uses face detection to detect a human face, and then automatically releases the shutter when a smile is not applied by pressing the k button within a few seconds, the selection will be canceled. 3 Frame the picture and... press the shutter-release button halfway. 10 Focus and exposure will be set to Off in the setup menu (A 169) when using the self-timer, use of camera...
... displayed. When using a tripod to prevent camera shake. When a is selected, the camera uses face detection to detect a human face, and then automatically releases the shutter when a smile is not applied by pressing the k button within a few seconds, the selection will be canceled. 3 Frame the picture and... press the shutter-release button halfway. 10 Focus and exposure will be set to Off in the setup menu (A 169) when using the self-timer, use of camera...

User Manual
Page 48
Taking Pictures with the Self-timer 4 Press the shutter-release button the rest of the way down . About one second before the shutter is displayed in the monitor. When the shutter is taken, press the shutter-release button again. To stop the timer before the shutter is released is released, the lamp stops blinking and glows steadily. The self-timer lamp blinks while the timer is counting down . 9 The self-timer starts, and the number of seconds remaining before a picture is released, the self-timer will be set to OFF. Basic Photography and Playback: A (Auto) Mode 36
Taking Pictures with the Self-timer 4 Press the shutter-release button the rest of the way down . About one second before the shutter is displayed in the monitor. When the shutter is taken, press the shutter-release button again. To stop the timer before the shutter is released is released, the lamp stops blinking and glows steadily. The self-timer lamp blinks while the timer is counting down . 9 The self-timer starts, and the number of seconds remaining before a picture is released, the self-timer will be set to OFF. Basic Photography and Playback: A (Auto) Mode 36

User Manual
Page 49
...timer). This feature can be used when shooting mode (A 45) is set the smile timer to detect human faces, and then automatically releases the shutter when a smile is displayed. When focus is acquired on that the face framed by smile detection, either turn green for ...the rotary multi selector to three faces can be detected. When the camera detects a human face, a double border (focus area) is automatically released. Basic Photography and Playback: A (Auto) Mode Taking Pictures with the Smile Timer The camera uses face detection to OFF. 37 If the camera...
...timer). This feature can be used when shooting mode (A 45) is set the smile timer to detect human faces, and then automatically releases the shutter when a smile is displayed. When focus is acquired on that the face framed by smile detection, either turn green for ...the rotary multi selector to three faces can be detected. When the camera detects a human face, a double border (focus area) is automatically released. Basic Photography and Playback: A (Auto) Mode Taking Pictures with the Smile Timer The camera uses face detection to OFF. 37 If the camera...

User Manual
Page 50
...are performed. • The camera does not detect any faces. • The camera detected a face, but cannot detect a smile. C Releasing the Shutter Manually Pictures can also be used simultaneously with certain functions. C Auto Power Off in Smile Timer Mode When using smile timer, ...after the shutter is activated and the camera turns off function (A 184) is released. D More Information See "Autofocus" (A 29) for more information. • This function cannot be taken by pressing the shutter-release button. See "Camera Settings that Cannot Be Applied Simultaneously" (A 87) for ...
...are performed. • The camera does not detect any faces. • The camera detected a face, but cannot detect a smile. C Releasing the Shutter Manually Pictures can also be used simultaneously with certain functions. C Auto Power Off in Smile Timer Mode When using smile timer, ...after the shutter is activated and the camera turns off function (A 184) is released. D More Information See "Autofocus" (A 29) for more information. • This function cannot be taken by pressing the shutter-release button. See "Camera Settings that Cannot Be Applied Simultaneously" (A 87) for ...

User Manual
Page 51
... (4.4 in.) from the lens. When using A (auto) mode, if Autofocus mode (A 60) is set to Full-time AF, the camera focuses continuously until the shutter-release button is pressed halfway to lock the focus. The macro mode menu is displayed. 2 Use the rotary multi selector to the zoom position at which...
... (4.4 in.) from the lens. When using A (auto) mode, if Autofocus mode (A 60) is set to Full-time AF, the camera focuses continuously until the shutter-release button is pressed halfway to lock the focus. The macro mode menu is displayed. 2 Use the rotary multi selector to the zoom position at which...

User Manual
Page 54
When the effect is displayed. +0.3 Exit +0.3 25 5 Press the shutter-release button to take a picture. If brightness is adjusted, H and the compensation value are saved in step 3, the selected amount of effect is complete, press J or K ... y and press the k button. Adjusting Brightness (Exposure Compensation), Vividness, and Hue 4 When adjustment is applied. If the k button (except when P is selected) or the shutter-release button is pressed in the camera's memory even when the 42 camera is displayed. If vividness is adjusted, a is turned off.
When the effect is displayed. +0.3 Exit +0.3 25 5 Press the shutter-release button to take a picture. If brightness is adjusted, H and the compensation value are saved in step 3, the selected amount of effect is complete, press J or K ... y and press the k button. Adjusting Brightness (Exposure Compensation), Vividness, and Hue 4 When adjustment is applied. If the k button (except when P is selected) or the shutter-release button is pressed in the camera's memory even when the 42 camera is displayed. If vividness is adjusted, a is turned off.

User Manual
Page 56
... the compensation value. When an exposure compensation value other than 0.0 is applied, the value is displayed with the H indicator in the monitor. 4 Press the shutter-release button to set the value to select a compensation value. To make the subject darker, apply negative (-) exposure compensation. Exposure compensation guide +0.3 +0.3 Exposure compensation Histogram Exposure...
... the compensation value. When an exposure compensation value other than 0.0 is applied, the value is displayed with the H indicator in the monitor. 4 Press the shutter-release button to set the value to select a compensation value. To make the subject darker, apply negative (-) exposure compensation. Exposure compensation guide +0.3 +0.3 Exposure compensation Histogram Exposure...

User Manual
Page 62
... measured white balance value, choose Cancel and press the k button. Preset manual Cancel Measure 4 Frame the reference object in the measuring window. The shutter is released and the new white-balance value is set . More on Preset Manual A value for flash lighting cannot be measured with a red shade look as though...
... measured white balance value, choose Cancel and press the k button. Preset manual Cancel Measure 4 Frame the reference object in the measuring window. The shutter is released and the new white-balance value is set . More on Preset Manual A value for flash lighting cannot be measured with a red shade look as though...

User Manual
Page 65
... k button again. 53 Brightness (exposure compensation), vividness, hue To return to the camera. When taking pictures of the frame. Press the shutter-release button halfway to where the subject is pressed halfway, the focus areas that face. Flash mode, macro mode, self-timer - a Face priority ... and not positioned in the center of subjects other than one of the following functions, first press the k button to the Focus area camera. release button is , and take a picture. • To change the settings as desired. Rotate the rotary multi selector or press H, I, J, ...
... k button again. 53 Brightness (exposure compensation), vividness, hue To return to the camera. When taking pictures of the frame. Press the shutter-release button halfway to where the subject is pressed halfway, the focus areas that face. Flash mode, macro mode, self-timer - a Face priority ... and not positioned in the center of subjects other than one of the following functions, first press the k button to the Focus area camera. release button is , and take a picture. • To change the settings as desired. Rotate the rotary multi selector or press H, I, J, ...

User Manual
Page 67
...1 / 2 5 0 F 3.5 More on off-center subjects when center is selected for AF area mode. 1 Position the subject in the center of the frame. 2 Press the shutter-release button halfway. • Confirm that the focus area glows green. • Focus and exposure are locked. 3 Continue holding down the shutter... the picture. • Be sure to maintain the same distance between the camera and the subject while the shutter-release button is pressed halfway. 4 Press the shutter-release button the rest of focus lock when Center is selected for AF area mode. Changing A (Auto) Mode Settings ...
...1 / 2 5 0 F 3.5 More on off-center subjects when center is selected for AF area mode. 1 Position the subject in the center of the frame. 2 Press the shutter-release button halfway. • Confirm that the focus area glows green. • Focus and exposure are locked. 3 Continue holding down the shutter... the picture. • Be sure to maintain the same distance between the camera and the subject while the shutter-release button is pressed halfway. 4 Press the shutter-release button the rest of focus lock when Center is selected for AF area mode. Changing A (Auto) Mode Settings ...


