
User Manual
Page 5
...immediately with wet hands. Failure to observe this precaution could result in electric shock. • Do not damage, modify, forcibly tug or bend the USB cable, place it under heavy objects, or expose it upside down or backwards. • Do not short or disassemble the battery or attempt to remove or... to flame or to another or with a dry cloth. Continued use could result in fire. • Do not handle the plug or go near the Charging AC Adapter during lightning storms. Failure to heat or flames. iii Should the insulation be damaged and the wires become exposed, take it is prone...
...immediately with wet hands. Failure to observe this precaution could result in electric shock. • Do not damage, modify, forcibly tug or bend the USB cable, place it under heavy objects, or expose it upside down or backwards. • Do not short or disassemble the battery or attempt to remove or... to flame or to another or with a dry cloth. Continued use could result in fire. • Do not handle the plug or go near the Charging AC Adapter during lightning storms. Failure to heat or flames. iii Should the insulation be damaged and the wires become exposed, take it is prone...

User Manual
Page 28
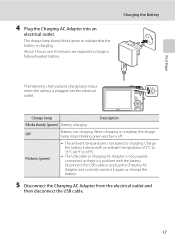
...not use force when connecting or disconnecting the USB cable. Once the two are properly oriented. USB cable 16 Push the plug adapter firmly until it is included, attach the plug adapter to the plug on . 3 Use the supplied USB cable to connect the Charging AC Adapter to the camera via the supplied ...USB Cable UC-E6, and then plugging the Charging AC Adapter into the camera, by connecting the supplied Charging AC Adapter EH-69P to the camera. Do not attempt to the...
...not use force when connecting or disconnecting the USB cable. Once the two are properly oriented. USB cable 16 Push the plug adapter firmly until it is included, attach the plug adapter to the plug on . 3 Use the supplied USB cable to connect the Charging AC Adapter to the camera via the supplied ...USB Cable UC-E6, and then plugging the Charging AC Adapter into the camera, by connecting the supplied Charging AC Adapter EH-69P to the camera. Do not attempt to the...
User Manual
Page 29
... Adapter from the electrical outlet and then disconnect the USB cable. 17 The charge lamp slowly blinks green to 95°F). • The USB cable or Charging AC Adapter is not properly connected, or there is not suited to charge a fully exhausted battery. Flickers (green) • The ambient temperature is a problem with an ambient temperature...
... Adapter from the electrical outlet and then disconnect the USB cable. 17 The charge lamp slowly blinks green to 95°F). • The USB cable or Charging AC Adapter is not properly connected, or there is not suited to charge a fully exhausted battery. Flickers (green) • The ambient temperature is a problem with an ambient temperature...
User Manual
Page 170
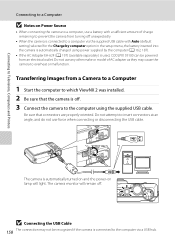
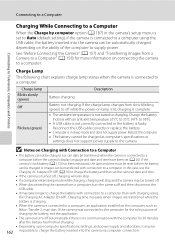
...light. B Connecting the USB Cable 158 The connection may cause the camera to overheat or malfunction. Do not use any other make or model of charge remaining to prevent the camera from turning off unexpectedly. • When the camera is used, COOLPIX S9100 can be recognized if the camera... is connected to the computer via the supplied USB cable with Auto (default setting) selected for the Charge by the computer (A 162, 187). • If the AC Adapter EH-62F...
...light. B Connecting the USB Cable 158 The connection may cause the camera to overheat or malfunction. Do not use any other make or model of charge remaining to prevent the camera from turning off unexpectedly. • When the camera is used, COOLPIX S9100 can be recognized if the camera... is connected to the computer via the supplied USB cable with Auto (default setting) selected for the Charge by the computer (A 162, 187). • If the AC Adapter EH-62F...
User Manual
Page 172
...is displayed (ViewNX 2 default setting) and transferred images are displayed. Disconnecting the Camera Do not turn off the camera and disconnect the USB cable. For more information on using ViewNX 2, refer to a Computer When transfer is complete, the ViewNX 2 screen is complete, turn off automatically ...no communication with the computer for 30 minutes while the camera is charging (A 162). The camera turns off the camera or disconnect the camera from the computer during transfer. B Charging the Battery 160 The charge lamp slowly blinks green while the battery inserted into the camera ...
...is displayed (ViewNX 2 default setting) and transferred images are displayed. Disconnecting the Camera Do not turn off the camera and disconnect the USB cable. For more information on using ViewNX 2, refer to a Computer When transfer is complete, the ViewNX 2 screen is complete, turn off automatically ...no communication with the computer for 30 minutes while the camera is charging (A 162). The camera turns off the camera or disconnect the camera from the computer during transfer. B Charging the Battery 160 The charge lamp slowly blinks green while the battery inserted into the camera ...
User Manual
Page 174
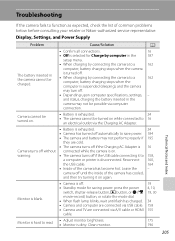
... power supply and allocation, it may be charged as Nikon Transfer 2, may take longer to charge the battery with connection to a computer than with an ambient temperature of charging the battery, exit the application. •... The camera turns off while the power-on connecting the camera to a computer. Charge lamp Blinks slowly (green) Off Flickers (green) Description Battery charging. Reconnect the USB cable...
... power supply and allocation, it may be charged as Nikon Transfer 2, may take longer to charge the battery with connection to a computer than with an ambient temperature of charging the battery, exit the application. •... The camera turns off while the power-on connecting the camera to a computer. Charge lamp Blinks slowly (green) Off Flickers (green) Description Battery charging. Reconnect the USB cable...
User Manual
Page 175
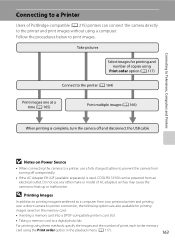
Do not use a fully charged battery to prevent the camera from turning off unexpectedly. • If the AC Adapter EH-62F (available separately) is complete, turn the camera off and disconnect the USB cable B Notes on the memory card: • Inserting a memory card into a DPOF-compatible printer's card ... 117) Connect to the printer (A 164) Print images one at a time (A 165) Print multiple images (A 166) When printing is used, COOLPIX S9100 can connect the camera directly to the printer and print images without using the Print order option in the playback menu (A 117). 163 Follow the...
Do not use a fully charged battery to prevent the camera from turning off unexpectedly. • If the AC Adapter EH-62F (available separately) is complete, turn the camera off and disconnect the USB cable B Notes on the memory card: • Inserting a memory card into a DPOF-compatible printer's card ... 117) Connect to the printer (A 164) Print images one at a time (A 165) Print multiple images (A 166) When printing is used, COOLPIX S9100 can connect the camera directly to the printer and print images without using the Print order option in the playback menu (A 117). 163 Follow the...
User Manual
Page 176
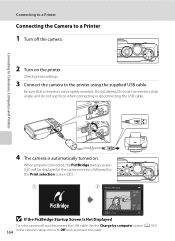
...an angle, and do not use force when connecting or disconnecting the USB cable. 4 The camera is automatically turned on the printer. Do not attempt to the printer using the supplied USB cable. Set the Charge by computer option (A 187) 164 in the camera monitor, followed by...connected, the PictBridge startup screen (1) will be displayed in the camera's setup menu to a Printer 1 Turn off and disconnect the USB cable. Be sure that connectors are properly oriented. Connecting to Televisions, Computers and Printers Connecting to a Printer Connecting the Camera to Off and reconnect the...
...an angle, and do not use force when connecting or disconnecting the USB cable. 4 The camera is automatically turned on the printer. Do not attempt to the printer using the supplied USB cable. Set the Charge by computer option (A 187) 164 in the camera monitor, followed by...connected, the PictBridge startup screen (1) will be displayed in the camera's setup menu to a Printer 1 Turn off and disconnect the USB cable. Be sure that connectors are properly oriented. Connecting to Televisions, Computers and Printers Connecting to a Printer Connecting the Camera to Off and reconnect the...
User Manual
Page 181
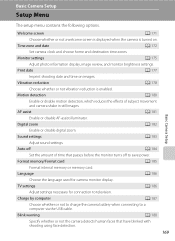
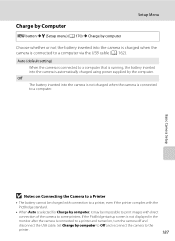
... with shooting using face detection. 169 Auto off A 184 Set the amount of subject movement and camera shake in still images. Charge by computer A 187 Choose whether or not to charge the camera battery when connecting to television. Sound settings A 183 Adjust sound settings. Language A 186 Choose the language used for connection...
... with shooting using face detection. 169 Auto off A 184 Set the amount of subject movement and camera shake in still images. Charge by computer A 187 Choose whether or not to charge the camera battery when connecting to television. Sound settings A 183 Adjust sound settings. Language A 186 Choose the language used for connection...
User Manual
Page 199
Off The battery inserted into the camera is not charged when the camera is connected to a computer via the USB cable (A 162). Set Charge by computer, it may be impossible to print images with direct connection of the camera to some printers. Basic Camera Setup B Notes on , ...turn the camera off and disconnect the USB cable. If the PictBridge startup screen is not displayed...
Off The battery inserted into the camera is not charged when the camera is connected to a computer via the USB cable (A 162). Set Charge by computer, it may be impossible to print images with direct connection of the camera to some printers. Basic Camera Setup B Notes on , ...turn the camera off and disconnect the USB cable. If the PictBridge startup screen is not displayed...
User Manual
Page 209
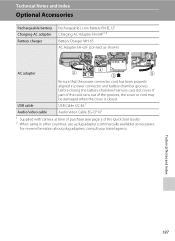
... Index 197 Technical Notes and Index Optional Accessories Rechargeable battery Charging AC adapter Battery charger Rechargeable Li-ion Battery EN-EL121 Charging AC Adapter EH-69P1, 2 Battery Charger MH-65 AC Adapter EH-62F (connect as shown) AC adapter USB cable Audio/video cable Be sure that the power connector cord has been properly...
... Index 197 Technical Notes and Index Optional Accessories Rechargeable battery Charging AC adapter Battery charger Rechargeable Li-ion Battery EN-EL121 Charging AC Adapter EH-69P1, 2 Battery Charger MH-65 AC Adapter EH-62F (connect as shown) AC adapter USB cable Audio/video cable Be sure that the power connector cord has been properly...
User Manual
Page 217
... are connected via the Charging AC Adapter. and status, charging the battery inserted in the camera may not be possible via computer connection. • Battery is off . • Depending upon computer specifications, settings, - Reconnect 160, the USB cable. 164 • Inside of common problems below before consulting your retailer or Nikon-authorized service representative...
... are connected via the Charging AC Adapter. and status, charging the battery inserted in the camera may not be possible via computer connection. • Battery is off . • Depending upon computer specifications, settings, - Reconnect 160, the USB cable. 164 • Inside of common problems below before consulting your retailer or Nikon-authorized service representative...
User Manual
Page 219
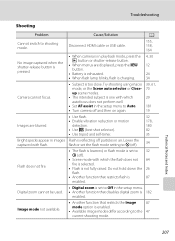
... 29 181 19 Images are displayed, press the d button. • Battery is exhausted. 12 24 • When flash lamp blinks, flash is charging. 34 Camera cannot focus. • Subject is enabled. • Available image modes differ according to Off in air. Technical Notes and Index 207 ...Disconnect HDMI cable or USB cable. 155, 158, 164 • When camera is in images Flash is pressed. Image mode not available. • Another function that ...
... 29 181 19 Images are displayed, press the d button. • Battery is exhausted. 12 24 • When flash lamp blinks, flash is charging. 34 Camera cannot focus. • Subject is enabled. • Available image modes differ according to Off in air. Technical Notes and Index 207 ...Disconnect HDMI cable or USB cable. 155, 158, 164 • When camera is in images Flash is pressed. Image mode not available. • Another function that ...

User Manual
Page 223
...; Remove the memory card to print images when Auto is not recognized by the computer. - Technical Notes and Index 211 For more information on Nikon Transfer 2, refer to be selected from the camera in the following situations, even when printing from the internal memory. Images to help information contained... size with printer to the printer. Troubleshooting Problem Cause/Solution A • Camera is off. 19 • Battery is exhausted. 24 • USB cable is not correctly connected. 158 • Camera is selected for the Charge by computer option in ViewNX 2.
...; Remove the memory card to print images when Auto is not recognized by the computer. - Technical Notes and Index 211 For more information on Nikon Transfer 2, refer to be selected from the camera in the following situations, even when printing from the internal memory. Images to help information contained... size with printer to the printer. Troubleshooting Problem Cause/Solution A • Camera is off. 19 • Battery is exhausted. 24 • USB cable is not correctly connected. 158 • Camera is selected for the Charge by computer option in ViewNX 2.

User Manual
Page 228
... 32, 49 Auto mode 24 Auto off 184 Auto sort menu 112 Auto sort mode 109 Autofocus 39, 60, 150 Autofocus mode 60, 150 AV cable 155 B Backlighting R 66 Battery 14, 16, 173 Battery chamber 5 Battery charger 18, 197 Battery latch 5, 14 Battery level 24 Battery-chamber/memory card slot cover... and white copy n 73 Blink warning 188, 189 Brightness 175 BSS 83 Button sound 183 C Calendar display 96 Center-weighted 51 Charge by computer 187 Charge lamp 17, 162 Charger 16, 197 Charging AC Adapter 16, 197 Choose key picture 129 Close-up k 70 Cloudy 49 Compression ratio 47 Computer 157 Connector cover 5
... 32, 49 Auto mode 24 Auto off 184 Auto sort menu 112 Auto sort mode 109 Autofocus 39, 60, 150 Autofocus mode 60, 150 AV cable 155 B Backlighting R 66 Battery 14, 16, 173 Battery chamber 5 Battery charger 18, 197 Battery latch 5, 14 Battery level 24 Battery-chamber/memory card slot cover... and white copy n 73 Blink warning 188, 189 Brightness 175 BSS 83 Button sound 183 C Calendar display 96 Center-weighted 51 Charge by computer 187 Charge lamp 17, 162 Charger 16, 197 Charging AC Adapter 16, 197 Choose key picture 129 Close-up k 70 Cloudy 49 Compression ratio 47 Computer 157 Connector cover 5


