User Manual
Page 9
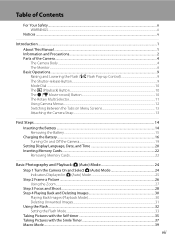
... the Camera...19 Setting Display Language, Date, and Time 20 Inserting Memory Cards ...22 Removing Memory Cards...22 Basic Photography and Playback: A (Auto) Mode 24 Step 1 Turn the Camera On and Select A (Auto) Mode 24 Indicators Displayed in A (Auto) Mode 25 Step 2 Frame a Picture ...26 Using the Zoom...27 Step 3 Focus and Shoot ...28 Step 4 Playing Back and Deleting Images 30 Playing Back Images (Playback Mode)...30 Deleting Unwanted Images...31 Using the Flash...32 Setting the Flash Mode...33 Taking Pictures with the Self-timer 35 Taking Pictures with the Smile Timer 37 Macro Mode...
... the Camera...19 Setting Display Language, Date, and Time 20 Inserting Memory Cards ...22 Removing Memory Cards...22 Basic Photography and Playback: A (Auto) Mode 24 Step 1 Turn the Camera On and Select A (Auto) Mode 24 Indicators Displayed in A (Auto) Mode 25 Step 2 Frame a Picture ...26 Using the Zoom...27 Step 3 Focus and Shoot ...28 Step 4 Playing Back and Deleting Images 30 Playing Back Images (Playback Mode)...30 Deleting Unwanted Images...31 Using the Flash...32 Setting the Flash Mode...33 Taking Pictures with the Self-timer 35 Taking Pictures with the Smile Timer 37 Macro Mode...
User Manual
Page 13
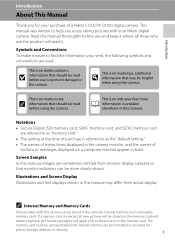
... setting at the time of a Nikon COOLPIX S9100 digital camera. Illustrations and Screen Display Illustrations and text displays shown in the camera's internal memory or on the memory card. The memory card must be more A information is available elsewhere in bold. Screen Samples In this manual thoroughly before the internal memory can be removed before use, and keep it . If a memory card is referred to the pictures on removable memory cards. Read this manual, images are referred to help you enjoy taking pictures with...
... setting at the time of a Nikon COOLPIX S9100 digital camera. Illustrations and Screen Display Illustrations and text displays shown in the camera's internal memory or on the memory card. The memory card must be more A information is available elsewhere in bold. Screen Samples In this manual thoroughly before the internal memory can be removed before use, and keep it . If a memory card is referred to the pictures on removable memory cards. Read this manual, images are referred to help you enjoy taking pictures with...
User Manual
Page 24
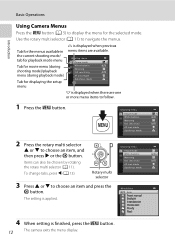
... is finished, press the d button. 12 The camera exits the menu display. Shooting menu Image mode White balance Metering ISO sensitivity AF area mode Autofocus mode White balance Auto Preset manual Daylight Incandescent Fluorescent Cloudy Flash 4 When setting is applied. Tab for the menus available in the current shooting mode/ tab for playback mode menu Tab for movie menu (during shooting mode)/playback menu (during playback mode) Tab for the selected mode. Shooting menu Image mode White balance Metering ISO sensitivity AF area mode Autofocus mode 2 Press the rotary multi...
... is finished, press the d button. 12 The camera exits the menu display. Shooting menu Image mode White balance Metering ISO sensitivity AF area mode Autofocus mode White balance Auto Preset manual Daylight Incandescent Fluorescent Cloudy Flash 4 When setting is applied. Tab for the menus available in the current shooting mode/ tab for playback mode menu Tab for movie menu (during shooting mode)/playback menu (during playback mode) Tab for the selected mode. Shooting menu Image mode White balance Metering ISO sensitivity AF area mode Autofocus mode 2 Press the rotary multi...
User Manual
Page 37
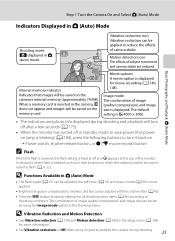
... is backlit, be saved on . ➝ Power switch, shutter-release button, or b (e movie-record) button C Flash When the flash is lowered, the flash setting is fixed at off in A (auto) mode. Step 1 Turn the Camera On and Select A (Auto) Mode Indicators Displayed in A (Auto) Mode Basic Photography and Playback: A (Auto) Mode Shooting mode A displayed in standby mode to save power (the poweron lamp is blinking) (A 184), press the following buttons to turn it back on the camera's internal memory (approximately 74 MB). Motion detection icon The effects of subject...
... is backlit, be saved on . ➝ Power switch, shutter-release button, or b (e movie-record) button C Flash When the flash is lowered, the flash setting is fixed at off in A (auto) mode. Step 1 Turn the Camera On and Select A (Auto) Mode Indicators Displayed in A (Auto) Mode Basic Photography and Playback: A (Auto) Mode Shooting mode A displayed in standby mode to save power (the poweron lamp is blinking) (A 184), press the following buttons to turn it back on the camera's internal memory (approximately 74 MB). Motion detection icon The effects of subject...
User Manual
Page 42
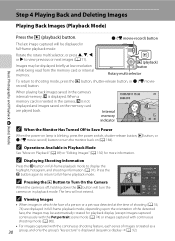
... shooting mode, press the c button, shutter-release button, or b (e movierecord) button. The lens will turn the monitor back on the memory card are displayed in full-frame playback mode, depending upon the orientation of a person or a pet was detected at low resolution while being read from the memory card or internal memory. When a memory card is inserted in the camera's internal memory, C is blinking, press the power switch, shutter-release button, c button, or b (e movie-record) button to view previous or next images (A 11). Internal memory indicator...
... shooting mode, press the c button, shutter-release button, or b (e movierecord) button. The lens will turn the monitor back on the memory card are displayed in full-frame playback mode, depending upon the orientation of a person or a pet was detected at low resolution while being read from the memory card or internal memory. When a memory card is inserted in the camera's internal memory, C is blinking, press the power switch, shutter-release button, c button, or b (e movie-record) button to view previous or next images (A 11). Internal memory indicator...

User Manual
Page 47
... picture and press the shutter-release button halfway. 10 Focus and exposure will be set to ten or two seconds. Basic Photography and Playback: A (Auto) Mode Taking Pictures with the Self-timer The self-timer is useful for self-timer is displayed. 2 Use the rotary multi selector to choose 10s or 2s and press the k button. 10s (ten seconds): Use on important occasions, such as weddings. 2s (two seconds): Use to prevent camera shake. The timer...
... picture and press the shutter-release button halfway. 10 Focus and exposure will be set to ten or two seconds. Basic Photography and Playback: A (Auto) Mode Taking Pictures with the Self-timer The self-timer is useful for self-timer is displayed. 2 Use the rotary multi selector to choose 10s or 2s and press the k button. 10s (ten seconds): Use on important occasions, such as weddings. 2s (two seconds): Use to prevent camera shake. The timer...

User Manual
Page 51
... k button. C Autofocus When using A (auto) mode or continuous shooting mode, the macro mode setting is saved in .). The closest distance at distances of objects as close as 4 cm (1.6 in the camera's memory even if the camera is displayed. Basic Photography and Playback: A (Auto) Mode Macro Mode Macro mode is pressed halfway to lock the focus. The macro mode icon (F) is turned off. 39 When using A (auto) mode, if Autofocus mode (A 60) is set to Full-time AF, the camera focuses continuously until the shutter-release button is used for taking pictures of...
... k button. C Autofocus When using A (auto) mode or continuous shooting mode, the macro mode setting is saved in .). The closest distance at distances of objects as close as 4 cm (1.6 in the camera's memory even if the camera is displayed. Basic Photography and Playback: A (Auto) Mode Macro Mode Macro mode is pressed halfway to lock the focus. The macro mode icon (F) is turned off. 39 When using A (auto) mode, if Autofocus mode (A 60) is set to Full-time AF, the camera focuses continuously until the shutter-release button is used for taking pictures of...

User Manual
Page 61
... mimic this feature cannot be set by pressing the d button even when using the creative slider (A 41), this adjustment by processing images according to changes in the shade, direct sunlight, or under most situations. Although the default setting, Auto, can be used simultaneously with the flash. a Auto (default setting) White balance is displayed in most types of the light source. See "Camera Settings that matches the light source before shooting. e Fluorescent Use under incandescent lighting.
... mimic this feature cannot be set by pressing the d button even when using the creative slider (A 41), this adjustment by processing images according to changes in the shade, direct sunlight, or under most situations. Although the default setting, Auto, can be used simultaneously with the flash. a Auto (default setting) White balance is displayed in most types of the light source. See "Camera Settings that matches the light source before shooting. e Fluorescent Use under incandescent lighting.

User Manual
Page 73
.... x (Scene auto selector) (A 62) By simply framing a picture, the camera automatically selects the optimum scene mode for the selected scene. To return to the original screen, rotate the zoom control to all shooting modes. 61 C Image Mode The Image mode setting (A 47) can be changed by pressing the d button in scene mode. b Portrait (default setting) (A 67) d Sports (A 68) Z Beach (A 69) h Sunset (A 69) k Close-up (A 70) l Museum (A 72) n Black and white copy (A 73...
.... x (Scene auto selector) (A 62) By simply framing a picture, the camera automatically selects the optimum scene mode for the selected scene. To return to the original screen, rotate the zoom control to all shooting modes. 61 C Image Mode The Image mode setting (A 47) can be changed by pressing the d button in scene mode. b Portrait (default setting) (A 67) d Sports (A 68) Z Beach (A 69) h Sunset (A 69) k Close-up (A 70) l Museum (A 72) n Black and white copy (A 73...

User Manual
Page 91
... Panorama Assist • Set flash mode, self-timer, macro mode and exposure compensation before taking the first picture.They cannot be adjusted after the first picture is activated. Shooting Suited to step 2. D R Indicator In panorama assist mode, exposure, white balance, and focus for all images in a panorama are locked. If the camera enters standby mode during shooting, set Auto off function (A 184) is taken. Repeat this process until the necessary number of images has been taken to complete the scene. 6 Press the k button when shooting is displayed...
... Panorama Assist • Set flash mode, self-timer, macro mode and exposure compensation before taking the first picture.They cannot be adjusted after the first picture is activated. Shooting Suited to step 2. D R Indicator In panorama assist mode, exposure, white balance, and focus for all images in a panorama are locked. If the camera enters standby mode during shooting, set Auto off function (A 184) is taken. Repeat this process until the necessary number of images has been taken to complete the scene. 6 Press the k button when shooting is displayed...
User Manual
Page 94
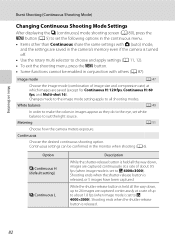
... of about 1.8 fps (when image mode is set to make the colors in conjunction with A (auto) mode, and the settings are saved (except for Continuous H: 120 fps, Continuous H: 60 fps, and Multi-shot 16). Continuous settings can be enabled in images appear as they do to the eye, set white balance to choose and apply settings (A 11, 12). • To exit the shooting menu, press the d button. • Some functions cannot be confirmed in...
... of about 1.8 fps (when image mode is set to make the colors in conjunction with A (auto) mode, and the settings are saved (except for Continuous H: 120 fps, Continuous H: 60 fps, and Multi-shot 16). Continuous settings can be enabled in images appear as they do to the eye, set white balance to choose and apply settings (A 11, 12). • To exit the shooting menu, press the d button. • Some functions cannot be confirmed in...
User Manual
Page 168
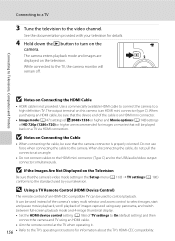
...'s operating instructions for details. 4 Hold down the c button to control playback. Do not use force when connecting the cable to a high-definition TV. D Using a TV Remote Control (HDMI Device Control) The remote control of TV settings to On (default setting) and then connect the camera and TV using easy panorama, and switch between full-screen playback mode and 4-image thumbnail display. • Set the HDMI device control setting (A 186) of an HDMI-CEC-compatible TV can be used to turn on Connecting the Cable • When connecting...
...'s operating instructions for details. 4 Hold down the c button to control playback. Do not use force when connecting the cable to a high-definition TV. D Using a TV Remote Control (HDMI Device Control) The remote control of TV settings to On (default setting) and then connect the camera and TV using easy panorama, and switch between full-screen playback mode and 4-image thumbnail display. • Set the HDMI device control setting (A 186) of an HDMI-CEC-compatible TV can be used to turn on Connecting the Cable • When connecting...
User Manual
Page 170
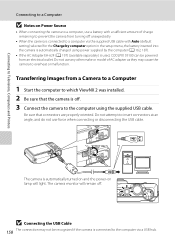
... 1 Start the computer to which ViewNX 2 was installed. 2 Be sure that connectors are properly oriented. Do not use any other make or model of charge remaining to prevent the camera from an electrical outlet. The camera is connected to the computer via the supplied USB cable with Auto (default setting) selected for the Charge by computer option in the setup menu, the battery inserted into the camera is used, COOLPIX S9100 can...
... 1 Start the computer to which ViewNX 2 was installed. 2 Be sure that connectors are properly oriented. Do not use any other make or model of charge remaining to prevent the camera from an electrical outlet. The camera is connected to the computer via the supplied USB cable with Auto (default setting) selected for the Charge by computer option in the setup menu, the battery inserted into the camera is used, COOLPIX S9100 can...
User Manual
Page 171
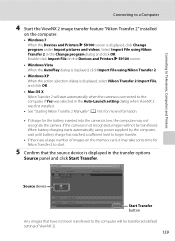
... selected in the Auto-Launch setting dialog when ViewNX 2 was first installed. • See "Starting Nikon Transfer 2 Manually" (A 161) for more information. • If charge for Nikon Transfer 2 to start. 5 Confirm that have not been transferred to the computer will not be transferred (default setting of images on the computer. • Windows 7 When the Devices and Printers K S9100 screen is displayed, click Change program under Import pictures and videos. Source device Start Transfer button Any images that the source...
... selected in the Auto-Launch setting dialog when ViewNX 2 was first installed. • See "Starting Nikon Transfer 2 Manually" (A 161) for more information. • If charge for Nikon Transfer 2 to start. 5 Confirm that have not been transferred to the computer will not be transferred (default setting of images on the computer. • Windows 7 When the Devices and Printers K S9100 screen is displayed, click Change program under Import pictures and videos. Source device Start Transfer button Any images that the source...

User Manual
Page 197
... COOLPIX S9100. 185 Data that has been deleted cannot be deleted! Format memory All images will be deleted! Format No Formatting a Memory Card When a memory card is inserted in the camera, the Format card option is displayed in the setup menu. Be sure to transfer important images to format memory cards previously used in the setup menu. The Format memory option is displayed in other devices the first time they are reset to their default settings (number icons) when the internal memory or memory card is formatted. • Do not turn the camera off or open the battery...
... COOLPIX S9100. 185 Data that has been deleted cannot be deleted! Format memory All images will be deleted! Format No Formatting a Memory Card When a memory card is inserted in the camera, the Format card option is displayed in the setup menu. Be sure to transfer important images to format memory cards previously used in the setup menu. The Format memory option is displayed in other devices the first time they are reset to their default settings (number icons) when the internal memory or memory card is formatted. • Do not turn the camera off or open the battery...

User Manual
Page 213
... mode setting of any images which need to be used for use internal memory. 47 31, 152 22 22 Error occurred while saving image. Yes No Memory card has not been formatted for welcome screen. u Out of file numbers. Error Messages Display Problem Solution A P Card is full. • Choose smaller image size. • Delete images. • Insert new memory card. • Remove memory card and use in size • Still images captured while recording high-definition or full high-definition movies Insufficient space to save a copy. Formatting deletes all data saved...
... mode setting of any images which need to be used for use internal memory. 47 31, 152 22 22 Error occurred while saving image. Yes No Memory card has not been formatted for welcome screen. u Out of file numbers. Error Messages Display Problem Solution A P Card is full. • Choose smaller image size. • Delete images. • Insert new memory card. • Remove memory card and use in size • Still images captured while recording high-definition or full high-definition movies Insufficient space to save a copy. Formatting deletes all data saved...
User Manual
Page 217
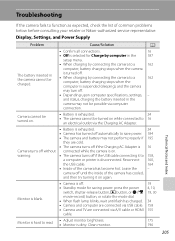
... the camera cannot be turned on again. Troubleshooting If the camera fails to function as expected, check the list of the camera has become hot. Display, Settings, and Power Supply Problem Cause/Solution A The battery inserted in the camera may turn off if the USB cable connecting it on while connected to 16 an electrical outlet via USB cable. • Camera and TV are cold. • The camera turns off if the Charging AC Adapter...
... the camera cannot be turned on again. Troubleshooting If the camera fails to function as expected, check the list of the camera has become hot. Display, Settings, and Power Supply Problem Cause/Solution A The battery inserted in the camera may turn off if the USB cable connecting it on while connected to 16 an electrical outlet via USB cable. • Camera and TV are cold. • The camera turns off if the Charging AC Adapter...
User Manual
Page 222
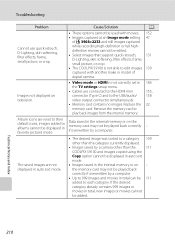
... an Image mode setting 47 of digital camera. The saved images are reset to their default icons, images added to albums cannot be displayed in favorite pictures mode. the memory card may not be displayed in auto sort mode. • Images saved in auto sort mode. • The desired image was sorted to each category. Troubleshooting Problem Cause/Solution A Cannot use quick retouch, D-Lighting, skin softening, filter effects, frame, small picture, or crop. • These options cannot be used with another make or model...
... an Image mode setting 47 of digital camera. The saved images are reset to their default icons, images added to albums cannot be displayed in favorite pictures mode. the memory card may not be displayed in auto sort mode. • Images saved in auto sort mode. • The desired image was sorted to each category. Troubleshooting Problem Cause/Solution A Cannot use quick retouch, D-Lighting, skin softening, filter effects, frame, small picture, or crop. • These options cannot be used with another make or model...

User Manual
Page 223
... the printer. PictBridge startup screen may not be displayed and it may be printed are not displayed. • Memory card contains no images. Images to help information contained in ViewNX 2. Use the Cannot select paper size with printer to start • Confirm system requirements. 157 when camera is connected. • Computer is not set to select paper size. size. Troubleshooting Problem Cause/Solution A • Camera is off. 19 • Battery is exhausted. 24 • USB cable...
... the printer. PictBridge startup screen may not be displayed and it may be printed are not displayed. • Memory card contains no images. Images to help information contained in ViewNX 2. Use the Cannot select paper size with printer to start • Confirm system requirements. 157 when camera is connected. • Computer is not set to select paper size. size. Troubleshooting Problem Cause/Solution A • Camera is off. 19 • Battery is exhausted. 24 • USB cable...

User Manual
Page 231
... display 94 Thumbnail playback 94 Time difference 174 Time zone 172, 174 Time zone and date 172 Tripod socket 5, 213 TV 155 TV Settings 186 U USB cable 158, 164, 197 USB/audio/video output connector 157, 158 V Vibration reduction 178 Video mode 186 ViewNX 2 157, 161 Voice memo 125 Volume 126, 152 W WAV 199 Welcome screen 171 White balance 49 Wind Noise Reduction 151 Z Zoom control 152 Zoom in 27 Zoom...
... display 94 Thumbnail playback 94 Time difference 174 Time zone 172, 174 Time zone and date 172 Tripod socket 5, 213 TV 155 TV Settings 186 U USB cable 158, 164, 197 USB/audio/video output connector 157, 158 V Vibration reduction 178 Video mode 186 ViewNX 2 157, 161 Voice memo 125 Volume 126, 152 W WAV 199 Welcome screen 171 White balance 49 Wind Noise Reduction 151 Z Zoom control 152 Zoom in 27 Zoom...


