User Manual
Page 9
... ...14 Removing the Battery ...15 Charging the Battery ...16 Turning On and Off the Camera...19 Setting Display Language, Date, and Time 20 Inserting Memory Cards ...22 Removing Memory Cards...22 Basic Photography and Playback: A (Auto) Mode 24 Step 1 Turn the Camera On and Select A (Auto) Mode 24 Indicators Displayed in A (Auto) Mode 25...
... ...14 Removing the Battery ...15 Charging the Battery ...16 Turning On and Off the Camera...19 Setting Display Language, Date, and Time 20 Inserting Memory Cards ...22 Removing Memory Cards...22 Basic Photography and Playback: A (Auto) Mode 24 Step 1 Turn the Camera On and Select A (Auto) Mode 24 Indicators Displayed in A (Auto) Mode 25...
User Manual
Page 11
... Menu 115 a Print Order (Creating a DPOF Print Order 117 b Slide Show...121 d Protect...122 f Rotate Image ...124 E Voice Memo ...125 h Copy (Copy Between Internal Memory and Memory Card 127 C Sequence Display Options...129 C Choose Key Picture...129 Editing Images...130 Editing Functions ...130 Image Editing ...132 k Quick Retouch: Enhancing Contrast and Saturation 132...
... Menu 115 a Print Order (Creating a DPOF Print Order 117 b Slide Show...121 d Protect...122 f Rotate Image ...124 E Voice Memo ...125 h Copy (Copy Between Internal Memory and Memory Card 127 C Sequence Display Options...129 C Choose Key Picture...129 Editing Images...130 Editing Functions ...130 Image Editing ...132 k Quick Retouch: Enhancing Contrast and Saturation 132...
User Manual
Page 12
...and Time 177 Vibration Reduction ...178 Motion Detection ...180 AF Assist...181 Digital Zoom...182 Sound Settings...183 Auto Off ...184 Format Memory/Format Card ...185 Language...186 TV Settings ...186 Charge by Computer...187 Blink Warning ...188 Reset All ...190 Firmware Version ...193 Caring for... Maximizing Camera Life and Performance 194 Cleaning ...196 Storage ...196 Technical Notes and Index...197 Optional Accessories ...197 Approved Memory Cards ...198 File and Folder Names...199 Error Messages...200 Troubleshooting...205 Specifications ...212 Supported Standards ...215 Index ...216 x
...and Time 177 Vibration Reduction ...178 Motion Detection ...180 AF Assist...181 Digital Zoom...182 Sound Settings...183 Auto Off ...184 Format Memory/Format Card ...185 Language...186 TV Settings ...186 Charge by Computer...187 Blink Warning ...188 Reset All ...190 Firmware Version ...193 Caring for... Maximizing Camera Life and Performance 194 Cleaning ...196 Storage ...196 Technical Notes and Index...197 Optional Accessories ...197 Approved Memory Cards ...198 File and Folder Names...199 Error Messages...200 Troubleshooting...205 Specifications ...212 Supported Standards ...215 Index ...216 x
User Manual
Page 13
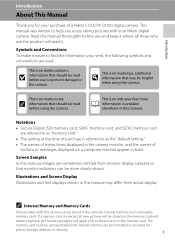
... be read it. This icon indicates that should be stored on the memory card and delete, playback, and format operations will read before use, and keep it easier to the pictures on the memory card. Illustrations and Screen Display Illustrations and text displays shown in the camera monitor, and the names of a Nikon COOLPIX S9100 digital camera.
... be read it. This icon indicates that should be stored on the memory card and delete, playback, and format operations will read before use, and keep it easier to the pictures on the memory card. Illustrations and Screen Display Illustrations and text displays shown in the camera monitor, and the names of a Nikon COOLPIX S9100 digital camera.

User Manual
Page 15
... image data. The copying or reproduction of Data Storage Devices Please note that was obtained, the copying or reproduction of unused postage stamps or post cards issued by private companies (shares, bills, checks, gift certificates, etc.), commuter passes, or coupon tickets, except when a minimum of making illegal copies or to... deletion software, or format the device and then completely refill it with copyright notices The copying or reproduction of copyrighted creative works such as memory cards or built-in camera memory does not completely erase the original image data.
... image data. The copying or reproduction of Data Storage Devices Please note that was obtained, the copying or reproduction of unused postage stamps or post cards issued by private companies (shares, bills, checks, gift certificates, etc.), commuter passes, or coupon tickets, except when a minimum of making illegal copies or to... deletion software, or format the device and then completely refill it with copyright notices The copying or reproduction of copyrighted creative works such as memory cards or built-in camera memory does not completely erase the original image data.
User Manual
Page 26
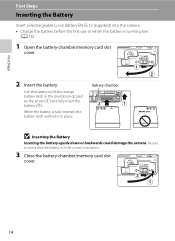
When the battery is fully inserted, the battery latch will lock it in the correct orientation. 3 Close the battery-chamber/memory card slot cover. 14 Battery chamber B Inserting the Battery Inserting the battery upside down or backwards could damage the camera. Be sure to...by the arrow (1) and fully insert the battery (2). Use the battery to check that the battery is running low (A 16). 1 Open the battery-chamber/memory card slot cover. 2 Insert the battery. First Steps First Steps Inserting the Battery Insert a Rechargeable Li-ion Battery EN-EL12 (supplied) into the camera. &#...
When the battery is fully inserted, the battery latch will lock it in the correct orientation. 3 Close the battery-chamber/memory card slot cover. 14 Battery chamber B Inserting the Battery Inserting the battery upside down or backwards could damage the camera. Be sure to...by the arrow (1) and fully insert the battery (2). Use the battery to check that the battery is running low (A 16). 1 Open the battery-chamber/memory card slot cover. 2 Insert the battery. First Steps First Steps Inserting the Battery Insert a Rechargeable Li-ion Battery EN-EL12 (supplied) into the camera. &#...
User Manual
Page 27
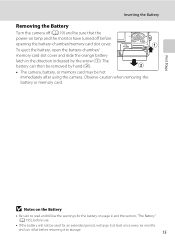
...be removed by the arrow (1). To eject the battery, open the battery-chamber/ memory card slot cover and slide the orange battery latch in the direction indicated by hand (2). • The camera, battery, or memory card may be hot immediately after using the camera. First Steps B Notes on the ...the battery on lamp and the monitor have turned off before returning it flat before opening the battery-chamber/memory card slot cover. Observe caution when removing the battery or memory card. Inserting the Battery Removing the Battery Turn the camera off (A 19) and be sure that the power...
...be removed by the arrow (1). To eject the battery, open the battery-chamber/ memory card slot cover and slide the orange battery latch in the direction indicated by hand (2). • The camera, battery, or memory card may be hot immediately after using the camera. First Steps B Notes on the ...the battery on lamp and the monitor have turned off before returning it flat before opening the battery-chamber/memory card slot cover. Observe caution when removing the battery or memory card. Inserting the Battery Removing the Battery Turn the camera off (A 19) and be sure that the power...

User Manual
Page 34
.... Observe caution when removing the battery or memory card. 22 B Inserting Memory Cards Inserting the memory card upside down or backwards could damage the camera or the memory card. Removing Memory Cards Turn the camera off and be sure that the power-on removable Secure Digital (SD) memory cards (commercially available; Remove the memory card to the memory card can be hot immediately after using the...
.... Observe caution when removing the battery or memory card. 22 B Inserting Memory Cards Inserting the memory card upside down or backwards could damage the camera or the memory card. Removing Memory Cards Turn the camera off and be sure that the power-on removable Secure Digital (SD) memory cards (commercially available; Remove the memory card to the memory card can be hot immediately after using the...
User Manual
Page 35
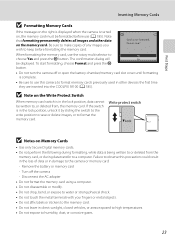
... First Steps Inserting Memory Cards B Formatting Memory Cards If the message on the right is displayed when the camera is turned on, the memory card must be formatted before formatting the memory card. Note that formatting permanently deletes all images and other devices the first time they are inserted into the COOLPIX S9100 (A 185). When formatting the memory card, use the rotary...
... First Steps Inserting Memory Cards B Formatting Memory Cards If the message on the right is displayed when the camera is turned on, the memory card must be formatted before formatting the memory card. Note that formatting permanently deletes all images and other devices the first time they are inserted into the COOLPIX S9100 (A 185). When formatting the memory card, use the rotary...
User Manual
Page 36
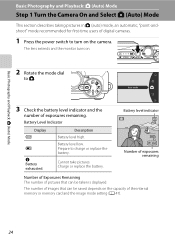
... cameras. 1 Press the power switch to turn on . 2 Rotate the mode dial to charge or replace the battery. Prepare to A. The number of the internal memory or memory card and the image mode setting (A 47). 24 Cannot take pictures. Basic Photography and Playback: A (Auto) Mode Basic Photography and Playback: A (Auto) Mode Step 1 Turn...
... cameras. 1 Press the power switch to turn on . 2 Rotate the mode dial to charge or replace the battery. Prepare to A. The number of the internal memory or memory card and the image mode setting (A 47). 24 Cannot take pictures. Basic Photography and Playback: A (Auto) Mode Basic Photography and Playback: A (Auto) Mode Step 1 Turn...
User Manual
Page 37
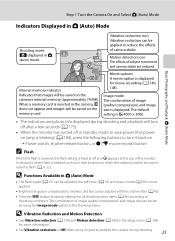
...displayed for all shooting menu items (A 46) according to reduce the effects of image quality (compression) and image size can be saved on the memory card. D Functions Available in standby mode to save power (the poweron lamp is blinking) (A 184), press the following buttons to turn off after... set by using a tripod to stabilize the camera during shooting and playback will turn it back on the camera's internal memory (approximately 74 MB). When a memory card is displayed. Motion detection icon The effects of the monitor. Movie options A movie option is fixed at the top of...
...displayed for all shooting menu items (A 46) according to reduce the effects of image quality (compression) and image size can be saved on the memory card. D Functions Available in standby mode to save power (the poweron lamp is blinking) (A 184), press the following buttons to turn off after... set by using a tripod to stabilize the camera during shooting and playback will turn it back on the camera's internal memory (approximately 74 MB). When a memory card is displayed. Motion detection icon The effects of the monitor. Movie options A movie option is fixed at the top of...

User Manual
Page 40
... camera focuses on the face framed by the double border. This indicates that are in effect. The shutter is in focus (up to the memory card or internal memory. 28 Shutter speed Aperture 1 / 2 5 0 F 3.5 Shutter speed Aperture The camera focuses at the center of the way down. Modify the composition and press the shutter...
... camera focuses on the face framed by the double border. This indicates that are in effect. The shutter is in focus (up to the memory card or internal memory. 28 Shutter speed Aperture 1 / 2 5 0 F 3.5 Shutter speed Aperture The camera focuses at the center of the way down. Modify the composition and press the shutter...

User Manual
Page 41
... If the camera cannot focus, try pressing the shutter-release button halfway to the camera or card. Do not open the battery-chamber/memory card slot cover while images are being saved. Cutting power or removing the memory card in these circumstances could result in loss of exposures remaining will blink. C AF-assist Illuminator and...
... If the camera cannot focus, try pressing the shutter-release button halfway to the camera or card. Do not open the battery-chamber/memory card slot cover while images are being saved. Cutting power or removing the memory card in these circumstances could result in loss of exposures remaining will blink. C AF-assist Illuminator and...
User Manual
Page 42
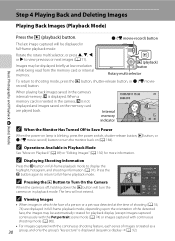
... Images Playing Back Images (Playback Mode) Basic Photography and Playback: A (Auto) Mode Press the c (playback) button. When a memory card is inserted in full-frame playback mode, depending upon the orientation of the detected face, the images may be displayed in playback mode... picture" is displayed (sequence display ➝ A 92). C Displaying Shooting Information Press the k button in Playback Mode See "More on the memory card are displayed in the camera, C is displayed. b (e movie-record) button The last image captured will not extend. +1.0 ISO 160 4/ ...
... Images Playing Back Images (Playback Mode) Basic Photography and Playback: A (Auto) Mode Press the c (playback) button. When a memory card is inserted in full-frame playback mode, depending upon the orientation of the detected face, the images may be displayed in playback mode... picture" is displayed (sequence display ➝ A 92). C Displaying Shooting Information Press the k button in Playback Mode See "More on the memory card are displayed in the camera, C is displayed. b (e movie-record) button The last image captured will not extend. +1.0 ISO 160 4/ ...

User Manual
Page 59
... images that Cannot Be Applied Simultaneously" (A 87) for the current setting is also applied to display on a television with an aspect ratio of the internal memory or memory card. The compression ratio is approximately 1:4. 4000 × 3000 3264 × 2448 2592 × 1944 2048 × 1536 Best choice in most situations. The icon...
... images that Cannot Be Applied Simultaneously" (A 87) for the current setting is also applied to display on a television with an aspect ratio of the internal memory or memory card. The compression ratio is approximately 1:4. 4000 × 3000 3264 × 2448 2592 × 1944 2048 × 1536 Best choice in most situations. The icon...
User Manual
Page 60
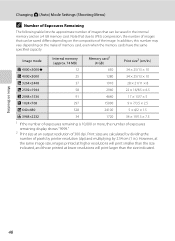
Image mode Internal memory (approx. 74 MB) Memory card1 (4 GB) Print size2 (cm/in.) H 4000×3000P 12 650 34 × 25/13 × 10 I 4000×3000 25 1280 34 × 25/... to JPEG compression, the number of pixels by printer resolution (dpi) and multiplying by 2.54 cm (1 in the internal memory and on a 4 GB memory card. More on the make of memory card, even when the memory cards have the same specified capacity. In addition, this number may vary depending on Shooting 48 However, at the same image...
Image mode Internal memory (approx. 74 MB) Memory card1 (4 GB) Print size2 (cm/in.) H 4000×3000P 12 650 34 × 25/13 × 10 I 4000×3000 25 1280 34 × 25/... to JPEG compression, the number of pixels by printer resolution (dpi) and multiplying by 2.54 cm (1 in the internal memory and on a 4 GB memory card. More on the make of memory card, even when the memory cards have the same specified capacity. In addition, this number may vary depending on Shooting 48 However, at the same image...

User Manual
Page 80
... o 0.02 1 The flash mode setting may decrease depending on the image mode, the type of up to 24 images are captured continuously at a rate of memory card used, and shooting conditions. • AF-assist illuminator (A 181) does not light. Shooting ends when the shutter-release button is released. • Focus, exposure compensation...
... o 0.02 1 The flash mode setting may decrease depending on the image mode, the type of up to 24 images are captured continuously at a rate of memory card used, and shooting conditions. • AF-assist illuminator (A 181) does not light. Shooting ends when the shutter-release button is released. • Focus, exposure compensation...
User Manual
Page 86
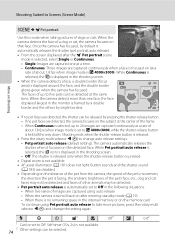
...1 Can be released by pressing the shutter-release button. - Continuous: Three images are captured one face, the face displayed largest in the internal memory or on that face. While Pet portrait auto release is selected, the d icon is no remaining space in the monitor is framed by a... multi selector J (n) to change the setting again. When the camera detects the face of a dog or cat, the camera focuses on the memory card To continue using auto release - Shooting ends when the shutter-release button is selected, select Single or Continuous. - Self-timer (10s, 2s)...
...1 Can be released by pressing the shutter-release button. - Continuous: Three images are captured one face, the face displayed largest in the internal memory or on that face. While Pet portrait auto release is selected, the d icon is no remaining space in the monitor is framed by a... multi selector J (n) to change the setting again. When the camera detects the face of a dog or cat, the camera focuses on the memory card To continue using auto release - Shooting ends when the shutter-release button is selected, select Single or Continuous. - Self-timer (10s, 2s)...
User Manual
Page 93
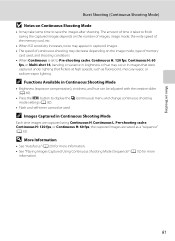
The amount of time it takes to finish saving the captured images depends on the number of images, image mode, the write speed of the memory card, etc. • When ISO sensitivity increases, noise may appear in captured images. • The speed of continuous shooting may decrease depending on Continuous Shooting Mode &#... may take some time to save the images after shooting. More on Shooting Burst Shooting (Continuous Shooting Mode) B Notes on the image mode, type of memory card used .
The amount of time it takes to finish saving the captured images depends on the number of images, image mode, the write speed of the memory card, etc. • When ISO sensitivity increases, noise may appear in captured images. • The speed of continuous shooting may decrease depending on Continuous Shooting Mode &#... may take some time to save the images after shooting. More on Shooting Burst Shooting (Continuous Shooting Mode) B Notes on the image mode, type of memory card used .

User Manual
Page 116
... deleted while using favorite pictures mode, the image will be removed from the album 104 and it will be permanently deleted from the internal memory or the memory card (A 108). Favorite pictures Protect Rotate image Small picture Voice memo Sequence display options Choose key picture Remove from favorites 3 Rotate the rotary multi selector...
... deleted while using favorite pictures mode, the image will be removed from the album 104 and it will be permanently deleted from the internal memory or the memory card (A 108). Favorite pictures Protect Rotate image Small picture Voice memo Sequence display options Choose key picture Remove from favorites 3 Rotate the rotary multi selector...


