
User Manual
Page 3
Introduction First Steps Basic Photography and Playback: A (Auto) Mode More on Shooting More on Playback Editing Images Movie Recording and Playback Connecting to Televisions, Computers and Printers Basic Camera Setup Caring for the Camera Technical Notes and Index i
Introduction First Steps Basic Photography and Playback: A (Auto) Mode More on Shooting More on Playback Editing Images Movie Recording and Playback Connecting to Televisions, Computers and Printers Basic Camera Setup Caring for the Camera Technical Notes and Index i
User Manual
Page 4
... open as this could result in the event of a fall or other small parts into their entirety before using this Nikon product, to prevent possible injury. Handle the camera strap with care Never place the strap around the neck of children Particular care should be read before using this equipment.... the product and/or removing the battery. Do not use the camera or Charging AC Adapter in the presence of the camera or Charging AC Adapter could result in injury. For Your Safety To prevent damage to your Nikon product or injury to yourself or to others, read the following ...
... open as this could result in the event of a fall or other small parts into their entirety before using this Nikon product, to prevent possible injury. Handle the camera strap with care Never place the strap around the neck of children Particular care should be read before using this equipment.... the product and/or removing the battery. Do not use the camera or Charging AC Adapter in the presence of the camera or Charging AC Adapter could result in injury. For Your Safety To prevent damage to your Nikon product or injury to yourself or to others, read the following ...

User Manual
Page 5
... may leak, overheat, or explode if improperly handled. To charge the battery with DCto-AC inverters. Failure to another or with the camera, use with travel converters or adapters designed to convert from the damaged battery comes in fire or electric shock. • Do not ... insulation be sure it to a Nikonauthorized service representative for use immediately should be sure to leakage when fully discharged. If you are using a camera that supports battery charging or by computer function. • When inserting the battery, do not attempt to insert it upside down or backwards. ...
... may leak, overheat, or explode if improperly handled. To charge the battery with DCto-AC inverters. Failure to another or with the camera, use with travel converters or adapters designed to convert from the damaged battery comes in fire or electric shock. • Do not ... insulation be sure it to a Nikonauthorized service representative for use immediately should be sure to leakage when fully discharged. If you are using a camera that supports battery charging or by computer function. • When inserting the battery, do not attempt to insert it upside down or backwards. ...
User Manual
Page 6
...impairment. iv CD-ROMs The CD-ROMs supplied with liquid crystal Should the monitor break, care should be taken to avoid injury caused by this camera may disrupt the electronic systems of the airplane or the instruments of the hospital when using while in a hospital. Observe caution when using inside... liquid crystal from the subject. The electromagnetic waves given out by broken glass and to your fingers or other objects are not pinched by Nikon for the purpose, to observe this device should be played back on an audio CD player could cause hearing loss or damage the equipment....
...impairment. iv CD-ROMs The CD-ROMs supplied with liquid crystal Should the monitor break, care should be taken to avoid injury caused by this camera may disrupt the electronic systems of the airplane or the instruments of the hospital when using while in a hospital. Observe caution when using inside... liquid crystal from the subject. The electromagnetic waves given out by broken glass and to your fingers or other objects are not pinched by Nikon for the purpose, to observe this device should be played back on an audio CD player could cause hearing loss or damage the equipment....
User Manual
Page 9
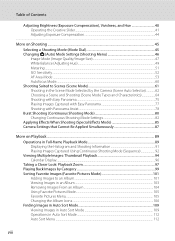
Table of Contents For Your Safety...ii WARNINGS...ii Notices ...v Introduction ...1 About This Manual ...1 Information and Precautions...2 Parts of the Camera...4 The Camera Body ...4 The Monitor...6 Basic Operations...9 Raising and Lowering the Flash (K Flash Pop-up Control 9 The Shutter-release Button...9 Mode ...Language, Date, and Time 20 Inserting Memory Cards ...22 Removing Memory Cards...22 Basic Photography and Playback: A (Auto) Mode 24 Step 1 Turn the Camera On and Select A (Auto) Mode 24 Indicators Displayed in A (Auto) Mode 25 Step 2 Frame a Picture ...26 Using the Zoom...27 Step...
Table of Contents For Your Safety...ii WARNINGS...ii Notices ...v Introduction ...1 About This Manual ...1 Information and Precautions...2 Parts of the Camera...4 The Camera Body ...4 The Monitor...6 Basic Operations...9 Raising and Lowering the Flash (K Flash Pop-up Control 9 The Shutter-release Button...9 Mode ...Language, Date, and Time 20 Inserting Memory Cards ...22 Removing Memory Cards...22 Basic Photography and Playback: A (Auto) Mode 24 Step 1 Turn the Camera On and Select A (Auto) Mode 24 Indicators Displayed in A (Auto) Mode 25 Step 2 Frame a Picture ...26 Using the Zoom...27 Step...
User Manual
Page 10
...52 AF Area Mode ...53 Autofocus Mode...60 Shooting Suited to Scenes (Scene Mode 61 Shooting in the Scene Mode Selected by the Camera (Scene Auto Selector 62 Choosing a Scene and Shooting (Scene Mode Types and Characteristics 64 Shooting with Easy Panorama...75 Playing Images ...Assist...78 Burst Shooting (Continuous Shooting Mode 80 Changing Continuous Shooting Mode Settings 82 Applying Effects When Shooting (Special Effects Mode 85 Camera Settings that Cannot Be Applied Simultaneously 87 More on Playback...89 Operations in Full-frame Playback Mode 89 Displaying the Histogram and Shooting...
...52 AF Area Mode ...53 Autofocus Mode...60 Shooting Suited to Scenes (Scene Mode 61 Shooting in the Scene Mode Selected by the Camera (Scene Auto Selector 62 Choosing a Scene and Shooting (Scene Mode Types and Characteristics 64 Shooting with Easy Panorama...75 Playing Images ...Assist...78 Burst Shooting (Continuous Shooting Mode 80 Changing Continuous Shooting Mode Settings 82 Applying Effects When Shooting (Special Effects Mode 85 Camera Settings that Cannot Be Applied Simultaneously 87 More on Playback...89 Operations in Full-frame Playback Mode 89 Displaying the Histogram and Shooting...
User Manual
Page 12
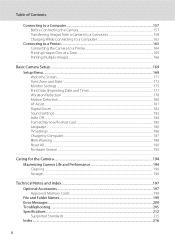
... 158 Charging While Connecting to a Computer 162 Connecting to a Printer...163 Connecting the Camera to a Printer...164 Printing Images One at a Time...165 Printing Multiple Images...166 Basic Camera Setup ...169 Setup Menu...169 Welcome Screen ...171 Time Zone and Date...172 Monitor Settings...186 TV Settings ...186 Charge by Computer...187 Blink Warning ...188 Reset All ...190 Firmware Version ...193 Caring for the Camera...194 Maximizing Camera Life and Performance 194 Cleaning ...196 Storage ...196 Technical Notes and Index...197 Optional Accessories ...197 Approved Memory Cards ...198...
... 158 Charging While Connecting to a Computer 162 Connecting to a Printer...163 Connecting the Camera to a Printer...164 Printing Images One at a Time...165 Printing Multiple Images...166 Basic Camera Setup ...169 Setup Menu...169 Welcome Screen ...171 Time Zone and Date...172 Monitor Settings...186 TV Settings ...186 Charge by Computer...187 Blink Warning ...188 Reset All ...190 Firmware Version ...193 Caring for the Camera...194 Maximizing Camera Life and Performance 194 Cleaning ...196 Storage ...196 Technical Notes and Index...197 Optional Accessories ...197 Approved Memory Cards ...198...
User Manual
Page 13
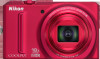
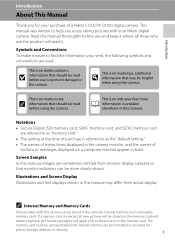
... that may differ from monitor display samples so that more clearly shown. This icon indicates that monitor indicators can be formatted or accessed for your Nikon digital camera. Screen Samples In this manual, images are used: This icon marks cautions, B information that should be stored on the memory card. Illustrations ...manual. If a memory card is inserted, all those who use , to prevent damage to as "memory card." • The setting at the time of a Nikon COOLPIX S9100 digital camera. Introduction Introduction About This Manual Thank you enjoy taking pictures with this...
... that may differ from monitor display samples so that more clearly shown. This icon indicates that monitor indicators can be formatted or accessed for your Nikon digital camera. Screen Samples In this manual, images are used: This icon marks cautions, B information that should be stored on the memory card. Illustrations ...manual. If a memory card is inserted, all those who use , to prevent damage to as "memory card." • The setting at the time of a Nikon COOLPIX S9100 digital camera. Introduction Introduction About This Manual Thank you enjoy taking pictures with this...
User Manual
Page 14
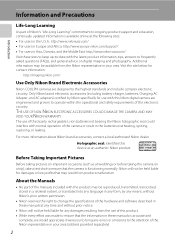
... or lost profits that may be available from product malfunction. For more information about Nikon brand accessories, contact a local authorized Nikon dealer. Nikon will not be held liable for contact information: http://imaging.nikon.com/ Use Only Nikon Brand Electronic Accessories Nikon COOLPIX cameras are engineered and proven to frequently asked questions (FAQs), and general advice on a trip...
... or lost profits that may be available from product malfunction. For more information about Nikon brand accessories, contact a local authorized Nikon dealer. Nikon will not be held liable for contact information: http://imaging.nikon.com/ Use Only Nikon Brand Electronic Accessories Nikon COOLPIX cameras are engineered and proven to frequently asked questions (FAQs), and general advice on a trip...

User Manual
Page 15
...should be recovered from being in possession of material that deleting images or formatting data storage devices such as memory cards or built-in camera memory does not completely erase the original image data. Unless the prior permission of the government was digitally copied or reproduced by means... of a scanner, digital camera or other device may be provided for the purpose of making illegal copies or to also replace any pictures selected for example, pictures ...
...should be recovered from being in possession of material that deleting images or formatting data storage devices such as memory cards or built-in camera memory does not completely erase the original image data. Unless the prior permission of the government was digitally copied or reproduced by means... of a scanner, digital camera or other device may be provided for the purpose of making illegal copies or to also replace any pictures selected for example, pictures ...

User Manual
Page 16
Introduction Parts of the Camera The Camera Body 1 2 3456 7 8 9 11 Flash raised 10 Lens cover closed Zoom control 27 f : wide 27 1 g : tele 27 h : thumbnail playback...........94, 96 i : playback zoom 97 j : help 61 2 Mode dial 45 3 Shutter-release button 9, 28 4 Self-timer lamp 35 AF-assist illuminator 181 5 Power switch/power-on lamp 19, 184 6 Speaker 126, 152 7 Microphone (stereo 125, 140 8 Flash 32 9 K (flash pop-up) control 32 10 Lens 196, 212 11 Lens cover 4
Introduction Parts of the Camera The Camera Body 1 2 3456 7 8 9 11 Flash raised 10 Lens cover closed Zoom control 27 f : wide 27 1 g : tele 27 h : thumbnail playback...........94, 96 i : playback zoom 97 j : help 61 2 Mode dial 45 3 Shutter-release button 9, 28 4 Self-timer lamp 35 AF-assist illuminator 181 5 Power switch/power-on lamp 19, 184 6 Speaker 126, 152 7 Microphone (stereo 125, 140 8 Flash 32 9 K (flash pop-up) control 32 10 Lens 196, 212 11 Lens cover 4
User Manual
Page 18
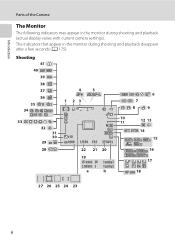
Shooting 41 40 39 38 37 36 35 10 2 34 4 5 1 23 6 7 8 9 33 10 11 12 13 32 31 30 29 +1.0 1 6 0 0 1 / 2 5 0 F 3.5 999 14 15 28 22 21 20 16 19 999 9999 a 1m00s 1m00s b 17 18 27 26 25 24 23 6 Introduction Parts of the Camera The Monitor The following indicators may appear in the monitor during shooting and playback (actual display varies with current camera settings). The indicators that appear in the monitor during shooting and playback disappear after a few seconds (A 175).
Shooting 41 40 39 38 37 36 35 10 2 34 4 5 1 23 6 7 8 9 33 10 11 12 13 32 31 30 29 +1.0 1 6 0 0 1 / 2 5 0 F 3.5 999 14 15 28 22 21 20 16 19 999 9999 a 1m00s 1m00s b 17 18 27 26 25 24 23 6 Introduction Parts of the Camera The Monitor The following indicators may appear in the monitor during shooting and playback (actual display varies with current camera settings). The indicators that appear in the monitor during shooting and playback disappear after a few seconds (A 175).
User Manual
Page 19
Introduction Parts of the Camera 1 Shooting mode 24, 58, 61, 80 2 Macro mode 39 3 Zoom indicator 27, 39 4 Focus indicator 28 5 AE/AF-L indicator 79 6 Flash mode 32 7 Battery level ...
Introduction Parts of the Camera 1 Shooting mode 24, 58, 61, 80 2 Macro mode 39 3 Zoom indicator 27, 39 4 Focus indicator 28 5 AE/AF-L indicator 79 6 Flash mode 32 7 Battery level ...
User Manual
Page 20
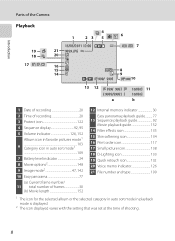
... category in auto sort mode in playback mode is displayed. 2 The icon displayed varies with the setting that was set at the time of the Camera Playback 19 18 17 4 1 23 5 15/05/2011 12:00 21 9 9 9 9 .
... category in auto sort mode in playback mode is displayed. 2 The icon displayed varies with the setting that was set at the time of the Camera Playback 19 18 17 4 1 23 5 15/05/2011 12:00 21 9 9 9 9 .

User Manual
Page 21
... use force when pressing the shutter-release button, as this position, release the shutter and take a picture 9 Introduction The Shutter-release Button The camera features a two-stage shutter-release button. Press halfway to make the flash pop up ) control (1) to set focus and exposure, press the shutter...-release button halfway, stopping when you feel resistance. While the shutter-release button is held in this may result in camera shake and blurred images. To set focus and exposure Press the rest of the way down to take a picture by pressing the shutter...
... use force when pressing the shutter-release button, as this position, release the shutter and take a picture 9 Introduction The Shutter-release Button The camera features a two-stage shutter-release button. Press halfway to make the flash pop up ) control (1) to set focus and exposure, press the shutter...-release button halfway, stopping when you feel resistance. While the shutter-release button is held in this may result in camera shake and blurred images. To set focus and exposure Press the rest of the way down to take a picture by pressing the shutter...
User Manual
Page 22
...; Press the c button in shooting mode to enter playback mode. • When the camera is in shooting mode, press the c button to switch to playback mode. • When the camera is off, holding down the c button will turn the camera on in shooting mode to start movie recording (A 140). The b (e Movie-record) Button...
...; Press the c button in shooting mode to enter playback mode. • When the camera is in shooting mode, press the c button to switch to playback mode. • When the camera is off, holding down the c button will turn the camera on in shooting mode to start movie recording (A 140). The b (e Movie-record) Button...
User Manual
Page 24
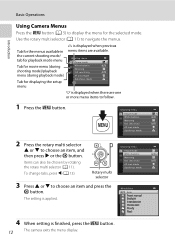
...rotary multi selector H or I to choose an item and press the k button. The setting is finished, press the d button. 12 The camera exits the menu display. Tab for the menus available in the current shooting mode/ tab for playback mode menu Tab for movie menu (during shooting... playback mode) Tab for the selected mode. Items can also be chosen by rotating the rotary multi selector (A 11). Introduction Basic Operations Using Camera Menus Press the d button (A 5) to display the menu for displaying the setup menu K is displayed when there are available. Shooting menu Image...
...rotary multi selector H or I to choose an item and press the k button. The setting is finished, press the d button. 12 The camera exits the menu display. Tab for the menus available in the current shooting mode/ tab for playback mode menu Tab for movie menu (during shooting... playback mode) Tab for the selected mode. Items can also be chosen by rotating the rotary multi selector (A 11). Introduction Basic Operations Using Camera Menus Press the d button (A 5) to display the menu for displaying the setup menu K is displayed when there are available. Shooting menu Image...

User Manual
Page 25
Introduction Basic Operations Switching Between the Tabs on Menu Screens Shooting menu Image mode White balance Metering ISO sensitivity AF area mode Autofocus mode Shooting menu Image mode White balance Metering ISO sensitivity AF area mode Autofocus mode Set up Welcome screen Time zone and date Monitor settings Print date Vibration reduction Motion detection AF assist Press the rotary multi selector J to highlight the tab Press the rotary multi selector H or I to select a tab, and press either the k button or K Attaching the Camera Strap The selected menu is displayed 13
Introduction Basic Operations Switching Between the Tabs on Menu Screens Shooting menu Image mode White balance Metering ISO sensitivity AF area mode Autofocus mode Shooting menu Image mode White balance Metering ISO sensitivity AF area mode Autofocus mode Set up Welcome screen Time zone and date Monitor settings Print date Vibration reduction Motion detection AF assist Press the rotary multi selector J to highlight the tab Press the rotary multi selector H or I to select a tab, and press either the k button or K Attaching the Camera Strap The selected menu is displayed 13
User Manual
Page 26
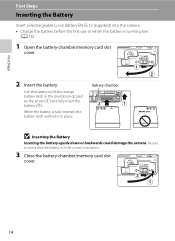
Battery chamber B Inserting the Battery Inserting the battery upside down or backwards could damage the camera. Be sure to lift the orange battery latch in the correct orientation. 3 Close the battery-chamber/memory card slot cover. 14 Use the battery to ...-chamber/memory card slot cover. 2 Insert the battery. First Steps First Steps Inserting the Battery Insert a Rechargeable Li-ion Battery EN-EL12 (supplied) into the camera. • Charge the battery before the first use or when the battery is fully inserted, the battery latch will lock it in place.
Battery chamber B Inserting the Battery Inserting the battery upside down or backwards could damage the camera. Be sure to lift the orange battery latch in the correct orientation. 3 Close the battery-chamber/memory card slot cover. 14 Use the battery to ...-chamber/memory card slot cover. 2 Insert the battery. First Steps First Steps Inserting the Battery Insert a Rechargeable Li-ion Battery EN-EL12 (supplied) into the camera. • Charge the battery before the first use or when the battery is fully inserted, the battery latch will lock it in place.
User Manual
Page 27
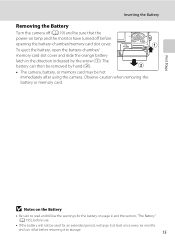
... opening the battery-chamber/memory card slot cover. The battery can then be removed by the arrow (1). Inserting the Battery Removing the Battery Turn the camera off (A 19) and be sure that the power-on lamp and the monitor have turned off before returning it to read and follow the warnings... eject the battery, open the battery-chamber/ memory card slot cover and slide the orange battery latch in the direction indicated by hand (2). • The camera, battery, or memory card may be hot immediately after using the...
... opening the battery-chamber/memory card slot cover. The battery can then be removed by the arrow (1). Inserting the Battery Removing the Battery Turn the camera off (A 19) and be sure that the power-on lamp and the monitor have turned off before returning it to read and follow the warnings... eject the battery, open the battery-chamber/ memory card slot cover and slide the orange battery latch in the direction indicated by hand (2). • The camera, battery, or memory card may be hot immediately after using the...


