User Manual
Page 11
... Changing the Album Icons ...127 Finding Images in Auto Sort Mode 129 Viewing Images in Auto Sort Mode ...129 Operations in Auto Sort Mode...131 Viewing Images by Date (List by Date 132 Viewing Images in List by Date Mode 132 Operations in List by Date Mode ...133 Playback Options: Playback Menu 134 a Print Order: Setting the Pictures and Number of Copies to Print 135 b Slide Show...138 d Protect ...139 Selecting Pictures ...140 f Rotate Image...141 i Hide Image...141 E Voice Memo...142 h Copy: Copying Between Internal Memory and Memory Card 144 C Sequence Display...
... Changing the Album Icons ...127 Finding Images in Auto Sort Mode 129 Viewing Images in Auto Sort Mode ...129 Operations in Auto Sort Mode...131 Viewing Images by Date (List by Date 132 Viewing Images in List by Date Mode 132 Operations in List by Date Mode ...133 Playback Options: Playback Menu 134 a Print Order: Setting the Pictures and Number of Copies to Print 135 b Slide Show...138 d Protect ...139 Selecting Pictures ...140 f Rotate Image...141 i Hide Image...141 E Voice Memo...142 h Copy: Copying Between Internal Memory and Memory Card 144 C Sequence Display...
User Manual
Page 37
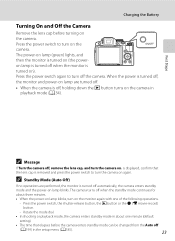
... power switch, the shutter-release button, the c button or the b (e movie-record) button. - The power-on lamp (green) lights, and then the monitor is turned on (the poweron lamp is turned off automatically, the camera enters standby mode and the power-on the camera in playback mode (A34). Rotate the mode dial. • In shooting or playback mode, the camera enters standby mode in the setup menu (A185). 23 is displayed, confirm that elapses before turning on . First Steps C Message...
... power switch, the shutter-release button, the c button or the b (e movie-record) button. - The power-on lamp (green) lights, and then the monitor is turned on (the poweron lamp is turned off automatically, the camera enters standby mode and the power-on the camera in playback mode (A34). Rotate the mode dial. • In shooting or playback mode, the camera enters standby mode in the setup menu (A185). 23 is displayed, confirm that elapses before turning on . First Steps C Message...

User Manual
Page 43
... setup menu (A185) for the shooting menu options Image quality (A83) and Image size (A84). Image quality/image size The current image quality (compression ratio) and image size are recorded to specify settings for more information. • Set Vibration reduction to Off when using a tripod to internal memory (approx. 102 MB). Rotate the mode dial. When a memory card is inserted, C is not displayed and pictures are displayed. record) button. - Basic Photography and Playback: A (Auto) Mode Step 1 Turn the Camera On and Select A (Auto) Mode Indicators Displayed...
... setup menu (A185) for the shooting menu options Image quality (A83) and Image size (A84). Image quality/image size The current image quality (compression ratio) and image size are recorded to specify settings for more information. • Set Vibration reduction to Off when using a tripod to internal memory (approx. 102 MB). Rotate the mode dial. When a memory card is inserted, C is not displayed and pictures are displayed. record) button. - Basic Photography and Playback: A (Auto) Mode Step 1 Turn the Camera On and Select A (Auto) Mode Indicators Displayed...
User Manual
Page 237
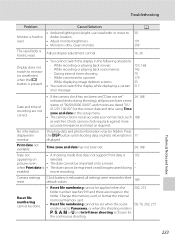
.... Change the memory card, or format the internal memory/memory card. • Reset file numbering cannot be set when the scene 58, 76, 202, 215 mode is set . 24, 188 Date not • A shooting mode that does not support Print date is 192 appearing on still images saved during shooting), still pictures have a time stamp of recording are not correct. • If the camera clock has not been set ("Date not set" 24, 188 indicator blinks during - read . While displaying image deletion screens 35 • You cannot switch...
.... Change the memory card, or format the internal memory/memory card. • Reset file numbering cannot be set when the scene 58, 76, 202, 215 mode is set . 24, 188 Date not • A shooting mode that does not support Print date is 192 appearing on still images saved during shooting), still pictures have a time stamp of recording are not correct. • If the camera clock has not been set ("Date not set" 24, 188 indicator blinks during - read . While displaying image deletion screens 35 • You cannot switch...

User Manual
Page 238
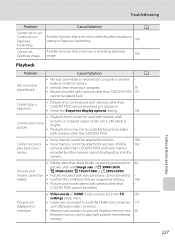
... time the problem occurred. Troubleshooting Problem Cause/Solution A Battery temperature is e (Night portrait) or HDR in a location with a high ambient temperature, the camera temperature may rise. Turn off , and the power- Cause/Solution A Disconnect the HDMI cable or USB cable. 171, 174, 180 • When camera is in playback mode, press the c or shutter-release button. • When menus are used in o (Backlighting) is Off, raise the flash. • When flash indicator blinks, flash...
... time the problem occurred. Troubleshooting Problem Cause/Solution A Battery temperature is e (Night portrait) or HDR in a location with a high ambient temperature, the camera temperature may rise. Turn off , and the power- Cause/Solution A Disconnect the HDMI cable or USB cable. 171, 174, 180 • When camera is in playback mode, press the c or shutter-release button. • When menus are used in o (Backlighting) is Off, raise the flash. • When flash indicator blinks, flash...
User Manual
Page 241
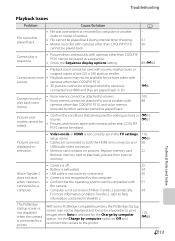
... set in progress. 79 • Movies recorded with cameras other than - Troubleshooting Problem Cause/Solution A Cannot set now is restricting Optimize Optimize image. Playback zoom may not be played back. Cannot play back pictures from internal memory. Another function that is set now is restricting the continuous setting or Exposure bracketing. 104 Cannot set Another function that are connected to both the HDMI mini connector 171 and USB/audio video connector. • Memory card contains no pictures. Cannot record or play...
... set in progress. 79 • Movies recorded with cameras other than - Troubleshooting Problem Cause/Solution A Cannot set now is restricting Optimize Optimize image. Playback zoom may not be played back. Cannot play back pictures from internal memory. Another function that is set now is restricting the continuous setting or Exposure bracketing. 104 Cannot set Another function that are connected to both the HDMI mini connector 171 and USB/audio video connector. • Memory card contains no pictures. Cannot record or play...

User Manual
Page 242
... paper size is not 181, 182 compatible with camera. With some PictBridge-compatible printers, the PictBridge startup screen may not be displayed and it may not be played back if overwritten by a computer. - • Up to 999 images and movies in the internal memory or on Nikon Transfer 2, refer to help information contained in auto sort mode. Set Charge by computer. Technical Notes and Index 228 Replace memory card. 26 • Remove memory card to print pictures...
... paper size is not 181, 182 compatible with camera. With some PictBridge-compatible printers, the PictBridge startup screen may not be displayed and it may not be played back if overwritten by a computer. - • Up to 999 images and movies in the internal memory or on Nikon Transfer 2, refer to help information contained in auto sort mode. Set Charge by computer. Technical Notes and Index 228 Replace memory card. 26 • Remove memory card to print pictures...
User Manual
Page 71
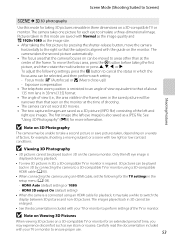
... the setup menu (A108). - To move the camera horizontally to the right so that the subject is aligned with the guide on the monitor. Focus mode (A (Autofocus) or p (Macro close-up)) - See "Using 3D Photography" (E8) for playback, it may take a second picture or save pictures taken, depending on can be moved to areas other than at the time of shooting. • The camera cannot record 3D movies...
... the setup menu (A108). - To move the camera horizontally to the right so that the subject is aligned with the guide on the monitor. Focus mode (A (Autofocus) or p (Macro close-up)) - See "Using 3D Photography" (E8) for playback, it may take a second picture or save pictures taken, depending on can be moved to areas other than at the time of shooting. • The camera cannot record 3D movies...
User Manual
Page 80
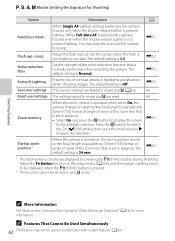
... Zoom memory When the zoom control is operated when set to On, the camera changes in steps to the focal length (equivalent to display the screen for focal length selection. Press the k button to switch the On [w]/Off setting, then press the multi selector K to mode dial M are Displayed" (A14) for more information. Select the Fn button function in highlights and shadows when shooting images. You may not be displayed...
... Zoom memory When the zoom control is operated when set to On, the camera changes in steps to the focal length (equivalent to display the screen for focal length selection. Press the k button to switch the On [w]/Off setting, then press the multi selector K to mode dial M are Displayed" (A14) for more information. Select the Fn button function in highlights and shadows when shooting images. You may not be displayed...

User Manual
Page 81
... D-Lighting (A62) • Image size (A78) • White balance (A61)5 • Continuous (A61) • Exposure bracketing (A61) • Autofocus mode (A62) • Noise reduction filter (A62) • Zoom memory (A62) 1 Choose the standard shooting mode. See "Saving Settings in M Mode" (A64) for shooting (User settings) can be saved in j (Programmed auto), k (Shutter-priority auto), l (Aperture-priority auto) or m (Manual). Shooting is possible in M. Shooting Features M (User Setting Modes) Setting combinations that are frequently used display is saved as a monitor display...
... D-Lighting (A62) • Image size (A78) • White balance (A61)5 • Continuous (A61) • Exposure bracketing (A61) • Autofocus mode (A62) • Noise reduction filter (A62) • Zoom memory (A62) 1 Choose the standard shooting mode. See "Saving Settings in M Mode" (A64) for shooting (User settings) can be saved in j (Programmed auto), k (Shutter-priority auto), l (Aperture-priority auto) or m (Manual). Shooting is possible in M. Shooting Features M (User Setting Modes) Setting combinations that are frequently used display is saved as a monitor display...

User Manual
Page 143
... playback menu to set to Individual pictures, F icon is displayed to represent the images in the sequence. Reference Section B Note on the monitor. Playing and Deleting Images Captured Using Continuous Shooting Mode (Sequence) The images shot in the following operations can be performed when each image in a sequence is displayed in fullframe playback mode, press the k button to display each time you shoot. • Continuous H, Continuous L, Pre-shooting cache, Continuous H: 120 fps or Continuous H: 60 fps in Continuous (E41) in the shooting menu...
... playback menu to set to Individual pictures, F icon is displayed to represent the images in the sequence. Reference Section B Note on the monitor. Playing and Deleting Images Captured Using Continuous Shooting Mode (Sequence) The images shot in the following operations can be performed when each image in a sequence is displayed in fullframe playback mode, press the k button to display each time you shoot. • Continuous H, Continuous L, Pre-shooting cache, Continuous H: 120 fps or Continuous H: 60 fps in Continuous (E41) in the shooting menu...
User Manual
Page 163
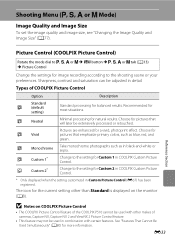
... the mode dial to j, k, l or m M d button M j, k, l or m tab (A13) M Picture Control Change the settings for image recording according to the setting for balanced results. e Monochrome Take monochrome photographs such as blue, red, and green. c Neutral Minimal processing for more information. Sharpness, contrast and saturation can be used in combination with other than Standard is displayed on COOLPIX Picture Control • The COOLPIX Picture Control feature of the COOLPIX P510 cannot be adjusted in black-and-white...
... the mode dial to j, k, l or m M d button M j, k, l or m tab (A13) M Picture Control Change the settings for image recording according to the setting for balanced results. e Monochrome Take monochrome photographs such as blue, red, and green. c Neutral Minimal processing for more information. Sharpness, contrast and saturation can be used in combination with other than Standard is displayed on COOLPIX Picture Control • The COOLPIX Picture Control feature of the COOLPIX P510 cannot be adjusted in black-and-white...

User Manual
Page 193
... the playback menu to copy the pictures stored in thumbnail playback mode (A35). C Sequence Display Options Press the c button (Playback mode) M d button (A13) M C Sequence display options Choose the method used to display a series of pictures. • When changing this setting, before pressing d, first select the desired sequence using full-frame playback mode or thumbnail playback mode. • When the key picture selection screen is turned off. E63 The Playback Menu C Message: "Memory contains no images., is displayed. C More Information See "File and Folder...
... the playback menu to copy the pictures stored in thumbnail playback mode (A35). C Sequence Display Options Press the c button (Playback mode) M d button (A13) M C Sequence display options Choose the method used to display a series of pictures. • When changing this setting, before pressing d, first select the desired sequence using full-frame playback mode or thumbnail playback mode. • When the key picture selection screen is turned off. E63 The Playback Menu C Message: "Memory contains no images., is displayed. C More Information See "File and Folder...
User Manual
Page 218
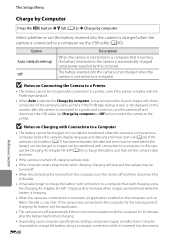
... with direct connection of charging the battery, exit the application. • The camera turns off automatically if there is turned off and then disconnect the USB cable. • It may be reset before the camera's display language and date and time have been set the camera's date and time. • If the camera is no communication with connection to a computer. Charging time increases when images are transferred while the battery is charging. • When the camera is automatically charged using power...
... with direct connection of charging the battery, exit the application. • The camera turns off automatically if there is turned off and then disconnect the USB cable. • It may be reset before the camera's display language and date and time have been set the camera's date and time. • If the camera is no communication with connection to a computer. Charging time increases when images are transferred while the battery is charging. • When the camera is automatically charged using power...

User Manual
Page 233
... movies. File not created with faster write speed. 23 Cannot reset file numbering. E61 Image cannot be Picture is protected. The flash is lowered when the scene mode is between two modes. Error Messages Display Cause/Solution A Failed to save 3D image Failed to save the 3D pictures. • Try shooting again. • Delete unnecessary pictures. • In some shooting conditions, such as home. E8 36 - Sound file cannot be saved. Time out error while recording movie. No more folders can be played back...
... movies. File not created with faster write speed. 23 Cannot reset file numbering. E61 Image cannot be Picture is protected. The flash is lowered when the scene mode is between two modes. Error Messages Display Cause/Solution A Failed to save 3D image Failed to save the 3D pictures. • Try shooting again. • Delete unnecessary pictures. • In some shooting conditions, such as home. E8 36 - Sound file cannot be saved. Time out error while recording movie. No more folders can be played back...
User Manual
Page 243
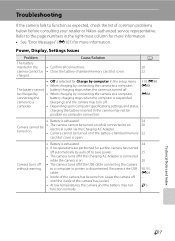
... specifications, settings, and status, - Reconnect the USB 90, 93, cable. Leave the camera off . Camera cannot be • Close the battery-chamber/memory card slot cover. 22 charged. • Off is selected for more information. Power, Display, Settings Issues Problem Cause/Solution A The battery inserted in the • Confirm all connections. 20 camera cannot be turned on while connected to an electrical outlet via the Charging AC Adapter. charging the battery inserted in the setup menu...
... specifications, settings, and status, - Reconnect the USB 90, 93, cable. Leave the camera off . Camera cannot be • Close the battery-chamber/memory card slot cover. 22 charged. • Off is selected for more information. Power, Display, Settings Issues Problem Cause/Solution A The battery inserted in the • Confirm all connections. 20 camera cannot be turned on while connected to an electrical outlet via the Charging AC Adapter. charging the battery inserted in the setup menu...
User Manual
Page 244
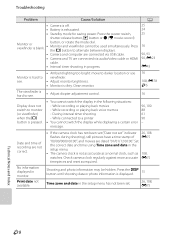
... cable. • Interval timer shooting in monitor. During interval timer shooting - Print date not available. While recording or playing back movies - Troubleshooting Problem Cause/Solution • Camera is off. • Battery is exhausted. • Standby mode for saving power: Press the power switch, shutter-release button, c button or b (e movie-record) Monitor or viewfinder is displayed. 15 Time zone and date in the setup menu has not been set " indicator 26, 108 flashes during shooting), still pictures have a time stamp of recording are connected via USB cable...
... cable. • Interval timer shooting in monitor. During interval timer shooting - Print date not available. While recording or playing back movies - Troubleshooting Problem Cause/Solution • Camera is off. • Battery is exhausted. • Standby mode for saving power: Press the power switch, shutter-release button, c button or b (e movie-record) Monitor or viewfinder is displayed. 15 Time zone and date in the setup menu has not been set " indicator 26, 108 flashes during shooting), still pictures have a time stamp of recording are connected via USB cable...
User Manual
Page 245
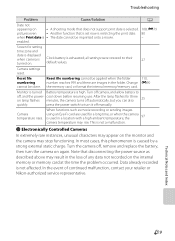
... flashes for three on • A shooting mode that does not support print date is selected. 108, E79 pictures even • Another function that disconnecting the power source as movie recording or sending images using an Eye-Fi card are images in a location with a high ambient temperature, the 97 camera temperature may stop functioning. press the power switch to their default values. 27 Camera settings reset. When functions such as described above may appear on the internal memory...
... flashes for three on • A shooting mode that does not support print date is selected. 108, E79 pictures even • Another function that disconnecting the power source as movie recording or sending images using an Eye-Fi card are images in a location with a high ambient temperature, the 97 camera temperature may stop functioning. press the power switch to their default values. 27 Camera settings reset. When functions such as described above may appear on the internal memory...
User Manual
Page 249
... print images when Auto is not set in 3D. - - Set the Charge by computer or another make or model of size 320 × 240 pixels or smaller. A - 61 96 Cannot play a sequence. • Pictures shot continuously with cameras other than COOLPIX - cameras other cameras cannot be played back. 100 88 Pictures and movies cannot be used is connected to both the HDMI mini connector and USB/audio video connector. • Memory card contains no pictures. Cause/Solution • File...
... print images when Auto is not set in 3D. - - Set the Charge by computer or another make or model of size 320 × 240 pixels or smaller. A - 61 96 Cannot play a sequence. • Pictures shot continuously with cameras other than COOLPIX - cameras other cameras cannot be played back. 100 88 Pictures and movies cannot be used is connected to both the HDMI mini connector and USB/audio video connector. • Memory card contains no pictures. Cause/Solution • File...

User Manual
Page 250
... file may not be recorded onto movies. - E73 card or replace the memory card with camera. Up to 100 log data events can be performed for the first time, when positioning was changed, it camera as much as possible in an open-air area. Unable to save log data. • • Up to 36 log data events can be printed are not displayed. Troubleshooting Problem Pictures to be stored on the shooting screen...
... file may not be recorded onto movies. - E73 card or replace the memory card with camera. Up to 100 log data events can be performed for the first time, when positioning was changed, it camera as much as possible in an open-air area. Unable to save log data. • • Up to 36 log data events can be printed are not displayed. Troubleshooting Problem Pictures to be stored on the shooting screen...


