User Manual
Page 4
...around the neck of a fall or other small parts into their entirety before using this Nikon product, to a Nikon-authorized service representative for inspection, after unplugging the product and/or removing the battery. Keep out of reach of flammable gas, as the result of an infant or child.... be taken to prevent infants from the camera or Charging AC Adapter, unplug the Charging AC Adapter and remove the battery immediately, taking care to a Nikon-authorized service representative for inspection. Do not use the camera or Charging AC Adapter in the presence of flammable gas Do...
...around the neck of a fall or other small parts into their entirety before using this Nikon product, to a Nikon-authorized service representative for inspection, after unplugging the product and/or removing the battery. Keep out of reach of flammable gas, as the result of an infant or child.... be taken to prevent infants from the camera or Charging AC Adapter, unplug the Charging AC Adapter and remove the battery immediately, taking care to a Nikon-authorized service representative for inspection. Do not use the camera or Charging AC Adapter in the presence of flammable gas Do...

User Manual
Page 5
...; Do not immerse in fire or transport or store with metal objects electric shock. Do not inspection. Failure to a Nikon- following precautions when handling the Charging AC • Before replacing the battery, turn the Adapter product off. to observe this precaution could result in electric shock. Failure to -AC inverters. For Your...
...; Do not immerse in fire or transport or store with metal objects electric shock. Do not inspection. Failure to a Nikon- following precautions when handling the Charging AC • Before replacing the battery, turn the Adapter product off. to observe this precaution could result in electric shock. Failure to -AC inverters. For Your...

User Manual
Page 8
...charge of waste management. This symbol on this product is to be collected separately. This symbol indicates that the battery is to be collected separately. Wash hands after handling. Nikon Inc., 1300 Walt Whitman Road, Melville, New York 11747-3064 USA Tel: 631-547-4200 Notice for ...European countries: vi Notices for separate collection at an appropriate collection point. The following apply only to users in European countries: • All batteries, whether marked with Canadian ICES-003. ATTENTION Cet appareil numérique de la classe B est conforme à la norme NMB-003 du...
...charge of waste management. This symbol on this product is to be collected separately. This symbol indicates that the battery is to be collected separately. Wash hands after handling. Nikon Inc., 1300 Walt Whitman Road, Melville, New York 11747-3064 USA Tel: 631-547-4200 Notice for ...European countries: vi Notices for separate collection at an appropriate collection point. The following apply only to users in European countries: • All batteries, whether marked with Canadian ICES-003. ATTENTION Cet appareil numérique de la classe B est conforme à la norme NMB-003 du...
User Manual
Page 9
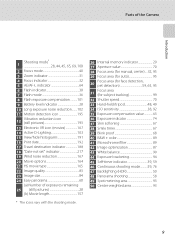
......14 Pressing the Shutter-Release Button Halfway/All the Way 15 x (Monitor) Button ...16 s (Display) Button ...17 First Steps ...18 Inserting the Battery...18 Removing the Battery...19 Charging the Battery ...20 Turning On and Off the Camera...23 Setting the Display Language, Date and Time 24 Inserting the Memory Card ...26 Removing...
......14 Pressing the Shutter-Release Button Halfway/All the Way 15 x (Monitor) Button ...16 s (Display) Button ...17 First Steps ...18 Inserting the Battery...18 Removing the Battery...19 Charging the Battery ...20 Turning On and Off the Camera...23 Setting the Display Language, Date and Time 24 Inserting the Memory Card ...26 Removing...
User Manual
Page 16
... the attention of the Nikon representative in your area. For more information about Nikon brand accessories, contact a local authorized Nikon dealer. Visit the site below for use of third-party rechargeable Li-ion batteries not bearing the Nikon holographic seal could interfere with... stored in a retrieval system, or translated into any language in any form, by Nikon specifically for contact information: http://imaging.nikon.com/ Use Only Nikon Brand Electronic Accessories Nikon COOLPIX cameras are engineered and proven to operate within the operational and safety requirements of this ...
... the attention of the Nikon representative in your area. For more information about Nikon brand accessories, contact a local authorized Nikon dealer. Visit the site below for use of third-party rechargeable Li-ion batteries not bearing the Nikon holographic seal could interfere with... stored in a retrieval system, or translated into any language in any form, by Nikon specifically for contact information: http://imaging.nikon.com/ Use Only Nikon Brand Electronic Accessories Nikon COOLPIX cameras are engineered and proven to operate within the operational and safety requirements of this ...

User Manual
Page 19
... selector 12 16 k (apply selection) button 12 17 d button......13, 45, 82, 135, 163, 186 18 l (delete) button 35, 143, 170 19 Tripod socket 20 Battery-chamber/ memory card slot cover 18, 26 21 Cover latch 18, 26 22 Memory card slot 26 23...
... selector 12 16 k (apply selection) button 12 17 d button......13, 45, 82, 135, 163, 186 18 l (delete) button 35, 143, 170 19 Tripod socket 20 Battery-chamber/ memory card slot cover 18, 26 21 Cover latch 18, 26 22 Memory card slot 26 23...
User Manual
Page 23
..., 69, 108 2 Focus mode 40 3 Zoom indicator 31 4 Focus indicator 32 5 AE/AF-L indicator 64 6 Flash indicator 38 7 Flash mode 36 8 Flash exposure compensation ..........101 9 Battery level indicator 28 10 Long exposure noise reduction........102 11 Motion detection icon 195 Vibration reduction icon 12 (still pictures 193 13 Electronic VR icon...
..., 69, 108 2 Focus mode 40 3 Zoom indicator 31 4 Focus indicator 32 5 AE/AF-L indicator 64 6 Flash indicator 38 7 Flash mode 36 8 Flash exposure compensation ..........101 9 Battery level indicator 28 10 Long exposure noise reduction........102 11 Motion detection icon 195 Vibration reduction icon 12 (still pictures 193 13 Electronic VR icon...

User Manual
Page 24
... 3 Protect icon 139 4 Sequence display 113, 145 5 Volume indicator 142, 168 Album icon in favorite pictures mode1 6 124 Category icon in auto sort mode1 129 7 Battery level indicator 28 8 Movie options2 164 9 Image quality2 83 10 Image size2 84 11 Easy panorama indicator 62 (a) Current frame number/total 12 number of...
... 3 Protect icon 139 4 Sequence display 113, 145 5 Volume indicator 142, 168 Album icon in favorite pictures mode1 6 124 Category icon in auto sort mode1 129 7 Battery level indicator 28 8 Movie options2 164 9 Image quality2 83 10 Image size2 84 11 Easy panorama indicator 62 (a) Current frame number/total 12 number of...
User Manual
Page 32
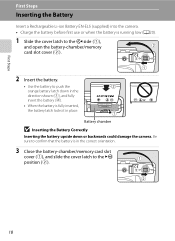
... (A20). 1 Slide the cover latch to the Y side (1), and open the battery-chamber/memory card slot cover (2). 2 Insert the battery. • Use the battery to the Z position (2). 18 Be sure to confirm that the battery is in the correct orientation. 3 Close the battery-chamber/memory card slot cover (1), and slide the cover latch to push...
... (A20). 1 Slide the cover latch to the Y side (1), and open the battery-chamber/memory card slot cover (2). 2 Insert the battery. • Use the battery to the Z position (2). 18 Be sure to confirm that the battery is in the correct orientation. 3 Close the battery-chamber/memory card slot cover (1), and slide the cover latch to push...
User Manual
Page 33
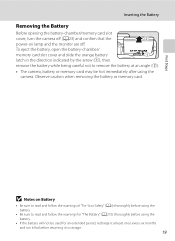
... thoroughly before using the camera. To eject the battery, open the battery-chamber/ memory card slot cover and slide the orange battery latch in the direction indicated by the arrow (1), then remove the battery while being careful not to remove the battery at least once every six months and run it... flat before using the battery. • If the battery will not be used for "The Battery" (A210) thoroughly before returning it at an angle ...
... thoroughly before using the camera. To eject the battery, open the battery-chamber/ memory card slot cover and slide the orange battery latch in the direction indicated by the arrow (1), then remove the battery while being careful not to remove the battery at least once every six months and run it... flat before using the battery. • If the battery will not be used for "The Battery" (A210) thoroughly before returning it at an angle ...

User Manual
Page 34
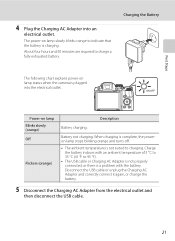
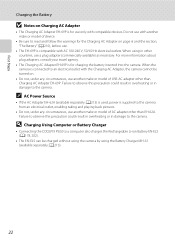
... to insert connectors at an angle, and do not use force when connecting or disconnecting the USB cable. First Steps Charging the Battery Charge the supplied Rechargeable Li-ion Battery EN-EL5 inserted into the camera, by connecting the supplied Charging AC Adapter EH-69P to the camera via the supplied USB..., and then plugging the Charging AC Adapter into the camera (A18). Do not attempt to the country or region in Argentina and Korea. 2 Insert the battery into an electrical outlet. 1 Prepare the Charging AC Adapter EH-69P.
... to insert connectors at an angle, and do not use force when connecting or disconnecting the USB cable. First Steps Charging the Battery Charge the supplied Rechargeable Li-ion Battery EN-EL5 inserted into the camera, by connecting the supplied Charging AC Adapter EH-69P to the camera via the supplied USB..., and then plugging the Charging AC Adapter into the camera (A18). Do not attempt to the country or region in Argentina and Korea. 2 Insert the battery into an electrical outlet. 1 Prepare the Charging AC Adapter EH-69P.
User Manual
Page 35
... the camera is charging. Disconnect the USB cable or unplug the Charging AC Adapter and correctly connect it again, or change the battery. 5 Disconnect the Charging AC Adapter from the electrical outlet and then disconnect the USB cable. 21 First Steps 4 Plug the...electrical outlet. About four hours and 50 minutes are required to charging. Charging the Battery The following chart explains power-on lamp Blinks slowly (orange) Off Flickers (orange) Description Battery charging. Battery not charging. When charging is complete, the poweron lamp stops blinking orange and turns ...
... the camera is charging. Disconnect the USB cable or unplug the Charging AC Adapter and correctly connect it again, or change the battery. 5 Disconnect the Charging AC Adapter from the electrical outlet and then disconnect the USB cable. 21 First Steps 4 Plug the...electrical outlet. About four hours and 50 minutes are required to charging. Charging the Battery The following chart explains power-on lamp Blinks slowly (orange) Off Flickers (orange) Description Battery charging. Battery not charging. When charging is complete, the poweron lamp stops blinking orange and turns ...
User Manual
Page 36
...The EN-EL5 can be turned on page iii and the section, "The Battery" (A210), before use. • The EH-69P is compatible with compatible devices. D Charging Using Computer or Battery Charger • Connecting the COOLPIX P500 to read and follow the warnings for use only with AC 100-240... V, 50/60 Hz electrical outlets. First Steps Charging the Battery B Notes on Charging AC Adapter • The Charging ...
...The EN-EL5 can be turned on page iii and the section, "The Battery" (A210), before use. • The EH-69P is compatible with compatible devices. D Charging Using Computer or Battery Charger • Connecting the COOLPIX P500 to read and follow the warnings for use only with AC 100-240... V, 50/60 Hz electrical outlets. First Steps Charging the Battery B Notes on Charging AC Adapter • The Charging ...
User Manual
Page 37
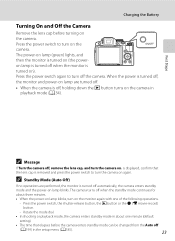
Charging the Battery Turning On and Off the Camera Remove the lens cap before the camera enters standby mode can be changed from the Auto off the camera. ...
Charging the Battery Turning On and Off the Camera Remove the lens cap before the camera enters standby mode can be changed from the Auto off the camera. ...
User Manual
Page 40
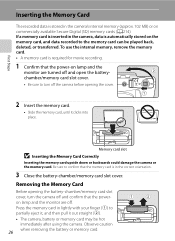
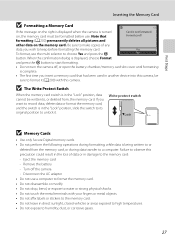
...off the camera before opening the cover. 2 Insert the memory card. • Slide the memory card, until it out straight (2). • The camera, battery or memory card may be played back, deleted, or transferred. To use the internal memory, remove the memory card. • A memory card is required...Memory Card Correctly Inserting the memory card upside down or backwards could damage the camera or the memory card. Observe caution when removing the battery or memory card. 26 First Steps Inserting the Memory Card The recorded data is stored in the camera's internal memory (approx. 102 MB...
...off the camera before opening the cover. 2 Insert the memory card. • Slide the memory card, until it out straight (2). • The camera, battery or memory card may be played back, deleted, or transferred. To use the internal memory, remove the memory card. • A memory card is required...Memory Card Correctly Inserting the memory card upside down or backwards could damage the camera or the memory card. Observe caution when removing the battery or memory card. 26 First Steps Inserting the Memory Card The recorded data is stored in the camera's internal memory (approx. 102 MB...
User Manual
Page 41
... the memory card. When the confirmation dialog is complete. • The first time you insert a memory card that Format card? Turn off , or open the battery-chamber/memory card slot cover until formatting is displayed, choose Format and press the k button to start formatting. • Do not turn the camera off... to high temperatures. • Do not expose to format it . formatting (A200) permanently deletes all pictures and other data on the memory card. Remove the battery -
... the memory card. When the confirmation dialog is complete. • The first time you insert a memory card that Format card? Turn off , or open the battery-chamber/memory card slot cover until formatting is displayed, choose Format and press the k button to start formatting. • Do not turn the camera off... to high temperatures. • Do not expose to format it . formatting (A200) permanently deletes all pictures and other data on the memory card. Remove the battery -
User Manual
Page 42
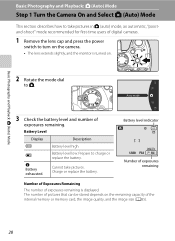
... Playback: A (Auto) Mode Step 1 Turn the Camera On and Select A (Auto) Mode This section describes how to take pictures. B Battery level low. Battery level indicator 1/250 F5.6 32 Number of exposures remaining Number of Exposures Remaining The number of exposures remaining. Charge or replace the... battery. Auto mode 3 Check the battery level and number of exposures remaining is turned on the remaining capacity of the internal memory or memory card, the...
... Playback: A (Auto) Mode Step 1 Turn the Camera On and Select A (Auto) Mode This section describes how to take pictures. B Battery level low. Battery level indicator 1/250 F5.6 32 Number of exposures remaining Number of Exposures Remaining The number of exposures remaining. Charge or replace the... battery. Auto mode 3 Check the battery level and number of exposures remaining is turned on the remaining capacity of the internal memory or memory card, the...
User Manual
Page 47
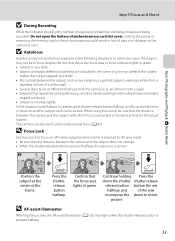
... shirt, is standing in green: • Subject is pressed halfway. 33 D Focus Lock Use focus lock to the camera or card. Do not open the battery-chamber/memory card slot cover. Press the shutterrelease button halfway. 1/250 F5.6 Confirm that subject appear very dark) • No contrast between the camera and...
... shirt, is standing in green: • Subject is pressed halfway. 33 D Focus Lock Use focus lock to the camera or card. Do not open the battery-chamber/memory card slot cover. Press the shutterrelease button halfway. 1/250 F5.6 Confirm that subject appear very dark) • No contrast between the camera and...
User Manual
Page 94
... picture is turned off and the power-on Interval Timer Shooting • To prevent the camera from turning off unexpectedly during shooting, use a fully charged battery. • To power the camera continuously for more information. 80 D More Information See "File and Folder Names" (A215) for extended periods, use an AC Adapter...
... picture is turned off and the power-on Interval Timer Shooting • To prevent the camera from turning off unexpectedly during shooting, use a fully charged battery. • To power the camera continuously for more information. 80 D More Information See "File and Folder Names" (A215) for extended periods, use an AC Adapter...

User Manual
Page 122
... (A103) 1 Choose the standard shooting mode. This is possible in j (Programmed auto), k (Shutter-priority auto), l (Aperture-priority auto), and m (Manual). More on Clock Battery If the internal clock battery (A189) is exhausted, the settings saved in M will also be saved when set to E (manual focus). 4 The preset value for shooting simply by...
... (A103) 1 Choose the standard shooting mode. This is possible in j (Programmed auto), k (Shutter-priority auto), l (Aperture-priority auto), and m (Manual). More on Clock Battery If the internal clock battery (A189) is exhausted, the settings saved in M will also be saved when set to E (manual focus). 4 The preset value for shooting simply by...


