User Manual
Page 15
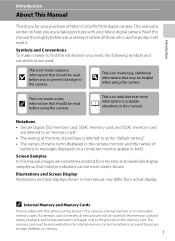
... Illustrations and text displays shown in bold. Notations • Secure Digital (SD) memory card, SDHC memory card, and SDXC memory card are referred to as "memory card." • The setting at the time of purchase is written to the pictures on the memory card and delete, playback... to as the "default setting." • The names of menu items displayed in the camera monitor, and the names of Nikon COOLPIX P500 digital camera. If a memory card is available elsewhere in the camera's internal memory or on a computer monitor appear in this manual thoroughly before using the camera.
... Illustrations and text displays shown in bold. Notations • Secure Digital (SD) memory card, SDHC memory card, and SDXC memory card are referred to as "memory card." • The setting at the time of purchase is written to the pictures on the memory card and delete, playback... to as the "default setting." • The names of menu items displayed in the camera monitor, and the names of Nikon COOLPIX P500 digital camera. If a memory card is available elsewhere in the camera's internal memory or on a computer monitor appear in this manual thoroughly before using the camera.

User Manual
Page 105
...measured white balance value will be set White balance to b Preset manual, then press the k button. • The lens extends to the zoom position for when the flash fires. B Note on Shooting Cancel Measure Reference object frame 5 Press the k button to measure the white balance ... with reddish light) look as though they were shot in the reference object frame. Preset manual Cancel Measure 4 Frame a white or gray reference object in normal light. Shooting Options: Shooting Menu (j, k, l, m Modes) Preset Manual Use when you want to make pictures shot under the lighting that...
...measured white balance value will be set White balance to b Preset manual, then press the k button. • The lens extends to the zoom position for when the flash fires. B Note on Shooting Cancel Measure Reference object frame 5 Press the k button to measure the white balance ... with reddish light) look as though they were shot in the reference object frame. Preset manual Cancel Measure 4 Frame a white or gray reference object in normal light. Shooting Options: Shooting Menu (j, k, l, m Modes) Preset Manual Use when you want to make pictures shot under the lighting that...
User Manual
Page 191
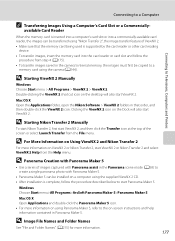
...; For more information. 177 Double-clicking the ViewNX 2 shortcut icon on ViewNX 2 or Nikon Transfer 2, start Panorama Maker 5. Clicking the ViewNX 2 icon on a computer using Panorama Maker 5, refer to the on-screen instructions and help information contained in the Panorama scene mode (A58)...5 can be transferred using the camera (A144). Windows Choose Start menu>All Programs>ArcSoft Panorama Maker 5>Panorama Maker 5. D Starting Nikon Transfer 2 Manually To start Nikon Transfer 2, first start ViewNX 2. D Image File Names and Folder Names See "File and Folder Names" (A215) for more ...
...; For more information. 177 Double-clicking the ViewNX 2 shortcut icon on ViewNX 2 or Nikon Transfer 2, start Panorama Maker 5. Clicking the ViewNX 2 icon on a computer using Panorama Maker 5, refer to the on-screen instructions and help information contained in the Panorama scene mode (A58)...5 can be transferred using the camera (A144). Windows Choose Start menu>All Programs>ArcSoft Panorama Maker 5>Panorama Maker 5. D Starting Nikon Transfer 2 Manually To start Nikon Transfer 2, first start ViewNX 2. D Image File Names and Folder Names See "File and Folder Names" (A215) for more ...
User Manual
Page 4
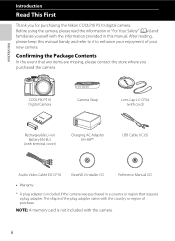
... memory card is included if the camera was purchased in this manual handy and refer to it to enhance your new camera. Confirming the Package Contents In the event that requires a plug adapter. Introduction COOLPIX P510 Digital Camera Camera Strap Lens Cap LC-CP24 (with cord) ... EG-CP16 ViewNX 2 Installer CD Reference Manual CD • Warranty * A plug adapter is not included with the information provided in a country or region that any items are missing, please contact the store where you for purchasing the Nikon COOLPIX P510 digital camera. Introduction Read This First...
... memory card is included if the camera was purchased in this manual handy and refer to it to enhance your new camera. Confirming the Package Contents In the event that requires a plug adapter. Introduction COOLPIX P510 Digital Camera Camera Strap Lens Cap LC-CP24 (with cord) ... EG-CP16 ViewNX 2 Installer CD Reference Manual CD • Warranty * A plug adapter is not included with the information provided in a country or region that any items are missing, please contact the store where you for purchasing the Nikon COOLPIX P510 digital camera. Introduction Read This First...
User Manual
Page 5
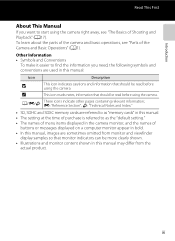
... before using the camera right away, see "Parts of Shooting and Playback" (A17). Introduction Read This First About This Manual If you need, the following symbols and conventions are sometimes omitted from monitor and viewfinder display samples so that monitor indicators ... monitor content shown in this manual may differ from the actual product. E: "Reference Section", F: "Technical Notes and Index." • SD, SDHC and SDXC memory cards are referred to as "memory cards" in this manual. • The setting at the time of purchase is referred to start using the camera...
... before using the camera right away, see "Parts of Shooting and Playback" (A17). Introduction Read This First About This Manual If you need, the following symbols and conventions are sometimes omitted from monitor and viewfinder display samples so that monitor indicators ... monitor content shown in this manual may differ from the actual product. E: "Reference Section", F: "Technical Notes and Index." • SD, SDHC and SDXC memory cards are referred to as "memory cards" in this manual. • The setting at the time of purchase is referred to start using the camera...

User Manual
Page 15
...Recording...102 Changing the GPS Settings (GPS Options Menu 105 General Camera Setup...107 The Setup Menu ...108 Reference Section...E1 Taking Pictures with Manual Focus E2 Using Easy Panorama (Shooting and Playing back E3 Taking Pictures with Easy Panorama E3 Viewing Easy ...Using 3D Photography...E8 j, k, l, m Modes ...E10 j (Programmed auto), k (Shutter-priority auto) or l (Aperture-priority auto)...E10 m (Manual) Mode...E11 Playing and Deleting Images Captured Using Continuous Shooting Mode (Sequence)...E13 Playing Images in a Sequence...E13 Deleting Images in a Sequence...E14 Editing ...
...Recording...102 Changing the GPS Settings (GPS Options Menu 105 General Camera Setup...107 The Setup Menu ...108 Reference Section...E1 Taking Pictures with Manual Focus E2 Using Easy Panorama (Shooting and Playing back E3 Taking Pictures with Easy Panorama E3 Viewing Easy ...Using 3D Photography...E8 j, k, l, m Modes ...E10 j (Programmed auto), k (Shutter-priority auto) or l (Aperture-priority auto)...E10 m (Manual) Mode...E11 Playing and Deleting Images Captured Using Continuous Shooting Mode (Sequence)...E13 Playing Images in a Sequence...E13 Deleting Images in a Sequence...E14 Editing ...

User Manual
Page 30
... 4/ 132 1 Previous or next images can be chosen by rotating the rotary multi selector. 2 When displaying image thumbnail or when the image is magnified, this manual. When Using Playback Mode Select the previous image1/Move the 15/05/2012 15:30 0004.JPG displayed area when the image is displayed. Basic... screen Select the item below* Select the item on the rotary multi selector, or pressing the k button. • The "rotary multi selector" is also referred to as the "multi selector" in shooting mode l or m (A59). Items can also be chosen while a menu is magnified (A35).
... 4/ 132 1 Previous or next images can be chosen by rotating the rotary multi selector. 2 When displaying image thumbnail or when the image is magnified, this manual. When Using Playback Mode Select the previous image1/Move the 15/05/2012 15:30 0004.JPG displayed area when the image is displayed. Basic... screen Select the item below* Select the item on the rotary multi selector, or pressing the k button. • The "rotary multi selector" is also referred to as the "multi selector" in shooting mode l or m (A59). Items can also be chosen while a menu is magnified (A35).
User Manual
Page 131
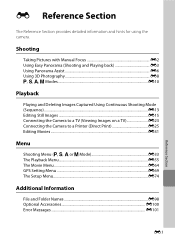
E Reference Section The Reference Section provides detailed information and hints for using the camera. Shooting Taking Pictures with Manual Focus E2 Using Easy Panorama (Shooting and Playing back E3 Using Panorama Assist E6 Using 3D Photography E8 j, k, l, m Modes E10 Playback Playing and Deleting Images ... Movie Menu ...E64 GPS Setting Menu ...E69 The Setup Menu...E74 Additional Information File and Folder Names E98 Optional Accessories E100 Error Messages ...E101 E1 Reference Section
E Reference Section The Reference Section provides detailed information and hints for using the camera. Shooting Taking Pictures with Manual Focus E2 Using Easy Panorama (Shooting and Playing back E3 Using Panorama Assist E6 Using 3D Photography E8 j, k, l, m Modes E10 Playback Playing and Deleting Images ... Movie Menu ...E64 GPS Setting Menu ...E69 The Setup Menu...E74 Additional Information File and Folder Names E98 Optional Accessories E100 Error Messages ...E101 E1 Reference Section
User Manual
Page 132
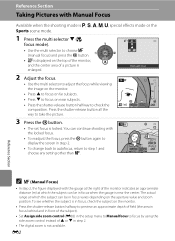
...8226; To change back to autofocus, return to step 1 and choose any setting other than E. 25m 0s 1/250 F5.6 840 Reference Section C E (Manual Focus) • In step 2, the figure displayed with Manual Focus Available when the shooting mode is j, k, l, m, M, special effects mode or the Sports scene mode. 1 Press the...subject can continue shooting with the locked focus. • To readjust the focus, press the k button again to check the composition. E2 Manual focus 2 Adjust the focus. • Use the multi selector to adjust the focus while viewing the image on the monitor. • ...
...8226; To change back to autofocus, return to step 1 and choose any setting other than E. 25m 0s 1/250 F5.6 840 Reference Section C E (Manual Focus) • In step 2, the figure displayed with Manual Focus Available when the shooting mode is j, k, l, m, M, special effects mode or the Sports scene mode. 1 Press the...subject can continue shooting with the locked focus. • To readjust the focus, press the k button again to check the composition. E2 Manual focus 2 Adjust the focus. • Use the multi selector to adjust the focus while viewing the image on the monitor. • ...

User Manual
Page 141
... has nine focus areas, and automatically selects the focus areas containing the subject closest to nine areas) light in focus (up to the camera. j, k, l, m Modes m (Manual) Mode The user controls both the shutter speed and aperture value. • The shutter speed can be set in a range from a maximum speed of 1/4000... desired exposure is in focus, the focus areas that are in green (E47). 25m 0s 1/125 F5.6 840 Exposure indicator 25m 0s 1/125 F8.0 840 Reference Section E11
... has nine focus areas, and automatically selects the focus areas containing the subject closest to nine areas) light in focus (up to the camera. j, k, l, m Modes m (Manual) Mode The user controls both the shutter speed and aperture value. • The shutter speed can be set in a range from a maximum speed of 1/4000... desired exposure is in focus, the focus areas that are in green (E47). 25m 0s 1/125 F5.6 840 Exposure indicator 25m 0s 1/125 F8.0 840 Reference Section E11

User Manual
Page 154
... the cable, do not pull the plug at the TV to operate. • See your TV's instruction manual or other related documentation to check whether your television. E24 Reference Section B Notes on Connecting an HDMI Cable An HDMI cable is oriented correctly. The output terminal on this ... during playback. Connecting the Camera to a TV (Viewing Images on a TV) 3 Tune the television to the video channel. • See the instruction manual provided with an HDMI cable. • Point the remote control at an angle. • Do not connect cables to a TV. Use a commercially available...
... the cable, do not pull the plug at the TV to operate. • See your TV's instruction manual or other related documentation to check whether your television. E24 Reference Section B Notes on Connecting an HDMI Cable An HDMI cable is oriented correctly. The output terminal on this ... during playback. Connecting the Camera to a TV (Viewing Images on a TV) 3 Tune the television to the video channel. • See the instruction manual provided with an HDMI cable. • Point the remote control at an angle. • Do not connect cables to a TV. Use a commercially available...

User Manual
Page 164
... k button to the previous screen. Shooting Menu (j, k, l or m Mode) Customizing Existing COOLPIX Picture Controls: Quick Adjust and Manual Adjust COOLPIX Picture Control can be customized using a grid. View grid Standard Quick adjust Image sharpening Contrast Saturation Reset Back Reference Section C View Grid of COOLPIX Picture Control When the zoom control is rotated toward g (i) again to...
... k button to the previous screen. Shooting Menu (j, k, l or m Mode) Customizing Existing COOLPIX Picture Controls: Quick Adjust and Manual Adjust COOLPIX Picture Control can be customized using a grid. View grid Standard Quick adjust Image sharpening Contrast Saturation Reset Back Reference Section C View Grid of COOLPIX Picture Control When the zoom control is rotated toward g (i) again to...
User Manual
Page 165
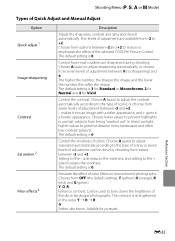
Choose A (auto) to tone down the brightness of the selected COOLPIX Picture Control. Control the vividness of color filters on monochrome photographs. Y, O, R: Enhance contrast. The default setting is 0. The higher the ... Menu (j, k, l or m Mode) Types of adjustment between -3 and +3. - Control how much outlines are available from seven levels of Quick Adjust and Manual Adjust Option Quick adjust 1 Image sharpening Contrast Saturation 2 Filter effects 3 Description Adjust the sharpness, contrast and saturation levels automatically. makes it into an image with...
Choose A (auto) to tone down the brightness of the selected COOLPIX Picture Control. Control the vividness of color filters on monochrome photographs. Y, O, R: Enhance contrast. The default setting is 0. The higher the ... Menu (j, k, l or m Mode) Types of adjustment between -3 and +3. - Control how much outlines are available from seven levels of Quick Adjust and Manual Adjust Option Quick adjust 1 Image sharpening Contrast Saturation 2 Filter effects 3 Description Adjust the sharpness, contrast and saturation levels automatically. makes it into an image with...

User Manual
Page 166
B Note on Contrast When Active D-Lighting (E53) is set manually are disabled if quick adjust is selected. Press J or K to ...levels of Image sharpening cannot be adjusted if Custom 1 or Custom 2 is used in the COOLPIX Picture Control grid. Reference Section B Note on the monitor during shooting. Check the results in Custom 1 and Custom ...• Results for contrast and saturation vary with the exposure, and the position and size of the original COOLPIX Picture Control can be previewed on Image Sharpening The effects of gradation. Shooting Menu (j, k, l or m Mode)...
B Note on Contrast When Active D-Lighting (E53) is set manually are disabled if quick adjust is selected. Press J or K to ...levels of Image sharpening cannot be adjusted if Custom 1 or Custom 2 is used in the COOLPIX Picture Control grid. Reference Section B Note on the monitor during shooting. Check the results in Custom 1 and Custom ...• Results for contrast and saturation vary with the exposure, and the position and size of the original COOLPIX Picture Control can be previewed on Image Sharpening The effects of gradation. Shooting Menu (j, k, l or m Mode)...
User Manual
Page 168
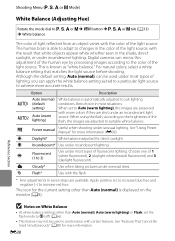
... more accurate results. g Flash* Use with the result that matches the light source before shooting. The icon for direct sunlight. E38 Reference Section b Preset manual Useful when shooting under overcast skies. When set the flash mode to suitable white balance. Shooting Menu (j, k, l or m Mode) White Balance (Adjusting Hue) Rotate the ...
... more accurate results. g Flash* Use with the result that matches the light source before shooting. The icon for direct sunlight. E38 Reference Section b Preset manual Useful when shooting under overcast skies. When set the flash mode to suitable white balance. Shooting Menu (j, k, l or m Mode) White Balance (Adjusting Hue) Rotate the ...

User Manual
Page 169
...most recently measured white balance value, select Cancel and press the k button. Preset manual Cancel Measure 4 Frame a white or gray reference object in normal light. Shooting Menu (j, k, l or m Mode) Using Preset Manual Use when you want to Auto (normal), Auto (warm lighting) or Flash. E39...light) look as though they were shot in the reference object frame. Preset manual Cancel Measure Reference object frame 5 Press the k button to the zoom position for when the flash fires. Reference Section B Note on Preset Manual The camera cannot measure a white balance value for ...
...most recently measured white balance value, select Cancel and press the k button. Preset manual Cancel Measure 4 Frame a white or gray reference object in normal light. Shooting Menu (j, k, l or m Mode) Using Preset Manual Use when you want to Auto (normal), Auto (warm lighting) or Flash. E39...light) look as though they were shot in the reference object frame. Preset manual Cancel Measure Reference object frame 5 Press the k button to the zoom position for when the flash fires. Reference Section B Note on Preset Manual The camera cannot measure a white balance value for ...
User Manual
Page 175
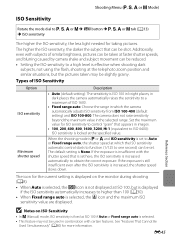
...tab (A13) M ISO sensitivity The higher the ISO sensitivity, the less light needed for the current setting is displayed on ISO Sensitivity • In m (Manual) mode, ISO sensitivity is fixed at ISO 100 if Auto or Fixed range auto is selected. • This feature may be set to Auto or...Setting the ISO sensitivity to obtain the correct exposure. If the exposure is insufficient with certain features. The icon for taking pictures. E45 Reference Section The camera does not raise sensitivity beyond the maximum value in bright places; Types of ISO 1600. • Fixed range auto: ...
...tab (A13) M ISO sensitivity The higher the ISO sensitivity, the less light needed for the current setting is displayed on ISO Sensitivity • In m (Manual) mode, ISO sensitivity is fixed at ISO 100 if Auto or Fixed range auto is selected. • This feature may be set to Auto or...Setting the ISO sensitivity to obtain the correct exposure. If the exposure is insufficient with certain features. The icon for taking pictures. E45 Reference Section The camera does not raise sensitivity beyond the maximum value in bright places; Types of ISO 1600. • Fixed range auto: ...
User Manual
Page 176
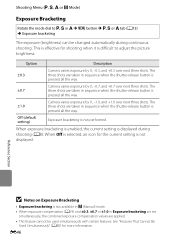
... is not performed. The ±1.0 three shots are applied. • This feature cannot be changed automatically during shooting (A8). Reference Section B Notes on Exposure Bracketing • Exposure bracketing is not available in m (Manual) mode. • When exposure compensation (A74) and ±0.3, ±0.7 or ±1.0 in Exposure bracketing are set simultaneously, the combined...
... is not performed. The ±1.0 three shots are applied. • This feature cannot be changed automatically during shooting (A8). Reference Section B Notes on Exposure Bracketing • Exposure bracketing is not available in m (Manual) mode. • When exposure compensation (A74) and ±0.3, ±0.7 or ±1.0 in Exposure bracketing are set simultaneously, the combined...

User Manual
Page 178
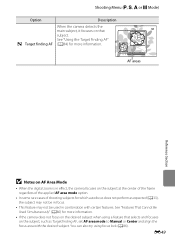
...to temporarily cancel focus area selection, and then adjust each setting. - See "Using Subject Tracking" (E50). 25m 0s 1/250 F5.6 840 Focus area End Reference Section E48 Rotate the multi selector or press H, I, J or K to the focus area selection screen, press the k button again. Flash mode, focus ...to where the subject is relatively still and not positioned at the center of the frame. Shooting Menu (j, k, l or m Mode) Option x Manual y Center s Subject tracking Description Choose manually the focus position from 99 areas in which the intended subject is , and take a picture.
...to temporarily cancel focus area selection, and then adjust each setting. - See "Using Subject Tracking" (E50). 25m 0s 1/250 F5.6 840 Focus area End Reference Section E48 Rotate the multi selector or press H, I, J or K to the focus area selection screen, press the k button again. Flash mode, focus ...to where the subject is relatively still and not positioned at the center of the frame. Shooting Menu (j, k, l or m Mode) Option x Manual y Center s Subject tracking Description Choose manually the focus position from 99 areas in which the intended subject is , and take a picture.
User Manual
Page 179
See "Features That Cannot Be Used Simultaneously" (A80) for more information. 1/250 F5.6 AF areas Reference Section B Notes on AF Area Mode • When the digital zoom is in effect, the camera focuses on the subject, such as expected (A33), the ... mode option. • In some rare cases of shooting subjects for which autofocus does not perform as Target finding AF, set AF area mode to Manual or Center and align the focus area with certain features.
See "Features That Cannot Be Used Simultaneously" (A80) for more information. 1/250 F5.6 AF areas Reference Section B Notes on AF Area Mode • When the digital zoom is in effect, the camera focuses on the subject, such as expected (A33), the ... mode option. • In some rare cases of shooting subjects for which autofocus does not perform as Target finding AF, set AF area mode to Manual or Center and align the focus area with certain features.


