
User Manual
Page 2
... are trademarks of SD-3C, LLC. • PictBridge is granted or shall be obtained from a video provider licensed to (i) encode video in compliance with your Nikon product are trademarks of Apple Inc., registered in the U.S. Trademark Information • Microsoft, Windows and Windows Vista are either registered trademarks or trademarks of Microsoft...
... are trademarks of SD-3C, LLC. • PictBridge is granted or shall be obtained from a video provider licensed to (i) encode video in compliance with your Nikon product are trademarks of Apple Inc., registered in the U.S. Trademark Information • Microsoft, Windows and Windows Vista are either registered trademarks or trademarks of Microsoft...

User Manual
Page 3
Introduction First Steps Basic Photography and Playback: A (Auto) Mode More on Shooting More on Playback Editing Pictures Movie Recording and Playback Connecting to Televisions, Computers and Printers Basic Camera Setup Caring for the Camera Technical Notes and Index i
Introduction First Steps Basic Photography and Playback: A (Auto) Mode More on Shooting More on Playback Editing Pictures Movie Recording and Playback Connecting to Televisions, Computers and Printers Basic Camera Setup Caring for the Camera Technical Notes and Index i
User Manual
Page 4
...or removing the battery. Continued operation could result in injury. Should the camera or Charging AC Adapter break open as this Nikon product, to prevent possible injury. This icon marks warnings, information that should be read before using this could cause permanent ...visual impairment. After removing or disconnecting the power source, take the product to a Nikon-authorized service representative for inspection. Repairs should be performed only by qualified technicians. Handle the camera strap with care Never place ...
...or removing the battery. Continued operation could result in injury. Should the camera or Charging AC Adapter break open as this Nikon product, to prevent possible injury. This icon marks warnings, information that should be read before using this could cause permanent ...visual impairment. After removing or disconnecting the power source, take the product to a Nikon-authorized service representative for inspection. Repairs should be performed only by qualified technicians. Handle the camera strap with care Never place ...

User Manual
Page 5
.... electric shock. • Use only a Rechargeable Li-ion • Dust on or near the Charging AC Adapter during lightning storms. Failure to observe attempt to a Nikon- water. Observe the water. Failure to observe this precaution could result camera and connecting the in fire or transport or store with a dry cloth. this...
.... electric shock. • Use only a Rechargeable Li-ion • Dust on or near the Charging AC Adapter during lightning storms. Failure to observe attempt to a Nikon- water. Observe the water. Failure to observe this precaution could result camera and connecting the in fire or transport or store with a dry cloth. this...

User Manual
Page 6
... CD equipment. For Your Safety Use appropriate cables When connecting cables to the input and output jacks, use only the cables provided or sold by Nikon for the purpose, to your fingers or other objects are not pinched by the lens cover or other moving parts with product regulations.
... CD equipment. For Your Safety Use appropriate cables When connecting cables to the input and output jacks, use only the cables provided or sold by Nikon for the purpose, to your fingers or other objects are not pinched by the lens cover or other moving parts with product regulations.
User Manual
Page 7
... modifications made to provide reasonable protection against harmful interference in the U.S.A. These limits are not expressly approved by Nikon for the power outlet if needed. IMPORTANT SAFETY INSTRUCTIONSSAVE THESE INSTRUCTIONS. Interface Cables Use the interface cables sold or provided by... Nikon Corporation may exceed the limits of Class B Part 15 of the proper configuration for your equipment. If this equipment does cause harmful COOLPIX P500 CAUTIONS Modifications The FCC requires the user to be determined...
... modifications made to provide reasonable protection against harmful interference in the U.S.A. These limits are not expressly approved by Nikon for the power outlet if needed. IMPORTANT SAFETY INSTRUCTIONSSAVE THESE INSTRUCTIONS. Interface Cables Use the interface cables sold or provided by... Nikon Corporation may exceed the limits of Class B Part 15 of the proper configuration for your equipment. If this equipment does cause harmful COOLPIX P500 CAUTIONS Modifications The FCC requires the user to be determined...

User Manual
Page 8
... battery indicates that this product will expose you to lead, a chemical known to the State of California to cause birth defects or other reproductive harm. Nikon Inc., 1300 Walt Whitman Road, Melville, New York 11747-3064 USA Tel: 631-547-4200 Notice for Customers in charge of waste management. DISPOSE OF...
... battery indicates that this product will expose you to lead, a chemical known to the State of California to cause birth defects or other reproductive harm. Nikon Inc., 1300 Walt Whitman Road, Melville, New York 11747-3064 USA Tel: 631-547-4200 Notice for Customers in charge of waste management. DISPOSE OF...
User Manual
Page 9
Table of Contents For Your Safety ...ii WARNINGS ...ii Notices ...v Introduction ...1 About This Manual ...1 Information and Precautions ...2 Parts of the Camera ...4 Camera Body ...4 Changing the Angle of the Monitor ...6 Raising and Lowering the Flash...7 Attaching the Camera Strap and Lens Cap 7 Monitor ...8 Basic Operations...11 Command Dial ...11 Multi Selector ...12 d (Menu) Button...13 Switching Between Tabs in the Menu Screen 13 Using Camera Menus...14 Pressing the Shutter-Release Button Halfway/All the Way 15 x (Monitor) Button ...16 s (Display) Button ...17 First Steps ...18 ...
Table of Contents For Your Safety ...ii WARNINGS ...ii Notices ...v Introduction ...1 About This Manual ...1 Information and Precautions ...2 Parts of the Camera ...4 Camera Body ...4 Changing the Angle of the Monitor ...6 Raising and Lowering the Flash...7 Attaching the Camera Strap and Lens Cap 7 Monitor ...8 Basic Operations...11 Command Dial ...11 Multi Selector ...12 d (Menu) Button...13 Switching Between Tabs in the Menu Screen 13 Using Camera Menus...14 Pressing the Shutter-Release Button Halfway/All the Way 15 x (Monitor) Button ...16 s (Display) Button ...17 First Steps ...18 ...
User Manual
Page 10
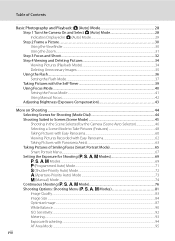
Table of Contents Basic Photography and Playback: A (Auto) Mode 28 Step 1 Turn the Camera On and Select A (Auto) Mode 28 Indicators Displayed in A (Auto) Mode 29 Step 2 Frame a Picture...30 Using the Viewfinder ...30 Using the Zoom...31 Step 3 Focus and Shoot ...32 Step 4 Viewing and Deleting Pictures 34 Viewing Pictures (Playback Mode) ...34 Deleting Unnecessary Images...35 Using the Flash...36 Setting the Flash Mode...37 Taking Pictures with the Self-Timer 39 Using Focus Mode ...40 Setting the Focus Mode ...41 Using Manual Focus...42 Adjusting Brightness (Exposure Compensation 43 More ...
Table of Contents Basic Photography and Playback: A (Auto) Mode 28 Step 1 Turn the Camera On and Select A (Auto) Mode 28 Indicators Displayed in A (Auto) Mode 29 Step 2 Frame a Picture...30 Using the Viewfinder ...30 Using the Zoom...31 Step 3 Focus and Shoot ...32 Step 4 Viewing and Deleting Pictures 34 Viewing Pictures (Playback Mode) ...34 Deleting Unnecessary Images...35 Using the Flash...36 Setting the Flash Mode...37 Taking Pictures with the Self-Timer 39 Using Focus Mode ...40 Setting the Focus Mode ...41 Using Manual Focus...42 Adjusting Brightness (Exposure Compensation 43 More ...
User Manual
Page 11
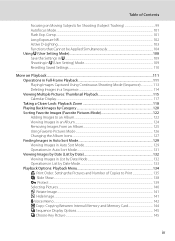
Table of Contents Focusing on Playback ...111 Operations in Full-Frame Playback 111 Playing Images Captured Using Continuous Shooting Mode (Sequence 113 Deleting Images in a Sequence...114 Viewing Multiple Pictures: Thumbnail Playback 115 Calendar Display...117 Taking a Closer Look: Playback Zoom 118 Playing Back Images by Category 120 Sorting Favorite Images (Favorite Pictures Mode 122 Adding Images to Print 135 b Slide Show...138 d Protect ...139 Selecting Pictures ...140 f Rotate Image...141 i Hide Image...141 E Voice Memo...142 h Copy: Copying Between Internal Memory and Memory ...
Table of Contents Focusing on Playback ...111 Operations in Full-Frame Playback 111 Playing Images Captured Using Continuous Shooting Mode (Sequence 113 Deleting Images in a Sequence...114 Viewing Multiple Pictures: Thumbnail Playback 115 Calendar Display...117 Taking a Closer Look: Playback Zoom 118 Playing Back Images by Category 120 Sorting Favorite Images (Favorite Pictures Mode 122 Adding Images to Print 135 b Slide Show...138 d Protect ...139 Selecting Pictures ...140 f Rotate Image...141 i Hide Image...141 E Voice Memo...142 h Copy: Copying Between Internal Memory and Memory ...

User Manual
Page 12
Table of Contents Editing Pictures ...146 Picture Editing Functions ...146 Editing Pictures...148 k Quick Retouch: Enhancing Contrast and Saturation 148 I D-Lighting: Enhancing Brightness and Contrast 149 e Skin Softening: Making Skin Appear Smoother 150 p Filter Effects: Digital Filter...152 g Small Picture: Decreasing Image Size 154 j Black Border: Adding a Black Border to Pictures 155 a Crop: Creating a Cropped Copy...156 Movie Recording and Playback 157 Recording Movies ...157 Recording Movies in Slow Motion and Fast Motion (HS Movie 160 Capturing Still Pictures While Recording ...
Table of Contents Editing Pictures ...146 Picture Editing Functions ...146 Editing Pictures...148 k Quick Retouch: Enhancing Contrast and Saturation 148 I D-Lighting: Enhancing Brightness and Contrast 149 e Skin Softening: Making Skin Appear Smoother 150 p Filter Effects: Digital Filter...152 g Small Picture: Decreasing Image Size 154 j Black Border: Adding a Black Border to Pictures 155 a Crop: Creating a Cropped Copy...156 Movie Recording and Playback 157 Recording Movies ...157 Recording Movies in Slow Motion and Fast Motion (HS Movie 160 Capturing Still Pictures While Recording ...
User Manual
Page 13
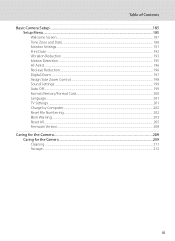
Table of Contents Basic Camera Setup ...185 Setup Menu...185 Welcome Screen ...187 Time Zone and Date...188 Monitor Settings...191 Print Date ...192 Vibration Reduction ...193 Motion Detection...195 AF Assist...196 Red-eye Reduction ...196 Digital Zoom...197 Assign Side Zoom Control ...198 Sound Settings...199 Auto Off ...199 Format Memory/Format Card...200 Language...201 TV Settings ...201 Charge by Computer...202 Reset File Numbering...202 Blink Warning ...203 Reset All ...205 Firmware Version...208 Caring for the Camera...209 Caring for the Camera ...209 Cleaning ...211 Storage ...212 xi
Table of Contents Basic Camera Setup ...185 Setup Menu...185 Welcome Screen ...187 Time Zone and Date...188 Monitor Settings...191 Print Date ...192 Vibration Reduction ...193 Motion Detection...195 AF Assist...196 Red-eye Reduction ...196 Digital Zoom...197 Assign Side Zoom Control ...198 Sound Settings...199 Auto Off ...199 Format Memory/Format Card...200 Language...201 TV Settings ...201 Charge by Computer...202 Reset File Numbering...202 Blink Warning ...203 Reset All ...205 Firmware Version...208 Caring for the Camera...209 Caring for the Camera ...209 Cleaning ...211 Storage ...212 xi

User Manual
Page 14
Table of Contents Technical Notes and Index ...213 Optional Accessories ...213 Approved Memory Cards ...214 File and Folder Names...215 Error Messages ...217 Troubleshooting...222 Specifications ...229 Supported Standards ...233 Index ...234 xii
Table of Contents Technical Notes and Index ...213 Optional Accessories ...213 Approved Memory Cards ...214 File and Folder Names...215 Error Messages ...217 Troubleshooting...222 Specifications ...229 Supported Standards ...233 Index ...234 xii
User Manual
Page 15
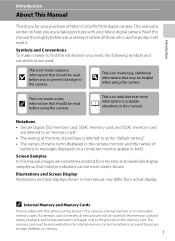
... that should be read before the internal memory can be stored on a computer monitor appear in the camera monitor, and the names of Nikon COOLPIX P500 digital camera. Read this manual thoroughly before use the product will apply only to as the "default setting." • The names of... Samples In this manual may be read before use, and keep it . The memory card must be formatted or accessed for your Nikon digital camera. Illustrations and Screen Display Illustrations and text displays shown in this camera can be removed before using the camera. This manual...
... that should be read before the internal memory can be stored on a computer monitor appear in the camera monitor, and the names of Nikon COOLPIX P500 digital camera. Read this manual thoroughly before use the product will apply only to as the "default setting." • The names of... Samples In this manual may be read before use, and keep it . The memory card must be formatted or accessed for your Nikon digital camera. Illustrations and Screen Display Illustrations and text displays shown in this camera can be removed before using the camera. This manual...
User Manual
Page 16
... of the camera or result in these manuals at weddings or before taking pictures on important occasions (such as an authentic Nikon product. Additional information may be available from the use of this electronic circuitry. Holographic seal: Identifies this product may result ... with this device as at any time and without prior notice. • Nikon will not be held liable for contact information: http://imaging.nikon.com/ Use Only Nikon Brand Electronic Accessories Nikon COOLPIX cameras are engineered and proven to operate within the operational and safety requirements of...
... of the camera or result in these manuals at weddings or before taking pictures on important occasions (such as an authentic Nikon product. Additional information may be available from the use of this electronic circuitry. Holographic seal: Identifies this product may result ... with this device as at any time and without prior notice. • Nikon will not be held liable for contact information: http://imaging.nikon.com/ Use Only Nikon Brand Electronic Accessories Nikon COOLPIX cameras are engineered and proven to operate within the operational and safety requirements of...
User Manual
Page 17
Do not use this product for the Select an image option in the Welcome screen setting (A187). Ensuring the privacy of such data is prohibited. The copying or reproduction of paper money, coins, or securities which are circulated in a foreign country is the user's responsibility. Be sure to also replace any pictures selected for the purpose of making illegal copies or to infringe copyright laws. The copying or reproduction of stamps issued by the government and of certified documents stipulated by law is prohibited. • Cautions on certain copies and reproductions The government ...
Do not use this product for the Select an image option in the Welcome screen setting (A187). Ensuring the privacy of such data is prohibited. The copying or reproduction of paper money, coins, or securities which are circulated in a foreign country is the user's responsibility. Be sure to also replace any pictures selected for the purpose of making illegal copies or to infringe copyright laws. The copying or reproduction of stamps issued by the government and of certified documents stipulated by law is prohibited. • Cautions on certain copies and reproductions The government ...
User Manual
Page 18
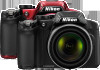
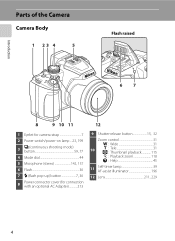
Introduction Parts of the Camera Camera Body 1 23 4 5 Flash raised 67 8 9 10 11 1 Eyelet for camera strap 7 2 Power switch/power-on lamp... 23, 199 3 C (continuous shooting mode) button 59, 77 4 Mode dial 44 5 Microphone (stereo 142, 157 6 Flash 36 7 m (flash pop-up) button 7, 36 8 Power connector cover (for connection with an optional AC Adapter 213 12 9 Shutter-release button 15, 32 Zoom control 31 f : Wide 31 10 g : Tele 31 h: Thumbnail playback 115 i : Playback zoom 118 j : Help 45 11 Self-timer lamp 39 AF-assist illuminator 196 12 Lens 211, 229...
Introduction Parts of the Camera Camera Body 1 23 4 5 Flash raised 67 8 9 10 11 1 Eyelet for camera strap 7 2 Power switch/power-on lamp... 23, 199 3 C (continuous shooting mode) button 59, 77 4 Mode dial 44 5 Microphone (stereo 142, 157 6 Flash 36 7 m (flash pop-up) button 7, 36 8 Power connector cover (for connection with an optional AC Adapter 213 12 9 Shutter-release button 15, 32 Zoom control 31 f : Wide 31 10 g : Tele 31 h: Thumbnail playback 115 i : Playback zoom 118 j : Help 45 11 Self-timer lamp 39 AF-assist illuminator 196 12 Lens 211, 229...

User Manual
Page 19
Introduction Parts of the Camera Bottom of camera 1 2 3 4 5 6 78 9 19 20 21 10 11 12 13 14 15 16 17 18 22 23 24 1 Side zoom control 31 2 Speaker 143, 168 3 x (monitor) button 16 4 Diopter adjustment control 30 5 Electronic viewfinder 16, 30 6 s (display) button 17 7 b (e movie-record) button 157 8 Movie mode switch 157 9 Command dial 11 10 USB/Audio video connector 171, 174, 180 11 HDMI Mini Connector 171 12 Connector cover 171, 174, 180 13 Monitor 8, 17, 29 14 c (playback) button 34 15 Multi selector 12 16 k (apply selection) button 12 17 d button......13, 45,...
Introduction Parts of the Camera Bottom of camera 1 2 3 4 5 6 78 9 19 20 21 10 11 12 13 14 15 16 17 18 22 23 24 1 Side zoom control 31 2 Speaker 143, 168 3 x (monitor) button 16 4 Diopter adjustment control 30 5 Electronic viewfinder 16, 30 6 s (display) button 17 7 b (e movie-record) button 157 8 Movie mode switch 157 9 Command dial 11 10 USB/Audio video connector 171, 174, 180 11 HDMI Mini Connector 171 12 Connector cover 171, 174, 180 13 Monitor 8, 17, 29 14 c (playback) button 34 15 Multi selector 12 16 k (apply selection) button 12 17 d button......13, 45,...

User Manual
Page 20
Introduction Parts of the Camera Changing the Angle of the Monitor The angle of the monitor. • The monitor cannot be lowered down to 82° or raised upward to 90°. B Notes on Monitor • Do not apply excessive force when changing the angle of the monitor can be moved horizontally. 6 • Put the monitor back in the original position when using in normal situations. This is convenient when taking pictures with the camera held at high or low positions.
Introduction Parts of the Camera Changing the Angle of the Monitor The angle of the monitor. • The monitor cannot be lowered down to 82° or raised upward to 90°. B Notes on Monitor • Do not apply excessive force when changing the angle of the monitor can be moved horizontally. 6 • Put the monitor back in the original position when using in normal situations. This is convenient when taking pictures with the camera held at high or low positions.

User Manual
Page 21
B Lens Cap • Remove the lens cap before you shoot a picture. • At times when you are not shooting pictures such as when the power is off, or while you are carrying the camera, attach the lens cap to the camera to the camera (at two places). Attaching the Camera Strap and Lens Cap Attach the lens cap to the strap, and then attach the strap to protect the lens. 7 Introduction Parts of the Camera Raising and Lowering the Flash Press the m (flash pop-up) button to raise the flash. • See "Using the Flash" (A36) for more information on setting the flash. • When not ...
B Lens Cap • Remove the lens cap before you shoot a picture. • At times when you are not shooting pictures such as when the power is off, or while you are carrying the camera, attach the lens cap to the camera to the camera (at two places). Attaching the Camera Strap and Lens Cap Attach the lens cap to the strap, and then attach the strap to protect the lens. 7 Introduction Parts of the Camera Raising and Lowering the Flash Press the m (flash pop-up) button to raise the flash. • See "Using the Flash" (A36) for more information on setting the flash. • When not ...
