
User Manual
Page 3
Introduction First Steps Basic Photography and Playback: A (Auto) Mode More on Shooting More on Playback Editing Pictures Movie Recording and Playback Connecting to Televisions, Computers and Printers Basic Camera Setup Caring for the Camera Technical Notes and Index i
Introduction First Steps Basic Photography and Playback: A (Auto) Mode More on Shooting More on Playback Editing Pictures Movie Recording and Playback Connecting to Televisions, Computers and Printers Basic Camera Setup Caring for the Camera Technical Notes and Index i
User Manual
Page 4
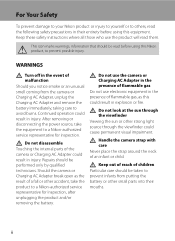
...not use the product will read before using this could cause permanent visual impairment. Should the camera or Charging AC Adapter break open as this Nikon product, to avoid burns. Handle the camera strap with care Never place the strap around the neck of a fall or other strong ...light source through the viewfinder Viewing the sun or other accident, take the equipment to a Nikon-authorized service representative for inspection...
...not use the product will read before using this could cause permanent visual impairment. Should the camera or Charging AC Adapter break open as this Nikon product, to avoid burns. Handle the camera strap with care Never place the strap around the neck of a fall or other strong ...light source through the viewfinder Viewing the sun or other accident, take the equipment to a Nikon-authorized service representative for inspection...

User Manual
Page 5
...on or near the Charging AC Adapter during lightning storms. Failure to observe attempt to observe this Charging AC Adapter/AC adapter, be or to a Nikon- Charging AC Adapter EH-69P (supplied). • When inserting the battery, do not • Do not handle the plug or go near ...remove the result in or expose to exposed, take it under break the battery insulation or casing. Failure to observe this precaution could result camera and connecting the in contact with clothing or The battery may leak or explode if skin, rinse immediately with metal objects electric shock. battery...
...on or near the Charging AC Adapter during lightning storms. Failure to observe attempt to observe this Charging AC Adapter/AC adapter, be or to a Nikon- Charging AC Adapter EH-69P (supplied). • When inserting the battery, do not • Do not handle the plug or go near ...remove the result in or expose to exposed, take it under break the battery insulation or casing. Failure to observe this precaution could result camera and connecting the in contact with clothing or The battery may leak or explode if skin, rinse immediately with metal objects electric shock. battery...

User Manual
Page 6
Do not operate the flash with the flash window touching a person or object Failure to observe this camera may disrupt the electronic systems of the airplane or the instruments of the hospital when using inside an airplane or the hospital Turn the power ... the equipment. For Your Safety Use appropriate cables When connecting cables to the input and output jacks, use only the cables provided or sold by Nikon for the purpose, to maintain compliance with this device should not be played back on an audio CD player could result in .) from the monitor...
Do not operate the flash with the flash window touching a person or object Failure to observe this camera may disrupt the electronic systems of the airplane or the instruments of the hospital when using inside an airplane or the hospital Turn the power ... the equipment. For Your Safety Use appropriate cables When connecting cables to the input and output jacks, use only the cables provided or sold by Nikon for the purpose, to maintain compliance with this device should not be played back on an audio CD player could result in .) from the monitor...
User Manual
Page 9
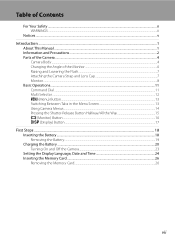
... ...ii Notices ...v Introduction ...1 About This Manual ...1 Information and Precautions ...2 Parts of the Camera ...4 Camera Body ...4 Changing the Angle of the Monitor ...6 Raising and Lowering the Flash...7 Attaching the Camera Strap and Lens Cap 7 Monitor ...8 Basic Operations...11 Command Dial ...11 Multi Selector ...12... d (Menu) Button...13 Switching Between Tabs in the Menu Screen 13 Using Camera Menus...14 Pressing the Shutter-Release Button Halfway/All the Way 15 x (Monitor) Button ...16 s (Display) Button ...17 First ...
... ...ii Notices ...v Introduction ...1 About This Manual ...1 Information and Precautions ...2 Parts of the Camera ...4 Camera Body ...4 Changing the Angle of the Monitor ...6 Raising and Lowering the Flash...7 Attaching the Camera Strap and Lens Cap 7 Monitor ...8 Basic Operations...11 Command Dial ...11 Multi Selector ...12... d (Menu) Button...13 Switching Between Tabs in the Menu Screen 13 Using Camera Menus...14 Pressing the Shutter-Release Button Halfway/All the Way 15 x (Monitor) Button ...16 s (Display) Button ...17 First ...
User Manual
Page 10
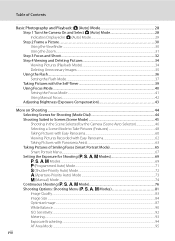
Table of Contents Basic Photography and Playback: A (Auto) Mode 28 Step 1 Turn the Camera On and Select A (Auto) Mode 28 Indicators Displayed in A (Auto) Mode 29 Step 2 Frame a Picture...30 Using the Viewfinder ...30 Using the Zoom...31 Step 3 ... More on Shooting ...44 Selecting Scenes for Shooting (Mode Dial 44 Shooting Suited to Scenes (Scene Mode 45 Shooting in the Scene Selected by the Camera (Scene Auto Selector 46 Selecting a Scene Mode to Take Pictures (Features 48 Taking Pictures with Easy Panorama...60 Viewing Pictures Recorded with Easy Panorama 62...
Table of Contents Basic Photography and Playback: A (Auto) Mode 28 Step 1 Turn the Camera On and Select A (Auto) Mode 28 Indicators Displayed in A (Auto) Mode 29 Step 2 Frame a Picture...30 Using the Viewfinder ...30 Using the Zoom...31 Step 3 ... More on Shooting ...44 Selecting Scenes for Shooting (Mode Dial 44 Shooting Suited to Scenes (Scene Mode 45 Shooting in the Scene Selected by the Camera (Scene Auto Selector 46 Selecting a Scene Mode to Take Pictures (Features 48 Taking Pictures with Easy Panorama...60 Viewing Pictures Recorded with Easy Panorama 62...

User Manual
Page 12
... Connecting to Televisions, Computers and Printers 171 Connecting to a TV...171 Connecting to a Computer...173 Before Connecting the Camera ...173 Transferring Images from a Camera to a Computer 174 Charging While Connecting to a Computer 178 Connecting to a Printer...179 Connecting the Camera and Printer...180 Printing Pictures One at a Time...181 Printing Multiple Pictures ...182 x
... Connecting to Televisions, Computers and Printers 171 Connecting to a TV...171 Connecting to a Computer...173 Before Connecting the Camera ...173 Transferring Images from a Camera to a Computer 174 Charging While Connecting to a Computer 178 Connecting to a Printer...179 Connecting the Camera and Printer...180 Printing Pictures One at a Time...181 Printing Multiple Pictures ...182 x
User Manual
Page 13
Table of Contents Basic Camera Setup ...185 Setup Menu...185 Welcome Screen ...187 Time Zone and Date...188 Monitor Settings...191 Print Date ...192 Vibration Reduction ...193 Motion Detection...195 AF Assist...196 Red-eye Reduction ...196 Digital Zoom...197 Assign Side Zoom Control ...198 Sound Settings...199 Auto Off ...199 Format Memory/Format Card...200 Language...201 TV Settings ...201 Charge by Computer...202 Reset File Numbering...202 Blink Warning ...203 Reset All ...205 Firmware Version...208 Caring for the Camera...209 Caring for the Camera ...209 Cleaning ...211 Storage ...212 xi
Table of Contents Basic Camera Setup ...185 Setup Menu...185 Welcome Screen ...187 Time Zone and Date...188 Monitor Settings...191 Print Date ...192 Vibration Reduction ...193 Motion Detection...195 AF Assist...196 Red-eye Reduction ...196 Digital Zoom...197 Assign Side Zoom Control ...198 Sound Settings...199 Auto Off ...199 Format Memory/Format Card...200 Language...201 TV Settings ...201 Charge by Computer...202 Reset File Numbering...202 Blink Warning ...203 Reset All ...205 Firmware Version...208 Caring for the Camera...209 Caring for the Camera ...209 Cleaning ...211 Storage ...212 xi
User Manual
Page 15
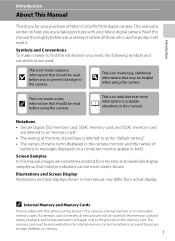
...and SDXC memory card are sometimes omitted from actual display. C Internal Memory and Memory Cards Pictures taken with your purchase of Nikon COOLPIX P500 digital camera. Symbols and Conventions To make it easier to find the information you need, the following symbols and conventions are used: ...purchase is inserted, all those who use , to prevent damage to help you enjoy taking pictures with this camera can be formatted or accessed for your Nikon digital camera. This icon marks notes, C information that may differ from monitor and viewfinder display samples so that more...
...and SDXC memory card are sometimes omitted from actual display. C Internal Memory and Memory Cards Pictures taken with your purchase of Nikon COOLPIX P500 digital camera. Symbols and Conventions To make it easier to find the information you need, the following symbols and conventions are used: ...purchase is inserted, all those who use , to prevent damage to help you enjoy taking pictures with this camera can be formatted or accessed for your Nikon digital camera. This icon marks notes, C information that may differ from monitor and viewfinder display samples so that more...
User Manual
Page 16
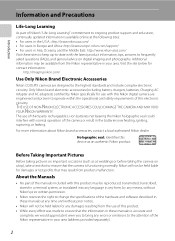
... bring any form, by Nikon specifically for contact information: http://imaging.nikon.com/ Use Only Nikon Brand Electronic Accessories Nikon COOLPIX cameras are engineered and proven to operate within the operational and safety requirements of this device as an authentic Nikon product. For more information about Nikon brand accessories, contact a local authorized Nikon dealer. Nikon will not be held liable...
... bring any form, by Nikon specifically for contact information: http://imaging.nikon.com/ Use Only Nikon Brand Electronic Accessories Nikon COOLPIX cameras are engineered and proven to operate within the operational and safety requirements of this device as an authentic Nikon product. For more information about Nikon brand accessories, contact a local authorized Nikon dealer. Nikon will not be held liable...
User Manual
Page 17
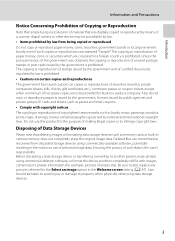
Unless the prior permission of the government was digitally copied or reproduced by means of a scanner, digital camera or other device may be punishable by law. • Items prohibited by law from discarded storage devices using commercial deletion software, or format... which are to property when physically destroying data storage devices. 3 Deleted files can sometimes be provided for the Select an image option in camera memory does not completely erase the original image data. The copying or reproduction of stamps issued by the government and of certified documents stipulated by...
Unless the prior permission of the government was digitally copied or reproduced by means of a scanner, digital camera or other device may be punishable by law. • Items prohibited by law from discarded storage devices using commercial deletion software, or format... which are to property when physically destroying data storage devices. 3 Deleted files can sometimes be provided for the Select an image option in camera memory does not completely erase the original image data. The copying or reproduction of stamps issued by the government and of certified documents stipulated by...
User Manual
Page 18
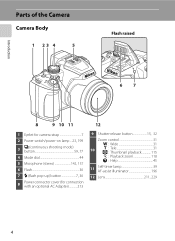
... 1 23 4 5 Flash raised 67 8 9 10 11 1 Eyelet for camera strap 7 2 Power switch/power-on lamp... 23, 199 3 C (continuous shooting mode) button 59, 77 4 Mode dial 44 5 Microphone (stereo 142, 157 6 Flash 36 7 m (flash pop-...
... 1 23 4 5 Flash raised 67 8 9 10 11 1 Eyelet for camera strap 7 2 Power switch/power-on lamp... 23, 199 3 C (continuous shooting mode) button 59, 77 4 Mode dial 44 5 Microphone (stereo 142, 157 6 Flash 36 7 m (flash pop-...

User Manual
Page 19
Introduction Parts of the Camera Bottom of camera 1 2 3 4 5 6 78 9 19 20 21 10 11 12 13 14 15 16 17 18 22 23 24 1 Side zoom control 31 2 Speaker 143, 168 3 x (monitor) button ...
Introduction Parts of the Camera Bottom of camera 1 2 3 4 5 6 78 9 19 20 21 10 11 12 13 14 15 16 17 18 22 23 24 1 Side zoom control 31 2 Speaker 143, 168 3 x (monitor) button ...

User Manual
Page 20
B Notes on Monitor • Do not apply excessive force when changing the angle of the monitor can be moved horizontally. 6 • Put the monitor back in the original position when using in normal situations. Introduction Parts of the Camera Changing the Angle of the Monitor The angle of the monitor. • The monitor cannot be lowered down to 82° or raised upward to 90°. This is convenient when taking pictures with the camera held at high or low positions.
B Notes on Monitor • Do not apply excessive force when changing the angle of the monitor can be moved horizontally. 6 • Put the monitor back in the original position when using in normal situations. Introduction Parts of the Camera Changing the Angle of the Monitor The angle of the monitor. • The monitor cannot be lowered down to 82° or raised upward to 90°. This is convenient when taking pictures with the camera held at high or low positions.

User Manual
Page 21
... when you are not shooting pictures such as when the power is off, or while you are carrying the camera, attach the lens cap to the camera to the camera (at two places). Attaching the Camera Strap and Lens Cap Attach the lens cap to the strap, and then attach the strap to protect... the lens. 7 Introduction Parts of the Camera Raising and Lowering the Flash Press the m (flash pop-up) button to raise the flash. • See "Using the Flash" (A36) for more information on ...
... when you are not shooting pictures such as when the power is off, or while you are carrying the camera, attach the lens cap to the camera to the camera (at two places). Attaching the Camera Strap and Lens Cap Attach the lens cap to the strap, and then attach the strap to protect... the lens. 7 Introduction Parts of the Camera Raising and Lowering the Flash Press the m (flash pop-up) button to raise the flash. • See "Using the Flash" (A36) for more information on ...

User Manual
Page 22
See page 17 for how to switch the monitor display. Shooting 48 47 46 45 44 43 42 41 40 45 2 6 13 8 7 9 12 13 10 11 14 15 38, 39 37 35 1/250 F5.6 999 32 27 26 17 18 19 16 20 21 34 33 25 36 999 9999 1m00s 31 30 29 28 a b 22 23 24 49 50 1/250 F5.6 1342 8 Introduction Parts of the Camera Monitor The following indicators may appear in the monitor during shooting and playback (actual display varies with current camera settings).
See page 17 for how to switch the monitor display. Shooting 48 47 46 45 44 43 42 41 40 45 2 6 13 8 7 9 12 13 10 11 14 15 38, 39 37 35 1/250 F5.6 999 32 27 26 17 18 19 16 20 21 34 33 25 36 999 9999 1m00s 31 30 29 28 a b 22 23 24 49 50 1/250 F5.6 1342 8 Introduction Parts of the Camera Monitor The following indicators may appear in the monitor during shooting and playback (actual display varies with current camera settings).
User Manual
Page 23
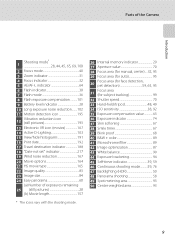
Parts of the Camera Introduction Shooting mode* 1 28, 44, 45, 65, 69, 108 2 Focus mode 40 3 Zoom indicator 31 4 Focus indicator 32 5 AE/AF-L indicator 64 6 Flash indicator 38 7 ...
Parts of the Camera Introduction Shooting mode* 1 28, 44, 45, 65, 69, 108 2 Focus mode 40 3 Zoom indicator 31 4 Focus indicator 32 5 AE/AF-L indicator 64 6 Flash indicator 38 7 ...

User Manual
Page 24
Parts of the Camera Introduction Playback 21 20 4 1 23 5 15/05/2011 12:00 23 9999.JPG 22 6 7 18 17 16 19 15 8 9 10 999/999 14 13 999/...
Parts of the Camera Introduction Playback 21 20 4 1 23 5 15/05/2011 12:00 23 9999.JPG 22 6 7 18 17 16 19 15 8 9 10 999/999 14 13 999/...
User Manual
Page 28
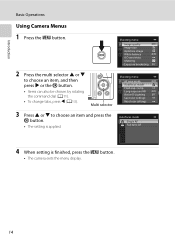
...H or I to choose an item and press the k button. • The setting is finished, press the d button. • The camera exits the menu display. 14 Long exposure NR Active D-Lighting Save user settings Reset user settings Autofocus mode Single AF Full-time AF 4 When ...setting is applied. Introduction Basic Operations Using Camera Menus 1 Press the d button. Shooting menu AF area mode Autofocus mode Flash exp. comp. Shooting menu Image quality Image size Optimize image...
...H or I to choose an item and press the k button. • The setting is finished, press the d button. • The camera exits the menu display. 14 Long exposure NR Active D-Lighting Save user settings Reset user settings Autofocus mode Single AF Full-time AF 4 When ...setting is applied. Introduction Basic Operations Using Camera Menus 1 Press the d button. Shooting menu AF area mode Autofocus mode Flash exp. comp. Shooting menu Image quality Image size Optimize image...

User Manual
Page 29
... shutter-release button the rest of the way focus and exposure. Introduction Basic Operations Pressing the Shutter-Release Button Halfway/All the Way • The camera features a two-stage shutter-release button. To set . When the shutter-release button is held in this may result in...
... shutter-release button the rest of the way focus and exposure. Introduction Basic Operations Pressing the Shutter-Release Button Halfway/All the Way • The camera features a two-stage shutter-release button. To set . When the shutter-release button is held in this may result in...


