M3 Series Hardware Manual
Page 2
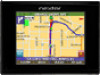
Your mobile navigation system assures that may be seriously injured. 1 Just enter information using the touch screen and let the voice prompt and detailed map guide you to your Nextar GPS Navigator. Important Safety Information Read and keep these instructions Failure to determine ground proximity for any purpose requiring precise measurement of your...
Your mobile navigation system assures that may be seriously injured. 1 Just enter information using the touch screen and let the voice prompt and detailed map guide you to your Nextar GPS Navigator. Important Safety Information Read and keep these instructions Failure to determine ground proximity for any purpose requiring precise measurement of your...
M3 Series Hardware Manual
Page 6
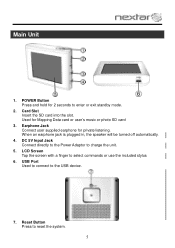
Earphone Jack Connect user supplied earphone for Mapping Data card or user's music or photo SD card 3. Reset Button Press to charge the unit. 5. DC 5V Input Jack Connect directly to the Power ...
Earphone Jack Connect user supplied earphone for Mapping Data card or user's music or photo SD card 3. Reset Button Press to charge the unit. 5. DC 5V Input Jack Connect directly to the Power ...
M3 Series Hardware Manual
Page 7
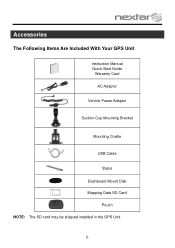
Accessories The Following Items Are Included With Your GPS Unit Instruction Manual Quick-Start Guide Warranty Card AC Adaptor Vehicle Power Adaptor Suction-Cup Mounting Bracket Mounting Cradle USB Cable Stylus Dashboard Mount Disk Mapping Data SD Card Pouch NOTE: The SD card may be shipped installed in the GPS Unit. 6
Accessories The Following Items Are Included With Your GPS Unit Instruction Manual Quick-Start Guide Warranty Card AC Adaptor Vehicle Power Adaptor Suction-Cup Mounting Bracket Mounting Cradle USB Cable Stylus Dashboard Mount Disk Mapping Data SD Card Pouch NOTE: The SD card may be shipped installed in the GPS Unit. 6
M3 Series Hardware Manual
Page 10
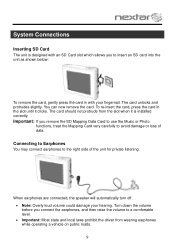
... the driver from the slot when it is designed with an SD Card slot which allows you remove the SD Mapping Data Card to use the Music or Photo functions, treat the Mapping Card very carefully to insert an SD card into the unit as shown below: To remove the card, gently...
... the driver from the slot when it is designed with an SD Card slot which allows you remove the SD Mapping Data Card to use the Music or Photo functions, treat the Mapping Card very carefully to insert an SD card into the unit as shown below: To remove the card, gently...
M3 Series Hardware Manual
Page 16
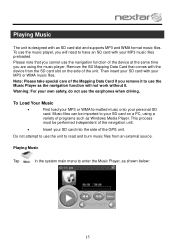
To use the music player, you remove it . Note: Please take special care of the Mapping Data Card if you will not work without it to have an SD card with your SD card into the side of the GPS unit. ... onto your own safety, do not use the Music Player as the navigation function will need to use the earphones when driving. Remove the SD Mapping Data Card that you are using a variety of programs such as Windows Media Player. Music files can be performed independent of the navigation unit. ...
To use the music player, you remove it . Note: Please take special care of the Mapping Data Card if you will not work without it to have an SD card with your SD card into the side of the GPS unit. ... onto your own safety, do not use the Music Player as the navigation function will need to use the earphones when driving. Remove the SD Mapping Data Card that you are using a variety of programs such as Windows Media Player. Music files can be performed independent of the navigation unit. ...
M3 Series Hardware Manual
Page 18
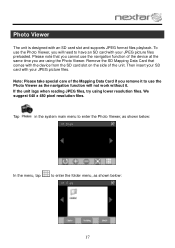
Note: Please take special care of the Mapping Data Card if you remove it to use the navigation function of the unit. We suggest 640 x 480 pixel resolution files. Please note that comes ... use the Photo Viewer as shown below : In the menu, tap to have an SD card with your JPEG picture files preloaded. Remove the SD Mapping Data Card that you will need to enter the folder menu, as the navigation function will not work without it. Photo Viewer The unit is...
Note: Please take special care of the Mapping Data Card if you remove it to use the navigation function of the unit. We suggest 640 x 480 pixel resolution files. Please note that comes ... use the Photo Viewer as shown below : In the menu, tap to have an SD card with your JPEG picture files preloaded. Remove the SD Mapping Data Card that you will need to enter the folder menu, as the navigation function will not work without it. Photo Viewer The unit is...
M3 Series Hardware Manual
Page 22
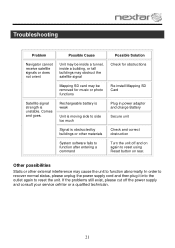
... interference may be inside a tunnel, inside a building, or tall buildings may obstruct the satellite signal Check for music or photo functions Re-install Mapping SD Card Satellite signal strength is obstructed by buildings or other materials Check and correct obstruction System software fails to function after entering a command Turn... qualified technician. 21 Troubleshooting Problem Possible Cause Possible Solution Navigator cannot receive satellite signals or does not orient Unit may be removed for obstructions Mapping SD card may cause the unit to reset the unit.
... interference may be inside a tunnel, inside a building, or tall buildings may obstruct the satellite signal Check for music or photo functions Re-install Mapping SD Card Satellite signal strength is obstructed by buildings or other materials Check and correct obstruction System software fails to function after entering a command Turn... qualified technician. 21 Troubleshooting Problem Possible Cause Possible Solution Navigator cannot receive satellite signals or does not orient Unit may be removed for obstructions Mapping SD card may cause the unit to reset the unit.
M3-04 Software Manual
Page 2
contents Getting started 2 Starting the system 2 Getting a GPS signal 3 Entering data on the system 4 Moving through the screens 5 Working with the map 6 Map view ...6 Maneuver detail 6 Panning the map 6 Route list ...7 Location and POI information 7 Planning your route 9 Setting a single destination 9 Using an address as a destination 10 Using an intersection as a destination 13 Using...
contents Getting started 2 Starting the system 2 Getting a GPS signal 3 Entering data on the system 4 Moving through the screens 5 Working with the map 6 Map view ...6 Maneuver detail 6 Panning the map 6 Route list ...7 Location and POI information 7 Planning your route 9 Setting a single destination 9 Using an address as a destination 10 Using an intersection as a destination 13 Using...
M3-04 Software Manual
Page 4
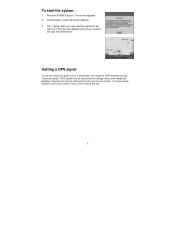
... are ready to set your vehicle. Getting a GPS signal To use the system to guide you to the warning. Signals can be receiving signals. The map view appears and you have read and agreed to a destination, the system's GPS antenna must be obstructed by the roof of the sky. - 3 - GPS signals...
... are ready to set your vehicle. Getting a GPS signal To use the system to guide you to the warning. Signals can be receiving signals. The map view appears and you have read and agreed to a destination, the system's GPS antenna must be obstructed by the roof of the sky. - 3 - GPS signals...
M3-04 Software Manual
Page 7
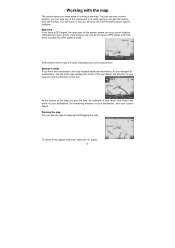
... on a route, and you can view any of your next turn . To return to that turn and the distance to the regular map view, press the "X" button. - 6 - Map view If you have a GPS signal, and if the arrow is yellow the GPS signal is a scale indicating your current zoom level. Maneuver ...detail If you have set a destination, the map displays additional information. At the bottom of how much time before you arrive at the map. As you navigate to a destination, the top of the map displays the name of the next street, the direction of the maneuvers on...
... on a route, and you can view any of your next turn . To return to that turn and the distance to the regular map view, press the "X" button. - 6 - Map view If you have a GPS signal, and if the arrow is yellow the GPS signal is a scale indicating your current zoom level. Maneuver ...detail If you have set a destination, the map displays additional information. At the bottom of how much time before you arrive at the map. As you navigate to a destination, the top of the map displays the name of the next street, the direction of the maneuvers on...
M3-04 Software Manual
Page 8
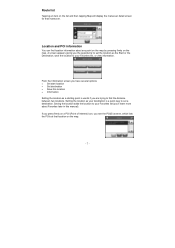
... view information. Saving the location adds the location to your destination is useful if you 'll learn more about any point on the map by pressing firmly on the map. If you press firmly on a POI (Point of Interest) icon, you the opportunity to set the location as your Favorites list (you... set a destination. Location and POI information You can find the distance between two locations. Route list Tapping an item on the list and then tapping Map will display the maneuver detail screen for that location on the...
... view information. Saving the location adds the location to your destination is useful if you 'll learn more about any point on the map by pressing firmly on the map. If you press firmly on a POI (Point of Interest) icon, you the opportunity to set the location as your Favorites list (you... set a destination. Location and POI information You can find the distance between two locations. Route list Tapping an item on the list and then tapping Map will display the maneuver detail screen for that location on the...
M3-04 Software Manual
Page 9
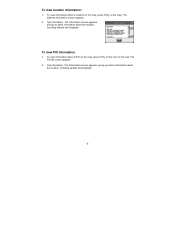
To view location information: 1. The Information screen appears, giving you block information about a location on the map, press firmly on the map. Tap Information. To view POI information: 1. The POI(S) screen appears. 2. To view information about the location, including latitude and longitude. - 8 - The address information screen appears. 2. To view information about the location, including latitude and longitude. Tap Information. The Information screen appears, giving you block information about a POI on the map, press firmly on the icon on the map.
To view location information: 1. The Information screen appears, giving you block information about a location on the map, press firmly on the map. Tap Information. To view POI information: 1. The POI(S) screen appears. 2. To view information about the location, including latitude and longitude. - 8 - The address information screen appears. 2. To view information about the location, including latitude and longitude. Tap Information. The Information screen appears, giving you block information about a POI on the map, press firmly on the icon on the map.
M3-04 Software Manual
Page 10
...add a detour or a stopover. Planning your route You can set as Home" 9. Once you have several options: • Nav • Fav • Map Nav calculates the route from the list. Tap Set Home 4. Tap "Save as a starting point) to . Tap Menu 2. Enter house number then tap ... Confirm by tap OK Setting a single destination You can set a destination, you can add destinations to the destination. tap OK 5. Map displays the location on the panning map without calculating a route. - 9 - You can enter up to 50 destinations and use the Itinerary screen to your home address: ...
...add a detour or a stopover. Planning your route You can set as Home" 9. Once you have several options: • Nav • Fav • Map Nav calculates the route from the list. Tap Set Home 4. Tap "Save as a starting point) to . Tap Menu 2. Enter house number then tap ... Confirm by tap OK Setting a single destination You can set a destination, you can add destinations to the destination. tap OK 5. Map displays the location on the panning map without calculating a route. - 9 - You can enter up to 50 destinations and use the Itinerary screen to your home address: ...
M3-04 Software Manual
Page 12
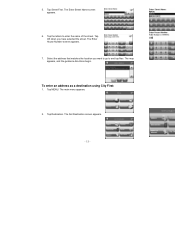
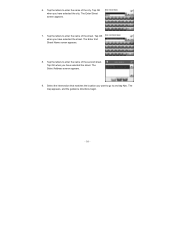
The Enter Street Name screen appears. 6. The Enter House Number screen appears. 7. 5. Tap Street First. Tap the letters to and tap Nav. Select the address that matches the location you have selected the street. The map appears, and the guidance directions begin. Tap MENU. The Set Destination screen appears. - 11 - Tap OK when you want to go to enter the name of the street. The main menu appears. 2. Tap Destination. To enter an address as a destination using City First: 1.
The Enter Street Name screen appears. 6. The Enter House Number screen appears. 7. 5. Tap Street First. Tap the letters to and tap Nav. Select the address that matches the location you have selected the street. The map appears, and the guidance directions begin. Tap MENU. The Set Destination screen appears. - 11 - Tap OK when you want to go to enter the name of the street. The main menu appears. 2. Tap Destination. To enter an address as a destination using City First: 1.
M3-04 Software Manual
Page 14
... city first. There are many records match, you will be selecting the city first. Tap Destination. Tap the numbers to enter the house number. The map appears, and the guidance directions begin. The main menu appears. 2.
... city first. There are many records match, you will be selecting the city first. Tap Destination. Tap the numbers to enter the house number. The map appears, and the guidance directions begin. The main menu appears. 2.

M3-04 Software Manual
Page 15
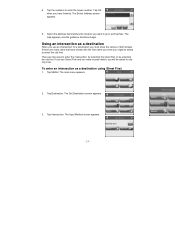
... of the region. • Tap OK when you have selected the street. Select the intersection that matches the location you have selected the region. The map appears, and the guidance directions begin. - 14 - Tap Street First. Tap OK when you want to go to the Input Method screen. 5. 4. If you have...
... of the region. • Tap OK when you have selected the street. Select the intersection that matches the location you have selected the region. The map appears, and the guidance directions begin. - 14 - Tap Street First. Tap OK when you want to go to the Input Method screen. 5. 4. If you have...
M3-04 Software Manual
Page 17
6. Tap the letters to enter the name of the city. Tap OK when you have selected the street. Select the intersection that matches the location you have selected the city. Tap OK when you have selected the street. The Enter Street screen appears. 7. Tap the letters to enter the name of the street. The Select Address screen appears. 9. The Enter 2nd Street Name screen appears. 8. Tap the letters to and tap Nav. Tap OK when you want to go to enter the name of the second street. The map appears, and the guidance directions begin. - 16 -
6. Tap the letters to enter the name of the city. Tap OK when you have selected the street. Select the intersection that matches the location you have selected the city. Tap OK when you have selected the street. The Enter Street screen appears. 7. Tap the letters to enter the name of the street. The Select Address screen appears. 9. The Enter 2nd Street Name screen appears. 8. Tap the letters to and tap Nav. Tap OK when you want to go to enter the name of the second street. The map appears, and the guidance directions begin. - 16 -

M3-04 Software Manual
Page 19
.... • Tap Nav. The Enter POI Name screen appears. • Tap the letters to scroll down the list by distance: • Tap By Distance. The map appears, and the guidance directions begin . 7. The POI Select screen appears, displaying the address of the POI. The POI List screen appears, listing the closest... have selected the POI. To select a nearby POI from an alphabetical list: • Tap Alphabetical. To select a nearby POI by tapping the scroll bar. The map appears, and the guidance directions begin - 18 - 5. Tap a subcategory.
.... • Tap Nav. The Enter POI Name screen appears. • Tap the letters to scroll down the list by distance: • Tap By Distance. The map appears, and the guidance directions begin . 7. The POI Select screen appears, displaying the address of the POI. The POI List screen appears, listing the closest... have selected the POI. To select a nearby POI from an alphabetical list: • Tap Alphabetical. To select a nearby POI by tapping the scroll bar. The map appears, and the guidance directions begin - 18 - 5. Tap a subcategory.

M3-04 Software Manual
Page 21
... screen appears. • Tap the letters to enter the name of the city and tap OK. The POI Select screen appears. • Tap Nav. The map appears, and the guidance directions begin . 7. 6. The Enter City Name screen appears. • Tap the letters to enter the name of the POI. To select...
... screen appears. • Tap the letters to enter the name of the city and tap OK. The POI Select screen appears. • Tap Nav. The map appears, and the guidance directions begin . 7. 6. The Enter City Name screen appears. • Tap the letters to enter the name of the POI. To select...

M3-04 Software Manual
Page 22
The map appears, and the guidance directions begin. - 21 - The main menu appears. 2. The Favorites screen appears. 4. The Set Destination screen appears. 3. Tap MENU. Tap on the ...
The map appears, and the guidance directions begin. - 21 - The main menu appears. 2. The Favorites screen appears. 4. The Set Destination screen appears. 3. Tap MENU. Tap on the ...


