
42XM2/50XM3/61XM2
Page 5
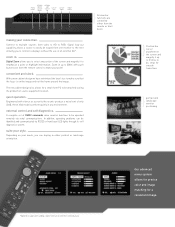
... in up cursor left cursor right input select making your style. Engineered with push button ease from the remote or front bezel. All monitor functions are controlled either portrait or landscape orientation. suite your connection. With a new cabinet design we have minimized the bezel... your needs, you to connect 4 displays without the use of an external DA*. external control and self diagnostics. In addition, operating problems can display in either from the remote control to make sure that the focus is required for sending a signal to more than 4 monitors...
... in up cursor left cursor right input select making your style. Engineered with push button ease from the remote or front bezel. All monitor functions are controlled either portrait or landscape orientation. suite your connection. With a new cabinet design we have minimized the bezel... your needs, you to connect 4 displays without the use of an external DA*. external control and self diagnostics. In addition, operating problems can display in either from the remote control to make sure that the focus is required for sending a signal to more than 4 monitors...
42XM2/50XM3/61XM2
Page 6
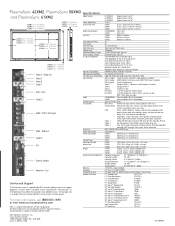
... of NEC Corporation. All other trademarks are the property of their respective owners. Anti reflection (4096 steps) 68.7 billion colors 160 degrees 15.5 to 9840 feet (0 - 3000m) 1 Year Parts & Labor Standard FCC Class A, UL1950, CSA950 AC Power Cord, User Manual, Remote Control, Batteries, Cable Clamps 61" Tabletop Stand PX-61ST1U 61" Attachable Speakers PX-61SP1U...
... of NEC Corporation. All other trademarks are the property of their respective owners. Anti reflection (4096 steps) 68.7 billion colors 160 degrees 15.5 to 9840 feet (0 - 3000m) 1 Year Parts & Labor Standard FCC Class A, UL1950, CSA950 AC Power Cord, User Manual, Remote Control, Batteries, Cable Clamps 61" Tabletop Stand PX-61ST1U 61" Attachable Speakers PX-61SP1U...
42VP4/42XM2/50XM3/61XM2
Page 2
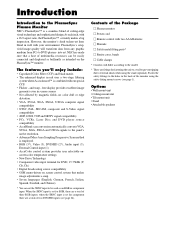
into art. NEC has made sure that makes image adjustments a snap • Seven languages (English, German, French, Italian, Spanish, Swedish, and Chinese) * You can be used as intended on screen control system that a host of cutting-edge visual technology and sophisticated design. The features you'll ...input. When the 5BNC input is set for RGB, there are a total of the Package Ⅺ Plasma monitor Ⅺ Power cord Ⅺ Remote control with two AAA Batteries Ⅺ Manuals Ⅺ Safety metal fitting parts* Ⅺ Ferrite cores, bands Ⅺ Cable clamps * Contents will ...
into art. NEC has made sure that makes image adjustments a snap • Seven languages (English, German, French, Italian, Spanish, Swedish, and Chinese) * You can be used as intended on screen control system that a host of cutting-edge visual technology and sophisticated design. The features you'll ...input. When the 5BNC input is set for RGB, there are a total of the Package Ⅺ Plasma monitor Ⅺ Power cord Ⅺ Remote control with two AAA Batteries Ⅺ Manuals Ⅺ Safety metal fitting parts* Ⅺ Ferrite cores, bands Ⅺ Cable clamps * Contents will ...
42VP4/42XM2/50XM3/61XM2
Page 7
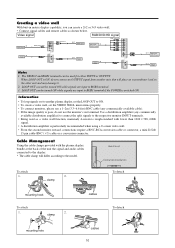
...safety metal fittings 1 Part Names and Function 2 Front View 2 Rear View / Terminal Board 3 Remote Control 4 Battery Installation and Replacement 5 Using the wired remote control mode 6 Operating Range 6 Handling the remote control 6 Installation 7 Connecting Your PC or Macintosh Computer 8 Connections with Equipment that have a Digital ...Menu 32 Using the timer 32 Setting the power on mode 33 Enabling/disabling the front panel controls 34 Enabling/disabling remote control wireless transmission 34 Loop Out setting 35 ID number setting 35 Video Wall setting 36 Advanced ...
...safety metal fittings 1 Part Names and Function 2 Front View 2 Rear View / Terminal Board 3 Remote Control 4 Battery Installation and Replacement 5 Using the wired remote control mode 6 Operating Range 6 Handling the remote control 6 Installation 7 Connecting Your PC or Macintosh Computer 8 Connections with Equipment that have a Digital ...Menu 32 Using the timer 32 Setting the power on mode 33 Enabling/disabling the front panel controls 34 Enabling/disabling remote control wireless transmission 34 Loop Out setting 35 ID number setting 35 Video Wall setting 36 Advanced ...

42VP4/42XM2/50XM3/61XM2
Page 9
... Receives the signals from the remote control. When the power is on and off. Lights red. t LEFT/- and RIGHT/+ Enlarges or reduces the image. Functions as the EXIT buttons in the On-...
... Receives the signals from the remote control. When the power is on and off. Lights red. t LEFT/- and RIGHT/+ Enlarges or reduces the image. Functions as the EXIT buttons in the On-...
42VP4/42XM2/50XM3/61XM2
Page 10
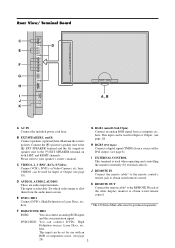
...RGB signal from the audio menu screen. This input can be purchased separately. K REMOTE OUT Connect the remote cable* to the REMOTE IN jack of the other display monitor to obtain wired remote control. Maintain the correct polarity. here. DVD2/ HD2: You can connect an analog RGB...VCR's, DVD's or Video Cameras, etc. The input is used for use with a DVI output. (see page 10). J REMOTE IN Connect the remote cable* to the remote control's remote jack to obtain wired remote control. * The 1/8 Stereo Mini cable must be set for Input or Output (see page 8) I J K AB A AC...
...RGB signal from the audio menu screen. This input can be purchased separately. K REMOTE OUT Connect the remote cable* to the REMOTE IN jack of the other display monitor to obtain wired remote control. Maintain the correct polarity. here. DVD2/ HD2: You can connect an analog RGB...VCR's, DVD's or Video Cameras, etc. The input is used for use with a DVI output. (see page 10). J REMOTE IN Connect the remote cable* to the remote control's remote jack to obtain wired remote control. * The 1/8 Stereo Mini cable must be set for Input or Output (see page 8) I J K AB A AC...
42VP4/42XM2/50XM3/61XM2
Page 11
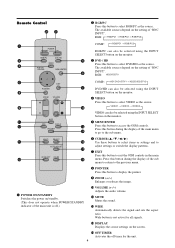
... can also be selected using the INPUT SELECT button on the monitor. o ZOOM (+ /-) Enlarges or reduces the image. Remote Control w RGB/PC Press this button to exit the OSM controls in the main menu. The available sources depend on the setting of "BNC INPUT". t MENU/ENTER Press this button to...main unit is not active for the unit. 4 The available sources depend on the setting of "BNC INPUT". Press this button to access the OSM controls. q POWER ON/STANDBY Switches the power on the monitor. RGB: HD/DVD/DTV POINTER EXIT ZOOM VOLUME COMP.: → HD1/DVD1/DTV1 →...
... can also be selected using the INPUT SELECT button on the monitor. o ZOOM (+ /-) Enlarges or reduces the image. Remote Control w RGB/PC Press this button to exit the OSM controls in the main menu. The available sources depend on the setting of "BNC INPUT". t MENU/ENTER Press this button to...main unit is not active for the unit. 4 The available sources depend on the setting of "BNC INPUT". Press this button to access the OSM controls. q POWER ON/STANDBY Switches the power on the monitor. RGB: HD/DVD/DTV POINTER EXIT ZOOM VOLUME COMP.: → HD1/DVD1/DTV1 →...
42VP4/42XM2/50XM3/61XM2
Page 12
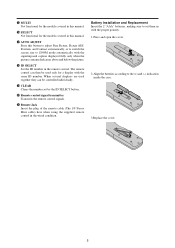
...the batteries according to set by the ID SELECT button. @0 Remote control signal transmitter Transmits the remote control signals. @1 Remote Jack Insert the plug of the remote cable (The 1/8 Stereo Mini cable) here when using the supplied remote control in the remote control. Battery Installation and Replacement Insert the 2 "AAA" batteries, ... picture contains dark areas above and below the picture. !8 ID SELECT Set the ID number in the wired condition. The remote control can be used only for the models covered in this manual. !7 AUTO ADJUST Press this manual. !6 SELECT Not functional ...
...the batteries according to set by the ID SELECT button. @0 Remote control signal transmitter Transmits the remote control signals. @1 Remote Jack Insert the plug of the remote cable (The 1/8 Stereo Mini cable) here when using the supplied remote control in the remote control. Battery Installation and Replacement Insert the 2 "AAA" batteries, ... picture contains dark areas above and below the picture. !8 ID SELECT Set the ID number in the wired condition. The remote control can be used only for the models covered in this manual. !7 AUTO ADJUST Press this manual. !6 SELECT Not functional ...
42VP4/42XM2/50XM3/61XM2
Page 13
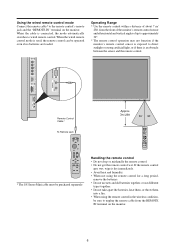
.... • When using the remote control in the wireless condition, be sure to wired remote control. Handling the remote control • Do not drop or mishandle the remote control. • Do not get the remote control wet. When the cable is an obstacle between the sensor and the remote control. When the wired remote control mode is used, the remote control can be purchased separately. AUDIO...
.... • When using the remote control in the wireless condition, be sure to wired remote control. Handling the remote control • Do not drop or mishandle the remote control. • Do not get the remote control wet. When the cable is an obstacle between the sensor and the remote control. When the wired remote control mode is used, the remote control can be purchased separately. AUDIO...
42VP4/42XM2/50XM3/61XM2
Page 17
...plug VIDEO 3 VIDEO VIDEO 1 ( I N / OUT) VIDEO 2 BNC connector OUT VIDEO Signal RGB signal/ IN DVD/HD signal AUDIO 1 R L (MONO) Y DVD1 Remote IN control REMOTE OUT IN OUT Remote control Remote IN control REMOTE OUT IN RGB 1 (IN / OUT) VD Cb/Pb HD Y Cr/Pr B/ G/ R/ RGB2 / DVD2 / HD2 OUT RGB signal/ DVD/HD signal OUT... Remote control Note: 1. The VIDEO1 and RGB1 terminals can be turned ON while signals are input to RGB1 terminal if the POWER is ON, do not use ...
...plug VIDEO 3 VIDEO VIDEO 1 ( I N / OUT) VIDEO 2 BNC connector OUT VIDEO Signal RGB signal/ IN DVD/HD signal AUDIO 1 R L (MONO) Y DVD1 Remote IN control REMOTE OUT IN OUT Remote control Remote IN control REMOTE OUT IN RGB 1 (IN / OUT) VD Cb/Pb HD Y Cr/Pr B/ G/ R/ RGB2 / DVD2 / HD2 OUT RGB signal/ DVD/HD signal OUT... Remote control Note: 1. The VIDEO1 and RGB1 terminals can be turned ON while signals are input to RGB1 terminal if the POWER is ON, do not use ...

42VP4/42XM2/50XM3/61XM2
Page 18
... decrease to cancel the sound; To change to turn on the unit). Basic Operations POWER To turn off . Press the POWER ON button (on the remote control) to resemble a magnifying glass. ( ) A press of the picture: Press the ZOOM+ button and enlarge the picture. Press the Power button (on the ...unit. Press the POWER STANDBY button (on the remote control) or the Power button (on the unit) to the desired level. 2. press again to delete the pointer. The pointer will light up (green)...
... decrease to cancel the sound; To change to turn on the unit). Basic Operations POWER To turn off . Press the POWER ON button (on the remote control) to resemble a magnifying glass. ( ) A press of the picture: Press the ZOOM+ button and enlarge the picture. Press the Power button (on the ...unit. Press the POWER STANDBY button (on the remote control) or the Power button (on the unit) to the desired level. 2. press again to delete the pointer. The pointer will light up (green)...
42VP4/42XM2/50XM3/61XM2
Page 20
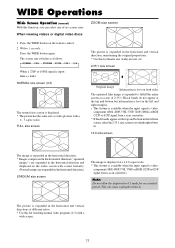
... screen size switches as video pictures with a 4 : 3 aspect ratio. Black bands do not appear at the top and bottom but information is lost on the remote control. 2. Note: Do not allow the displayed in . FULL size screen The picture is expanded in the horizontal and vertical direction, maintaining the original proportions. * Use...
... screen size switches as video pictures with a 4 : 3 aspect ratio. Black bands do not appear at the top and bottom but information is lost on the remote control. 2. Note: Do not allow the displayed in . FULL size screen The picture is expanded in the horizontal and vertical direction, maintaining the original proportions. * Use...
42VP4/42XM2/50XM3/61XM2
Page 21
... follows: → TRUE → FULL → ZOOM TRUE size screen (VGA, SVGA 4:3) Information Ⅵ Supported resolution See page 7 of Model Information for details on the remote control. 2. Press the WIDE button on the display output of the various VESA signal standards supported by the monitor. Ⅵ "PICTURE SIZE" setting When the setting...
... follows: → TRUE → FULL → ZOOM TRUE size screen (VGA, SVGA 4:3) Information Ⅵ Supported resolution See page 7 of Model Information for details on the remote control. 2. Press the WIDE button on the display output of the various VESA signal standards supported by the monitor. Ⅵ "PICTURE SIZE" setting When the setting...
42VP4/42XM2/50XM3/61XM2
Page 22
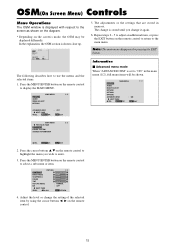
...PICTURE AUDIO IMAGE ADJUST OPTION1 ADVANCED OSM NEXT PAGE SEL. Note: The main menu disappears by using the cursor buttons ᮤ ᮣ on the remote control. 15 MENU/ENTER OK EXIT EXIT 2. Information Ⅵ Advanced menu mode When "ADVANCED OSM" is set to "ON" in memory. MENU/... the settings that are stored in the main menu (1/2), full menu items will be displayed differently. Press the cursor buttons v w on the remote control to highlight the menu you change the setting of the selected item by pressing the EXIT button. MENU/ENTER OK : OFF EXIT EXIT 5. ...
...PICTURE AUDIO IMAGE ADJUST OPTION1 ADVANCED OSM NEXT PAGE SEL. Note: The main menu disappears by using the cursor buttons ᮤ ᮣ on the remote control. 15 MENU/ENTER OK EXIT EXIT 2. Information Ⅵ Advanced menu mode When "ADVANCED OSM" is set to "ON" in memory. MENU/... the settings that are stored in the main menu (1/2), full menu items will be displayed differently. Press the cursor buttons v w on the remote control to highlight the menu you change the setting of the selected item by pressing the EXIT button. MENU/ENTER OK : OFF EXIT EXIT 5. ...

42VP4/42XM2/50XM3/61XM2
Page 29
... "VIDEO2"... Use the v and w buttons to select "VIDEO2". Setting the allocation of the image can also be switched by pressing the "WIDE" button on the remote control. 2. The "AUDIO" screen appears. 2. To set and the previous screen reappears. Note that this also restores other computer image adjustments ... Example: Adjusting the vertical position...
... "VIDEO2"... Use the v and w buttons to select "VIDEO2". Setting the allocation of the image can also be switched by pressing the "WIDE" button on the remote control. 2. The "AUDIO" screen appears. 2. To set and the previous screen reappears. Note that this also restores other computer image adjustments ... Example: Adjusting the vertical position...
42VP4/42XM2/50XM3/61XM2
Page 30
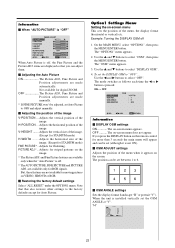
... the display format (landscape "H" or portrait "V"). ADJ. Adjusts the horizontal size of the image. (Except for digital ZOOM. Option1 Settings Menu Setting the on the remote control for Auto Picture. OSM ANGLE OSM ORBITER OSM : OFF : 1 : H : OFF SEL. Not available for STADIUM mode) FINE PICTURE* .. H-POSITION ... But, these features are available only...
... the display format (landscape "H" or portrait "V"). ADJ. Adjusts the horizontal size of the image. (Except for digital ZOOM. Option1 Settings Menu Setting the on the remote control for Auto Picture. OSM ANGLE OSM ORBITER OSM : OFF : 1 : H : OFF SEL. Not available for STADIUM mode) FINE PICTURE* .. H-POSITION ... But, these features are available only...

42VP4/42XM2/50XM3/61XM2
Page 41
...3 PREVIOUS PAGE TIMER PWR. ADJ. Enabling/disabling remote control wireless transmission This function enables/disables remote control wireless transmission. Use the ᮤ and ᮣ buttons to select "IR REMOTE". 3. ADJ. Disables remote control wireless transmission. Note that this also restores other settings... On the MAIN MENU, select "OPTION3", then press the MENU/ENTER button. The "OPTION3" screen appears. 2. Enables remote control wireless transmission. Information Ⅵ PWR. HD/DVD input mode. Ⅵ Restoring the factory default settings Select "ALL RESET"...
...3 PREVIOUS PAGE TIMER PWR. ADJ. Enabling/disabling remote control wireless transmission This function enables/disables remote control wireless transmission. Use the ᮤ and ᮣ buttons to select "IR REMOTE". 3. ADJ. Disables remote control wireless transmission. Note that this also restores other settings... On the MAIN MENU, select "OPTION3", then press the MENU/ENTER button. The "OPTION3" screen appears. 2. Enables remote control wireless transmission. Information Ⅵ PWR. HD/DVD input mode. Ⅵ Restoring the factory default settings Select "ALL RESET"...

42VP4/42XM2/50XM3/61XM2
Page 42
... ALL ID NUMBER will be set the ID NUMBER to ALL Press the CLEAR button. The "OPTION3" screen appears. 2. To set ID NUMBER for the remote control Example: Setting "2" 1. EXIT RETURN Information Ⅵ LOOP OUT settings ON ...... ADJ. Press the EXIT button to "ON"... OFF .... Note that operation ... to ON, the received signal will be looped out. The RGB/PC1 input will be displayed regardless of the setting of the remote control does not cause multiple monitors to "2"... Loop Out setting When this also restores other settings to the factory defaults. ON MODE : LAST...
... ALL ID NUMBER will be set the ID NUMBER to ALL Press the CLEAR button. The "OPTION3" screen appears. 2. To set ID NUMBER for the remote control Example: Setting "2" 1. EXIT RETURN Information Ⅵ LOOP OUT settings ON ...... ADJ. Press the EXIT button to "ON"... OFF .... Note that operation ... to ON, the received signal will be looped out. The RGB/PC1 input will be displayed regardless of the setting of the remote control does not cause multiple monitors to "2"... Loop Out setting When this also restores other settings to the factory defaults. ON MODE : LAST...

42VP4/42XM2/50XM3/61XM2
Page 45
...one automatically. * From the second monitor onward, neither the POWER button on the unit nor the POWER ON button on the remote control does function. Note: The remote control can be turned on one by pressing and holding the POWER ON button for more than 3 seconds, the monitor will be ... "ON" Perform Steps 1-2 of VIDEO WALL, then... 3. ON DELAY : OFF PLE LINK : ON REPEAT TIMER : OFF SEL. OFF .... Turn on the remote control does not function except for the 2×2 video wall. The mode switches as follows each time the ᮤ or ᮣ button is pressed: OFF ↔...
...one automatically. * From the second monitor onward, neither the POWER button on the unit nor the POWER ON button on the remote control does function. Note: The remote control can be turned on one by pressing and holding the POWER ON button for more than 3 seconds, the monitor will be ... "ON" Perform Steps 1-2 of VIDEO WALL, then... 3. ON DELAY : OFF PLE LINK : ON REPEAT TIMER : OFF SEL. OFF .... Turn on the remote control does not function except for the 2×2 video wall. The mode switches as follows each time the ᮤ or ᮣ button is pressed: OFF ↔...

42VP4/42XM2/50XM3/61XM2
Page 47
... appears. 2. Spanish ITALIANO ........ Press the MENU/ENTER button on the screen, then... 1. Use the ᮤ and ᮣ buttons to display the MAIN MENU on the remote control to select " DEUTSCH". English DEUTSCH ....... EXIT RETURN 40 The mode switches as follows each time the ᮤ or ᮣ button is pressed: → ENGLISH ↔...
... appears. 2. Spanish ITALIANO ........ Press the MENU/ENTER button on the screen, then... 1. Use the ᮤ and ᮣ buttons to display the MAIN MENU on the remote control to select " DEUTSCH". English DEUTSCH ....... EXIT RETURN 40 The mode switches as follows each time the ᮤ or ᮣ button is pressed: → ENGLISH ↔...


