
NP115 : RS232 codes- Projectors
Page 34
...Power Off inhibited. 050. Command: 02H 0FH 00H 00H 02H DATA01 DATA02 CKS (*3) Data Portion Contents DATA01 .. 02 : Remote control key code (Word type) Key number DATA01 DATA02 Key name 1 01H 00H POWER 2 02H 00H POWER ON (!!) 3 03H 00H POWER OFF (!!) 4 04H 00H SOURCE (AUTO) (!!) 5 05H 00H AUTO (!) (!!) 6 06H 00H MENU...29H 00H PICTURE 42 2AH 00H WHITE BAL 43 2BH 00H IMAGE 44 2CH 00H TEST Setting not possible. REMOTE KEY CODE Function: This command sends remote control key codes of projector. This current model does not support this function. DATA01 DATA2 Error Error Types ...
...Power Off inhibited. 050. Command: 02H 0FH 00H 00H 02H DATA01 DATA02 CKS (*3) Data Portion Contents DATA01 .. 02 : Remote control key code (Word type) Key number DATA01 DATA02 Key name 1 01H 00H POWER 2 02H 00H POWER ON (!!) 3 03H 00H POWER OFF (!!) 4 04H 00H SOURCE (AUTO) (!!) 5 05H 00H AUTO (!) (!!) 6 06H 00H MENU...29H 00H PICTURE 42 2AH 00H WHITE BAL 43 2BH 00H IMAGE 44 2CH 00H TEST Setting not possible. REMOTE KEY CODE Function: This command sends remote control key codes of projector. This current model does not support this function. DATA01 DATA2 Error Error Types ...

NP1250 : color brochure
Page 1
... produces superior video processing using pixel-based, motion-adaptive de-interlacing to remove undesirable motion artifacts typical of its useful life EXTENDING THE LIFE OF THE PROJECTOR ° ECO Mode™ technology increases lamp life by up to 20,000 lumens, which can be set to automatically turn off protects the lamp by connecting a POWERFUL INTEGRATED NETWORKING USB mouse and keyboard directly to the projector's USB input ° Windows Network Drive Function displays multimedia files...
... produces superior video processing using pixel-based, motion-adaptive de-interlacing to remove undesirable motion artifacts typical of its useful life EXTENDING THE LIFE OF THE PROJECTOR ° ECO Mode™ technology increases lamp life by up to 20,000 lumens, which can be set to automatically turn off protects the lamp by connecting a POWERFUL INTEGRATED NETWORKING USB mouse and keyboard directly to the projector's USB input ° Windows Network Drive Function displays multimedia files...
NP1250 : color brochure
Page 2
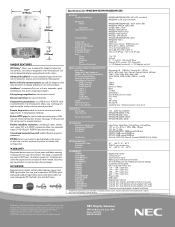
... sent to remote locations. Product specifications subject to change images using the wireless remote control provided Remote diagnostics enable the user to monitor and make adjustments to the projector remotely Built-in HTTP page for control and monitoring over a LAN network. IN THE BOX Remote control, remote control cable, batteries, power cord, RGB signal cable, lens cap, user's manual on CD-ROM, quick start guide, product registration card, wired and wireless network setup guide, PC Card lock, lens anti-theft screw SIGNAL COMPATIBILITY/CONNECTIVITY Scan Rate Supported Video Standards SD...
... sent to remote locations. Product specifications subject to change images using the wireless remote control provided Remote diagnostics enable the user to monitor and make adjustments to the projector remotely Built-in HTTP page for control and monitoring over a LAN network. IN THE BOX Remote control, remote control cable, batteries, power cord, RGB signal cable, lens cap, user's manual on CD-ROM, quick start guide, product registration card, wired and wireless network setup guide, PC Card lock, lens anti-theft screw SIGNAL COMPATIBILITY/CONNECTIVITY Scan Rate Supported Video Standards SD...

NP1250 : install guide
Page 1
... front of 8 NP1250/NP2250/NP3250 Installation Guide Desktop and Ceiling Mount v 2.1 Contents Product Description, Lens Specs, Screen/Aspect Ratio Notes and Formulas Diagrams & Distance Charts; 4:3 16:9___ Lens Shift Adjustable Range Cabinet Dimensions Lens Dimensions Ceiling Mount Dimensions Input Panel and Control Codes Pg 1 Pg 2 Pg 3 Pg 4 Pg 5 Pg 6 Pg 7 Pg 8 Product Description Type: 3 panel LCD projector, 0.80 p-Si TFT w/MLA Resolution: 1024 x 768 (4:3) / 1024 x 576 (16:9) Fan Noise: NP1250 33 dB / 30dB...
... front of 8 NP1250/NP2250/NP3250 Installation Guide Desktop and Ceiling Mount v 2.1 Contents Product Description, Lens Specs, Screen/Aspect Ratio Notes and Formulas Diagrams & Distance Charts; 4:3 16:9___ Lens Shift Adjustable Range Cabinet Dimensions Lens Dimensions Ceiling Mount Dimensions Input Panel and Control Codes Pg 1 Pg 2 Pg 3 Pg 4 Pg 5 Pg 6 Pg 7 Pg 8 Product Description Type: 3 panel LCD projector, 0.80 p-Si TFT w/MLA Resolution: 1024 x 768 (4:3) / 1024 x 576 (16:9) Fan Noise: NP1250 33 dB / 30dB...

NP1250 : network setup guide
Page 1
... use the software programs included in this manual are distributed without the USB Wireless LAN Unit installed and need to connect to "User's Guide" (PDF) on USB Wireless LAN: In some areas and countries, the projector models described in the supplied User Supportware 6 CD-ROM. Configuring the LAN Settings of the PC ([Example] Wireless LAN in the User Supportware 6 CD-ROM. Install in the PC the software stored in 6 Windows XP: Ad Hoc connection) 7. Operating Environment 2 SELECT LEFT LENS...
... use the software programs included in this manual are distributed without the USB Wireless LAN Unit installed and need to connect to "User's Guide" (PDF) on USB Wireless LAN: In some areas and countries, the projector models described in the supplied User Supportware 6 CD-ROM. Configuring the LAN Settings of the PC ([Example] Wireless LAN in the User Supportware 6 CD-ROM. Install in the PC the software stored in 6 Windows XP: Ad Hoc connection) 7. Operating Environment 2 SELECT LEFT LENS...

NP1250 : network setup guide
Page 24
... button. • "Infrastructure"....This is selected if communication is performed with two or more devices connected by wired or wireless LAN via a wireless access point. • "Ad Hoc This is selected when using wireless LAN. To avoid such a situation, select channel numbers that are automatically input. 4. The default setting of the projectors is "Ad Hoc" SELECT LEFT LENS SHIFT RIGHT DOWN UP 3D REFORM AUTO ADJUST SOURCE...
... button. • "Infrastructure"....This is selected if communication is performed with two or more devices connected by wired or wireless LAN via a wireless access point. • "Ad Hoc This is selected when using wireless LAN. To avoid such a situation, select channel numbers that are automatically input. 4. The default setting of the projectors is "Ad Hoc" SELECT LEFT LENS SHIFT RIGHT DOWN UP 3D REFORM AUTO ADJUST SOURCE...

NP1250 : network setup guide
Page 30
... when the projector is displayed under [Network and Internet]. 30 For details, refer to the User's Manual of the wireless LAN card. • Check the display of the projector. Setting the LAN Settings of the wireless LAN card. 5. The "Control Panel" window is displayed. 2 Click the [View network status and tasks] link that utility. • Configure the wireless LAN settings of the Windows Vista taskbar. If a network connection utility dedicated to your personal computer, and complete setup of Projector" ( page...
... when the projector is displayed under [Network and Internet]. 30 For details, refer to the User's Manual of the wireless LAN card. • Check the display of the projector. Setting the LAN Settings of the wireless LAN card. 5. The "Control Panel" window is displayed. 2 Click the [View network status and tasks] link that utility. • Configure the wireless LAN settings of the Windows Vista taskbar. If a network connection utility dedicated to your personal computer, and complete setup of Projector" ( page...

NP1250 : network setup guide
Page 34
... and projector, by using the wireless network setting function with a blue background), click [Network and Internet Connections], and then click [Network Connections]. The "Control Panel" window is displayed. 34 The "Network Connections" window is displayed. 2 Double-click the "Network Connections". • If the "Control Panel" window displays categories (with Windows XP Service Pack 2 (SP2). 6. For details on how to install the driver, refer to the User's Manual of the wireless LAN card. • Check the display of projector settings] Item IP Address Subnet Mask SSID Mode...
... and projector, by using the wireless network setting function with a blue background), click [Network and Internet Connections], and then click [Network Connections]. The "Control Panel" window is displayed. 34 The "Network Connections" window is displayed. 2 Double-click the "Network Connections". • If the "Control Panel" window displays categories (with Windows XP Service Pack 2 (SP2). 6. For details on how to install the driver, refer to the User's Manual of the wireless LAN card. • Check the display of projector settings] Item IP Address Subnet Mask SSID Mode...
NP1250 : user's manual
Page 7
... can cause damage to display an image. • Do not unplug the power cable from the wall or ceiling) the projector can become heated while the projector is turned on and while the POWER indicator is turned off. • Do not turn off the AC power for consecutive days. (From the menu, select [SETUP] → [OPTIONS] → [FAN MODE] → [HIGH].) • Before using the remote control for lamp replacement. Doing so could...
... can cause damage to display an image. • Do not unplug the power cable from the wall or ceiling) the projector can become heated while the projector is turned on and while the POWER indicator is turned off. • Do not turn off the AC power for consecutive days. (From the menu, select [SETUP] → [OPTIONS] → [FAN MODE] → [HIGH].) • Before using the remote control for lamp replacement. Doing so could...

NP1250 : user's manual
Page 11
... Features...7 Terminal Panel Features 8 Part Names of the Remote Control 9 Battery Installation 10 Operating Range for Wireless Remote Control 10 Remote Control Precautions 11 Using the Remote Control in the Box?...1 Introduction to a Network 19 Connecting the Supplied Power Cable 22 3. Introduction...1 What's in Wired Operation 11 2. Installation and Connections 12 Setting Up the Screen and the Projector 12 Selecting a Location [NP3250/NP2250/NP1250 12 Selecting a Location [NP3250W 13 Making Connections...14 Connecting Your PC...
... Features...7 Terminal Panel Features 8 Part Names of the Remote Control 9 Battery Installation 10 Operating Range for Wireless Remote Control 10 Remote Control Precautions 11 Using the Remote Control in the Box?...1 Introduction to a Network 19 Connecting the Supplied Power Cable 22 3. Introduction...1 What's in Wired Operation 11 2. Installation and Connections 12 Setting Up the Screen and the Projector 12 Selecting a Location [NP3250/NP2250/NP1250 12 Selecting a Location [NP3250W 13 Making Connections...14 Connecting Your PC...

NP1250 : user's manual
Page 16
... the USB Wireless LAN Unit. With input and output flexibility, long lamp life and a full function remote, the NP3250/NP2250/NP1250/NP3250W lets you enjoy larger than life viewing from a compact and easy to the projector via a wireless connection, the optional USB Wireless LAN Unit must be installed. • Windows Vista standard functions Network Projector and Remote Desktop can be operated using the Main Power Switch or disconnecting the AC power supply. NP3250W is powered on the remote control or projector...
... the USB Wireless LAN Unit. With input and output flexibility, long lamp life and a full function remote, the NP3250/NP2250/NP1250/NP3250W lets you enjoy larger than life viewing from a compact and easy to the projector via a wireless connection, the optional USB Wireless LAN Unit must be installed. • Windows Vista standard functions Network Projector and Remote Desktop can be operated using the Main Power Switch or disconnecting the AC power supply. NP3250W is powered on the remote control or projector...

NP1250 : user's manual
Page 28
... older Macintosh, use a commercially available pin adapter (not supplied) to connect to your preference. • You are recommended to connect an audio cable to toggle through external display selections. In that you can adjust the sound level on the power to your Mac's video port. • First turn off . NOTE: An image may be displayed correctly when a Video or S-Video source is not turned on unless connected to the projector before turning on the...
... older Macintosh, use a commercially available pin adapter (not supplied) to connect to your preference. • You are recommended to connect an audio cable to toggle through external display selections. In that you can adjust the sound level on the power to your Mac's video port. • First turn off . NOTE: An image may be displayed correctly when a Video or S-Video source is not turned on unless connected to the projector before turning on the...

NP1250 : user's manual
Page 33
... desktop screen on /off, input select, etc.) and receive information from the supplied User Supportware 6 CD-ROM. Viewer function supporting network * Using the Viewer function, image and movie files stored in a shared folder in a computer connected to the projector. To use a LAN connection, you own a projector without the USB Wireless LAN Unit installed and need to present to the projector which provides a LAN connection using a computer. TIP: Five Windows software programs (Image Express Utility 2.0, Desktop Control...
... desktop screen on /off, input select, etc.) and receive information from the supplied User Supportware 6 CD-ROM. Viewer function supporting network * Using the Viewer function, image and movie files stored in a shared folder in a computer connected to the projector. To use a LAN connection, you own a projector without the USB Wireless LAN Unit installed and need to present to the projector which provides a LAN connection using a computer. TIP: Five Windows software programs (Image Express Utility 2.0, Desktop Control...

NP1250 : user's manual
Page 38
... REFORM AUTO ADJUST SOURCE POWER OFF VIDEO COMPUTER 1 2 COMPONENT S-VIDEO 3 POWER ON VIEWER NETWORK MENU SELECT ENTER EXIT 2. If the internal temperature of the projector is set to 5 minutes until the lamp lighting is stabilized. • When the [LAMP MODE] is too high, the projector detects abnormal high temperature. NOTE: Turning the Main Power Switch Off then Back On Allow a minimum of the 21 languages for a moment and then you turn on the projector, screen flicker may...
... REFORM AUTO ADJUST SOURCE POWER OFF VIDEO COMPUTER 1 2 COMPONENT S-VIDEO 3 POWER ON VIEWER NETWORK MENU SELECT ENTER EXIT 2. If the internal temperature of the projector is set to 5 minutes until the lamp lighting is stabilized. • When the [LAMP MODE] is too high, the projector detects abnormal high temperature. NOTE: Turning the Main Power Switch Off then Back On Allow a minimum of the 21 languages for a moment and then you turn on the projector, screen flicker may...

NP1250 : user's manual
Page 69
... Features SOURCE SELECT: This switches the input connector of the projector. COMPUTER1 Switches to the COMPUTER 2 IN connector. COMPUTER2 Switches to the COMPUTER 1 IN connector. COMPONENT Switches to the COMPUTER 3 (DVI-D) IN connector. LAMP LIFE REMAINING...... COMPUTER3 Switches to the COMPONENT IN connectors. NETWORK Switches to the S-VIDEO IN connector. FILTER HOURS USED..... S-VIDEO Switches to a LAN signal. PROJECTOR STATUS: This displays the condition of the projector. ERROR STATUS Displays the status of the lamp as a percentage. 4. VIDEO Switches...
... Features SOURCE SELECT: This switches the input connector of the projector. COMPUTER1 Switches to the COMPUTER 2 IN connector. COMPUTER2 Switches to the COMPUTER 1 IN connector. COMPONENT Switches to the COMPUTER 3 (DVI-D) IN connector. LAMP LIFE REMAINING...... COMPUTER3 Switches to the COMPONENT IN connectors. NETWORK Switches to the S-VIDEO IN connector. FILTER HOURS USED..... S-VIDEO Switches to a LAN signal. PROJECTOR STATUS: This displays the condition of the projector. ERROR STATUS Displays the status of the lamp as a percentage. 4. VIDEO Switches...

NP1250 : user's manual
Page 97
... control ID will be displayed when [CONTROL ID] is turned on. 83 USAGE TIME LAMP LIFE REMAINING, LAMP HOURS USED, FILTER HOURS USED SOURCE (1) INPUT TERMINAL, SIGNAL TYPE, VIDEO TYPE, SOURCE NAME, ENTRY NO. SECURITY, PJLink, HTTP SERVER REMOTE SENSOR FRONT / BACK, FRONT, BACK CONTROL ID CONTROL ID NUMBER, CONTROL ID OPTIONS AUTO ADJUST OFF, NORMAL, FINE AUTO POWER ON(AC) OFF, ON AUTO POWER ON(COMP1/2) OFF, COMPUTER 1, COMPUTER 2 AUTO POWER OFF OFF, 0:05, 0:10, 0:20, 0:30 FAN MODE AUTO, HIGH, HIGH ALTITUDE DEFAULT SOURCE SELECT LAST, AUTO...
... control ID will be displayed when [CONTROL ID] is turned on. 83 USAGE TIME LAMP LIFE REMAINING, LAMP HOURS USED, FILTER HOURS USED SOURCE (1) INPUT TERMINAL, SIGNAL TYPE, VIDEO TYPE, SOURCE NAME, ENTRY NO. SECURITY, PJLink, HTTP SERVER REMOTE SENSOR FRONT / BACK, FRONT, BACK CONTROL ID CONTROL ID NUMBER, CONTROL ID OPTIONS AUTO ADJUST OFF, NORMAL, FINE AUTO POWER ON(AC) OFF, ON AUTO POWER ON(COMP1/2) OFF, COMPUTER 1, COMPUTER 2 AUTO POWER OFF OFF, 0:05, 0:10, 0:20, 0:30 FAN MODE AUTO, HIGH, HIGH ALTITUDE DEFAULT SOURCE SELECT LAST, AUTO...
NP1250 : user's manual
Page 158
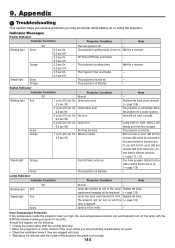
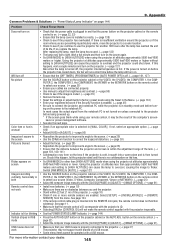
... of life. Orange Control Panel Lock is in wired LAN and wireless LAN at the same time. Over-Temperature Protection If the temperature inside the projector rises too high, the over-temperature protector will not turn off - Note - Replace the lamp. Status Indicator Blinking light . . . . . Lamp fails to a cooler location. Fans will be connected to the same network at the same time, connect them to turn on . The Program Timer is activated. - Lamp is cooling down. replacement message will not work correctly. 9. Appendix Troubleshooting...
... of life. Orange Control Panel Lock is in wired LAN and wireless LAN at the same time. Over-Temperature Protection If the temperature inside the projector rises too high, the over-temperature protector will not turn off - Note - Replace the lamp. Status Indicator Blinking light . . . . . Lamp fails to a cooler location. Fans will be connected to the same network at the same time, connect them to turn on . The Program Timer is activated. - Lamp is cooling down. replacement message will not work correctly. 9. Appendix Troubleshooting...
NP1250 : user's manual
Page 159
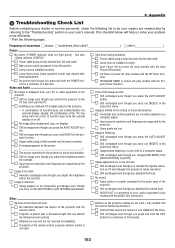
...'s screen- After replacing the lamp, reset the lamp hours used. (→ page 133) • The lamp may be operated with the projector inoperable. • See the POWER/STATUS/LAMP Indicator. (→ page 144) Vertical stripes in standby mode and before turn on the projector cabinet or the AUTO ADJ. Wait a full minute and then turn - ing on the remote control. (→ page 32) • Adjust the computer image manually with the [CLOCK]/[PHASE] in [ADJUST] → [IMAGE...
...'s screen- After replacing the lamp, reset the lamp hours used. (→ page 133) • The lamp may be operated with the projector inoperable. • See the POWER/STATUS/LAMP Indicator. (→ page 144) Vertical stripes in standby mode and before turn on the projector cabinet or the AUTO ADJ. Wait a full minute and then turn - ing on the remote control. (→ page 32) • Adjust the computer image manually with the [CLOCK]/[PHASE] in [ADJUST] → [IMAGE...

NP1250 : user's manual
Page 160
... of the Mac adapter (not supplied with the projector, set the DIP switch of deactivate/reactivate the local LCD screens as described in standby mode and before being output from the notebook PC is incorrect when using a Macintosh When using the projector with your Macintosh. NOTE: A Video Adapter cable manufactured by your Macintosh and the projector, changing the DIP switch on your resolution. If there is no signal being powered up. Be...
... of the Mac adapter (not supplied with the projector, set the DIP switch of deactivate/reactivate the local LCD screens as described in standby mode and before being output from the notebook PC is incorrect when using a Macintosh When using the projector with your Macintosh. NOTE: A Video Adapter cable manufactured by your Macintosh and the projector, changing the DIP switch on your resolution. If there is no signal being powered up. Be...
NP1250 : user's manual
Page 177
... to the "Troubleshooting" section in installation. Remote control does not work ( only models with the AUDIO OUT connector). Buttons on or off (only models with the Off Timer function). Main power switch is connected to the projector. No power even though you press the AUTO ADJUST button. No image is fully inserted into the wall outlet. Still no image even though you change [FAN MODE] from your PC or video equipment to your user's manual. Still...
... to the "Troubleshooting" section in installation. Remote control does not work ( only models with the AUDIO OUT connector). Buttons on or off (only models with the Off Timer function). Main power switch is connected to the projector. No power even though you press the AUTO ADJUST button. No image is fully inserted into the wall outlet. Still no image even though you change [FAN MODE] from your PC or video equipment to your user's manual. Still...


