NP115 : RS232 codes- Projectors
Page 34
... model does not support this function. Invalid values specified. Power Off inhibited. 050. REMOTE KEY CODE Function: This command sends remote control key codes of projector. Setting not possible. Command: 02H 0FH 00H 00H 02H DATA01 DATA02 CKS (*3) Data Portion Contents DATA01 .. 02 : Remote control key code (Word type) Key number DATA01 DATA02 Key name 1 01H 00H POWER 2 02H 00H POWER ON (!!) 3 03H 00H POWER OFF (!!) 4 04H 00H SOURCE (AUTO) (!!) 5 05H 00H AUTO...
... model does not support this function. Invalid values specified. Power Off inhibited. 050. REMOTE KEY CODE Function: This command sends remote control key codes of projector. Setting not possible. Command: 02H 0FH 00H 00H 02H DATA01 DATA02 CKS (*3) Data Portion Contents DATA01 .. 02 : Remote control key code (Word type) Key number DATA01 DATA02 Key name 1 01H 00H POWER 2 02H 00H POWER ON (!!) 3 03H 00H POWER OFF (!!) 4 04H 00H SOURCE (AUTO) (!!) 5 05H 00H AUTO...
GT5000/6000 color brochure
Page 12
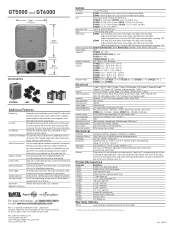
... LENS LAMPS Additional Features Networking Integrated wired networking or wireless/wired PC Card network connectivity options allows systems administrators to conduct remote diagnostics and control for asset management, email Lens Shift notification and real time source display Powered Horizontal and Vertical mechanical lens shift provides the ability to project from off center screen installations while maintaining the native image quality of the source information Lens Memory Controls lens attributes (zoom, focus, shift) based on input resolution and input...
... LENS LAMPS Additional Features Networking Integrated wired networking or wireless/wired PC Card network connectivity options allows systems administrators to conduct remote diagnostics and control for asset management, email Lens Shift notification and real time source display Powered Horizontal and Vertical mechanical lens shift provides the ability to project from off center screen installations while maintaining the native image quality of the source information Lens Memory Controls lens attributes (zoom, focus, shift) based on input resolution and input...

GT5000/GT6000/GT6000R UM
Page 3
... to clean the lens, and be operated with the POWER button). Use a blower or lens paper to scratch or mar the lens. Allow at least 3 inches (10 cm) of its usable life, the lamp bulb may cause damage to the projector: • While the message "Please wait a moment." iii Never use a mild detergent. When using a LAN cable: For safety, do so may encounter damage caused by a qualified NEC service...
... to clean the lens, and be operated with the POWER button). Use a blower or lens paper to scratch or mar the lens. Allow at least 3 inches (10 cm) of its usable life, the lamp bulb may cause damage to the projector: • While the message "Please wait a moment." iii Never use a mild detergent. When using a LAN cable: For safety, do so may encounter damage caused by a qualified NEC service...
GT5000/GT6000/GT6000R UM
Page 4
...Setting Up for Wireless Remote Control 1-12 Using the Remote Control in Link Mode 7-6 8. Maintenancez Replacing the Lamp ......... 9-2 z Replacing or Cleaning the Filter 9-3 x Cleaning the Cabinet and the Lens 9-4 10. Projecting an Image (Basic Operation) z Turning on , Projected Image (ChalkBoard 4-4 . Adjust 8-12 Using 3D Reform 8-12 Screen Type 8-12 Reference White Balance 8-12 Reference Color Correction 8-12 Reference Lens Memory 8-13 Factory Default 8-13 Projector Options 8-13 Menu 8-13 Setup 8-15 Lamp Settings 8-18 Link Mode 8-18 LAN Mode 8-19 Seamless Switch...
...Setting Up for Wireless Remote Control 1-12 Using the Remote Control in Link Mode 7-6 8. Maintenancez Replacing the Lamp ......... 9-2 z Replacing or Cleaning the Filter 9-3 x Cleaning the Cabinet and the Lens 9-4 10. Projecting an Image (Basic Operation) z Turning on , Projected Image (ChalkBoard 4-4 . Adjust 8-12 Using 3D Reform 8-12 Screen Type 8-12 Reference White Balance 8-12 Reference Color Correction 8-12 Reference Lens Memory 8-13 Factory Default 8-13 Projector Options 8-13 Menu 8-13 Setup 8-15 Lamp Settings 8-18 Link Mode 8-18 LAN Mode 8-19 Seamless Switch...
GT5000/GT6000/GT6000R UM
Page 7
... security settings for password protection, control panel lock, menu lock and PC card protection key to help prevent unauthorized access and adjustments to the projector • Seamless Switch function provides a transition effect during source switching (GT6000 only). • ADA508 and Executive Order 13221 Federal Government compliance *1 • NEC 3D 10-bit video decoder for expanded black levels and adaptive gamma correction • High performance optional long life lamp for wireless network connectivity...
... security settings for password protection, control panel lock, menu lock and PC card protection key to help prevent unauthorized access and adjustments to the projector • Seamless Switch function provides a transition effect during source switching (GT6000 only). • ADA508 and Executive Order 13221 Federal Government compliance *1 • NEC 3D 10-bit video decoder for expanded black levels and adaptive gamma correction • High performance optional long life lamp for wireless network connectivity...
GT5000/GT6000/GT6000R UM
Page 11
... optimal picture. FOCUS Button (+/-) Adjust the lens focus. 1-7 POWER Button (ON / STAND BY)( ) Use this light blinks red rapidly, it indicates that the lamp has reached the end of two seconds. 2. If this light remains orange, it indicates that an error has occurred, the lamp cover is enabled. After this light blinks red rapidly, it is in standby mode or idle mode. MENU Button Displays the menu. 9. Press to adjust. LAMP Indicator 1/2 If this light appears, replace the lamp as soon as a volume control. ̇̈ : Use these buttons...
... optimal picture. FOCUS Button (+/-) Adjust the lens focus. 1-7 POWER Button (ON / STAND BY)( ) Use this light blinks red rapidly, it indicates that the lamp has reached the end of two seconds. 2. If this light remains orange, it indicates that an error has occurred, the lamp cover is enabled. After this light blinks red rapidly, it is in standby mode or idle mode. MENU Button Displays the menu. 9. Press to adjust. LAMP Indicator 1/2 If this light appears, replace the lamp as soon as a volume control. ̇̈ : Use these buttons...

GT5000/GT6000/GT6000R UM
Page 13
... screen controller and the screen will go up. You can be connected to control the projector on the Main Power switch, the POWER indicator turns orange and the projector is powered ON the screen trigger output sends a low voltage trigger to the remote control. 10 11 1. There are connected. 1-9 Two-pin type for UTP Ethernet/Fast Ethernet. Use this connector to this port. • A USB-supported scanner or PC peripheral can operate the menu...
... screen controller and the screen will go up. You can be connected to control the projector on the Main Power switch, the POWER indicator turns orange and the projector is powered ON the screen trigger output sends a low voltage trigger to the remote control. 10 11 1. There are connected. 1-9 Two-pin type for UTP Ethernet/Fast Ethernet. Use this connector to this port. • A USB-supported scanner or PC peripheral can operate the menu...

GT5000/GT6000/GT6000R UM
Page 14
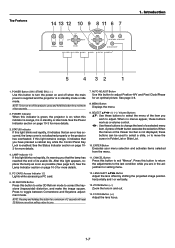
BS + MENU ADDRESS ENTER ADJUST IMAGE PICTURE WHITE BAL. Introduction 1. ADJUST WHITE BAL. 18 Press to display the Picture adjustment screen. Pressing this button sequentially selects Image Options screens. 25 While pressing and holding CTL, press this button to display the Remote Control ID dialog box to specify the remote control ID. NOTE: While pressing and holding CTL, pressing this button confirms adjustments/setting and returns to the selected signal found in the entry screen. FOCUS ZOOM LENS CTL 1. POWER OFF...
BS + MENU ADDRESS ENTER ADJUST IMAGE PICTURE WHITE BAL. Introduction 1. ADJUST WHITE BAL. 18 Press to display the Picture adjustment screen. Pressing this button sequentially selects Image Options screens. 25 While pressing and holding CTL, press this button to display the Remote Control ID dialog box to specify the remote control ID. NOTE: While pressing and holding CTL, pressing this button confirms adjustments/setting and returns to the selected signal found in the entry screen. FOCUS ZOOM LENS CTL 1. POWER OFF...

GT5000/GT6000/GT6000R UM
Page 30
... AUDIO SLOT 1 DVI SLOT 2 RGB 1 B/Cb VIDEO S-VIDEO H/ HV V L/MONO L/MONO R R 2 USB A USB B PC CARD 1 PC CONTROL IN OUT SC TRIGGER LAN REMOTE 1 REMOTE 2 IN OUT AC IN RGB signal cable (not supplied) To mini D-Sub 15-pin connector on the projector and the computer. 4. Turn off the power to connect the PC and the projector using a DVI-D signal cable (not supplied) before turning on the remote control, wait 90 seconds (2 minutes in no picture...
... AUDIO SLOT 1 DVI SLOT 2 RGB 1 B/Cb VIDEO S-VIDEO H/ HV V L/MONO L/MONO R R 2 USB A USB B PC CARD 1 PC CONTROL IN OUT SC TRIGGER LAN REMOTE 1 REMOTE 2 IN OUT AC IN RGB signal cable (not supplied) To mini D-Sub 15-pin connector on the projector and the computer. 4. Turn off the power to connect the PC and the projector using a DVI-D signal cable (not supplied) before turning on the remote control, wait 90 seconds (2 minutes in no picture...

GT5000/GT6000/GT6000R UM
Page 37
... AUTO ADJUST E NTER CANCE L ON/STAND BY LAMP 2 STATUS POWER After this happens, wait for 60 seconds immediately after turning on the projector, screen flicker may cause damage to use. MENU SELECT 3D A 3D REFORM AUTO ADJUST E NTER CANCE L ON/STAND BY LAMP 2 STATUS POWER NOTE: You cannot turn to green and the projector become ready to the projector. • The projector has two power switches: A main power switch and a POWER button (POWER ON and OFF on the remote control...
... AUTO ADJUST E NTER CANCE L ON/STAND BY LAMP 2 STATUS POWER After this happens, wait for 60 seconds immediately after turning on the projector, screen flicker may cause damage to use. MENU SELECT 3D A 3D REFORM AUTO ADJUST E NTER CANCE L ON/STAND BY LAMP 2 STATUS POWER NOTE: You cannot turn to green and the projector become ready to the projector. • The projector has two power switches: A main power switch and a POWER button (POWER ON and OFF on the remote control...

GT5000/GT6000/GT6000R UM
Page 42
... or do not turn off the projector for 1 minute immediately after turning on the remote control for 90 seconds (2 minutes in the optional extended life lamp GT60LPS) after the projector is turned off). • While accessing a PC card or LAN card. (The PC Card Access indicator lights.) 3. appears. Projecting an Image 3-7 BS + MENU ADDRESS ENTER Power on Fan working Standby or Idle POWER Steady green light ON/STAND BY POWER POWER Flashing orange Steady orange light light NOTE: You cannot...
... or do not turn off the projector for 1 minute immediately after turning on the remote control for 90 seconds (2 minutes in the optional extended life lamp GT60LPS) after the projector is turned off). • While accessing a PC card or LAN card. (The PC Card Access indicator lights.) 3. appears. Projecting an Image 3-7 BS + MENU ADDRESS ENTER Power on Fan working Standby or Idle POWER Steady green light ON/STAND BY POWER POWER Flashing orange Steady orange light light NOTE: You cannot...
GT5000/GT6000/GT6000R UM
Page 50
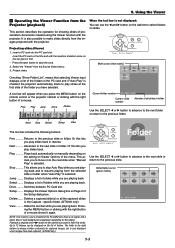
... REFORM AUTO ADJUST Projecting slides (Viewer) 1. Advances to the previous slide or folder. This allows you to eject the card. 2. Jump ........ Drive ......... specific folder. (GT5000 only) View ......... It is selected. Select the "Viewer" from the images projected with the projector. Next Stop Select Setup View The tool bar includes the following buttons: Prev .......... Displays a list of folders while you press the MENU button on the remote control...
... REFORM AUTO ADJUST Projecting slides (Viewer) 1. Advances to the previous slide or folder. This allows you to eject the card. 2. Jump ........ Drive ......... specific folder. (GT5000 only) View ......... It is selected. Select the "Viewer" from the images projected with the projector. Next Stop Select Setup View The tool bar includes the following buttons: Prev .......... Displays a list of folders while you press the MENU button on the remote control...
GT5000/GT6000/GT6000R UM
Page 55
... uses. (In a network environment or USB cable connection (*3) , support of multiple units is not available on Dynamic Image Utility included on the supplied CD-ROM. (1) Images and slides can abbreviate the troublesome LAN settings when using the Image Express Utility and connecting the PC and projector via a wireless LAN. • From the Advanced menu, select [Projector Options] → [LAN Mode] → [Status] → [Advanced] → [Network Type] → [Mode] → [Easy Connection] on /off, control the adjustment...
... uses. (In a network environment or USB cable connection (*3) , support of multiple units is not available on Dynamic Image Utility included on the supplied CD-ROM. (1) Images and slides can abbreviate the troublesome LAN settings when using the Image Express Utility and connecting the PC and projector via a wireless LAN. • From the Advanced menu, select [Projector Options] → [LAN Mode] → [Status] → [Advanced] → [Network Type] → [Mode] → [Easy Connection] on /off, control the adjustment...

GT5000/GT6000/GT6000R UM
Page 79
... resolution (GT6000: SXGA+ and GT5000: XGA), "Resolution" is set to correct the tint of the analog input signal. Select the appropriate one of a picture Selecting Color Correction Adjusts red, green, blue, yellow, magenta, cyan and color gain each R, G, and B. For dark portions of the following five settings. • Presentation • sRGB • Graphic • Video • Movie Image Options Pixel Adjust Displays the Clock and Phase adjustments. Adjusting White Balance Press the White Balance button...
... resolution (GT6000: SXGA+ and GT5000: XGA), "Resolution" is set to correct the tint of the analog input signal. Select the appropriate one of a picture Selecting Color Correction Adjusts red, green, blue, yellow, magenta, cyan and color gain each R, G, and B. For dark portions of the following five settings. • Presentation • sRGB • Graphic • Video • Movie Image Options Pixel Adjust Displays the Clock and Phase adjustments. Adjusting White Balance Press the White Balance button...

GT5000/GT6000/GT6000R UM
Page 83
... appears on the remote control. Time is the factory preset. [Page 2] Manual ........ The "Auto 45 sec" is expressed in this order using a USB mouse. Enter month, date and year in the 24-hour format. Auto 45 sec . The preset choices are : Lamp life warning, lamp error, 3-minute before power off . Using On-Screen Menu Selecting Menu Display Time This option allows you to be turned off in clock ceases, set the current time, month, date...
... appears on the remote control. Time is the factory preset. [Page 2] Manual ........ The "Auto 45 sec" is expressed in this order using a USB mouse. Enter month, date and year in the 24-hour format. Auto 45 sec . The preset choices are : Lamp life warning, lamp error, 3-minute before power off . Using On-Screen Menu Selecting Menu Display Time This option allows you to be turned off in clock ceases, set the current time, month, date...

GT5000/GT6000/GT6000R UM
Page 91
Mail 8. Using On-Screen Menu Test Mail: Send a test mail to highlight "OK" and press the ENTER button before executing "Test Mail". Should this box enables Alert Mail feature. NOTE: To the Mail Alert feature on wireless LAN connection, select "Infrastructure" for more details. Sample of a message sent from the projector: The lamp is at the end of the "Sender's Address", "SMTP...
Mail 8. Using On-Screen Menu Test Mail: Send a test mail to highlight "OK" and press the ENTER button before executing "Test Mail". Should this box enables Alert Mail feature. NOTE: To the Mail Alert feature on wireless LAN connection, select "Infrastructure" for more details. Sample of a message sent from the projector: The lamp is at the end of the "Sender's Address", "SMTP...

GT5000/GT6000/GT6000R UM
Page 101
... x Replacing or Cleaning the Filter To replace the filter: • Replace both filters at the same time. • Before replacing the filters, remove dust and dirt from getting inside the projector and should be turned on or off using the "Message" option on the projector. 5. jector cabinet. • The projector contains high-precision parts. CAUTION • Turn off the main power and unplug the projector before replacing the filters. 1. tended life lamp GT60LPS), turn on the Setup menu. Preparation: Replace...
... x Replacing or Cleaning the Filter To replace the filter: • Replace both filters at the same time. • Before replacing the filters, remove dust and dirt from getting inside the projector and should be turned on or off using the "Message" option on the projector. 5. jector cabinet. • The projector contains high-precision parts. CAUTION • Turn off the main power and unplug the projector before replacing the filters. 1. tended life lamp GT60LPS), turn on the Setup menu. Preparation: Replace...
GT5000/GT6000/GT6000R UM
Page 105
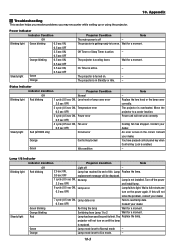
... projector is turned on . Status Indicator Indicator Condition Projector Condition Blinking light Steady light Off Red blinking Red (GT6000 only) Normal 1 cycle (0.5 sec ON, Lens hood or lamp cover error 2.5 sec OFF) 2 cycle (0.5 sec ON, Temperature error 0.5 sec OFF) 3 cycle (0.5 sec ON, Power error 0.5 sec OFF) 4 cycle (0.5 sec ON, Fan error 0.5 sec OFF) Circuit error Orange Control key locked Green Idle condition Note - If this will be displayed. 1 cycle (0.5 sec ON, No lamp Lamp is set to read lamp data. Red Lamp has been used beyond...
... projector is turned on . Status Indicator Indicator Condition Projector Condition Blinking light Steady light Off Red blinking Red (GT6000 only) Normal 1 cycle (0.5 sec ON, Lens hood or lamp cover error 2.5 sec OFF) 2 cycle (0.5 sec ON, Temperature error 0.5 sec OFF) 3 cycle (0.5 sec ON, Power error 0.5 sec OFF) 4 cycle (0.5 sec ON, Fan error 0.5 sec OFF) Circuit error Orange Control key locked Green Idle condition Note - If this will be displayed. 1 cycle (0.5 sec ON, No lamp Lamp is set to read lamp data. Red Lamp has been used beyond...
GT5000/GT6000/GT6000R UM
Page 106
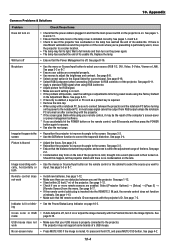
... the projector. Replace the lamp. See page 8-16. See page 8-11. • Apply a standard RGB signal when using your remote control, it on the remote control, wait 60 seconds and then press the POWER button again to select your USB mouse is lit or blink- • See the Power/Status/Lamp Indicator on the lens. See page 7-2. See pages 1-4 and 9-2. • Check to cally, horizontally or input. Picture is installed correctly. See mode...
... the projector. Replace the lamp. See page 8-16. See page 8-11. • Apply a standard RGB signal when using your remote control, it on the remote control, wait 60 seconds and then press the POWER button again to select your USB mouse is lit or blink- • See the Power/Status/Lamp Indicator on the lens. See page 7-2. See pages 1-4 and 9-2. • Check to cally, horizontally or input. Picture is installed correctly. See mode...

GT5000/GT6000/GT6000R UM
Page 114
... the browser should be accepted depending the settings of browser. Should this happen, consult your network. Access is gained to the help files and the other information provided in rapid intervals. Appendix ⁄0 Operation Using an HTTP Browser Structure of HTTP server functions is not available during Standby mode. * The display's or button's response can 't get any response, pull...
... the browser should be accepted depending the settings of browser. Should this happen, consult your network. Access is gained to the help files and the other information provided in rapid intervals. Appendix ⁄0 Operation Using an HTTP Browser Structure of HTTP server functions is not available during Standby mode. * The display's or button's response can 't get any response, pull...


