User Guide
Page 1
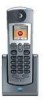
C51 Series Connected System Phone Expansion Handset Digital 5.8 GHz Expandable Model Family: SD7501 and SD7502 Users Guide
C51 Series Connected System Phone Expansion Handset Digital 5.8 GHz Expandable Model Family: SD7501 and SD7502 Users Guide
User Guide
Page 3
SD7501/02 User Guide Table of Contents Important Safety Instructions viii Welcome ...1 Handset Overview ...2 Handset Charger Overview 3 SD7501 Main Menu Display Overview 4 SD7501 Caller ID Display Overview 4 SD7502 Main Menu Display Overview 5 SD7502 Caller ID Display Overview 6 Battery Safety Instructions 7 Installing the Handset Battery 8 Selecting a Location for Your Handset Charger 9 Connecting the Handset Charger 10 Charging the Handset Battery 10 How to Use this Guide ...11 Registering a New Handset 12 i
SD7501/02 User Guide Table of Contents Important Safety Instructions viii Welcome ...1 Handset Overview ...2 Handset Charger Overview 3 SD7501 Main Menu Display Overview 4 SD7501 Caller ID Display Overview 4 SD7502 Main Menu Display Overview 5 SD7502 Caller ID Display Overview 6 Battery Safety Instructions 7 Installing the Handset Battery 8 Selecting a Location for Your Handset Charger 9 Connecting the Handset Charger 10 Charging the Handset Battery 10 How to Use this Guide ...11 Registering a New Handset 12 i
User Guide
Page 4
SD7501/02 User Guide Using Your New Handset...13 System Indicators and Icons 15 Handset Information ...15 Base Unit LEDs...15 Customizing Your Handset 16 Customizing Ring Tones and Volume 18 Setting the Date and Time 19 Display Language Menu 20 Color Handset Display Options 21 Naming Your Handset...22 Setting an Alarm ...24 Using the Setup Devices Menu 25 Reviewing Caller ID Records 26 Using the Phonebook ...27 Adding a Phonebook Entry 28 Dialing a Phonebook Entry 29 ii
SD7501/02 User Guide Using Your New Handset...13 System Indicators and Icons 15 Handset Information ...15 Base Unit LEDs...15 Customizing Your Handset 16 Customizing Ring Tones and Volume 18 Setting the Date and Time 19 Display Language Menu 20 Color Handset Display Options 21 Naming Your Handset...22 Setting an Alarm ...24 Using the Setup Devices Menu 25 Reviewing Caller ID Records 26 Using the Phonebook ...27 Adding a Phonebook Entry 28 Dialing a Phonebook Entry 29 ii
User Guide
Page 5
SD7501/02 User Guide Editing a Phonebook Entry 29 Deleting a Phonebook Entry 30 Using Your System with Multiple Handsets 31 Setting Intercom Options 31 Using Your Phone as an Intercom 32 Transferring Calls Between Handsets 33 Changing the Order of Devices 34 Changing the Default Phone Line Settings 34 Troubleshooting ...35 Warranty ...37 iii
SD7501/02 User Guide Editing a Phonebook Entry 29 Deleting a Phonebook Entry 30 Using Your System with Multiple Handsets 31 Setting Intercom Options 31 Using Your Phone as an Intercom 32 Transferring Calls Between Handsets 33 Changing the Order of Devices 34 Changing the Default Phone Line Settings 34 Troubleshooting ...35 Warranty ...37 iii

User Guide
Page 10
... near water (for example, near or over a radiator or heat register. viii Do not place this product from the type of the base unit and handset are provided for cleaning. 4. To protect them from overheating, these openings must not be operated only from the wall outlet before cleaning. This product should...
... near water (for example, near or over a radiator or heat register. viii Do not place this product from the type of the base unit and handset are provided for cleaning. 4. To protect them from overheating, these openings must not be operated only from the wall outlet before cleaning. This product should...
User Guide
Page 11
... by the operating instructions, as this product where it to normal operation. • If the product has been dropped and the base and/or handset has been damaged. • If the product exhibits a distinct change in a risk of any kind into this product from the wall outlet and... result in performance. ix Never spill liquid of fire or electric shock. 10. Do not overload wall outlets and extension cords, as improper adjustment of the base or handset other risks. Do not allow anything to dangerous voltages or other than specified access doors may result in the base ...
... by the operating instructions, as this product where it to normal operation. • If the product has been dropped and the base and/or handset has been damaged. • If the product exhibits a distinct change in a risk of any kind into this product from the wall outlet and... result in performance. ix Never spill liquid of fire or electric shock. 10. Do not overload wall outlets and extension cords, as improper adjustment of the base or handset other risks. Do not allow anything to dangerous voltages or other than specified access doors may result in the base ...
User Guide
Page 12
SD7501/02 User Guide 14. There is a remote risk of your telephone next to report a gas leak in normal talk mode. Only put the handset of electric shock from lightning. 15. x Avoid using a telephone (other than cordless) during an electrical storm. Do not use the telephone to your ear when it is in the vicinity of the leak. 16.
SD7501/02 User Guide 14. There is a remote risk of your telephone next to report a gas leak in normal talk mode. Only put the handset of electric shock from lightning. 15. x Avoid using a telephone (other than cordless) during an electrical storm. Do not use the telephone to your ear when it is in the vicinity of the leak. 16.
User Guide
Page 13
For warranty service of your Motorola product, you should your purchase of a Motorola SD7501 and SD7502 Series expansion handset. Check the contents listing on your Motorola product require an update or other service. Registering helps us facilitate warranty service, and permits ...warranty coverage. To register your product online, visit: http://broadbandregistration.motorola.com Product registration is an important step toward enjoying your records. Registration is not required for your new Motorola product. Product registration is not available in Canada. SD7501/02 User...
For warranty service of your Motorola product, you should your purchase of a Motorola SD7501 and SD7502 Series expansion handset. Check the contents listing on your Motorola product require an update or other service. Registering helps us facilitate warranty service, and permits ...warranty coverage. To register your product online, visit: http://broadbandregistration.motorola.com Product registration is an important step toward enjoying your records. Registration is not required for your new Motorola product. Product registration is not available in Canada. SD7501/02 User...
User Guide
Page 14
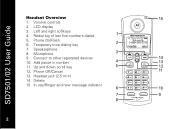
Microphone 9. Headset jack (2.5 mm) 14. Volume controls 2. LCD display 3. Temporary tone dialing key 7. Add pause in number 11. Delete 15. Redial log of last five numbers dialed 5. Speakerphone 8. In use/Ringer and new message indicator 2 2 Phone Off/Cancel 13. SD7501/02 User Guide Handset Overview 1. Left and right softkeys 4. Connect to other registered devices 10. Up and down scroll key 12. Phone On/Flash 6.
Microphone 9. Headset jack (2.5 mm) 14. Volume controls 2. LCD display 3. Temporary tone dialing key 7. Add pause in number 11. Delete 15. Redial log of last five numbers dialed 5. Speakerphone 8. In use/Ringer and new message indicator 2 2 Phone Off/Cancel 13. SD7501/02 User Guide Handset Overview 1. Left and right softkeys 4. Connect to other registered devices 10. Up and down scroll key 12. Phone On/Flash 6.
User Guide
Page 15
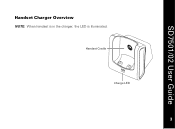
Handset Cradle Charge LED 3 3 SD7501/02 User Guide Handset Charger Overview NOTE: When handset is in the charger, the LED is illuminated.
Handset Cradle Charge LED 3 3 SD7501/02 User Guide Handset Charger Overview NOTE: When handset is in the charger, the LED is illuminated.
User Guide
Page 16
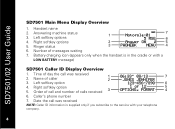
Ringer status 6. Battery charging icon (appears only when the handset is supplied only if you subscribe to the service with a LOW BATTERY message) SD7501 Caller ID Display Overview 1. Right softkey option 5. Order of calls received 6....4. Right softkey options 5. Left softkey option 4. Name of messages waiting 7. Caller's phone number 7. Answering machine status 3. SD7501/02 User Guide SD7501 Main Menu Display Overview 1. Handset name 2. Number of caller 3. Time of day the call and number of call was received NOTE: Caller ID information is in the cradle or with...
Ringer status 6. Battery charging icon (appears only when the handset is supplied only if you subscribe to the service with a LOW BATTERY message) SD7501 Caller ID Display Overview 1. Right softkey option 5. Order of calls received 6....4. Right softkey options 5. Left softkey option 4. Name of messages waiting 7. Caller's phone number 7. Answering machine status 3. SD7501/02 User Guide SD7501 Main Menu Display Overview 1. Handset name 2. Number of caller 3. Time of day the call and number of call was received NOTE: Caller ID information is in the cradle or with...
User Guide
Page 17
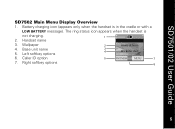
Handset name 3. Left softkey options 2 HANDSET-B-03 3 4 MY BASE UNIT 6. Caller ID option 5 PHONEBK cid MENU 7 7. Base unit name 5. Right softkey options 6 5 5 Wallpaper 4. Battery charging icon (appears only when the handset is not charging. 1 2. The ring status icon appears when the handset is in the cradle or with a LOW BATTERY message). SD7501/02 User Guide SD7502 Main Menu Display Overview 1.
Handset name 3. Left softkey options 2 HANDSET-B-03 3 4 MY BASE UNIT 6. Caller ID option 5 PHONEBK cid MENU 7 7. Base unit name 5. Right softkey options 6 5 5 Wallpaper 4. Battery charging icon (appears only when the handset is not charging. 1 2. The ring status icon appears when the handset is in the cradle or with a LOW BATTERY message). SD7501/02 User Guide SD7502 Main Menu Display Overview 1.

User Guide
Page 20
SD7501/02 User Guide Installing the Handset Battery 1. Replace the battery door. 6. Plug the battery connector into the battery compartment. 5. Attach the belt clip (optional). 8 8 Insert the battery into the receptacle. (Make sure the black wire is on the indentation and sliding downward. 3. Remove the battery door by pressing down on the right.) 4. Remove any stickers or inserts, if present. 2.
SD7501/02 User Guide Installing the Handset Battery 1. Replace the battery door. 6. Plug the battery connector into the battery compartment. 5. Attach the belt clip (optional). 8 8 Insert the battery into the receptacle. (Make sure the black wire is on the indentation and sliding downward. 3. Remove the battery door by pressing down on the right.) 4. Remove any stickers or inserts, if present. 2.

User Guide
Page 21
SD7501/02 User Guide Selecting a Location for Your Handset Charger 9 9
SD7501/02 User Guide Selecting a Location for Your Handset Charger 9 9

User Guide
Page 22
...when you press the keys), charge the handset. 10 10 NOTE: If your handset displays a LOW BATTERY message, or the handset appears inactive, (the LCD is 10-12 hours. NOTE: The handset charger does not require a phone line. Be sure to place the handset in its charger when not in the ...charger's handset cradle. Charging the Handset Battery To charge the battery, place the handset in use to insure maximum daily performance. Insert the power...
...when you press the keys), charge the handset. 10 10 NOTE: If your handset displays a LOW BATTERY message, or the handset appears inactive, (the LCD is 10-12 hours. NOTE: The handset charger does not require a phone line. Be sure to place the handset in its charger when not in the ...charger's handset cradle. Charging the Handset Battery To charge the battery, place the handset in use to insure maximum daily performance. Insert the power...

User Guide
Page 23
...to (CONNECT TO) different devices. • FEATURES/OPTIONS are located above the corresponding softkeys (see Using ON OFF Right soft key Your New Handset for additional information). 1111 SD7501/02 User Guide How to Use this guide, use of two fonts to distinguish between FUNCTIONS and FEATURES/OPTIONS. &#...8226; FUNCTION keys are found on the handset and allow you to perform actions such as Ringer, Alarm Clock, and Phonebook. When you see the FEATURES/OPTIONS font in this Guide ...
...to (CONNECT TO) different devices. • FEATURES/OPTIONS are located above the corresponding softkeys (see Using ON OFF Right soft key Your New Handset for additional information). 1111 SD7501/02 User Guide How to Use this guide, use of two fonts to distinguish between FUNCTIONS and FEATURES/OPTIONS. &#...8226; FUNCTION keys are found on the handset and allow you to perform actions such as Ringer, Alarm Clock, and Phonebook. When you see the FEATURES/OPTIONS font in this Guide ...

User Guide
Page 24
Handset (X) Registered appears when the process is complete. 12 12 Wait Registering... SD7500 Series base units allow you must register it to your base unit, and use up to 12 devices (e.g., handsets, cameras, cell docks) to your base unit. Scroll to and select Register. 3. Press and hold the base unit's PAGE button. appears on the display. SD7501/02 User Guide Registering a New Handset Before you can use your new expansion handset, you to register up to four devices at one time. To register a new handset: 1. Press the MENU softkey. 2.
Handset (X) Registered appears when the process is complete. 12 12 Wait Registering... SD7500 Series base units allow you must register it to your base unit, and use up to 12 devices (e.g., handsets, cameras, cell docks) to your base unit. Scroll to and select Register. 3. Press and hold the base unit's PAGE button. appears on the display. SD7501/02 User Guide Registering a New Handset Before you can use your new expansion handset, you to register up to four devices at one time. To register a new handset: 1. Press the MENU softkey. 2.

User Guide
Page 25
... from the list. Available functions change as you have an SD7581 base unit, all of your new handset. Press OFF/CANCEL to answer a call. The softkeys are located above the button on your new handset. ON/FLASH OFF/CANCEL Left and right softkeys Scroll keys Redial Press to exit the redial review... to navigate through menu options. (An up and down arrowhead v indicates additional options are applicable to the next. SD7501/02 User Guide Using Your New Handset The features available on your new...
... from the list. Available functions change as you have an SD7581 base unit, all of your new handset. Press OFF/CANCEL to answer a call. The softkeys are located above the button on your new handset. ON/FLASH OFF/CANCEL Left and right softkeys Scroll keys Redial Press to exit the redial review... to navigate through menu options. (An up and down arrowhead v indicates additional options are applicable to the next. SD7501/02 User Guide Using Your New Handset The features available on your new...

User Guide
Page 26
... or after pressing the key. Press to connect to any device registered to a comfortable level. When you are not on the left side of the handset to adjust the listening volume to your base unit. To make or answer a call hands-free. Press the corresponding softkey to connect to the device...
... or after pressing the key. Press to connect to any device registered to a comfortable level. When you are not on the left side of the handset to adjust the listening volume to your base unit. To make or answer a call hands-free. Press the corresponding softkey to connect to the device...
User Guide
Page 27
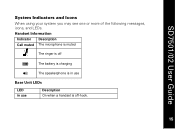
Handset Information Indicator Description Call muted The microphone is muted The ringer is off E The battery is charging v The speakerphone is in use Base Unit LEDs LED in use Description On when a handset is off-hook. 1155 SD7501/02 User Guide System Indicators and Icons When using your system you may see one or more of the following messages, icons, and LEDs.
Handset Information Indicator Description Call muted The microphone is muted The ringer is off E The battery is charging v The speakerphone is in use Base Unit LEDs LED in use Description On when a handset is off-hook. 1155 SD7501/02 User Guide System Indicators and Icons When using your system you may see one or more of the following messages, icons, and LEDs.

