
User Guide
Page 2
... or changes in the product(s) described in this publication and to make changes in the U.S. No part of their respective owners. Motorola reserves the right to revise this manual at any derivative work (such as translation, transformation or adaptation) without written permission from time...expressed, including but not limited to provide notification of merchantability and fitness for product-related questions, visit us online at: www.motorola.com/cordless Or phone us at: •1-800-353-2729 U.S.A. •1-800-461-4575 Canada •1-888-390-6456 TTY (Text Telephone) Copyright &#...
... or changes in the product(s) described in this publication and to make changes in the U.S. No part of their respective owners. Motorola reserves the right to revise this manual at any derivative work (such as translation, transformation or adaptation) without written permission from time...expressed, including but not limited to provide notification of merchantability and fitness for product-related questions, visit us online at: www.motorola.com/cordless Or phone us at: •1-800-353-2729 U.S.A. •1-800-461-4575 Canada •1-888-390-6456 TTY (Text Telephone) Copyright &#...
User Guide
Page 4
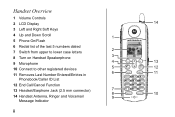
Handset Overview 1 Volume Controls 2 LCD Display 3 Left and Right Soft Keys 4 Up and Down Scroll 5 Phone On/Flash 6 Redial list of the last 5 numbers dialed 7 Switch from upper to lower case letters 8 Turn on Handset Speakerphone 9 Microphone 10 Connect to other registered devices 11 Removes Last Number Entered/Entries in Phonebook/Caller ID List 12 End Call/Cancel Function 13 Headset/Earphone Jack (2.5 mm connector) 14 Handset Antenna, Ringer and Voicemail Message Indicator ii 14 1 1:16 pm Handset 1 2 3 Phonebk cid Menu 4 13 5 12 6 11 7 8 10 9
Handset Overview 1 Volume Controls 2 LCD Display 3 Left and Right Soft Keys 4 Up and Down Scroll 5 Phone On/Flash 6 Redial list of the last 5 numbers dialed 7 Switch from upper to lower case letters 8 Turn on Handset Speakerphone 9 Microphone 10 Connect to other registered devices 11 Removes Last Number Entered/Entries in Phonebook/Caller ID List 12 End Call/Cancel Function 13 Headset/Earphone Jack (2.5 mm connector) 14 Handset Antenna, Ringer and Voicemail Message Indicator ii 14 1 1:16 pm Handset 1 2 3 Phonebk cid Menu 4 13 5 12 6 11 7 8 10 9
User Guide
Page 10
... aerosol cleaners. Place the power cord so that it will not be walked on the power cord. Keep all slits and openings of the phone unblocked. Do not allow anything to persons or property: To reduce the risk of fire and shock: 1. viii Unplug this product near ...ventilation is provided at the installation site. 2. Ensure that may result in water. 3. Do not set the phone on a heating register or over a radiator. Important Safety Instructions Follow these safety precautions when using your cordless phone to reduce the risk of fire, electric shock and injury to rest on . 5.
... aerosol cleaners. Place the power cord so that it will not be walked on the power cord. Keep all slits and openings of the phone unblocked. Do not allow anything to persons or property: To reduce the risk of fire and shock: 1. viii Unplug this product near ...ventilation is provided at the installation site. 2. Ensure that may result in water. 3. Do not set the phone on a heating register or over a radiator. Important Safety Instructions Follow these safety precautions when using your cordless phone to reduce the risk of fire, electric shock and injury to rest on . 5.
User Guide
Page 11
...or water. Unplug this product. If service or repair work is required, contact the Motorola address found in the back of this cordless phone to report a gas leak, especially if you have unplugged the power and phone from an outlet if: • The power cord or plug is damaged or ...exposed to protect the equipment. 10. Do not overload wall outlets and extension cords. 9. Do not use this user guide. 8. Avoid using during an electrical storm. ix Important Safety Instructions 7. Do not retrieve the handset or base until after you are in performance. Then retrieve the unit ...
...or water. Unplug this product. If service or repair work is required, contact the Motorola address found in the back of this cordless phone to report a gas leak, especially if you have unplugged the power and phone from an outlet if: • The power cord or plug is damaged or ...exposed to protect the equipment. 10. Do not overload wall outlets and extension cords. 9. Do not use this user guide. 8. Avoid using during an electrical storm. ix Important Safety Instructions 7. Do not retrieve the handset or base until after you are in performance. Then retrieve the unit ...
User Guide
Page 12
.... Do not use chemicals or cleaning agents. Adjust only those controls that is indicated on an unstable cart, stand, or table. Do not place this phone using only the power source that are unsure of other controls may fall, causing serious damage to normal operation. 7. This product may result in damage...
.... Do not use chemicals or cleaning agents. Adjust only those controls that is indicated on an unstable cart, stand, or table. Do not place this phone using only the power source that are unsure of other controls may fall, causing serious damage to normal operation. 7. This product may result in damage...
User Guide
Page 13
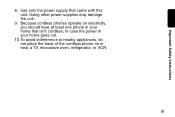
xi Because cordless phones operate on or near a TV, microwave oven, refrigerator, or VCR. Use only the power supply that isn't cordless, in case the power in your home goes out. 10.To avoid interference to nearby appliances, do not place the base of the cordless phone on electricity, you should have at least one phone in your home that came with this unit. Using other power supplies may damage the unit. 9. Important Safety Instructions 8.
xi Because cordless phones operate on or near a TV, microwave oven, refrigerator, or VCR. Use only the power supply that isn't cordless, in case the power in your home goes out. 10.To avoid interference to nearby appliances, do not place the base of the cordless phone on electricity, you should have at least one phone in your home that came with this unit. Using other power supplies may damage the unit. 9. Important Safety Instructions 8.
User Guide
Page 14
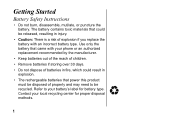
Refer to be released, resulting in injury. • Caution: There is a risk of explosion if you replace the battery with your phone or an authorized replacement recommended by the manufacturer. • Keep batteries out of the reach of children. • Remove batteries if storing over 30 days. &#...
Refer to be released, resulting in injury. • Caution: There is a risk of explosion if you replace the battery with your phone or an authorized replacement recommended by the manufacturer. • Keep batteries out of the reach of children. • Remove batteries if storing over 30 days. &#...
User Guide
Page 16
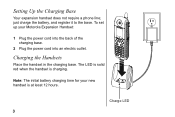
To set up your new handset is charging. Note: The initial battery charging time for your Motorola Expansion Handset: 1 Plug the power cord into the back of the charging base. 2 Plug the power cord into an electric outlet. Setting Up the Charging Base Your expansion handset does not require a phone line; The LED is solid red when the handset is at least 12 hours. Charge LED 3 Charging the Handsets Place the handset in the charging base. just charge the battery, and register it to the base.
To set up your new handset is charging. Note: The initial battery charging time for your Motorola Expansion Handset: 1 Plug the power cord into the back of the charging base. 2 Plug the power cord into an electric outlet. Setting Up the Charging Base Your expansion handset does not require a phone line; The LED is solid red when the handset is at least 12 hours. Charge LED 3 Charging the Handsets Place the handset in the charging base. just charge the battery, and register it to the base.
User Guide
Page 18
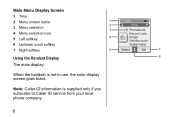
Note: Caller ID information is not in use, the color display screen goes black. Main Menu Display Screen 1 Time 2 Menu screen name 3 Menu selection 4 Menu selection icon 5 Left softkey 6 Up/down scroll softkey 7 Right softkey Using the Handset Display The main display: 1 1:16 pm 2 Menu 3 Phonebook Recent calls 4 Ringer Monitor room Walkie-talkie 5 Select Exit 7 6 When the handset is supplied only if you subscribe to Caller ID service from your local phone company. 5
Note: Caller ID information is not in use, the color display screen goes black. Main Menu Display Screen 1 Time 2 Menu screen name 3 Menu selection 4 Menu selection icon 5 Left softkey 6 Up/down scroll softkey 7 Right softkey Using the Handset Display The main display: 1 1:16 pm 2 Menu 3 Phonebook Recent calls 4 Ringer Monitor room Walkie-talkie 5 Select Exit 7 6 When the handset is supplied only if you subscribe to Caller ID service from your local phone company. 5
User Guide
Page 30
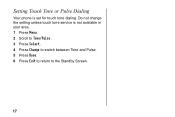
Setting Touch Tone or Pulse Dialing Your phone is not available in your area. 1 Press Menu. 2 Scroll to Tone/Pulse. 3 Press Select. 4 Press Change to switch between Tone and Pulse. 5 Press Done. 6 Press Exit to return to the Standby Screen. 17 Do not change the setting unless touch tone service is set for touch tone dialing.
Setting Touch Tone or Pulse Dialing Your phone is not available in your area. 1 Press Menu. 2 Scroll to Tone/Pulse. 3 Press Select. 4 Press Change to switch between Tone and Pulse. 5 Press Done. 6 Press Exit to return to the Standby Screen. 17 Do not change the setting unless touch tone service is set for touch tone dialing.
User Guide
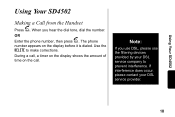
Page 31
If interference does occur, please contact your DSL service company to make corrections. Note: If you hear the dial tone, dial the number. Use the DELETE to prevent interference. When you use DSL, please use the filtering devices provided by your DSL service provider. 18 The phone number appears on the call. A OR Enter the phone number, then press . Using Your SD4502 Using Your SD4502 Making a Call from the Handset A Press . During a call, a timer on the display shows the amount of time on the display before it is dialed.
If interference does occur, please contact your DSL service company to make corrections. Note: If you hear the dial tone, dial the number. Use the DELETE to prevent interference. When you use DSL, please use the filtering devices provided by your DSL service provider. 18 The phone number appears on the call. A OR Enter the phone number, then press . Using Your SD4502 Using Your SD4502 Making a Call from the Handset A Press . During a call, a timer on the display shows the amount of time on the display before it is dialed.

User Guide
Page 38
The phone number displays in the phonebook from the Caller ID list. 25 To modify the number, 8 Press Delete to backspace and erase characters to left of blinking cursor. 9 Press Done when entry is correct to the left of the blinking cursor. 5 Scroll down. Press DELETE to backspace and erase characters to save. Note: You can also store a number in the Number field. 6 Press DONE. 7 Press EXIT once to return to the redial list, or press EXIT twice to return to 11 characters). Enter the name (up to the standby menu.
The phone number displays in the phonebook from the Caller ID list. 25 To modify the number, 8 Press Delete to backspace and erase characters to left of blinking cursor. 9 Press Done when entry is correct to the left of the blinking cursor. 5 Scroll down. Press DELETE to backspace and erase characters to save. Note: You can also store a number in the Number field. 6 Press DONE. 7 Press EXIT once to return to the redial list, or press EXIT twice to return to 11 characters). Enter the name (up to the standby menu.
User Guide
Page 39
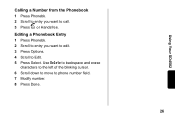
Editing a Phonebook Entry 1 Press Phonebk. 2 Scroll to entry you want to edit. 3 Press Options. 4 Scroll to Edit. 5 Press Select. Use Delete to backspace and erase characters to the left of the blinking cursor. 6 Scroll down to move to call. 3 Press or Handsfree. A 2 Scroll to entry you want to phone number field. 7 Modify number. 8 Press Done. 26 Using Your SD4502 Calling a Number from the Phonebook 1 Press Phonebk.
Editing a Phonebook Entry 1 Press Phonebk. 2 Scroll to entry you want to edit. 3 Press Options. 4 Scroll to Edit. 5 Press Select. Use Delete to backspace and erase characters to the left of the blinking cursor. 6 Scroll down to move to call. 3 Press or Handsfree. A 2 Scroll to entry you want to phone number field. 7 Modify number. 8 Press Done. 26 Using Your SD4502 Calling a Number from the Phonebook 1 Press Phonebk.
User Guide
Page 40
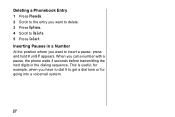
Inserting Pauses in the dialing sequence. When you call a number with a pause, the phone waits 3 seconds before transmitting the next digits in a Number At the position where you want to delete. 3 Press Options. 4 Scroll to Delete. 5 Press Select. This is useful, for example, when you have to dial 9 to get a dial tone or for going into a voicemail system. 27 Deleting a Phonebook Entry 1 Press Phonebk. 2 Scroll to the entry you want to insert a pause, press and hold # until P appears.
Inserting Pauses in the dialing sequence. When you call a number with a pause, the phone waits 3 seconds before transmitting the next digits in a Number At the position where you want to delete. 3 Press Options. 4 Scroll to Delete. 5 Press Select. This is useful, for example, when you have to dial 9 to get a dial tone or for going into a voicemail system. 27 Deleting a Phonebook Entry 1 Press Phonebk. 2 Scroll to the entry you want to insert a pause, press and hold # until P appears.

User Guide
Page 41
...call selected number. 28 Reviewing Caller ID Call List The handset can hold up to 40 caller ID records. 1 Scroll to use the caller ID features of your phone. A 2 Scroll to review more calls. 3 Press to call listed first. Using Your SD4502 Using Caller ID Note: You must subscribe to caller ...ID service from the phone company, or you receive an incoming call. If no Caller ID information...
...call selected number. 28 Reviewing Caller ID Call List The handset can hold up to 40 caller ID records. 1 Scroll to use the caller ID features of your phone. A 2 Scroll to review more calls. 3 Press to call listed first. Using Your SD4502 Using Caller ID Note: You must subscribe to caller ...ID service from the phone company, or you receive an incoming call. If no Caller ID information...
User Guide
Page 42
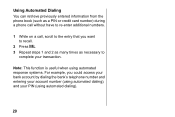
... (using automated dialing), and your transaction. Note: This function is useful when using automated response systems. For example, you want to recall. 2 Press DIAL. 3 Repeat steps 1 and 2 as many times as a PIN or credit card number) during a phone call without have to re-enter additional numbers. 1 While on a call, scroll to complete...
... (using automated dialing), and your transaction. Note: This function is useful when using automated response systems. For example, you want to recall. 2 Press DIAL. 3 Repeat steps 1 and 2 as many times as a PIN or credit card number) during a phone call without have to re-enter additional numbers. 1 While on a call, scroll to complete...
User Guide
Page 43
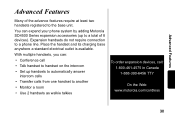
... a standard electrical outlet is available. With multiple handsets, you can expand your phone system by adding Motorola SD4500 Series expansion accessories (up handsets to automatically answer intercom calls • Transfer calls from one handset to another • Monitor a room • Use 2 handsets as walkie talkies To order expansion devices, call • Talk handset to handset on the intercom • Set up...
... a standard electrical outlet is available. With multiple handsets, you can expand your phone system by adding Motorola SD4500 Series expansion accessories (up handsets to automatically answer intercom calls • Transfer calls from one handset to another • Monitor a room • Use 2 handsets as walkie talkies To order expansion devices, call • Talk handset to handset on the intercom • Set up...

User Guide
Page 48
...to answer the page. 7 Press to handset. This feature works even when the handsets are out of range of the handsets. 5 Press the number on the handset keypad that corresponds to the handset you want to use with the walkie talkie feature. (For example, if the handset you want to talk to is in ...walkie talkie mode, you talk handset to end the walkie talkie session. Using the Handset as a Walkie Talkie The walkie talkie feature lets you cannot make or receive phone calls....
...to answer the page. 7 Press to handset. This feature works even when the handsets are out of range of the handsets. 5 Press the number on the handset keypad that corresponds to the handset you want to use with the walkie talkie feature. (For example, if the handset you want to talk to is in ...walkie talkie mode, you talk handset to end the walkie talkie session. Using the Handset as a Walkie Talkie The walkie talkie feature lets you cannot make or receive phone calls....
User Guide
Page 54
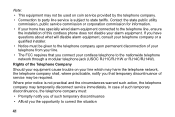
...be used on your line which may harm the telephone network, the telephone company shall, where practicable, notify you connect your cordless telephone to the telephone line, ensure the installation of such temporary discontinuance • Afford you the opportunity to state tariffs. Note... alarm equipment, consult your telephone company or a qualified installer. • Notice must : • Promptly notify you of this cordless phone does not disable your home has specially wired alarm equipment connected to the nationwide telephone network through a modular telephone jack (USOC RJ11C...
...be used on your line which may harm the telephone network, the telephone company shall, where practicable, notify you connect your cordless telephone to the telephone line, ensure the installation of such temporary discontinuance • Afford you the opportunity to state tariffs. Note... alarm equipment, consult your telephone company or a qualified installer. • Notice must : • Promptly notify you of this cordless phone does not disable your home has specially wired alarm equipment connected to the nationwide telephone network through a modular telephone jack (USOC RJ11C...
User Guide
Page 57
...be extended by the certification/registration number found on the label on the telephone base unit. The plug and jack used to connect this cordless phone, you may not exceed 5. Industry Canada (IC) Information This equipment meets the applicable Industry Canada (IC) radio and terminal equipment technical ...called. This is confirmed by means of these devices ring when your telephone line and still have all of a certified connector assembly (telephone extension cord). The Ringer Equivalency Number (REN) for this product. The sum of the RENs of all devices connected to one line may ...
...be extended by the certification/registration number found on the label on the telephone base unit. The plug and jack used to connect this cordless phone, you may not exceed 5. Industry Canada (IC) Information This equipment meets the applicable Industry Canada (IC) radio and terminal equipment technical ...called. This is confirmed by means of these devices ring when your telephone line and still have all of a certified connector assembly (telephone extension cord). The Ringer Equivalency Number (REN) for this product. The sum of the RENs of all devices connected to one line may ...


