User Guide
Page 6
Table of Contents Welcome i Handset Overview ii Handset Charger Overview iii Important Safety Instructions viii Getting Started 1 Battery Safety Instructions 1 Charging the Handsets 3 Handset Display Screens 4 Main Display Screen 4 Main Menu Display Screen 5 Using the Handset Display 5 Using the Soft Keys 6 Using the Navigation Key 6 Setting Up 7 Registering Your Handset 7 iv
Table of Contents Welcome i Handset Overview ii Handset Charger Overview iii Important Safety Instructions viii Getting Started 1 Battery Safety Instructions 1 Charging the Handsets 3 Handset Display Screens 4 Main Display Screen 4 Main Menu Display Screen 5 Using the Handset Display 5 Using the Soft Keys 6 Using the Navigation Key 6 Setting Up 7 Registering Your Handset 7 iv
User Guide
Page 14
...by the manufacturer. • Keep batteries out of the reach of children. • Remove batteries if storing over 30 days. • Do not dispose of batteries in fire, which could be released, resulting in explosion. • The rechargeable batteries that could result in injury. •... is a risk of properly and may need to your local recycling center for battery type. Getting Started Battery Safety Instructions • Do not burn, disassemble, mutilate, or puncture the battery. Contact your battery's label for proper disposal methods. 1 Refer to be disposed of explosion if...
...by the manufacturer. • Keep batteries out of the reach of children. • Remove batteries if storing over 30 days. • Do not dispose of batteries in fire, which could be released, resulting in explosion. • The rechargeable batteries that could result in injury. •... is a risk of properly and may need to your local recycling center for battery type. Getting Started Battery Safety Instructions • Do not burn, disassemble, mutilate, or puncture the battery. Contact your battery's label for proper disposal methods. 1 Refer to be disposed of explosion if...
User Guide
Page 15
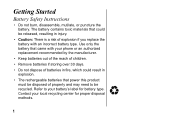
Red Black 2 Getting Started Installing the Batteries 1 Remove any stickers from the battery door if present. 2 Press on the indentation on the battery door, and slide downwards to remove. 3 Plug connector into the receptacle, and insert the battery into the compartment. (Make sure that the black wire is on the right hand side to ensure proper connection.) 4 Replace the battery door. 5 Attach the optional belt clip.
Red Black 2 Getting Started Installing the Batteries 1 Remove any stickers from the battery door if present. 2 Press on the indentation on the battery door, and slide downwards to remove. 3 Plug connector into the receptacle, and insert the battery into the compartment. (Make sure that the black wire is on the right hand side to ensure proper connection.) 4 Replace the battery door. 5 Attach the optional belt clip.
User Guide
Page 16
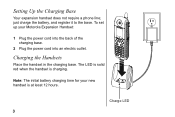
just charge the battery, and register it to the base. Charging the Handsets Place the handset in the charging base. Note: The initial battery charging time for your Motorola Expansion Handset: 1 Plug the power cord into the back of the charging base. 2 Plug the power cord into an electric outlet. Charge LED 3 To set up your new handset is charging. The LED is solid red when the handset is at least 12 hours. Setting Up the Charging Base Your expansion handset does not require a phone line;
just charge the battery, and register it to the base. Charging the Handsets Place the handset in the charging base. Note: The initial battery charging time for your Motorola Expansion Handset: 1 Plug the power cord into the back of the charging base. 2 Plug the power cord into an electric outlet. Charge LED 3 To set up your new handset is charging. The LED is solid red when the handset is at least 12 hours. Setting Up the Charging Base Your expansion handset does not require a phone line;
User Guide
Page 17
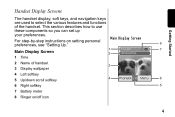
... wallpaper 4 Left softkey 5 Up/down scroll softkey 4 Phonebk cid Menu 6 6 Right softkey 5 7 Battery meter 8 Ringer on setting personal preferences, see "Setting Up." 8 Main Display Screen 1 1:16 pm 7 2 Handset-D(4) 1 Time 2 Name of the handset. Getting Started Handset Display Screens The handset display, soft keys, and navigation keys are used to use these components so you can...
... wallpaper 4 Left softkey 5 Up/down scroll softkey 4 Phonebk cid Menu 6 6 Right softkey 5 7 Battery meter 8 Ringer on setting personal preferences, see "Setting Up." 8 Main Display Screen 1 1:16 pm 7 2 Handset-D(4) 1 Time 2 Name of the handset. Getting Started Handset Display Screens The handset display, soft keys, and navigation keys are used to use these components so you can...
User Guide
Page 62
... falls below 80% of their rated capacity and batteries that leak are covered by someone other than Motorola, or its authorized service centers, are excluded from coverage. 49 Length of coverage: ninety (90) days from the date of Non-Motorola Products and Accessories. or (d) Acts of God or...heavy perspiration, sand, dirt or the like, extreme heat, or food; (c) use of Non-Motorola branded or certified Products, Accessories, Software or other acts which are not the fault of Motorola, are excluded from coverage. Length of coverage: The balance of the original warranty or for commercial ...
... falls below 80% of their rated capacity and batteries that leak are covered by someone other than Motorola, or its authorized service centers, are excluded from coverage. 49 Length of coverage: ninety (90) days from the date of Non-Motorola Products and Accessories. or (d) Acts of God or...heavy perspiration, sand, dirt or the like, extreme heat, or food; (c) use of Non-Motorola branded or certified Products, Accessories, Software or other acts which are not the fault of Motorola, are excluded from coverage. Length of coverage: The balance of the original warranty or for commercial ...


