
User Guide
Page 2
Motorola provides this guide without warranty of any derivative work (such as translation, transformation or adaptation) without obligation on the part of such revision or change. All other product or service names are registered in this publication and to make any kind, either implied or expressed, including but not limited to revise this manual at : •1-800-353-2729 U.S.A. •1-800...
Motorola provides this guide without warranty of any derivative work (such as translation, transformation or adaptation) without obligation on the part of such revision or change. All other product or service names are registered in this publication and to make any kind, either implied or expressed, including but not limited to revise this manual at : •1-800-353-2729 U.S.A. •1-800...
User Guide
Page 3
... an important step toward enjoying 1:16 pm Handset 1 your product online, visit: https://broadbandregistration.motorola.com Product registration is not required for your purchase includes each of a Motorola SD4502 series telephone. Registration is not available in Canada. i To register your new Motorola product. Take a moment to ensure that your records. Registering helps us facilitate Pho neb k cid Menu warranty service, and permits us to confirm warranty...
... an important step toward enjoying 1:16 pm Handset 1 your product online, visit: https://broadbandregistration.motorola.com Product registration is not required for your purchase includes each of a Motorola SD4502 series telephone. Registration is not available in Canada. i To register your new Motorola product. Take a moment to ensure that your records. Registering helps us facilitate Pho neb k cid Menu warranty service, and permits us to confirm warranty...
User Guide
Page 4
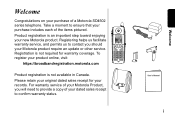
Handset Overview 1 Volume Controls 2 LCD Display 3 Left and Right Soft Keys 4 Up and Down Scroll 5 Phone On/Flash 6 Redial list of the last 5 numbers dialed 7 Switch from upper to lower case letters 8 Turn on Handset Speakerphone 9 Microphone 10 Connect to other registered devices 11 Removes Last Number Entered/Entries in Phonebook/Caller ID List 12 End Call/Cancel Function 13 Headset/Earphone Jack (2.5 mm connector) 14 Handset Antenna, Ringer and Voicemail Message Indicator ii 14 1 1:16 pm Handset 1 2 3 Phonebk cid Menu 4 13 5 12 6 11 7 8 10 9
Handset Overview 1 Volume Controls 2 LCD Display 3 Left and Right Soft Keys 4 Up and Down Scroll 5 Phone On/Flash 6 Redial list of the last 5 numbers dialed 7 Switch from upper to lower case letters 8 Turn on Handset Speakerphone 9 Microphone 10 Connect to other registered devices 11 Removes Last Number Entered/Entries in Phonebook/Caller ID List 12 End Call/Cancel Function 13 Headset/Earphone Jack (2.5 mm connector) 14 Handset Antenna, Ringer and Voicemail Message Indicator ii 14 1 1:16 pm Handset 1 2 3 Phonebk cid Menu 4 13 5 12 6 11 7 8 10 9
User Guide
Page 6
Table of Contents Welcome i Handset Overview ii Handset Charger Overview iii Important Safety Instructions viii Getting Started 1 Battery Safety Instructions 1 Charging the Handsets 3 Handset Display Screens 4 Main Display Screen 4 Main Menu Display Screen 5 Using the Handset Display 5 Using the Soft Keys 6 Using the Navigation Key 6 Setting Up 7 Registering Your Handset 7 iv
Table of Contents Welcome i Handset Overview ii Handset Charger Overview iii Important Safety Instructions viii Getting Started 1 Battery Safety Instructions 1 Charging the Handsets 3 Handset Display Screens 4 Main Display Screen 4 Main Menu Display Screen 5 Using the Handset Display 5 Using the Soft Keys 6 Using the Navigation Key 6 Setting Up 7 Registering Your Handset 7 iv
User Guide
Page 7
Setting the Display Setup Options 8 Setting the Display Contrast 9 Setting the Menu Color 9 Ringer Options 10 Setting the Ring Tone and Ring Volume 11 Setting Key Beeps On or Off 12 Naming a Handset 13 Setting Touch Tone or Pulse Dialing 17 Using Your SD4502 18 Making a Call from the Handset 18 Answering/Ending a Call 19 Adjusting the Volume During a Call 19 Making a Call Using the Speakerphone 20 Switching Between the Handset and Speakerphone 20 Muting a Call 21 Placing a Call on Hold 21 Redialing a Number 21 v
Setting the Display Setup Options 8 Setting the Display Contrast 9 Setting the Menu Color 9 Ringer Options 10 Setting the Ring Tone and Ring Volume 11 Setting Key Beeps On or Off 12 Naming a Handset 13 Setting Touch Tone or Pulse Dialing 17 Using Your SD4502 18 Making a Call from the Handset 18 Answering/Ending a Call 19 Adjusting the Volume During a Call 19 Making a Call Using the Speakerphone 20 Switching Between the Handset and Speakerphone 20 Muting a Call 21 Placing a Call on Hold 21 Redialing a Number 21 v
User Guide
Page 11
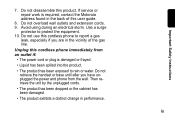
... the wall. ix Then retrieve the unit by the unplugged cords. • The product has been dropped or the cabinet has been damaged. • The product exhibits a distinct change in the vicinity of this user guide. 8. Do not overload wall outlets and extension cords. 9. Do not retrieve the handset or base until after you are in performance. Do not use this product. If service or repair work...
... the wall. ix Then retrieve the unit by the unplugged cords. • The product has been dropped or the cabinet has been damaged. • The product exhibits a distinct change in the vicinity of this user guide. 8. Do not overload wall outlets and extension cords. 9. Do not retrieve the handset or base until after you are in performance. Do not use this product. If service or repair work...
User Guide
Page 16
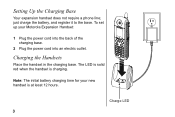
Setting Up the Charging Base Your expansion handset does not require a phone line; just charge the battery, and register it to the base. To set up your new handset is charging. Note: The initial battery charging time for your Motorola Expansion Handset: 1 Plug the power cord into the back of the charging base. 2 Plug the power cord into an electric outlet. Charge LED 3 Charging the Handsets Place the handset in the charging base. The LED is solid red when the handset is at least 12 hours.
Setting Up the Charging Base Your expansion handset does not require a phone line; just charge the battery, and register it to the base. To set up your new handset is charging. Note: The initial battery charging time for your Motorola Expansion Handset: 1 Plug the power cord into the back of the charging base. 2 Plug the power cord into an electric outlet. Charge LED 3 Charging the Handsets Place the handset in the charging base. The LED is solid red when the handset is at least 12 hours.
User Guide
Page 21
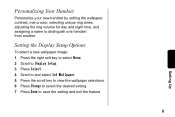
... key to select Menu. 2 Scroll to Display Setup. 3 Press Select. 4 Scroll to and select Set Wallpaper. 5 Press the scroll key to view the wallpaper selections. 6 Press Change to select the desired setting. 7 Press Done to distinguish one handset from another. Personalizing Your Handset Personalize your new handset by setting the wallpaper, contrast, menu color, selecting unique ring tones, adjusting the ring volume for day and night time...
... key to select Menu. 2 Scroll to Display Setup. 3 Press Select. 4 Scroll to and select Set Wallpaper. 5 Press the scroll key to view the wallpaper selections. 6 Press Change to select the desired setting. 7 Press Done to distinguish one handset from another. Personalizing Your Handset Personalize your new handset by setting the wallpaper, contrast, menu color, selecting unique ring tones, adjusting the ring volume for day and night time...
User Guide
Page 23
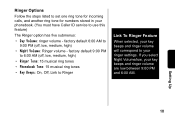
... and 6:00 AM. factory default 6:00 AM to 9:00 PM (off , low, medium, high) • Ringer Tone: 15 musical ring tones • Phonebook Tone: 15 musical ring tones • Key Beeps: On, Off, Link to Ringer Link To Ringer Feature When selected, your key beeps and ringer volume will correspond to your phonebook. (You must have Caller ID service to use this feature) The Ringer option has five submenus: • Day Volume: ringer volume - Setting Up 10
... and 6:00 AM. factory default 6:00 AM to 9:00 PM (off , low, medium, high) • Ringer Tone: 15 musical ring tones • Phonebook Tone: 15 musical ring tones • Key Beeps: On, Off, Link to Ringer Link To Ringer Feature When selected, your key beeps and ringer volume will correspond to your phonebook. (You must have Caller ID service to use this feature) The Ringer option has five submenus: • Day Volume: ringer volume - Setting Up 10

User Guide
Page 24
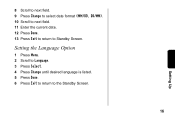
..., m edium , high) Ringer Tone: 15 ring tones Phonebook Tone: 15 ring tones Key Beeps: O n, O ff, Link to Ringer. 3 Press Select. 4 Scroll through list of options (Day Volume, Night Volume, Ringer Tone, etc.). 5 Select desired option. 6 Press Change. Setting the Ring Tone and Ring Volume 1 Press Menu. 2 Scroll to Ringer 11 Each tone/volume plays as you press Change. 7 Stop at desired tone/volume to set. 8 Press Done. 9 Press Exit to return to Standby Screen or press scroll keys to view different...
..., m edium , high) Ringer Tone: 15 ring tones Phonebook Tone: 15 ring tones Key Beeps: O n, O ff, Link to Ringer. 3 Press Select. 4 Scroll through list of options (Day Volume, Night Volume, Ringer Tone, etc.). 5 Select desired option. 6 Press Change. Setting the Ring Tone and Ring Volume 1 Press Menu. 2 Scroll to Ringer 11 Each tone/volume plays as you press Change. 7 Stop at desired tone/volume to set. 8 Press Done. 9 Press Exit to return to Standby Screen or press scroll keys to view different...
User Guide
Page 29
8 Scroll to next field. 9 Press Change to select date format (MM/DD, DD/MM). 10 Scroll to next field. 11 Enter the current date. 12 Press Done. 13 Press Exit to return to the Standby Screen. 16 Setting Up Setting the Language Option 1 Press Menu. 2 Scroll to Language. 3 Press Select. 4 Press Change until desired language is listed. 5 Press Done. 6 Press Exit to return to Standby Screen.
8 Scroll to next field. 9 Press Change to select date format (MM/DD, DD/MM). 10 Scroll to next field. 11 Enter the current date. 12 Press Done. 13 Press Exit to return to the Standby Screen. 16 Setting Up Setting the Language Option 1 Press Menu. 2 Scroll to Language. 3 Press Select. 4 Press Change until desired language is listed. 5 Press Done. 6 Press Exit to return to Standby Screen.
User Guide
Page 32
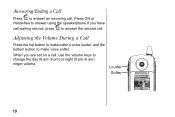
When you have call waiting service, press to answer the second call , use the volume keys to change the day (6 am-9 pm) or night (9 pm-6 am) ringer volume. Press ON or A Handsfree to answer using the speakerphone.If you are not on a call . Answering/Ending a Call A Press to make caller's voice louder, and the bottom button to answer an incoming call. Louder Softer 1:16 pm Handset 1 Phonebk cid Menu 19 Adjusting the Volume During a Call Press the top button to make voice softer.
When you have call waiting service, press to answer the second call , use the volume keys to change the day (6 am-9 pm) or night (9 pm-6 am) ringer volume. Press ON or A Handsfree to answer using the speakerphone.If you are not on a call . Answering/Ending a Call A Press to make caller's voice louder, and the bottom button to answer an incoming call. Louder Softer 1:16 pm Handset 1 Phonebk cid Menu 19 Adjusting the Volume During a Call Press the top button to make voice softer.
User Guide
Page 36
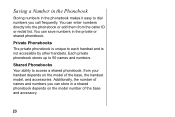
... phonebook depends on the model of names and numbers you call frequently. Private Phonebooks The private phonebook is unique to 50 names and numbers. You can enter numbers directly into the phonebook or add them from your handset depends on the model number of the base and accessory. 23 Shared Phonebooks Your ability to access a shared phonebook, from the caller ID or redial list...
... phonebook depends on the model of names and numbers you call frequently. Private Phonebooks The private phonebook is unique to 50 names and numbers. You can enter numbers directly into the phonebook or add them from your handset depends on the model number of the base and accessory. 23 Shared Phonebooks Your ability to access a shared phonebook, from the caller ID or redial list...
User Guide
Page 43
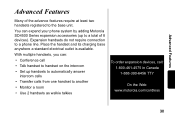
...-390-6456 TTY (Text Telephone) On the Web: www.motorola.com/cordless 30 With multiple handsets, you can expand your phone system by adding Motorola SD4500 Series expansion accessories (up handsets to automatically answer intercom calls • Transfer calls from one handset to a total of the advance features require at least two handsets registered to a phone line. Expansion handsets do not require connection to the base unit. Place the handset and its charging base anywhere a standard electrical outlet is available.
...-390-6456 TTY (Text Telephone) On the Web: www.motorola.com/cordless 30 With multiple handsets, you can expand your phone system by adding Motorola SD4500 Series expansion accessories (up handsets to automatically answer intercom calls • Transfer calls from one handset to a total of the advance features require at least two handsets registered to a phone line. Expansion handsets do not require connection to the base unit. Place the handset and its charging base anywhere a standard electrical outlet is available.
User Guide
Page 44
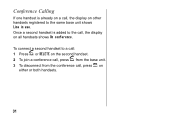
Once a second handset is already on a call, the display on other handsets registered to the same base unit shows Line in use. A 2 To join a conference call, press from the conference call, press on either or both handsets. 31 B 3 To disconnect from the base unit. To connect a second handset to a call: A 1 Press or DELETE on the second handset. Conference Calling If one handset is added to the call, the display on all handsets shows On conference.
Once a second handset is already on a call, the display on other handsets registered to the same base unit shows Line in use. A 2 To join a conference call, press from the conference call, press on either or both handsets. 31 B 3 To disconnect from the base unit. To connect a second handset to a call: A 1 Press or DELETE on the second handset. Conference Calling If one handset is added to the call, the display on all handsets shows On conference.
User Guide
Page 45
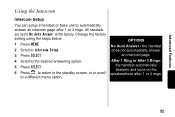
... return to the standby screen, or to scroll to the desired answering option. the handset automatically answers and turns on the speakerphone after 1 or 3 rings. All handsets are set to automatically answer an intercom page after 1 or 3 rings. 32 After 1 Ring or After 3 Rings; the handset does not automatically answer an intercom page. Advanced Features Using the Intercom Intercom Setup You can setup a handset or base unit to No Auto Answer at the factory. OPTIONS No Auto...
... return to the standby screen, or to scroll to the desired answering option. the handset automatically answers and turns on the speakerphone after 1 or 3 rings. All handsets are set to automatically answer an intercom page after 1 or 3 rings. 32 After 1 Ring or After 3 Rings; the handset does not automatically answer an intercom page. Advanced Features Using the Intercom Intercom Setup You can setup a handset or base unit to No Auto Answer at the factory. OPTIONS No Auto...
User Guide
Page 49
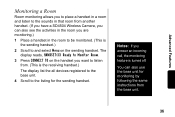
... and select Menu on the handset you answer an incoming call, the monitoring feature is the receiving handset.) The display list the all devices registered to the base unit. 4 Scroll to the listing for monitoring by following the same instructions from . (This is turned off. The display reads, HANDSET(X) Ready to Monitor Room. 3 Press CONNECT TO on the sending handset. Notes: If you want to...
... and select Menu on the handset you answer an incoming call, the monitoring feature is the receiving handset.) The display list the all devices registered to the base unit. 4 Scroll to the listing for monitoring by following the same instructions from . (This is turned off. The display reads, HANDSET(X) Ready to Monitor Room. 3 Press CONNECT TO on the sending handset. Notes: If you want to...
User Guide
Page 52
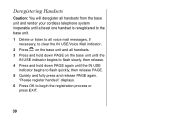
Deregistering Handsets Caution: You will deregister all handsets from the base unit and render your cordless telephone system inoperable until at least one handset is reregistered to the base unit. 1 Delete or listen to all voice mail messages, if B necessary, to clear the IN USE/Voice Mail indicator. 2 Press on the base unit and all handsets. 3 Press and hold down PAGE on the base unit until the IN USE indicator begins to flash slowly, then release. 4 Press and hold down...
Deregistering Handsets Caution: You will deregister all handsets from the base unit and render your cordless telephone system inoperable until at least one handset is reregistered to the base unit. 1 Delete or listen to all voice mail messages, if B necessary, to clear the IN USE/Voice Mail indicator. 2 Press on the base unit and all handsets. 3 Press and hold down PAGE on the base unit until the IN USE indicator begins to flash slowly, then release. 4 Press and hold down...
User Guide
Page 55
... set forth in a residential installation. However, there is subject to the following two conditions: This device may cause undesired operation. Operation is no guarantee that could affect the operation of the equipment. • Inform you to make changes in a particular installation. 42 This equipment generates, uses, and can radiate radio frequency energy and, if not installed and used in order for a Class B digital...
... set forth in a residential installation. However, there is subject to the following two conditions: This device may cause undesired operation. Operation is no guarantee that could affect the operation of the equipment. • Inform you to make changes in a particular installation. 42 This equipment generates, uses, and can radiate radio frequency energy and, if not installed and used in order for a Class B digital...
User Guide
Page 57
... your telephone number is called. It is designed to be connected to a compatible modular jack that is permissible to be aware that it is also compliant. 44 This is located on the FCC/IC label on the telephone base unit. It does not imply that the Industry Canada technical specifications were met. The REN is provided with a single line individual service...
... your telephone number is called. It is designed to be connected to a compatible modular jack that is permissible to be aware that it is also compliant. 44 This is located on the FCC/IC label on the telephone base unit. It does not imply that the Industry Canada technical specifications were met. The REN is provided with a single line individual service...


