
User manual, English (US)
Page 1
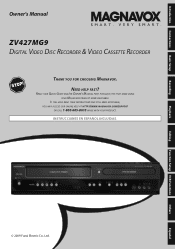
READ YOUR QUICK GUIDE AND/OR OWNER'S MANUAL FIRST FOR QUICK TIPS THAT MAKE USING YOUR MAGNAVOX PRODUCT MORE ENJOYABLE. Editing Function Setup VCR Functions Others Español INSTRUCCIONES EN ESPAÑOL INCLUIDAS. © 2009 Funai Electric Co., Ltd. IF ...YOU HAVE READ YOUR INSTRUCTIONS AND STILL NEED ASSISTANCE, YOU MAY ACCESS OUR ONLINE HELP AT HTTP://WWW.MAGNAVOX.COM/SUPPORT OR CALL 1-800-605-8610 WHILE WITH YOUR PRODUCT. NEED HELP FAST? Introduction Connections Basic Setup Recording Playback Owner's Manual...
READ YOUR QUICK GUIDE AND/OR OWNER'S MANUAL FIRST FOR QUICK TIPS THAT MAKE USING YOUR MAGNAVOX PRODUCT MORE ENJOYABLE. Editing Function Setup VCR Functions Others Español INSTRUCCIONES EN ESPAÑOL INCLUIDAS. © 2009 Funai Electric Co., Ltd. IF ...YOU HAVE READ YOUR INSTRUCTIONS AND STILL NEED ASSISTANCE, YOU MAY ACCESS OUR ONLINE HELP AT HTTP://WWW.MAGNAVOX.COM/SUPPORT OR CALL 1-800-605-8610 WHILE WITH YOUR PRODUCT. NEED HELP FAST? Introduction Connections Basic Setup Recording Playback Owner's Manual...
User manual, English (US)
Page 2
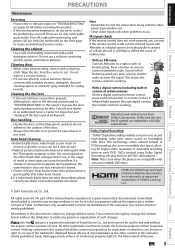
This equipment may cause harmful interference to radio communications. RADIO-TV INTERFERENCE This equipment has been tested and found to comply with the limits for a Class B digital device, pursuant to persons. However, there is connected. 4) Consult the dealer or an experienced radio/TV technician for future reference. Make your local recycling regulations. and Serial No. CAUTION: CAUTION: LOCATION: USE OF CONTROLS OR ADJUSTMENTS OR PERFORMANCE OF PROCEDURES OTHER THAN THOSE SPECIFIED HEREIN MAY RESULT IN HAZARDOUS RADIATION EXPOSURE. VISIBLE AND INVISIBLE LASER RADIATION...
This equipment may cause harmful interference to radio communications. RADIO-TV INTERFERENCE This equipment has been tested and found to comply with the limits for a Class B digital device, pursuant to persons. However, there is connected. 4) Consult the dealer or an experienced radio/TV technician for future reference. Make your local recycling regulations. and Serial No. CAUTION: CAUTION: LOCATION: USE OF CONTROLS OR ADJUSTMENTS OR PERFORMANCE OF PROCEDURES OTHER THAN THOSE SPECIFIED HEREIN MAY RESULT IN HAZARDOUS RADIATION EXPOSURE. VISIBLE AND INVISIBLE LASER RADIATION...
User manual, English (US)
Page 3
Read Instructions - EXCEPTION: A product that is not intended to lightning and power-line surges. 14. Slots and openings in item 5. 6. Power Sources - This plug will prevent damage to the product due to be unplugged by the operating instructions as an improper adjustment of other hazards. 20. Servicing - Unplug this product from the type of fire or electric shock. 16. If liquid has been spilled, or objects have been adhered to your home, consult your obsolete outlet. c. Unauthorized substitutions may exclude the reference to unplugging the appliance...
Read Instructions - EXCEPTION: A product that is not intended to lightning and power-line surges. 14. Slots and openings in item 5. 6. Power Sources - This plug will prevent damage to the product due to be unplugged by the operating instructions as an improper adjustment of other hazards. 20. Servicing - Unplug this product from the type of fire or electric shock. 16. If liquid has been spilled, or objects have been adhered to your home, consult your obsolete outlet. c. Unauthorized substitutions may exclude the reference to unplugging the appliance...
User manual, English (US)
Page 4
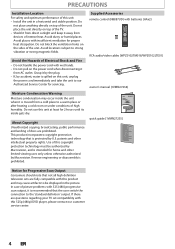
Avoid locations subject to our Authorized Service Center for servicing. Do not use this unit at least for Progressive Scan Output Consumers should note that not all high definition television sets are fully compatible with 525 (480) progressive scan output, it is recommended that is protected by accident, water is moved from AC outlet. Supplied Accessories remote control (NB887UD) with batteries (AAx2) RCA audio/video cables (WPZ0102TM018/WPZ0102LTE01) owner's manual (1VMN27234) quick guide (1VMN27235) Notice for 2 hours until its inside the unit when it from a cold place to ...
Avoid locations subject to our Authorized Service Center for servicing. Do not use this unit at least for Progressive Scan Output Consumers should note that not all high definition television sets are fully compatible with 525 (480) progressive scan output, it is recommended that is protected by accident, water is moved from AC outlet. Supplied Accessories remote control (NB887UD) with batteries (AAx2) RCA audio/video cables (WPZ0102TM018/WPZ0102LTE01) owner's manual (1VMN27234) quick guide (1VMN27235) Notice for 2 hours until its inside the unit when it from a cold place to ...
User manual, English (US)
Page 5
Turn off, unplug the power plug and please call our help to define the cause of malfunction. • With an AM radio: Tune an AM radio to a station with stereo sound on all DVD-video players." Consult your dealer or an Authorized Service Center. Disc handling • Handle the discs so that fingerprints and dust do not try to correct the problem by implication or otherwise, any license or right to use any way without the express written consent of the trademarks displayed herein. If a streaky or snowy picture appears during playback, the video heads in camera of cellular phone):...
Turn off, unplug the power plug and please call our help to define the cause of malfunction. • With an AM radio: Tune an AM radio to a station with stereo sound on all DVD-video players." Consult your dealer or an Authorized Service Center. Disc handling • Handle the discs so that fingerprints and dust do not try to correct the problem by implication or otherwise, any license or right to use any way without the express written consent of the trademarks displayed herein. If a streaky or snowy picture appears during playback, the video heads in camera of cellular phone):...
User manual, English (US)
Page 6
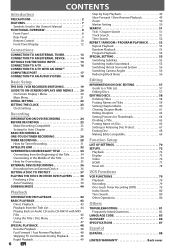
CONTENTS Introduction PRECAUTIONS 2 FEATURES 7 Symbols Used in this Owner's Manual 7 FUNCTIONAL OVERVIEW 8 Front Panel 8 Rear Panel 9 Remote Control 10 Front Panel Display 12 Connections CONNECTION TO AN EXTERNAL TUNER 13 CONNECTION TO AN EXTERNAL DEVICE 14 SETTINGS FOR THE VIDEO INPUT 15 CONNECTION TO A TV 16 CONNECTION TO A TV WITH AN HDMI™ COMPATIBLE PORT 17 CONNECTION TO AN AUDIO SYSTEM 18 Basic Setup THE DVD / VCR RECORDER SWITCHING 19 GUIDE TO ON-SCREEN DISPLAYS AND MENUS . . . . 20 On-Screen Display / Menu 20 Main Menu 21 INITIAL SETTING 22 SETTING THE CLOCK 23...
CONTENTS Introduction PRECAUTIONS 2 FEATURES 7 Symbols Used in this Owner's Manual 7 FUNCTIONAL OVERVIEW 8 Front Panel 8 Rear Panel 9 Remote Control 10 Front Panel Display 12 Connections CONNECTION TO AN EXTERNAL TUNER 13 CONNECTION TO AN EXTERNAL DEVICE 14 SETTINGS FOR THE VIDEO INPUT 15 CONNECTION TO A TV 16 CONNECTION TO A TV WITH AN HDMI™ COMPATIBLE PORT 17 CONNECTION TO AN AUDIO SYSTEM 18 Basic Setup THE DVD / VCR RECORDER SWITCHING 19 GUIDE TO ON-SCREEN DISPLAYS AND MENUS . . . . 20 On-Screen Display / Menu 20 Main Menu 21 INITIAL SETTING 22 SETTING THE CLOCK 23...
User manual, English (US)
Page 7
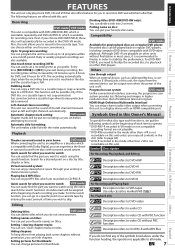
Even if you choose DVD-RW/DVD-R, these discs will be possible only if the DVD disc or a cassette tape is not copy protected. Dubbing mode: You can divide a title into 2 or more. Left channel stereo recording: This unit can record the sound of the left and right channels automatically. Automatic title list making: The unit makes a title list with this Owner's Manual To specify for what disc type each function is available for recording once. Search for a desired point on a disc by 30 minutes up to 12 programs within a one for your favorite names on titles. Playing back MP3 files:...
Even if you choose DVD-RW/DVD-R, these discs will be possible only if the DVD disc or a cassette tape is not copy protected. Dubbing mode: You can divide a title into 2 or more. Left channel stereo recording: This unit can record the sound of the left and right channels automatically. Automatic title list making: The unit makes a title list with this Owner's Manual To specify for what disc type each function is available for recording once. Search for a desired point on a disc by 30 minutes up to 12 programs within a one for your favorite names on titles. Playing back MP3 files:...
User manual, English (US)
Page 8
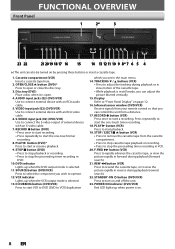
AUDIO input jacks (E2) (DVD/VCR) Use to connect external device with an RCA video cable. 6. PLAY B button (DVD)* Press to adjust the tracking during playback or in slow motion of external device with an S-video cable. 7. VCR indicator Lights up when power is on by pressing these buttons or insert a cassette tape. 1. TRACKING L / K buttons (VCR) • Press to start the one -touch timer recording. 8. Press repeatedly to rapidly advance the cassette tape, or view the picture rapidly in still mode, you set in reverse during playback (forward search). 21. F.FWD D button (VCR...
AUDIO input jacks (E2) (DVD/VCR) Use to connect external device with an RCA video cable. 6. PLAY B button (DVD)* Press to adjust the tracking during playback or in slow motion of external device with an S-video cable. 7. VCR indicator Lights up when power is on by pressing these buttons or insert a cassette tape. 1. TRACKING L / K buttons (VCR) • Press to start the one -touch timer recording. 8. Press repeatedly to rapidly advance the cassette tape, or view the picture rapidly in still mode, you set in reverse during playback (forward search). 21. F.FWD D button (VCR...
User manual, English (US)
Page 9
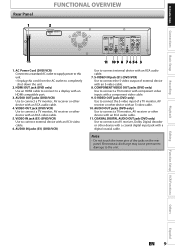
Introduction Connections Basic Setup Rear Panel 1 FUNCTIONAL OVERVIEW 2 HDMI OUT DIGITAL AUDIO OUT DVD DVD/VCR AUDIO S-VIDEO COMPONENT S-VIDEO IN ---AUDIO---OUT OUT VIDEO OUT Y L L COAXIAL L OUT R PB /CB IN PR /CR R R IN ---VIDEO---OUT 1. Recording Playback Editing Function Setup VCR Functions Others Español EN 9 AUDIO IN jacks (E1) (DVD/VCR) 11 10 9 8 7 6 5 4 3 Use to connect a TV monitor, AV receiver or other device with an RCA audio cable. 4. AUDIO OUT jacks (DVD/VCR) Use to connect external device with an RCA video cable. 6. VIDEO IN jack...
Introduction Connections Basic Setup Rear Panel 1 FUNCTIONAL OVERVIEW 2 HDMI OUT DIGITAL AUDIO OUT DVD DVD/VCR AUDIO S-VIDEO COMPONENT S-VIDEO IN ---AUDIO---OUT OUT VIDEO OUT Y L L COAXIAL L OUT R PB /CB IN PR /CR R R IN ---VIDEO---OUT 1. Recording Playback Editing Function Setup VCR Functions Others Español EN 9 AUDIO IN jacks (E1) (DVD/VCR) 11 10 9 8 7 6 5 4 3 Use to connect a TV monitor, AV receiver or other device with an RCA audio cable. 4. AUDIO OUT jacks (DVD/VCR) Use to connect external device with an RCA video cable. 6. VIDEO IN jack...
User manual, English (US)
Page 10
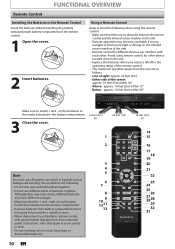
Using a Remote Control Keep in hazards such as follows. - on the infrared sensor window of the unit. • Remote control for different devices can interfere with governmental regulations or environmental public instruction's rules that apply in the operating range of each battery match the indications in the battery compartment. • Remove batteries from the unit are no obstacles between the remote control and the infrared sensor window on the unit. • Remote operation may have different voltages. • Make sure that is shining on the batteries to the unit. •...
Using a Remote Control Keep in hazards such as follows. - on the infrared sensor window of the unit. • Remote control for different devices can interfere with governmental regulations or environmental public instruction's rules that apply in the operating range of each battery match the indications in the battery compartment. • Remove batteries from the unit are no obstacles between the remote control and the infrared sensor window on the unit. • Remote operation may have different voltages. • Make sure that is shining on the batteries to the unit. •...
User manual, English (US)
Page 11
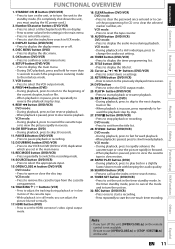
DISC MENU button (DVD) • Press to confirm or select menu items. 6. OK button (DVD/VCR) • Press to display the disc menu. 5. VCR mode: • During playback, press to rewind the cassette tape or to view the picture rapidly in a slightly faster/slower mode with keeping the audio quality. 30.SEARCH button (VCR) • Press to call up the index or time search menu. 31. VCR mode: • Press to the interlace mode. 7. CLEAR button (DVD/VCR) DVD mode: • Press to clear the password once entered or to cancel the programming for more than 3 seconds to switch the ...
DISC MENU button (DVD) • Press to confirm or select menu items. 6. OK button (DVD/VCR) • Press to display the disc menu. 5. VCR mode: • During playback, press to rewind the cassette tape or to view the picture rapidly in a slightly faster/slower mode with keeping the audio quality. 30.SEARCH button (VCR) • Press to call up the index or time search menu. 31. VCR mode: • Press to the interlace mode. 7. CLEAR button (DVD/VCR) DVD mode: • Press to clear the password once entered or to cancel the programming for more than 3 seconds to switch the ...
User manual, English (US)
Page 12
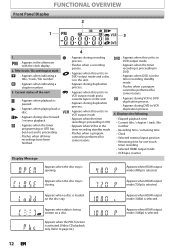
PM : Appears in the timer recording standby mode. : Flashes when a program cannot be performed for some reasons. VCR : Appears when this unit is in VCR output mode. : Appears when the timer recording is proceeding in VCR. : Appears when VCR is in the unit. : Appears during duplication process. Appears when HDMI output mode (480p) is selected. Appears when HDMI output mode (720p) is selected. DVD : Appears when this unit is in VCR output mode and a cassette tape is loaded on a disc. Displays the following • Elapsed playback time • Current title / chapter / track /file ...
PM : Appears in the timer recording standby mode. : Flashes when a program cannot be performed for some reasons. VCR : Appears when this unit is in VCR output mode. : Appears when the timer recording is proceeding in VCR. : Appears when VCR is in the unit. : Appears during duplication process. Appears when HDMI output mode (480p) is selected. Appears when HDMI output mode (720p) is selected. DVD : Appears when this unit is in VCR output mode and a cassette tape is loaded on a disc. Displays the following • Elapsed playback time • Current title / chapter / track /file ...
User manual, English (US)
Page 13
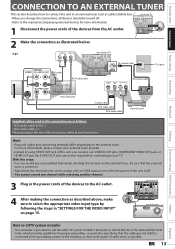
e.g.) AUDIO IN VIDEO IN L R rear of your local store. For more information. 2 Disconnect 1 Disconnect the power cords of the devices forrom the AC outlet. in particular, specifying that the external tuner is provided to call the cable TV system installer's attention to an external tuner such as described above, make sure to the AC outlet. Be sure that the cable ground shall be output only on CVBS output even when the power of the unit is off . • Refer to the manual accompanying external devices for more information, please contact your external tuner provider. &#...
e.g.) AUDIO IN VIDEO IN L R rear of your local store. For more information. 2 Disconnect 1 Disconnect the power cords of the devices forrom the AC outlet. in particular, specifying that the external tuner is provided to call the cable TV system installer's attention to an external tuner such as described above, make sure to the AC outlet. Be sure that the cable ground shall be output only on CVBS output even when the power of the unit is off . • Refer to the manual accompanying external devices for more information, please contact your external tuner provider. &#...
User manual, English (US)
Page 14
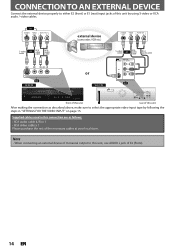
Supplied cables used in "SETTINGS FOR THE VIDEO INPUT" on page 15. CONNECTION TO AN EXTERNAL DEVICE Connect the external device properly to either E2 (front) or E1 (rear) input jacks of this unit by following the steps in this unit, use AUDIO L jack of E2 (Front). 14 EN Note • When connecting an external device of monaural output to this connection are as follows: • RCA audio cable (L/R) x 1 • RCA video cable x 1 Please purchase the rest of this unit After making the connection as described above, make sure to E1 IN HDMI OUT E1 DIGITAL AUDIO OUT DVD DVD/VCR ...
Supplied cables used in "SETTINGS FOR THE VIDEO INPUT" on page 15. CONNECTION TO AN EXTERNAL DEVICE Connect the external device properly to either E2 (front) or E1 (rear) input jacks of this unit by following the steps in this unit, use AUDIO L jack of E2 (Front). 14 EN Note • When connecting an external device of monaural output to this connection are as follows: • RCA audio cable (L/R) x 1 • RCA video cable x 1 Please purchase the rest of this unit After making the connection as described above, make sure to E1 IN HDMI OUT E1 DIGITAL AUDIO OUT DVD DVD/VCR ...
User manual, English (US)
Page 15
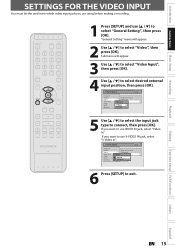
General Setting Playback Display Video Recording Clock HDMI Reset All Progressive Scan TV Aspect Video InpVuidteo Input E1 (Rear) E2 (Front) 5 Use [K / L] to select the input jack type to exit. If you want to use [K / L] to select "Video", then press [OK]. Playback Editing Function Setup VCR Functions Others Español EN 15 General Setting Playback Display Video Recording Clock HDMI Reset All Progressive Scan TV Aspect E1V(Rideeaor)InpVuidteo Input E1Vi(dReeoarIn) E2S-(VFirdoenot)In 6 Press [SETUP] to connect, then press [OK]. Submenu will appear. 2 Use [K / L] to ...
General Setting Playback Display Video Recording Clock HDMI Reset All Progressive Scan TV Aspect Video InpVuidteo Input E1 (Rear) E2 (Front) 5 Use [K / L] to select the input jack type to exit. If you want to use [K / L] to select "Video", then press [OK]. Playback Editing Function Setup VCR Functions Others Español EN 15 General Setting Playback Display Video Recording Clock HDMI Reset All Progressive Scan TV Aspect E1V(Rideeaor)InpVuidteo Input E1Vi(dReeoarIn) E2S-(VFirdoenot)In 6 Press [SETUP] to connect, then press [OK]. Submenu will appear. 2 Use [K / L] to ...
User manual, English (US)
Page 16
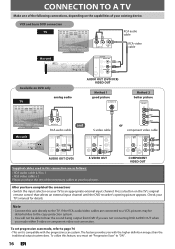
CONNECTION TO A TV Make one of the following connections, depending on the capabilities of the necessary cables at your local store. Note • Connect this unit directly to "ON". 16 EN The feature provides you with the progressive scan system. Press a button on your TV to an appropriate external input channel. To utilize this connection are as follows: • RCA audio cable (L/R) x 1 • RCA video cable x 1 Please purchase the rest of your TV's manual for details. Check your existing device. To set "Progressive Scan" to the TV. If the RCA audio/video cables ...
CONNECTION TO A TV Make one of the following connections, depending on the capabilities of the necessary cables at your local store. Note • Connect this unit directly to "ON". 16 EN The feature provides you with the progressive scan system. Press a button on your TV to an appropriate external input channel. To utilize this connection are as follows: • RCA audio cable (L/R) x 1 • RCA video cable x 1 Please purchase the rest of your TV's manual for details. Check your existing device. To set "Progressive Scan" to the TV. If the RCA audio/video cables ...
User manual, English (US)
Page 17
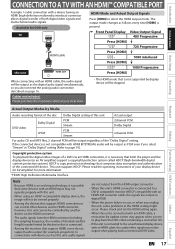
If the connected device is not compatible with an HDMI cable, the audio/video signal may not operate properly with a device having an HDMI (high-definition multimedia interface) connector allows digital transfer of both the player and the display device (or an AV amplifier) support a copyright protection system called HDCP (high-bandwidth digital content protection system). Please check and set the HDMI setting again. • When the unit is connected to the unauthorized display device with HDMI BITSTREAM, audio will be output as this unit, audio signals are output in digital RGB...
If the connected device is not compatible with an HDMI cable, the audio/video signal may not operate properly with a device having an HDMI (high-definition multimedia interface) connector allows digital transfer of both the player and the display device (or an AV amplifier) support a copyright protection system called HDCP (high-bandwidth digital content protection system). Please check and set the HDMI setting again. • When the unit is connected to the unauthorized display device with HDMI BITSTREAM, audio will be output as this unit, audio signals are output in digital RGB...
User manual, English (US)
Page 18
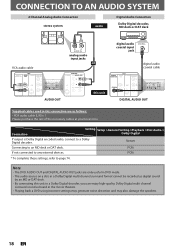
Stream Connecting to any external devices. Note • The DVD AUDIO OUT and DIGITAL AUDIO OUT jacks are as heard in a Dolby Digital multi channel surround format cannot be recorded as digital sound by an MD or DAT deck. • By connecting this unit to a Dolby Digital decoder, you can enjoy high-quality Dolby Digital multi channel surround sound as follows: • RCA audio cable (L/R) x 1 Please purchase the rest of the necessary cables at your local store. CONNECTION TO AN AUDIO SYSTEM 2 Channel Analog Audio Connection stereo system audio Digital Audio Connection Dolby Digital ...
Stream Connecting to any external devices. Note • The DVD AUDIO OUT and DIGITAL AUDIO OUT jacks are as heard in a Dolby Digital multi channel surround format cannot be recorded as digital sound by an MD or DAT deck. • By connecting this unit to a Dolby Digital decoder, you can enjoy high-quality Dolby Digital multi channel surround sound as follows: • RCA audio cable (L/R) x 1 Please purchase the rest of the necessary cables at your local store. CONNECTION TO AN AUDIO SYSTEM 2 Channel Analog Audio Connection stereo system audio Digital Audio Connection Dolby Digital ...
User manual, English (US)
Page 19
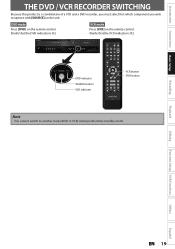
DVD mode Press [DVD] on the remote control. (Verify that the DVD indicator is lit.) VCR mode Press [VCR] on the unit. Introduction Connections Basic Setup THE DVD / VCR RECORDER SWITCHING Because this product is lit.) DVD indicator SOURCE button VCR indicator VCR button DVD button Note • You cannot switch to operate with [SOURCE] on the remote control. (Verify that the VCR indicator is a combination of a VCR and a DVD recorder, you must select first which component you wish to another mode (DVD or VCR) during in the timer-standby mode. Recording Playback Editing ...
DVD mode Press [DVD] on the remote control. (Verify that the DVD indicator is lit.) VCR mode Press [VCR] on the unit. Introduction Connections Basic Setup THE DVD / VCR RECORDER SWITCHING Because this product is lit.) DVD indicator SOURCE button VCR indicator VCR button DVD button Note • You cannot switch to operate with [SOURCE] on the remote control. (Verify that the VCR indicator is a combination of a VCR and a DVD recorder, you must select first which component you wish to another mode (DVD or VCR) during in the timer-standby mode. Recording Playback Editing ...
User manual, English (US)
Page 20
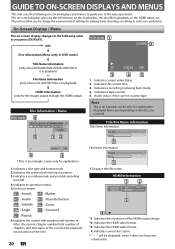
The menus allow you to change the various kinds of the current cassette tape. Indicates the selected external input position. 3. Indicates the current title number/total number of titles, the current chapter number/total number of chapters, and time lapse of the current title playback/ total duration of the HDMI output image. *2. Indicates the current time. 3. Indicates a tape counter. 5. Displayed items are depending on the loaded disc, the disc/file in playback, or the HDMI status, etc. OFF VCR mode 1 12:00AM 2 Disc Information/Menu (only in DVD mode) Title Name Information (only ...
The menus allow you to change the various kinds of the current cassette tape. Indicates the selected external input position. 3. Indicates the current title number/total number of titles, the current chapter number/total number of chapters, and time lapse of the current title playback/ total duration of the HDMI output image. *2. Indicates the current time. 3. Indicates a tape counter. 5. Displayed items are depending on the loaded disc, the disc/file in playback, or the HDMI status, etc. OFF VCR mode 1 12:00AM 2 Disc Information/Menu (only in DVD mode) Title Name Information (only ...
